In my years of experience with Windows, I’ve encountered many Windows 11 issues and found ways to solve them using the built-in help features. I can tell you from my experience that understanding how to get help in Windows 11 is essential for quickly resolving issues and getting the most from your system
Through my daily work with Windows 11, I’ve learned that its help tools can handle everything from error messages to basic operations. I’ll share these straightforward solutions that work right from your desktop.
If you’re using Windows 11, you’ll find multiple ways to get help when you need it. I’ve created this guide to be your personal Windows help assistant. I’ll share my expertise in using the smart Get Help app, Windows Search, and Quick Assist, showing you the fastest ways to find solutions. I’ll also teach you how to connect with Microsoft’s support team when you need that extra help.
You’ll discover that Windows 11 has transformed how you can solve problems. The operating system now combines AI-powered help, community solutions, and traditional support into one system.
I’ll walk you through each help feature step by step, and you’ll learn exactly where to click and what to type. We’ll focus on practical solutions that you can use right away, from basic troubleshooting to getting remote assistance. Let’s make Windows 11 help features work for you.
Let’s start with the built-in help features you’ll use most often.
Key Takeaway
- The Get Help app provides AI-powered solutions and connects you with Microsoft support when needed
- Windows 11 offers multiple built-in help tools accessible through Windows Search and the Settings app
- Built-in troubleshooters can automatically fix most common Windows 11 problems
- Windows Security includes dedicated help for protecting your device from threats
- Command Prompt and PowerShell offer built-in help for advanced troubleshooting
- The Feedback Hub lets you report bugs, suggest features, and see if others experience the same issues
- Community Forums offer free support options for immediate assistance
- Microsoft Support Chat gives you direct access to human experts who can help with complex problems
If you’re interested in making your Windows 11 run faster, check out my comprehensive guide on “How to Speed Up Windows 11“
Table of Contents
Windows 11 Built-in Help Features
Using the Get Help App in Windows 11
The Get Help app is your primary support tool in Windows 11. It combines AI-powered search with direct access to Microsoft support. You’ll find it most useful for quick answers and step-by-step guidance for common problems.
When to use: Choose this option when you need immediate answers about Windows features or when troubleshooting specific errors.
Use case: You’re trying to connect a Bluetooth device but getting connection errors.
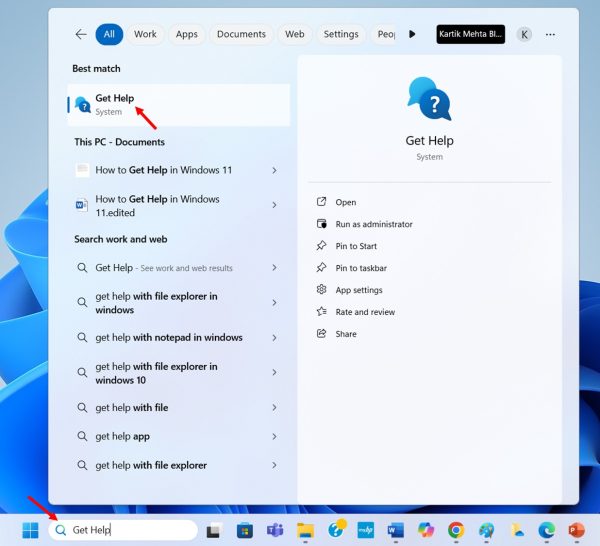
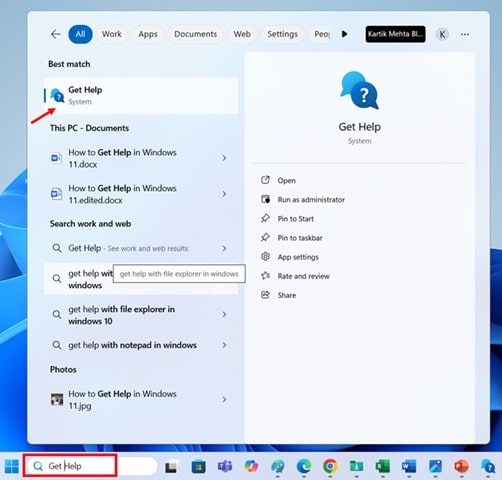
- Select Search from the taskbar, type Get Help, and select that app when you see it in the results. You’ll see a question mark icon next to the Get Help app name.
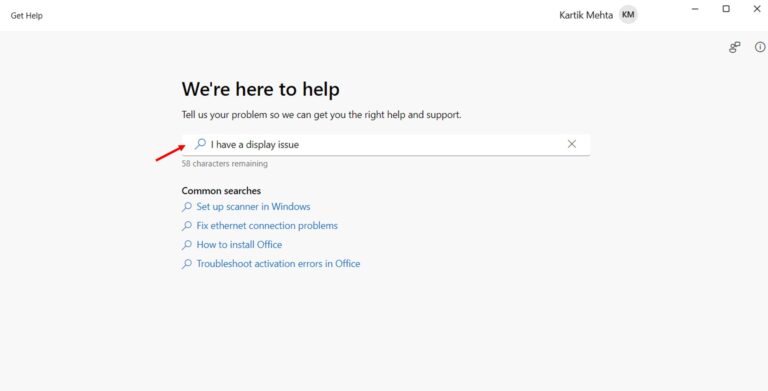
- Once the Get Help app opens, select the search box at the top. Type your question or describe your problem as specifically as possible in the search box.
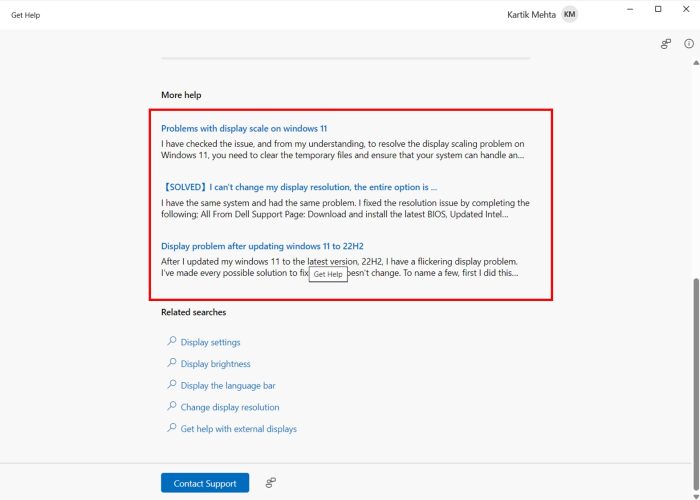
- After typing your question, press Enter. Look through the suggested articles that appear below your search, select the one that best matches your issue, and read through the step-by-step instructions provided.
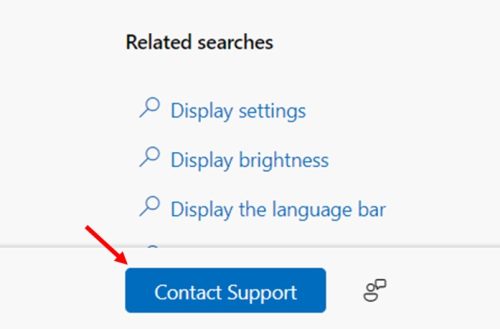
- If you don’t find what you need, scroll to the bottom of the results and select Contact Support. You can then choose to chat with a support agent or schedule a callback.
Using Windows Search for Help in Windows 11
Windows Search works as your quick access point to all help resources in Windows 11. I’ll show you how to use it effectively to find solutions, locate features, and access support tools instantly.
When to use: Choose this option when you need to quickly find any Windows 11 help resource or aren’t sure which support tool to use.
Use case: You’re seeing an error message and want to find all available help resources about it.
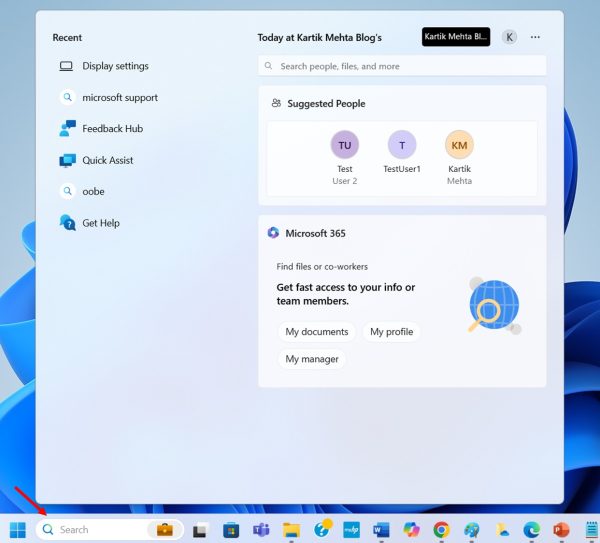
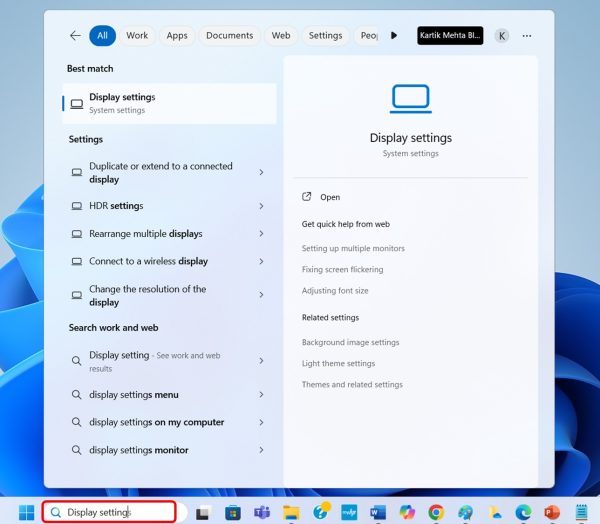
- Select the Search icon on your taskbar (it looks like a magnifying glass) or press the Windows key + S on your keyboard.
- In the search box, type your question starting with “how to” or describe your problem. For example, type “how to connect Bluetooth” or “Wi-Fi not working.”
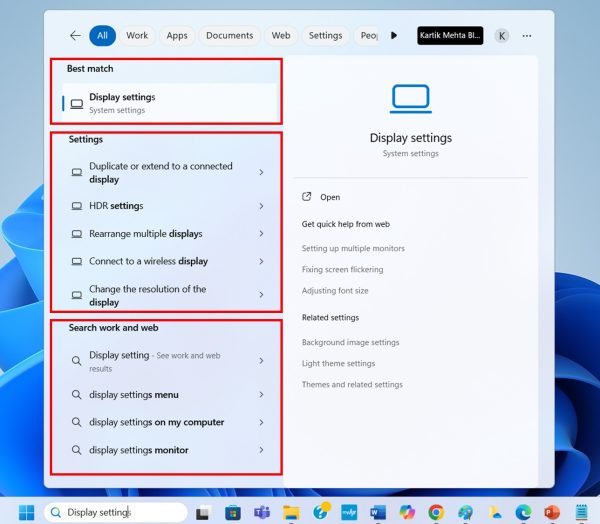
- Look through the search results, which are organized into different sections:
- Under Best match, you’ll see the most relevant system settings or tools
- Under Related settings, you’ll find additional relevant controls
- Under Web results, you’ll see helpful articles from Microsoft Support
- Select any result to open it. If you select a settings result, it will take you directly to that settings page. If you select a web result, it will open in your default web browser.
Using Settings Help in Windows 11
The Settings Help Panel provides contextual help for every Windows setting. You’ll find detailed explanations and related settings right beside the options you’re configuring.
When to use: Perfect when you’re adjusting system settings and need to understand what each option does.
Use case: You’re configuring your privacy settings and need to understand what each permission means.
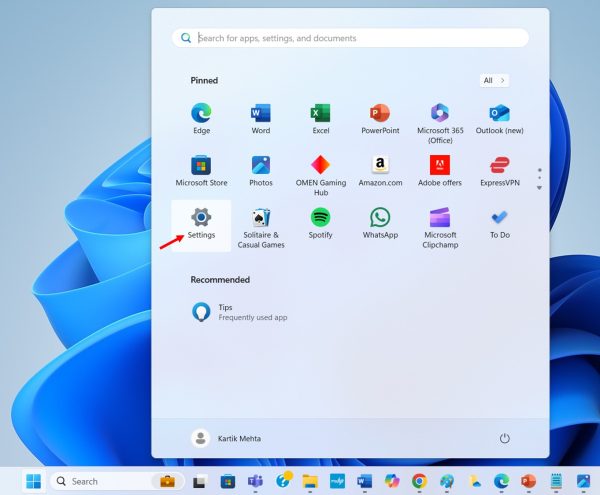
- Open Settings by selecting the Start button, then selecting the Settings icon (it looks like a gear), or by pressing Windows key + I on your keyboard.
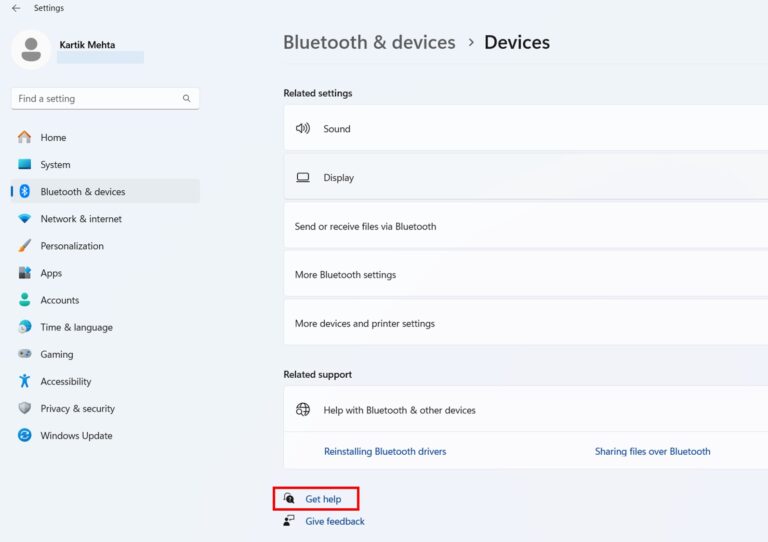
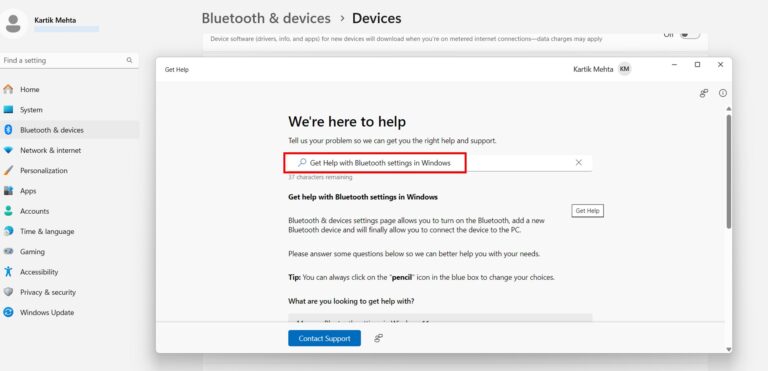
- Click the Get Help at the bottom of any Settings page to access contextual help for that setting.
- A Get Help window appears.
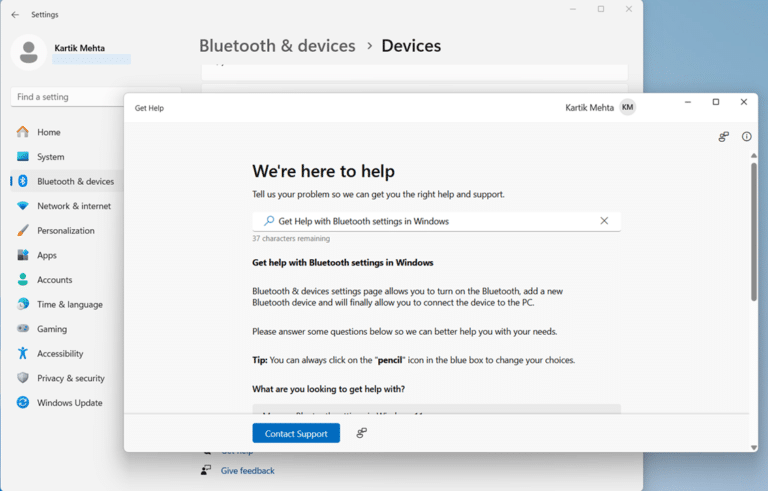
- Wait for a few seconds, and Windows 11 will search for the selected setting-specific page relevant help
Using Windows Troubleshooters in Windows 11
Windows troubleshooters are automated diagnostic tools that can find and fix common problems. You’ll find specific troubleshooters for network issues, sound problems, Windows updates, and more.
When to use: Choose this option when you’re experiencing specific problems with hardware, connectivity, or Windows features.
Use case: Your printer isn’t working, and you need to diagnose connection issues.
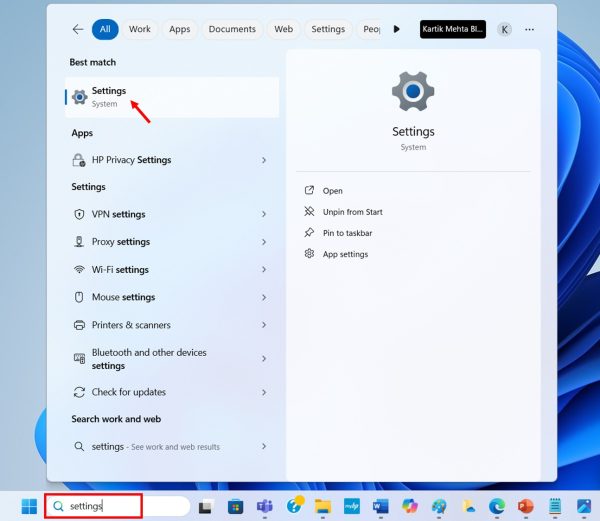
- Select Search from the taskbar, type Settings, and select the Settings app when it appears in the results.
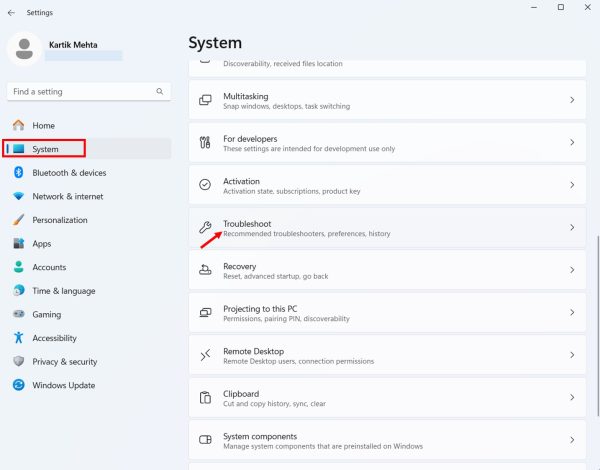
- Select System from the left sidebar, scroll down to find Troubleshoot, and click it.
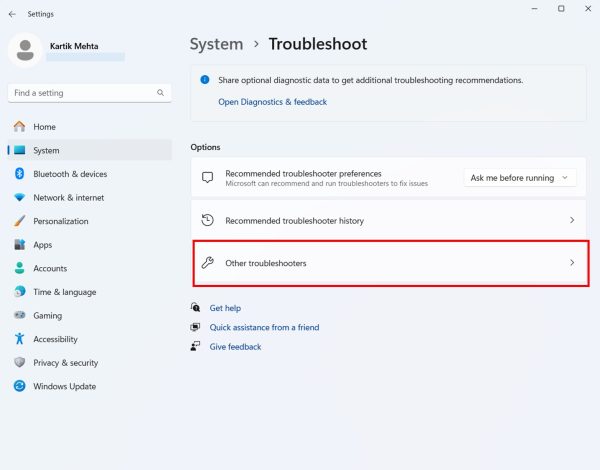
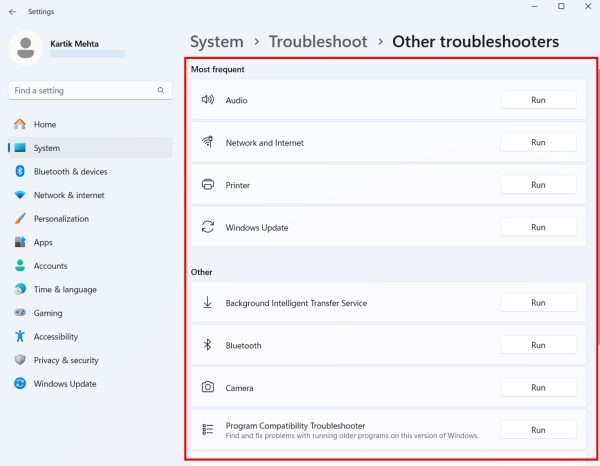
- On the Troubleshoot page, select Other Troubleshooters to see a list of all available troubleshooters.
- Scroll through the list to find the troubleshooter that matches your problem. Common options include:
- Windows Update
- Internet Connections
- Bluetooth
- Printer
- Audio
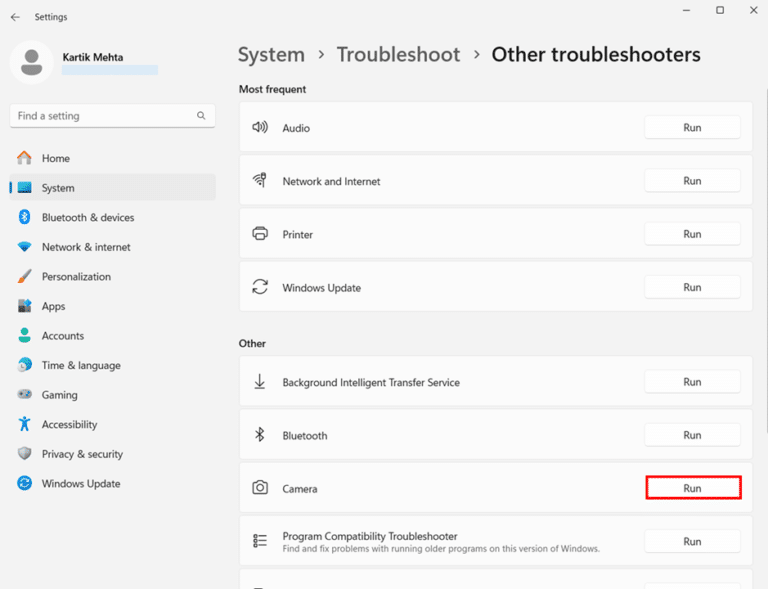
- When you find the appropriate troubleshooter, select the Run button next to it. Windows will begin checking for problems.
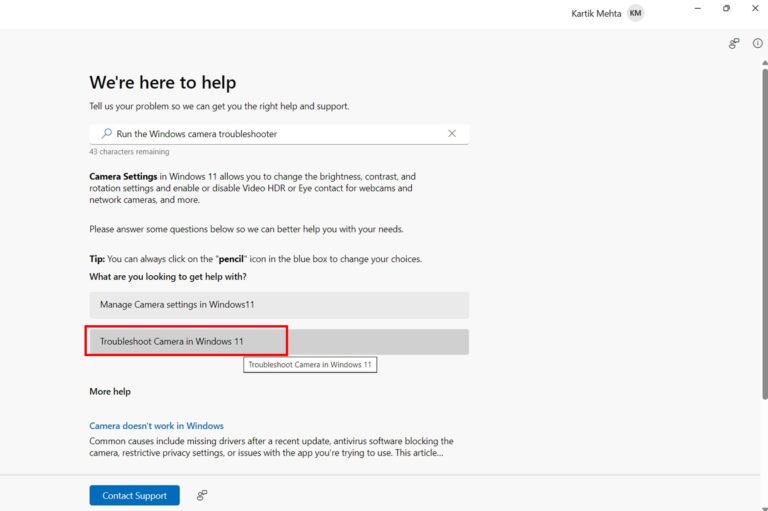
- Follow Based on your type of Troubleshooter you have Run Windows 11 will ask you further questions. In this scenareo for troubleshooting my Camera issue I will click “Troubleshoot Camera in Windows 11“
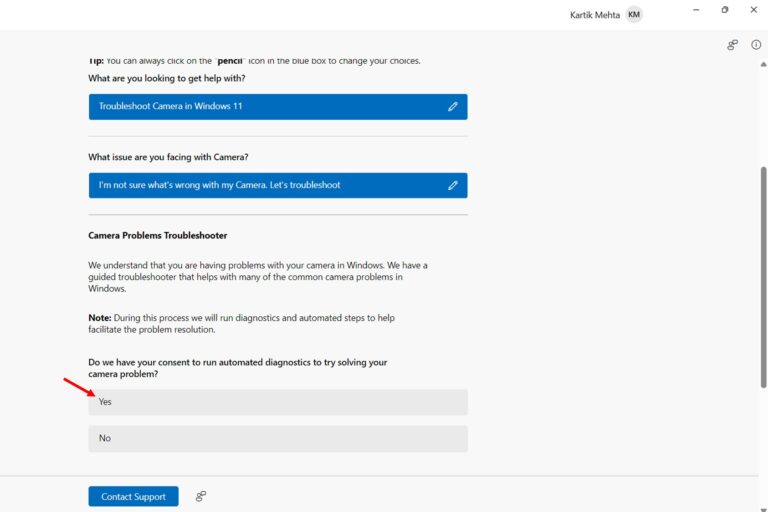
- Windows 11 will further ask the two options one if you have got any error code while using camera or if you are not sure about any error code. In this scenario I will click “I am not sure what’s with my Camera. Let’s troubleshoot”
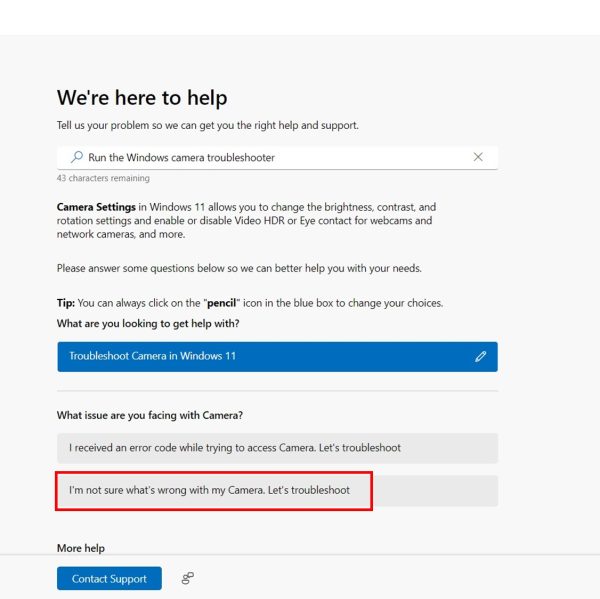
- Windows 11 will then take your consent to run automatic diagnostics. Click on Yes to proceed for it.
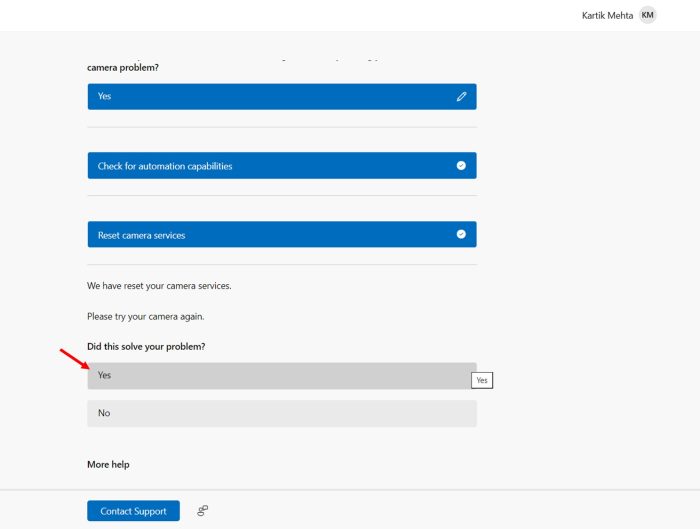
- Once the diagnostics has been completed Windows 11 will ask does that solved your problem. Check your camera to see if it has been resolved if it is resolved then click on Yes
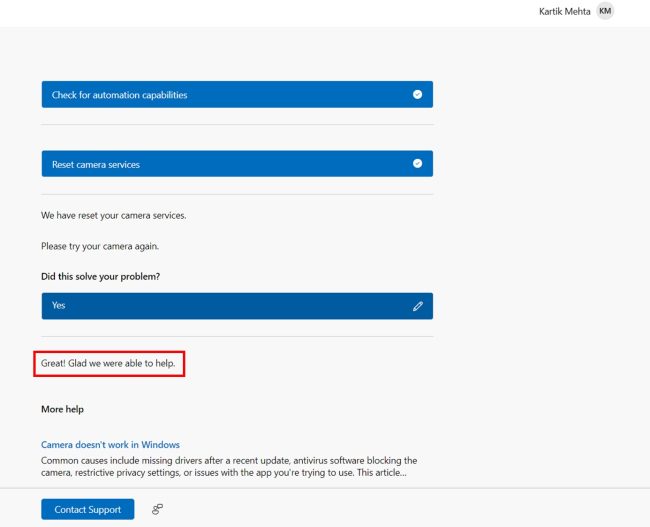
- Windows 11 will then acknowledge it
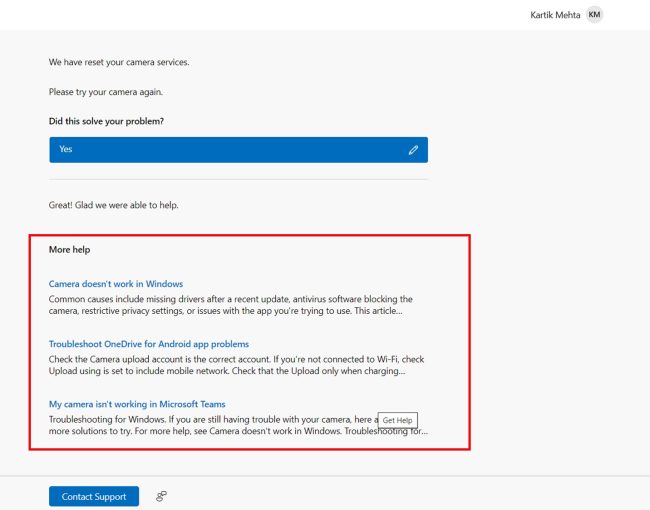
- Windows 11 will also so you other help article for the selected troubleshooter. You can go through it if required
Getting Help with Windows Security in Windows 11
Windows Security provides specialized help for protecting your device. You’ll find dedicated help content for virus protection, firewall settings, and other security features.
When to use: Choose this option when you need help with virus protection, firewall settings, account protection, or other security features.
Use case: You want to understand why Windows Defender flagged a file as suspicious.
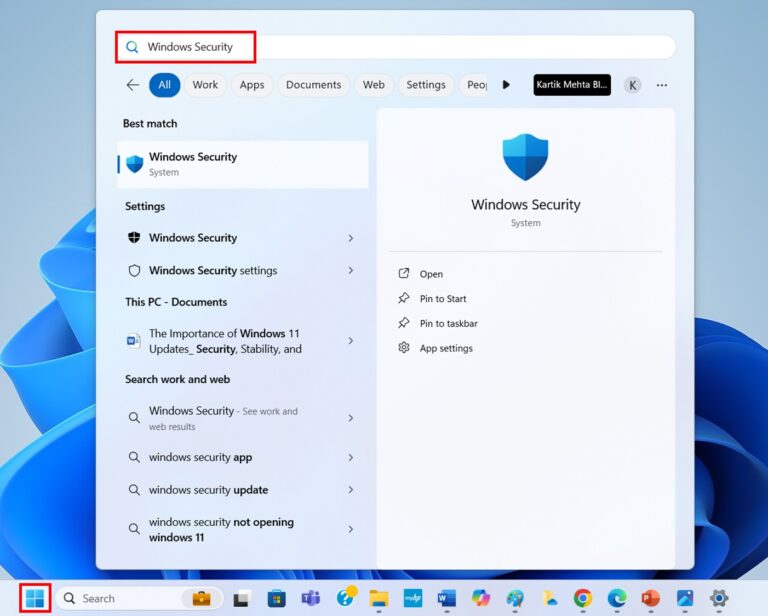
- Select Start, type Windows Security, and select Windows Security when it appears in the results.
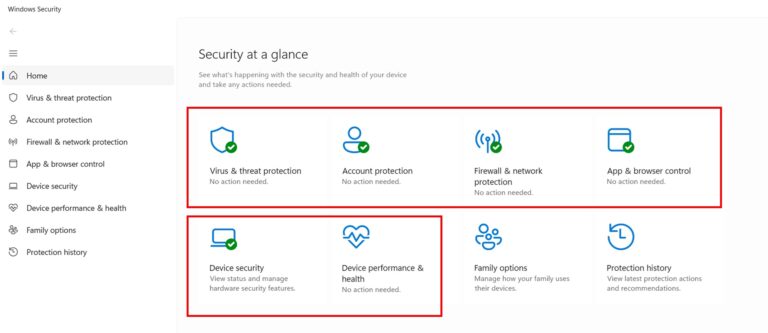
- When Windows Security opens, you’ll see six security areas on the main page:
- Virus & threat protection
- Account protection
- Firewall & network protection
- App & browser control
- Device security
- Device performance & health
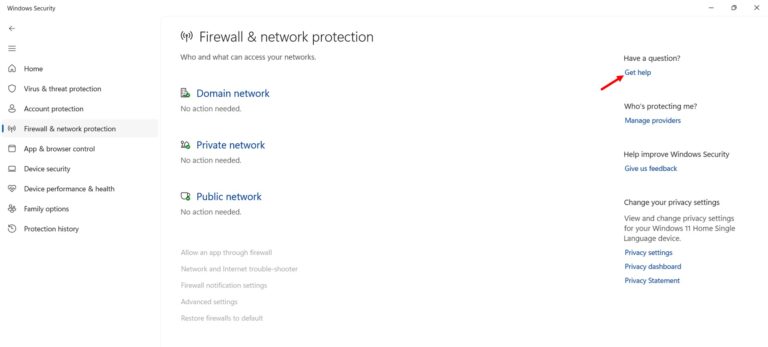
- Select any of these areas to see more detailed information. Each section has its Get help button in the top-right corner.
Using Command Prompt Help in Windows 11
Command Prompt includes built-in help for all commands. You’ll get detailed information about command syntax, options, and examples directly in the terminal.
When to use: Choose this option when you need help with command-line tools and syntax.
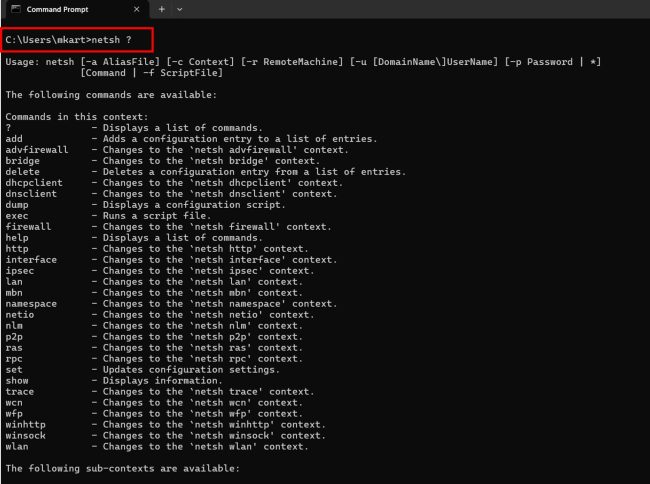
Use case: You’re using the ‘netsh’ command but aren’t sure about its parameters.
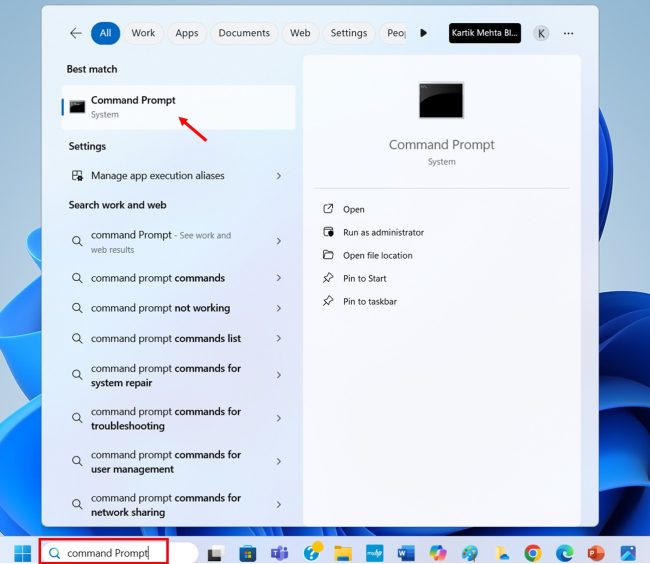
- Select Search from the taskbar, type Command Prompt, then select Command Prompt from the results.
- Once the Command Prompt opens, type help and press Enter to see a list of all available commands.
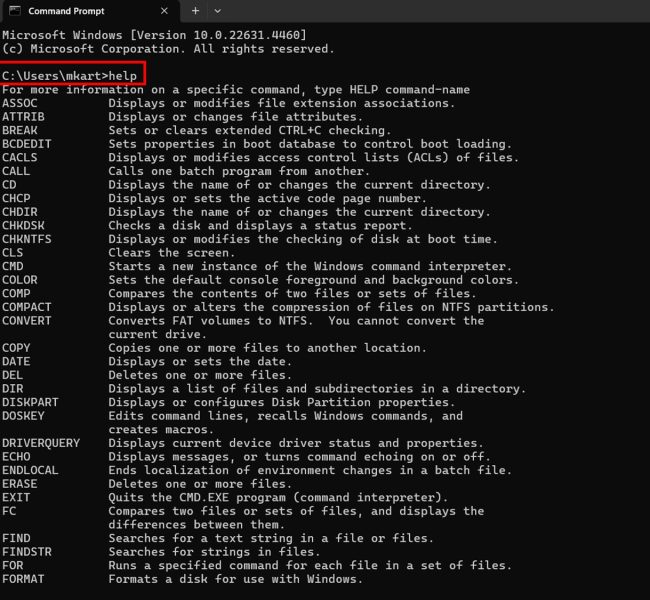
- To get help with a specific command, type the command followed by /?. For example:
- Type dir /? for help with directory listings
- Type copy /? for help with copying files
- Type del /? for help with deleting files
Using PowerShell Help in Windows 11
PowerShell provides comprehensive help through its Get-Help system. You’ll find detailed documentation, examples, and interactive tutorials for all PowerShell commands (cmdlets).
When to use: Choose this option when you need help with PowerShell commands, scripting, or automation tasks.
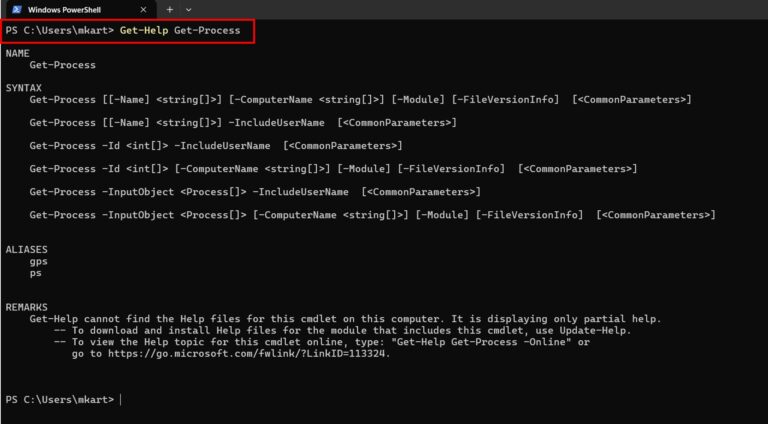
Use case: You’re using the ‘Get-Process’ cmdlet and need to understand all its parameters.
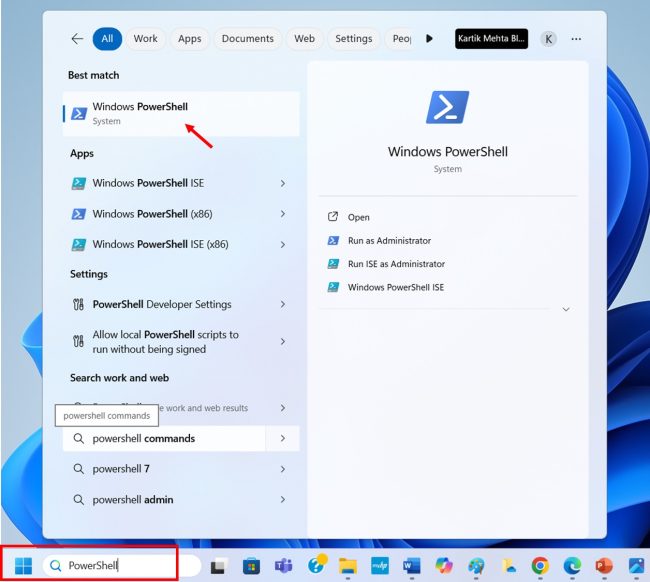
- Select Search from your taskbar, type PowerShell, and select Windows PowerShell when it appears in the results.
- In PowerShell, type Get-Help followed by the command you need help with. For example, type Get-Help Get-Process and press Enter.
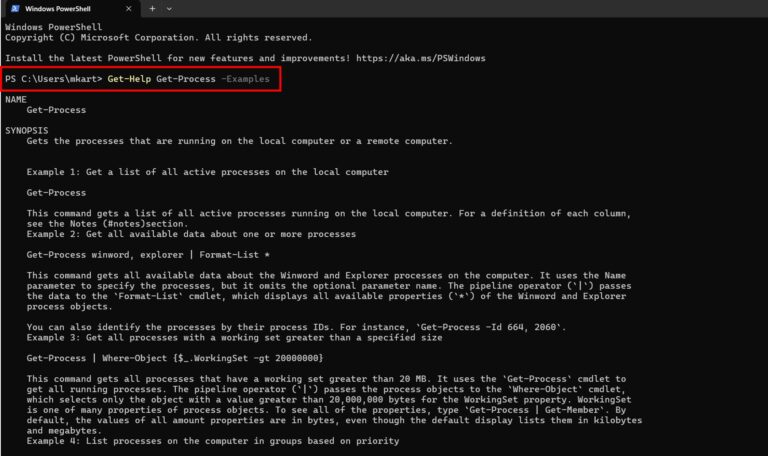
- To get detailed examples for a command, add the -Examples parameter. For example, type Get-Help Get-Process -Examples and press Enter.
Getting Real-Time Support in Windows 11
Using Feedback Hub
Feedback Hub lets you report issues directly to Microsoft and track their status. You’ll also see if others are experiencing the same problem.
When to use: Best for reporting bugs or suggesting new features to Microsoft.
Use case: You’ve discovered a bug in the new Windows 11 context menu.
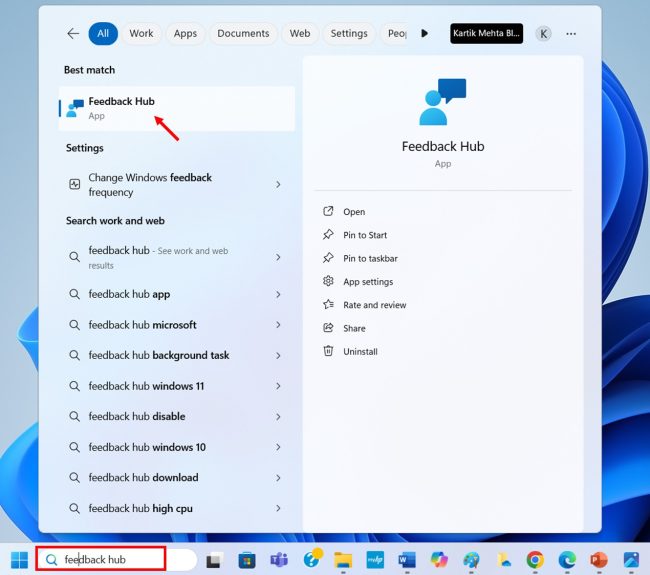
- Select Search from the taskbar, type Feedback Hub, and select the Feedback Hub app when it appears in the results.
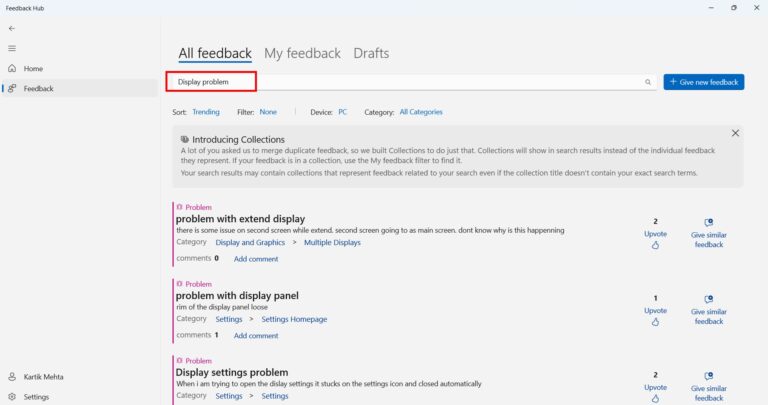
- In Feedback Hub, select the search box at the top and type keywords related to your issue.
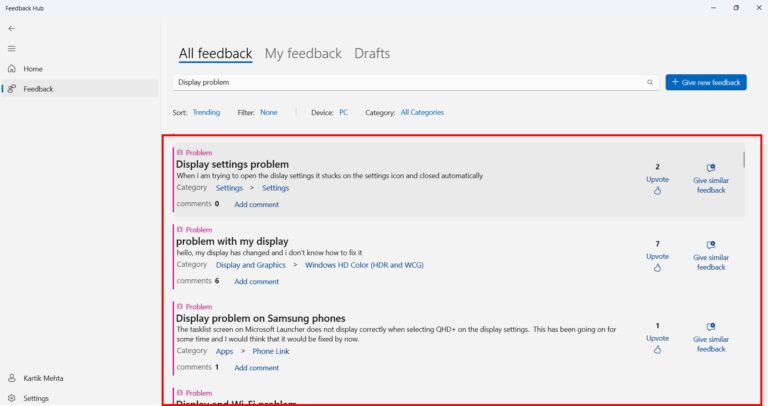
- Review existing feedback to see if others have reported the same problem and found solutions.
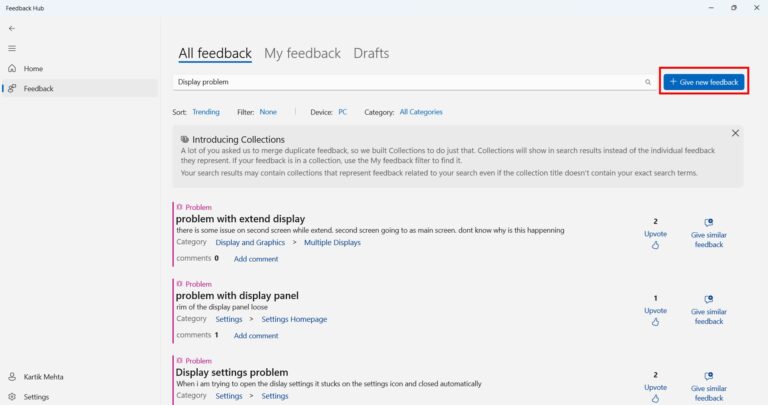
- If you don’t find a solution, select + Give new feedback to report your issue and get help from the Windows community.
Using Microsoft Community Forums
The Community Forums connect you with Microsoft experts and experienced users. You’ll find solutions from people who’ve faced similar issues.
When to use: Ideal for getting multiple perspectives on an issue or finding solutions for unique problems.
Use case: You need suggestions for optimizing Windows 11 for gaming performance.
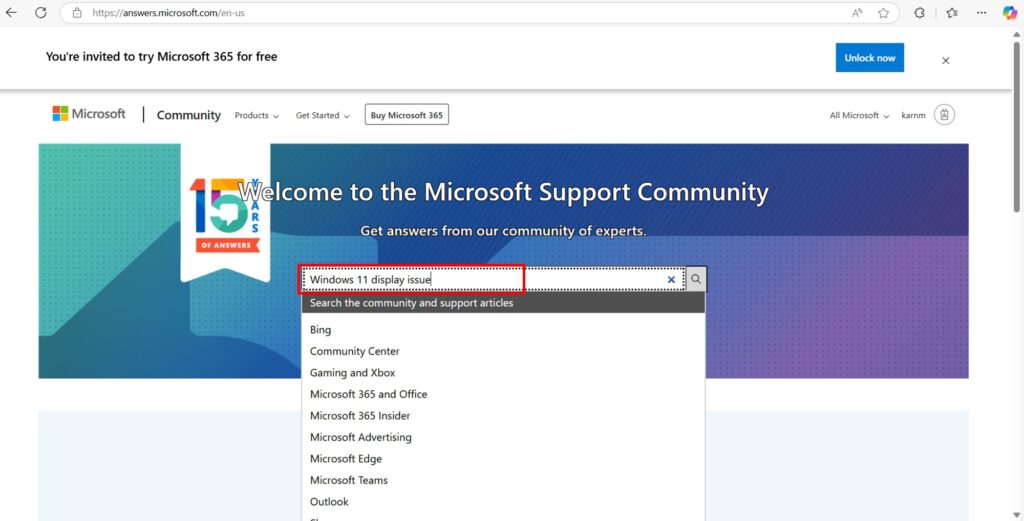
- Select your preferred web browser from the taskbar, navigate to answers.microsoft.com, and wait for the Microsoft Community page to load.
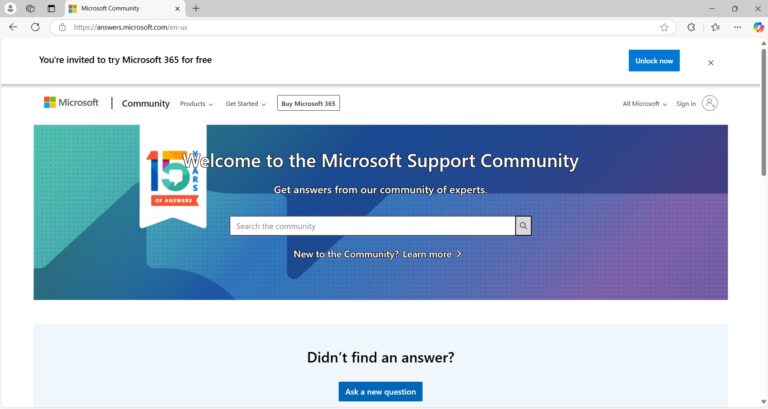
- Once on the community page, select the Sign In button at the top right, If you have signed in earlier your account will be displayed click on it if you want use the same account or click on Sign in with different account and enter your Microsoft account credentials, and click Sign In to access your account.
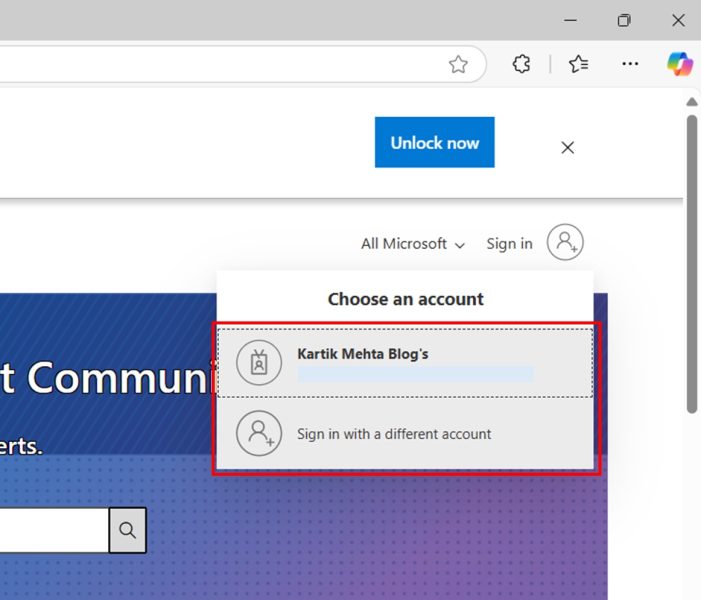
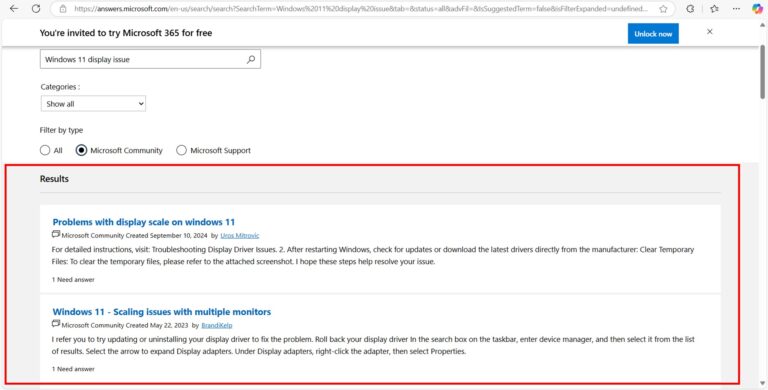
- After signing in, select the search bar at the top of the page, type your Windows 11 question with specific details, and press Enter to search existing posts.
- Search results with already asked question for the same query will be displayed
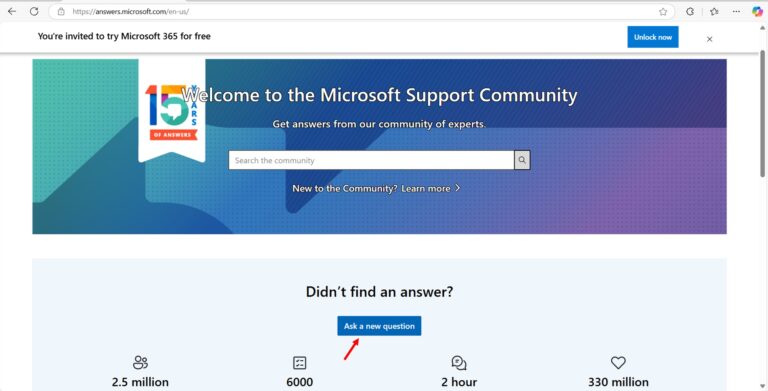
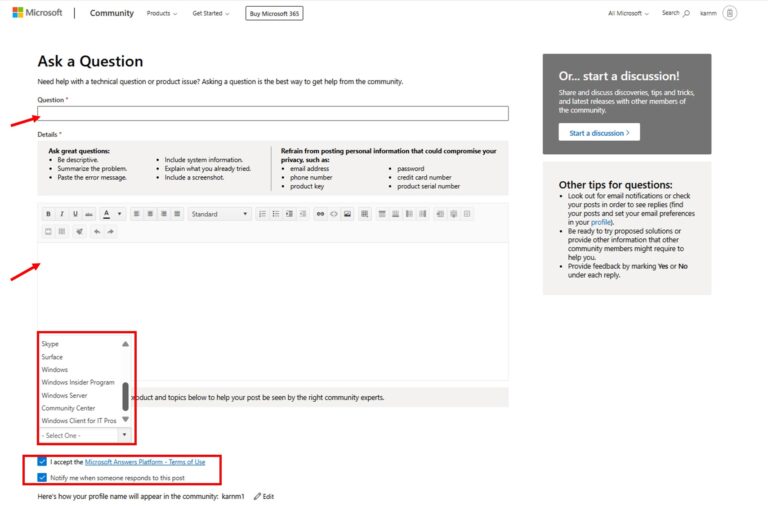
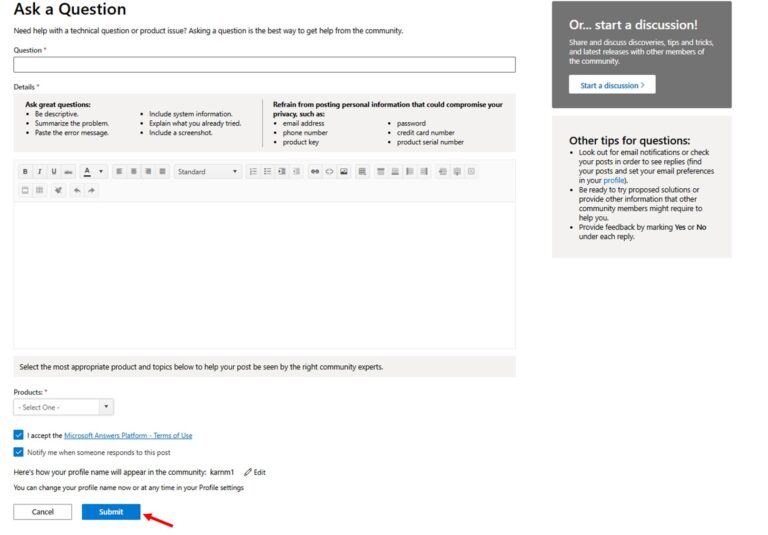
- If you don’t find an answer, select Ask a new question, choose Windows in the product dropdown Menu, and fill in all required fields with detailed information.
- When writing your question, including your Windows 11 version, describe the steps to reproduce your issue and add any error messages you’ve received.
- After filling in all details click on Submit
- After posting, monitor your email for response notifications, return to the forum to read suggestions, and mark helpful answers as solutions.
- If a solution works, select Mark as Answer under the helpful response, write a brief comment about how it helped, and close your forum thread.
Using Microsoft Support Chat
Microsoft’s live chat connects you with support agents who can help solve complex issues. You’ll get personalized assistance and can share your screen if needed.
When to use: Best for complex issues that need human expertise or when automated help isn’t enough. Use case: You’re getting a specific error code while upgrading Windows 11 and need expert guidance.
- Select “Start” from the taskbar, type “Get Help” in the search box, and click the “Get Help” app when it appears in the search results. This opens Microsoft’s built-in support application.
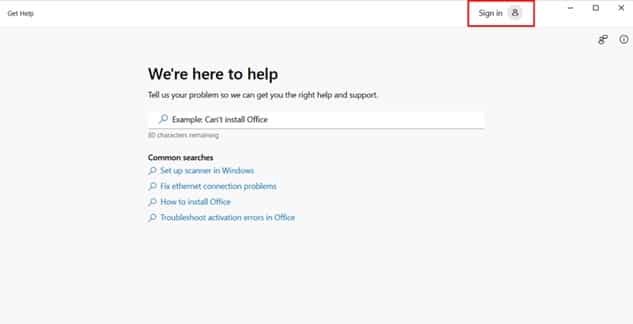
- Get Help window will open as given below. Click on the Sign In at top right corner to Sign in with your Microsoft account
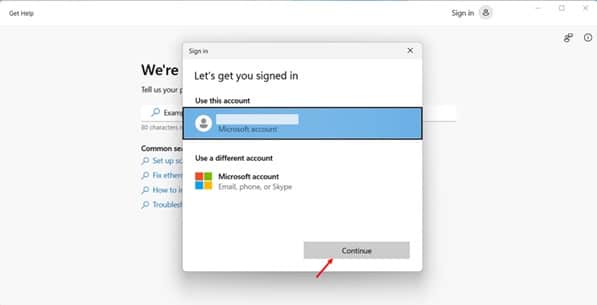
- Sign in window will appear. If you have already signed in with your Microsoft account in past it will show you in “Use this account”. You can select it or if you want to Sign in with different Microsoft account select “Use a different account”. I will use my existing account. Click on Continue
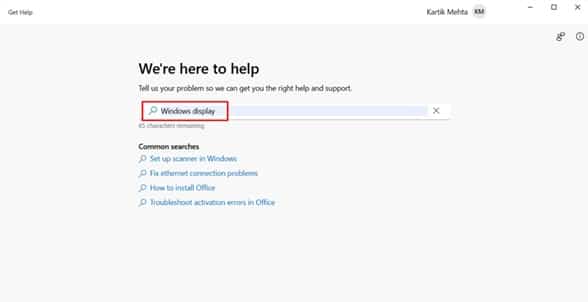
- Once Signe in type your search query for which you want to connect with Microsoft support agent on chat and press Enter
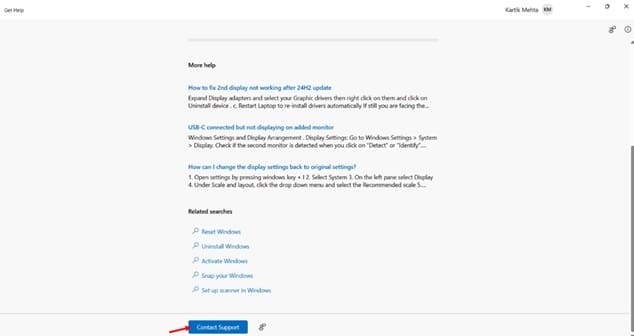
- Locate and click “Contact Support” at the bottom of the Get Help window, then select “Chat with Microsoft Support” from the available options. Enter your Microsoft account credentials if prompted to sign in.
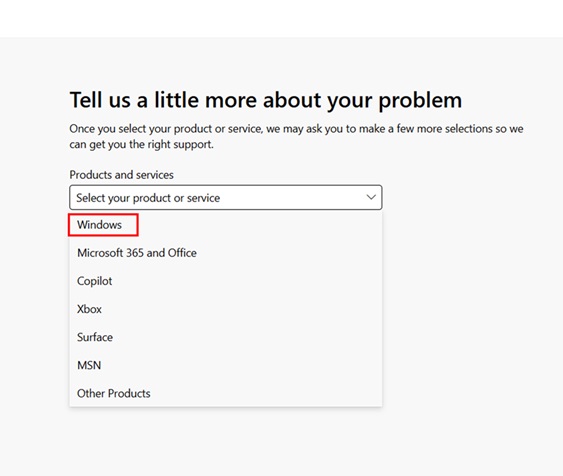
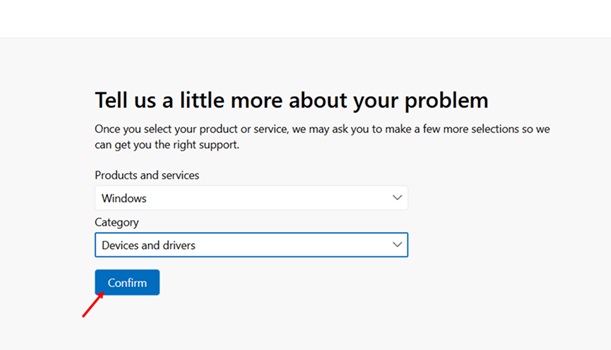
- Look for the “Products and services” dropdown menu in the Tell us a Little more about your problem window and select the specific Microsoft product you need assistance with. The available chat options will update based on your selection.
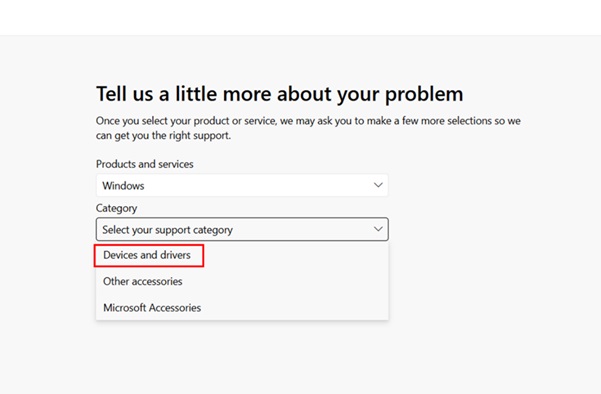
- Select the “Choose a category” dropdown menu that appears after picking your product, then choose the specific category that best matches your issue. This helps route your chat to the most appropriate support team.
- After selecting “Product and services” and “Category” click on Confirm
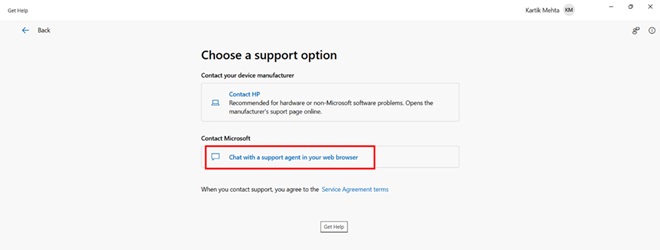
- In the “Choose a support option“ window that appears, then click “Chat with a support agent in your web browser” in “Contact Microsoft” section
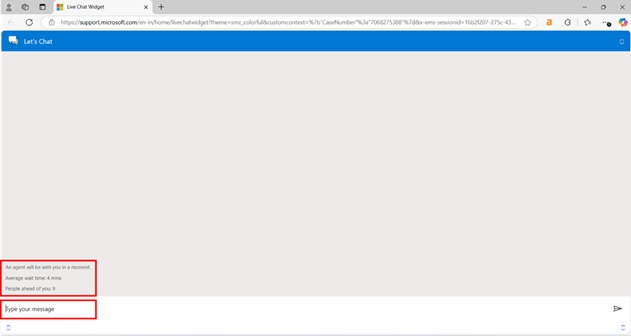
- Chat window will appear Wait for the “Support Agent” connection message to appear, which will show your position in the queue and estimated wait time.
Conclusion
I’ve walked you through all the built-in help tools in Windows 11, from basic troubleshooters to advanced support options. When you’re stuck, you can start with Windows Search or the Get Help app – they’re quick and easy. If you need immediate answers, I’ve shown you how the Virtual Assistant can help with common problems. For more technical issues, you’ll find the Windows Troubleshooters particularly useful, as they can automatically fix many common issues.
For complex issues, I recommend exploring the support channels I’ve outlined. The Community Forums are excellent for getting different perspectives on your problem, and the Feedback Hub lets you see if others are experiencing the same issue.
Whether you’re just starting with Windows 11’s new features or an advanced user dealing with complex problems, you now have tools for every situation at your fingertips. Using my guide, you’ll always know exactly which help tool to use when you run into any Windows 11 issue. This will save you time and potentially money as you resolve your problems.
If you want to learn all the ways to find your processor speed, RAM, graphics card, and other important hardware details checkout my detail guide “How to Check PC Specs in Windows 11“
Frequently Asked Questions (FAQs)
I recommend starting with Windows Search – it’s your quickest path to help. Type your question or error message in the taskbar search box, and you’ll see relevant help articles, settings, and troubleshooters. If you don’t find what you need, your next step should be the Get Help app, which provides more detailed solutions and access to Microsoft support if required.
Not all support options are free, but you’ll find plenty of no-cost help tools. You can freely use Windows Search, Get Help app, Virtual Assistant, Community Forums, Feedback Hub, and Windows Troubleshooters. However, direct Microsoft Support Chat might charge per incident unless you have a Microsoft 365 subscription. Local Microsoft Store support might also involve costs for repairs or advanced support, though basic diagnostics are usually free.
Consider professional support if:
- Built-in troubleshooters don’t resolve your issue.
- You’re experiencing recurring system crashes.
- Hardware components aren’t working correctly.
- You see persistent error messages.
- System performance has significantly decreased. Before paying for support, try the free options I’ve outlined and check if your Microsoft 365 subscription includes support benefits.
You have several options to save helpful solutions:
- Bookmark articles in your browser
- Use the Windows Notepad to create a solutions file.
- Screenshot help articles with Windows+Shift+S.
- Save PDFs of Microsoft support pages. I recommend creating a dedicated folder for these resources so you can easily find them later.
Before reaching out to support, I recommend collecting the following:
- Your Windows 11 build number (Windows key + R, type “winver”)
- Recent error messages or codes
- When the problem started
- What changes have you made recently?
- Steps to reproduce the issue
- List of troubleshooting steps you’ve already tried. Having this information ready will help you get faster, more accurate support.
