Let me show you how double spacing in Microsoft Word works and why it matters for technical documentation and formal deliverables. As a Solution Architect who’s standardized document formatting across multiple projects and teams, I can tell you that mastering proper spacing configuration is one of the effective ways to ensure professional consistency and improve the readability of technical content.
Whether you’re looking to format an existing document to meet submission guidelines, prepare a new document with the correct spacing from the start, or create standardized templates for your team, you’ll find everything you need in this guide. I’ll walk you through multiple methods for adding double spacing to text you’ve already written, setting up proper spacing in new documents before you begin typing, and creating reusable spacing configurations that save time on future projects.
Looking to speed up your document editing? check out my comprehensive guide on using Microsoft Word Find and Replace
Table of Contents
Understanding Document Spacing in Microsoft Word
Have you ever opened a document and felt the text seemed too crowded? Or perhaps you’ve received formatting guidelines requiring “double spacing” but weren’t quite sure what that meant? Document spacing in Microsoft Word might seem straightforward, but there’s more to it than meets the eye. Let’s break down everything you need to know about spacing in Word to give you complete control over how your documents look and feel.
What Does Double Spacing Actually Mean?
When we talk about “double spacing” in Word, we’re referring to the amount of vertical space between lines of text. But Word doesn’t measure this space in inches or centimeters – it uses a relative measurement based on your font size.
In single-spaced text, the spacing is roughly equal to the height of your text. When you double space, you’re essentially telling Word to add space between lines approximately equal to another line of text. Think of it as if you were writing on every other line of notebook paper.
The word actually measures this as a percentage. Single spacing is set at 100% of your line height, while double spacing is 200%. This is why you’ll sometimes see spacing expressed as “2.0” in Word’s interface.
The Spectrum of Spacing Options
Word doesn’t limit you to just single or double spacing. Here’s the full range of common spacing options available:
- Single spacing (1.0): Text lines sit directly on top of each other with minimal space between them. This is common in business letters, emails, and most web content.
- 1.5 spacing: A happy medium between single and double spacing. Many professors and editors prefer this spacing, improving readability without using as much paper as double spacing.
- Double spacing (2.0): This is the standard for many academic papers, manuscripts, and drafts that will be edited. The extra space makes it easier to read and leaves room for handwritten comments.
- Custom spacing: Word allows you to set any value you want, such as 2.5 or even 3.0 for extra-spacious documents or tighter spacing like 0.9 for fitting more text on a page.
Why Spacing Matters in Different Contexts
Different document types have different spacing expectations, and understanding these can save you from formatting headaches:
Academic Papers: Many universities and academic journals require double spacing. This tradition dates back to the days of typewriters and handwritten edits but continues today because it makes papers easier to read and grade. MLA, APA, and Chicago style guides typically call for double spacing throughout the document.
Business Documents: Most business correspondence uses single spacing or the default 1.15 spacing. Reports might use 1.5 spacing for better readability. The compact spacing looks more professional and saves paper when printing.
Book Manuscripts: Publishers often request double-spaced manuscripts for editing purposes, but the final printed book will use single spacing with paragraph breaks or indentation.
Legal Documents: Many legal documents use double spacing or even triple spacing, especially for contracts where clients need to add signatures or initials.
How to Add Double-Spacing in Word to Existing Text
Adding double-spacing to text you’ve already written is one of the most common formatting tasks in Microsoft Word. Whether you’re preparing an academic paper, editing a manuscript, or simply making your document more readable, knowing how to quickly convert existing text to double spacing will save you time and frustration.
Method 1: Using the Ribbon Interface
The fastest way to double-space existing text is through Word’s ribbon interface:
- Select the text you want to double-space. If you want to change your entire document, press Ctrl+A (Windows) or Command+A (Mac) to select all text at once.
- Locate the Home tab on the ribbon at the top of the Word window. Click on this tab to access common formatting options.

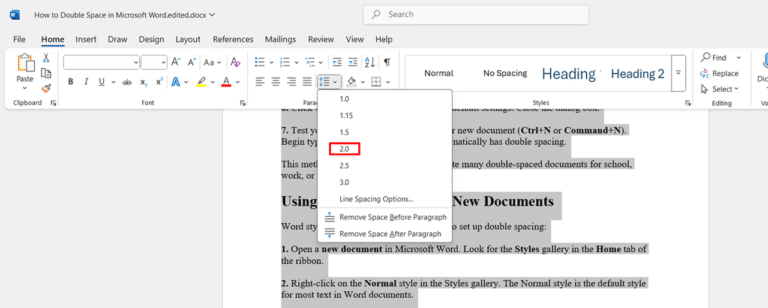
- Find the Paragraph group in the Home tab. Look for the Line and Paragraph Spacing button, which displays horizontal lines with up/down arrows.
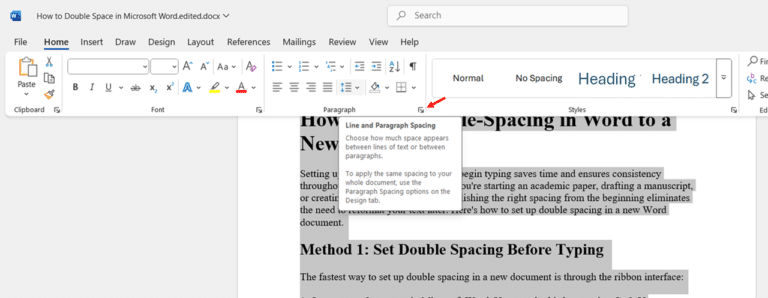
- Click the Line and Paragraph Spacing button to reveal the dropdown menu. Select 2.0 from the options to instantly convert your selected text to double spacing.
- Review your document to verify the spacing change has been applied correctly. All the selected text should now have double spacing between the lines.
Method 2: Using Keyboard Shortcuts
If you prefer keyboard shortcuts, this method is even faster:
- Select the existing text you want to modify. Press Ctrl+A (Windows) or Command+A (Mac) for the entire document.
- Press Ctrl+2 (Windows) or Command+2 (Mac) on your keyboard. This instantly applies double spacing to all selected text.
- Check that the spacing has been applied correctly throughout your selection. This keyboard shortcut works in all modern versions of Word.
Other Valuable Spacing Shortcuts
Word offers a complete set of spacing shortcuts that follow the same pattern:
- Press Ctrl+1 on your keyboard to apply single spacing to selected text. This is useful when you need to revert double-spaced text back to single spacing.
- Press Ctrl+5 on your keyboard to apply 1.5 line spacing. This creates a spacing somewhere between single and double, which many readers find to be a comfortable compromise.
- Press Ctrl+0 (that’s Ctrl plus zero) to add or remove a 12-point paragraph spacing before the selected paragraph. This affects the space between paragraphs rather than between lines within paragraphs.
- Verify your changes after applying any of these shortcuts. Different spacing options create distinctly different visual appearances in your document.
Method 3: Using the Paragraph Dialog Box
For more control over your spacing settings:
- Select the existing text you want to convert to double spacing. Or, if you want to modify the entire document, press Ctrl+A (Windows) or Command+A (Mac).
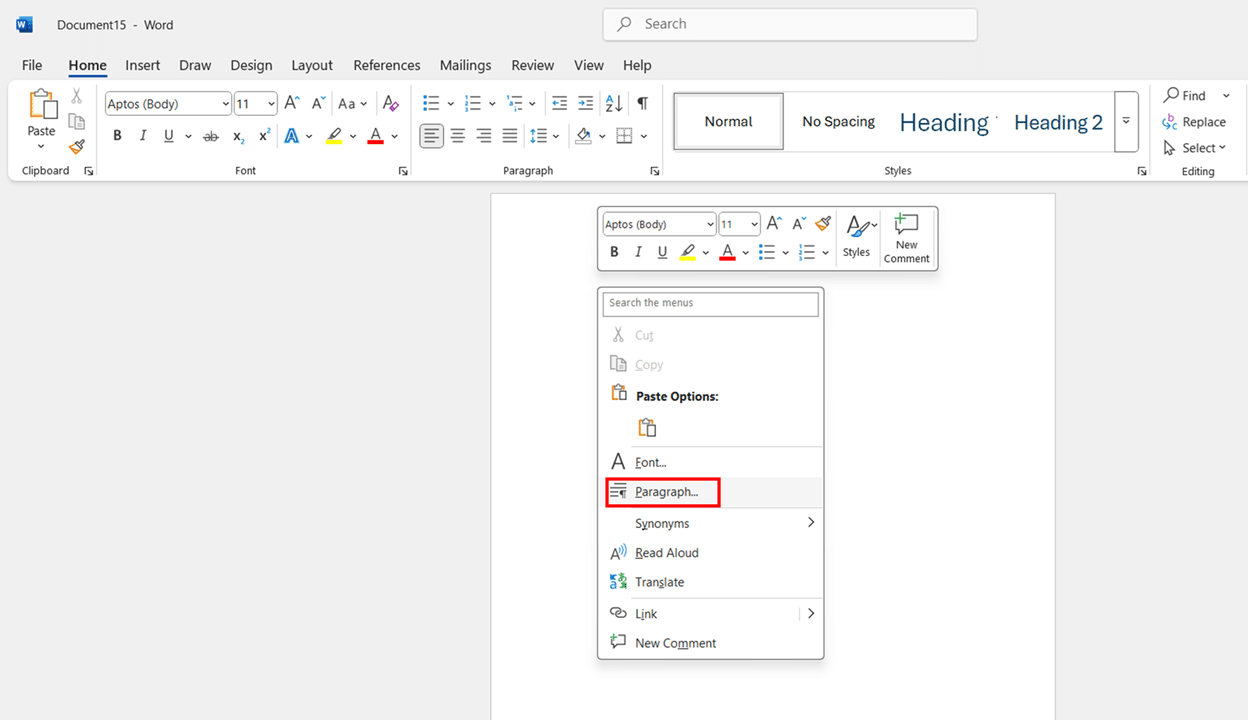
- Right-click anywhere within the selected text and choose Paragraph from the context menu. This opens the Paragraph dialog box with various formatting options.

- Look for the Line spacing dropdown menu in the Spacing section of the dialog box. Click the dropdown and select Double.

- Check the preview window at the bottom of the dialog box to confirm how your text will appear. Adjust other spacing options if needed.
- Click the OK button to apply double spacing to your selected text. Your existing text will now display with double spacing.

Making the Change Permanent for Future Editing
To ensure your double spacing remains consistent as you continue to edit:
- After applying double spacing to your existing text, press Ctrl+S (Windows) or Command+S (Mac) to save your document with the new formatting.
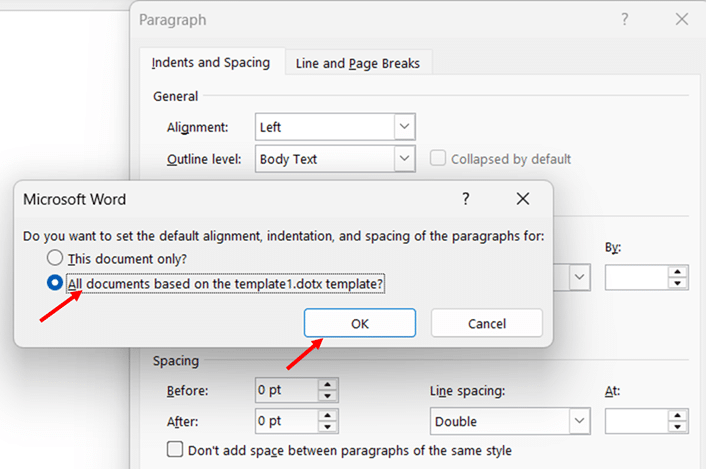
- To make double spacing your default for all new documents, select some double-spaced text, open the Paragraph dialog box, set the spacing to Double, and click the Set As Default button, then select All documents based on the Normal template option.
- consider adding a note about the spacing requirements for collaborative documents if you’re sharing the file with others who might continue editing it.
Once you know these methods, double-spacing existing text in Word is a straightforward process. By selecting the approach that best fits your workflow—whether that’s the ribbon interface, keyboard shortcuts, or the detailed paragraph dialog—you can quickly transform your document’s appearance and readability without having to retype anything.
How to Add Double-Spacing in Word to a New Document
Setting up double spacing before you begin typing saves time and ensures consistency throughout your document. Whether you’re starting an academic paper, drafting a manuscript, or creating a professional report, establishing the right spacing from the beginning eliminates the need to reformat your text later. Here’s how to set up double spacing in a new Word document.
Method 1: Using Ribbon Interface Set Double Spacing in New Word Document
The fastest way to set up double spacing in a new document is through the ribbon interface:
- Open a new document in Microsoft Word. You can do this by pressing Ctrl+N (Windows) or Command+N (Mac), or by clicking File and then New.
- Click on the Home tab in the ribbon at the top of your screen. This tab contains most of the common formatting controls you’ll need.
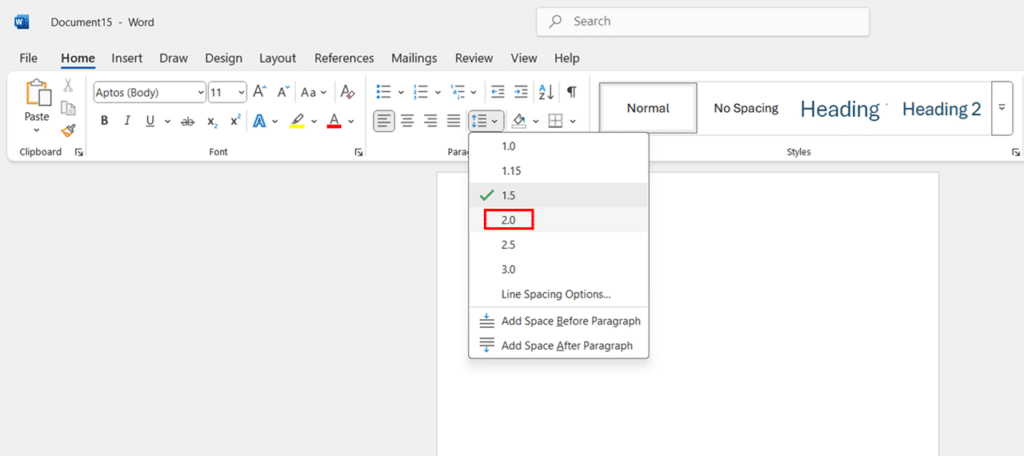
- Locate the Paragraph group in the Home tab. Find the Line and Paragraph Spacing button, which shows horizontal lines with arrows pointing up and down.

- Click the Line and Paragraph Spacing button before you start typing any text. Select 2.0 from the dropdown menu to set double spacing.
- Begin typing your document. All the text you type will automatically have double spacing between lines.
This method sets double spacing for wherever you’re currently positioned in the document. The spacing will apply to all text you type from that point forward until you change it again.
Method 2: Keyboard Shortcut Method for New Documents
If you prefer using keyboard shortcuts:
- Open a new document in Microsoft Word using Ctrl+N (Windows) or Command+N (Mac).
- Press Ctrl+2 (Windows) or Command+2 (Mac) on your keyboard before you start typing. This sets double spacing for new text.
- Begin typing your document. All your text will now have double spacing applied automatically.
- Verify the spacing is correct as you type. If you need to change to a different spacing, you can use Ctrl+1 for single spacing or Ctrl+5 for 1.5 spacing at any time.
This keyboard shortcut method is particularly efficient as it requires minimal interruption to your workflow.
Paragraph Dialog Method for Precise Control
For more detailed control over your document spacing:
- Open a new document in Microsoft Word. Position your cursor where you want to begin typing with double spacing.
- Right-click on the empty document and select Paragraph from the context menu. Alternatively, click the small diagonal arrow in the bottom-right corner of the Paragraph group on the Home tab.
- Look for the line spacing dropdown that appears in the spacing section of the dialog box. Click the dropdown and select Double.

- Verify other spacing settings, such as Before and After paragraph spacing. For consistent double spacing throughout, these are typically set to 0 pt.
- Click the OK button to apply these settings. Now, begin typing your document with the double spacing already established.

This method gives you more control over all aspects of paragraph formatting from the start.
Method 4: Using Document Styles for New Documents
Word styles provide another efficient way to set up double spacing:
- Open a new document in Microsoft Word. Look for the Styles gallery in the Home tab of the ribbon.
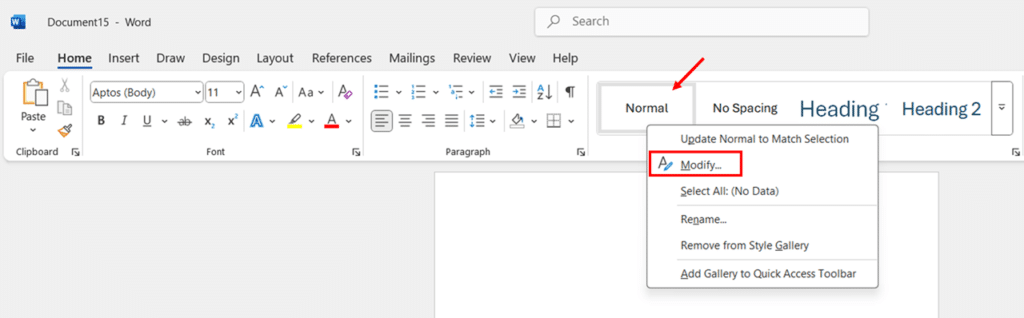
- Right-click on the Normal style in the Styles gallery. The Normal style is the default style for most text in Word documents.
- Select Modify from the context menu to open the Modify Style dialog box.
- Click the Format button at the bottom of the dialog and select Paragraph from the dropdown menu.

- In the Paragraph dialog that appears, set the Line spacing to Double in the Spacing section.

- Click OK to close the Paragraph dialog, then click OK again to close the Modify Style dialog.

- Begin typing in your document. All text using the Normal style (which is the default) will now have double spacing.
This approach is powerful because it uses Word’s style system, which helps maintain consistent formatting throughout your document.
Method 5: Setting Up Double Spacing with Templates
For the most efficient workflow with specific document types:
- Open a new document in Microsoft Word. Set up double spacing using any of the methods above.
- Configure any other formatting you regularly use, such as font style, size, margins, or header/footer information.
- Click the File tab, then select Save As. Choose where you want to save your template.
- Click the Save as type dropdown and select Word Template (*.dotx) from the list of file types.
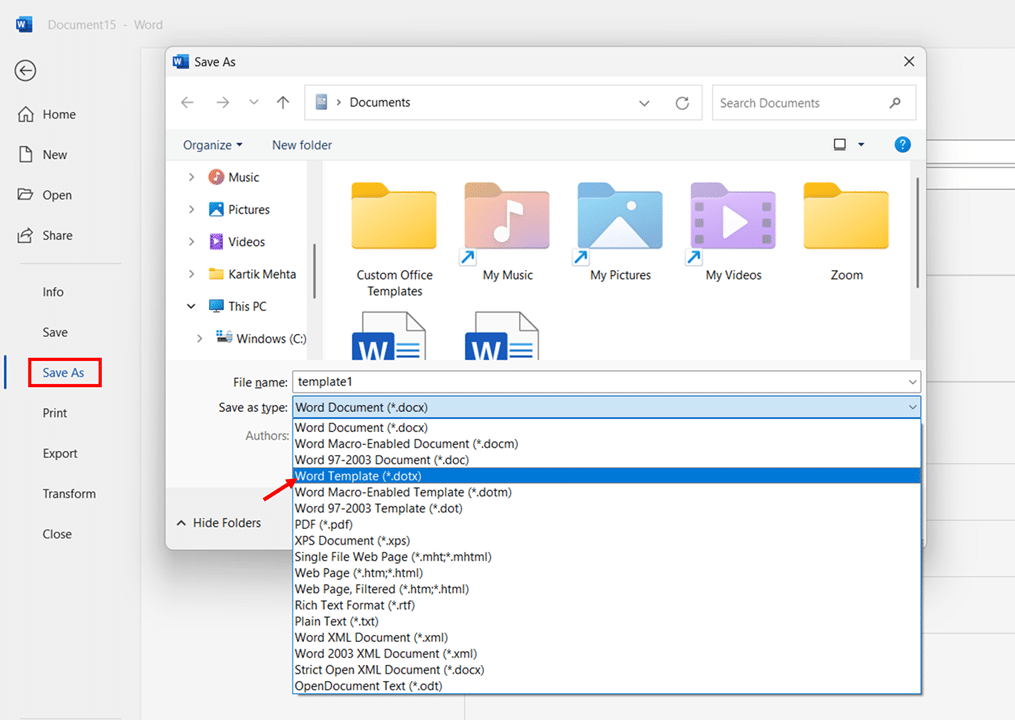
- Give your template a descriptive name like “Double Spaced Document” and click Save.

- Access your template for future documents by clicking File, then New, then Personal, or by browsing to the saved location.
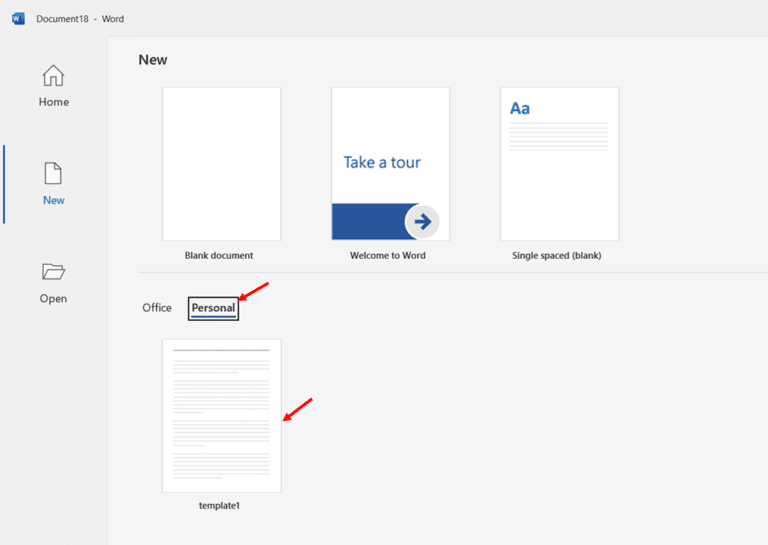
Using a template ensures that all your common formatting preferences, including double spacing, are automatically applied whenever you create a new document based on that template.
Setting Double Spacing as the Default for All New Documents
If you frequently create double-spaced documents, you can save time by making it your default setting:
- Open a new blank document in Microsoft Word. Don’t type any text yet.
- Right-click on the empty document and select Paragraph from the context menu to open the Paragraph dialog box.

- Set the Line spacing to Double in the Spacing section. Adjust any other paragraph settings you want as your default.

- Click the Set As Default button at the bottom of the dialog box. A confirmation dialog will appear.

- Select the All documents based on the Normal template option to make double spacing the default for all new documents you create.
- Click OK to confirm and save your new default settings. Close the dialog box.
- Test your new default by creating another new document (Ctrl+N or Command+N). Begin typing and confirm that the text automatically has double spacing.
Conclusion
Double spacing your Word documents doesn’t have to be complicated. You’ve now learned multiple ways to apply double spacing, from the quick Ctrl+2 keyboard shortcut to the detailed Paragraph dialog box. Each method has its place in your workflow, and you can choose whichever works best for your current task.
I recommend practicing these techniques on your next document for a few minutes. The more you use them, the faster you’ll become at formatting your papers, reports, and manuscripts. Your professors, colleagues, and readers will appreciate the clean, professional appearance that proper spacing brings to your work. Remember, good formatting isn’t just about following rules—it’s about making your ideas easier to read and understand.
Struggling with unwanted pages? Read my detailed guide How to Delete a Page in Microsoft Word for quick and effective solutions.
Frequently Asked Questions (FAQs)
Yes, you can apply double spacing to any selected portion of text. Click and drag to select the specific paragraphs, sentences, or sections you want to double space. Then apply double spacing using any method—Ctrl+2 keyboard shortcut, the Line and Paragraph Spacing button in the Ribbon, or through the Paragraph dialog box. The spacing change will only affect your selection, leaving the rest of the document unchanged. This selective formatting is particularly useful for documents with different sections that require different spacing standards, such as block quotes within academic papers or certain elements in formal reports.
No, double spacing only controls the space between lines within each paragraph. The spacing between paragraphs is controlled separately by the “Before” and “After” settings in the Paragraph dialog box. This distinction is important for creating properly formatted documents. For most academic papers requiring double spacing throughout, you should set the line spacing to “Double” and set both “Before” and “After” paragraph spacing to 0 pt. This creates consistent double spacing throughout the document, including between paragraphs. If you want additional separation between paragraphs while maintaining double spacing within them, you can increase the “After” value to 6 pt or 12 pt.
They’re exactly the same thing—just different ways of expressing the same spacing value in different parts of Word’s interface. “2.0” is the numerical representation showing that the spacing is twice (200%) the height of a single line of text. This terminology appears in the Line and Paragraph Spacing dropdown in the Ribbon. “Double” is the Word equivalent in the Paragraph dialog box’s Line spacing dropdown. Both settings create the same amount of space between lines. Word uses these different terms in different contexts, but they produce identical results in your document.
Yes. Select only the paragraphs you want to format differently, then apply the desired spacing only to that selection. For example, this allows you to have double-spaced body text with single-spaced block quotes.
Yes, double spacing works the same way on both platforms, though the keyboard shortcuts differ: Ctrl+2 on Windows vs. Command+2 on Mac. The visual appearance of double spacing should be consistent across platforms.