How many times do you see your Windows 11 lock screen each day – 20, 50, maybe 100 times? Yet, if you’re like most users, you’re probably stuck with the same boring default image or basic settings, missing out on one of the most impactful ways to personalize your computing experience. As someone who’s spent years helping users customize Windows systems and enhance their daily workflows, I can tell you that mastering your lock screen customization is one of the most effective ways to transform your PC from generic to genuinely yours.
Whether you’re looking to create stunning personal photo slideshows, implement dynamic Spotlight backgrounds that change daily, or simply replace the default image with something more meaningful, you’ll find everything you need in this comprehensive guide. I’ll walk you through every customization method, from simple Settings app changes to creating rotating photo collections that showcase your favorite memories and moments.
You’ll discover techniques that work for every skill level, from complete beginners to users seeking more creative control over their lock screen experience. By the end of this guide, you’ll transform your lock screen from a basic security barrier into a personalized gateway that reflects your style and brings joy to your daily computing routine.
Tired of accidental Sticky Keys activation? Learn how to disable it permanently in my guide How to Turn Off Sticky Keys in Windows 11
Understanding Windows 11 Lock Screen Options
Table of Contents
The lock screen in Windows 11 functions as your initial interface layer, appearing whenever you start your device or wake it from sleep mode.
This isn’t just a pretty picture blocking access to your desktop – it’s a sophisticated security feature that requires authentication through biometric gestures, PINs, or passwords before granting access to your personal workspace.
Beyond protection, your lock screen can display useful information, such as the time, date, weather updates, and app notifications, making it both functional and visually appealing.
Windows 11 offers three distinct lock screen types, each serving different needs and preferences.
Windows Spotlight is a dynamic option that automatically downloads fresh, high-quality images from Microsoft’s curated collection daily. Spotlight requires an active internet connection and works best when your connection isn’t set to metered mode, as it needs to download new content regularly.
Picture option provides complete personal control, allowing you to select any image from your device or choose from Windows’ built-in collection. This static approach ensures consistency – perfect for showcasing family photos, favorite artwork, or company branding. You can browse through recent images or explore your entire photo library to find that perfect personal touch.
Slideshow mode transforms your lock screen into a rotating gallery, cycling through multiple images from designated folders. This option combines the best of both worlds – personal customization with dynamic variety. You can include images from your camera roll, OneDrive, or specific folders with customizable timing intervals and transition effects.
Advanced slideshow settings let you optimize pictures for your screen size, control battery usage, and manage when slideshows play.
Understanding the key differences between lock screen and desktop wallpaper helps optimize your Windows 11 experience. Your lock screen image appears before authentication, serving as a security barrier, while the desktop wallpaper is displayed after a successful login.
These can be completely different images, allowing for separate personalization of public-facing security screens and private workspace backgrounds. This separation proves especially valuable in professional environments where lock screens might display company branding while desktops remain personally customized.
The beauty of Windows 11 lock screen options lies in their flexibility. Whether you prefer the surprise and delight of ever-changing Spotlight images, the consistency of a cherished personal photo, or the dynamic variety of a custom slideshow, each option transforms your daily computing ritual from routine to remarkable, making every interaction with your device a little more personal and engaging.
How to Change Lock Screen Through Settings App
Accessing Windows 11’s lock screen settings through the Settings app is the most straightforward and user-friendly method for personalizing your computer’s first impression. Think of the Settings app as your personalization command center – it’s where Microsoft has thoughtfully organized all customization options in one convenient location, making it incredibly easy to transform your lock screen from default to delightful.
The Settings app method is consistent across all Windows 11 versions and doesn’t require advanced technical knowledge. Whether you’re a complete beginner or someone who prefers the official Microsoft approach, this method ensures you’ll never encounter compatibility issues or system conflicts that sometimes occur with alternative methods.
Getting to Lock Screen Settings
- Open the Settings app by pressing Windows + I or clicking the Start button and selecting Settings.

- Click Personalization in the left sidebar of the Settings window.
- Select the Lock screen from the right panel under the Personalization section. This takes you directly to all lock screen customization options, where you can control every aspect of your lock screen appearance.

Choosing Lock Screen Background Type
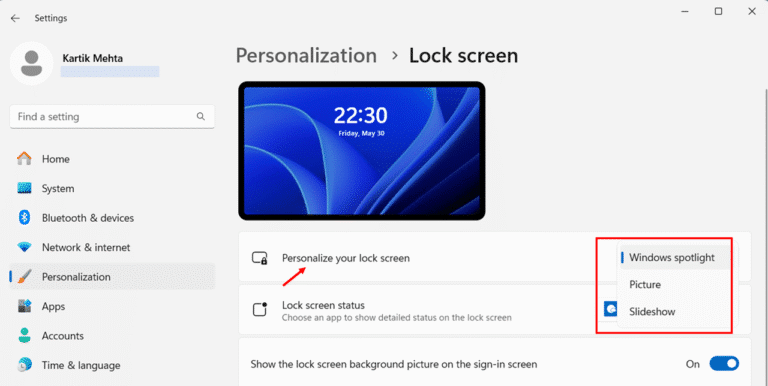
- Locate the Personalize your lock screen dropdown menu at the top of the Lock screen settings page. This dropdown contains three distinct options that determine how your lock screen will look and behave.

- Click the dropdown menu to reveal your background options: Windows Spotlight, Picture, and Slideshow. Each option serves different preferences and use cases, so consider your personal style and functional needs.

Setting Up a Custom Picture Background
- Select Picture from the dropdown if you want to use a single, static image.

- Choose from the thumbnail preview images displayed below the dropdown, or click Browse photos to select a custom image from your device’s storage. The preview thumbnails show recently used images and Windows’ built-in selection.

- Navigate to your desired image file if using Browse photos, then click Choose Picture to apply it immediately. Windows 11 supports common image formats, including JPEG, PNG, and BMP files.

Configuring Additional Lock Screen Features
- Locate the Get fun facts, tips, tricks, and more on your lock screen checkbox below your background selection. Check this box if you want Microsoft’s helpful tips and interesting facts displayed on your lock screen, or uncheck it for a cleaner appearance.
- Find the Lock screen status dropdown to choose which app can display detailed information on your lock screen. Select Weather and more for weather and news updates, or choose None if you prefer minimal distractions.
- Toggle the Show the lock screen background picture on the sign-in screen option based on your preference. Enabling this creates visual consistency between your lock screen and sign-in screen while disabling it provides a plain background for the sign-in screen.

- Press Windows + L to immediately lock your computer and preview your new lock screen settings.
Setting Up Windows Spotlight for Dynamic Backgrounds
Windows Spotlight transforms your lock screen into a gateway of wonder, delivering breathtaking imagery from around the globe directly to your computer each day. Think of it as having a personal curator who selects stunning photographs of natural landscapes, architectural marvels, and cultural landmarks, ensuring you start each computing session with visual inspiration. This dynamic feature eliminates the monotony of static backgrounds while introducing you to places you might never have discovered otherwise.
Understanding how Windows Spotlight operates helps you make the most of this remarkable feature. Microsoft’s Spotlight service connects to Bing’s extensive image collection, automatically downloading high-resolution photographs that showcase the beauty and diversity of our world. These images aren’t random selections – Microsoft’s content team carefully curates them to ensure quality, relevance, and visual appeal. Along with these stunning visuals, you’ll often receive interesting facts, historical context, or travel tips related to the featured locations.
Prerequisites and System Requirements
Before enabling Windows Spotlight, ensure your system meets the necessary requirements for optimal performance. Your Windows 11 device requires a stable internet connection, as Spotlight downloads fresh images regularly from Microsoft’s servers. The feature works best with unlimited or high-bandwidth connections, as image files can be several megabytes in size. Additionally, verify that your Windows 11 installation is up to date, as Microsoft frequently improves Spotlight functionality through system updates.
Enabling Windows Spotlight for Lock Screen
- Open the Settings app by pressing Windows + I or clicking the Start button and selecting Settings.

- Click Personalization in the left sidebar of the Settings window. This section contains all appearance and customization options for your Windows 11 experience.
- Select the Lock screen from the right panel under Personalization settings.

- Locate the Personalize your lock screen dropdown menu at the top of the page. Click this dropdown to reveal the three available background options for your lock screen.
- Choose Windows Spotlight from the dropdown menu. This immediately activates the dynamic background feature and begins the image download process.

Configuring Network Settings for Optimal Performance
- Navigate to Settings > Network & Internet to verify your connection settings. Windows Spotlight requires unrestricted internet access to function properly.
- Click your current network connection, whether Wi-Fi or Ethernet, to access connection properties. This allows you to modify data usage settings that affect Spotlight.
- Ensure the Metered connection toggle is set to Off. Metered connections restrict background data usage, preventing Spotlight from automatically downloading new images.
Managing Spotlight Preferences and Feedback
- Return to your lock screen after enabling Spotlight to see the new dynamic background. Lock your computer using Windows + L to immediately preview the current Spotlight image.
- Look for the Like what you see? icon that appears on Spotlight images. Click this icon to provide feedback about image preferences, helping Microsoft tailor future selections to your tastes.
- Access the Learn more option when available to discover fascinating details about featured locations, turning your lock screen into an educational experience that broadens your cultural awareness.
For a complete guide on optimizing your system’s performance by disabling background apps in Windows 11, visit my detailed article How to Turn off Background Apps in Windows 11
Creating Custom Lock Screen Slideshows
Transform your Windows 11 lock screen into a personal gallery that showcases your most cherished memories, favorite artwork, or inspiring imagery with custom slideshows. Unlike the curated beauty of Windows Spotlight, slideshows put you in complete creative control, allowing you to craft a visual experience that reflects your unique personality and preferences. Whether you want to display family vacation photos, stunning nature photography, or motivational quotes, custom slideshows turn every computer wake-up into a delightful surprise.
The slideshow feature represents one of Windows 11’s most underutilized personalization tools, offering far more flexibility than most users realize. You’re not limited to a single folder or image type – you can create sophisticated rotation systems that pull from multiple locations, include cloud-stored photos, and even adjust timing preferences to match your workflow. This level of customization means your lock screen can evolve with your interests, seasons, or current projects, keeping your computing experience fresh and personally meaningful.
Preparing Your Image Collection
Before diving into the slideshow setup, invest time in organizing your image collection for optimal results. Create dedicated folders for different themes or categories – perhaps one for family photos, another for landscapes, and a third for professional or artistic images. This organizational strategy allows you to easily swap slideshow sources based on your mood or current preferences without reorganizing your entire photo library.
Consider image quality and resolution when selecting photos for your slideshow. Windows 11 performs best with high-resolution images that match or exceed your display’s native resolution. While the system can resize images automatically, starting with properly sized photos ensures crisp, professional-looking results. Remove any corrupted, blurry, or inappropriate images from your slideshow folders, as these can disrupt the viewing experience and create visual inconsistencies.
Setting Up Your Custom Slideshow
- Open the Settings app using Windows + I or by clicking the Start button and selecting Settings.

- Navigate to Personalization in the left sidebar, then click Lock screen in the right panel. This section contains all lock screen customization options, including background types, app status displays, and advanced slideshow controls.

- Locate the “Personalize your lock screen” dropdown menu and select “Slideshow” from the available options. This activates slideshow mode and reveals additional configuration options specific to rotating image displays.

- Click the Browse button next to Add an album for your slideshow to begin selecting image sources. This opens a folder browser where you can navigate to your prepared image collections.
- Navigate to your chosen image folder and click Choose this folder to add it to your slideshow rotation. Windows 11 immediately begins indexing the images in this location for use in a slideshow.

- Repeat the browse and selection process to add multiple folders if desired. Each additional folder expands the variety of your slideshow and prevents repetitive viewing experiences.
Configuring Advanced Slideshow Settings
- Expand the Advanced slideshow settings section to access powerful customization options that control slideshow behavior and appearance. These settings have a significant impact on the functionality and user experience of your slideshow.

- Check Include camera roll folders from this PC and OneDrive if you want to incorporate automatically synced photos from your devices and cloud storage. This option keeps your slideshow fresh with recently captured images, eliminating the need for manual intervention.
- Toggle Only use pictures that fit my screen based on your preference for image cropping versus complete visibility. Enabling this option prevents awkward cropping but may exclude some images while disabling it ensures all images appear but might require scaling.
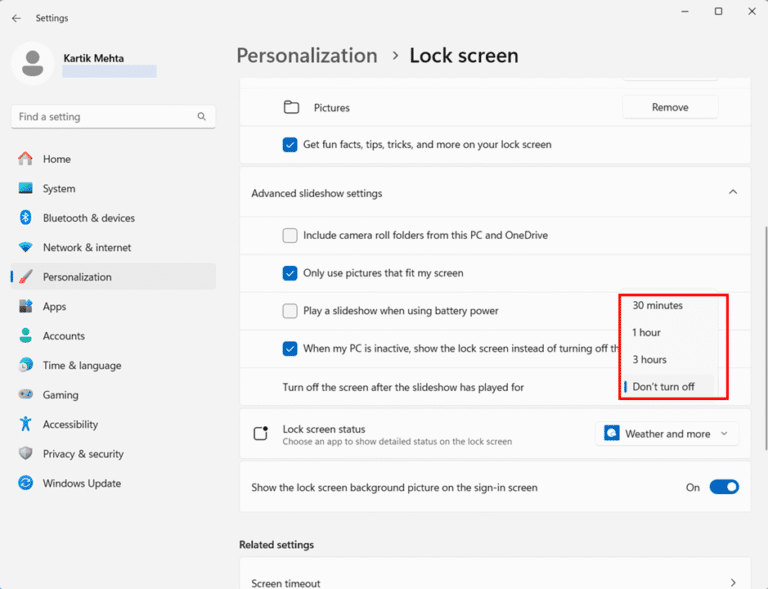
- Configure When my PC is inactive, show the lock screen instead of turning off the screen to use your slideshow as an attractive screensaver alternative. This setting transforms idle periods into continuous visual entertainment.
- Select your preferred timeout duration from the Turn of the screen after the slideshow has played for the dropdown menu. Choose from ‘Don’t turn off‘, 30 minutes, 1 hour, or 3 hours, based on your power conservation needs and viewing preferences.
Optimizing Slideshow Performance and Management
- Uncheck Get fun facts, tips, tricks, and more on your lock screen to maintain clean, uncluttered image displays. This setting removes Microsoft’s informational overlays that might detract from your personal photos.
- Test your slideshow immediately by pressing Windows + L to lock your computer and observe the image rotation. Allow several minutes to see multiple images and verify that transitions work smoothly without delays or errors.
- Return to slideshow settings to remove unwanted folders by clicking the Remove button next to any added album. This management feature enables you to refine your slideshow content without having to restart the entire setup process.
Conclusion
You now have complete control over your Windows 11 lock screen, from basic Settings app changes to custom slideshows and dynamic Spotlight backgrounds. I’ve walked you through every customization method available, whether you want simple picture changes, rotating photo collections, or fresh daily images from Microsoft’s curated collection. Each technique serves different needs – use the Settings app for quick personal changes or create custom slideshows to showcase your favorite memories.
Take action now – pick the customization method that matches your preferences and implement it step by step. Your personalized lock screen awaits, and you have all the knowledge needed to create exactly what you want. Transform your daily login experience from boring default images into something that truly reflects your personality and style.
If you want to understand what is Windows 11 startup folder and how to manage the Windows 11 startup applications you can checkout my Essential guide on Windows 11 Startup Folder
Frequently Asked Questions (FAQs)
The lock screen appears before you sign in and provides security by requiring authentication. Desktop wallpaper shows after successful login. You can set different images for each, and the lock screen can display app notifications and system information while maintaining security.
Custom static images have negligible performance impact. Slideshows consume more resources due to continuous indexing and image loading. Windows Spotlight uses network bandwidth and processing power for downloads. For older hardware, use single static images for optimal performance.
Advanced AI can resolve multi-step processes like returns, refunds, account changes, and technical troubleshooting. AI seamlessly escalates to human agents with full conversation context for highly complex or emotional issues.
Windows 11 doesn’t include built-in scheduling, but you can create PowerShell scripts with Task Scheduler to automatically change lock screen images at specific times. Alternatively, use third-party software like DisplayFusion or Wallpaper Engine for advanced scheduling features.
This usually indicates network connectivity issues or a corrupted Spotlight cache. Reset by switching the lock screen to Picture mode, restarting your computer, and then switching back to Windows Spotlight. Also, ensure that your connection isn’t metered and that you have stable internet access.
