We’ve all been there—you’re waiting for an important email, but when you open your inbox, it’s filled with unwanted junk. That newsletter you signed up for two years ago, the promotional emails from a store you visited once, or worse, random spam from who-knows-where. It’s enough to make you want to hit the “delete” button a hundred times! But there’s a better way.
In this guide, I’ll show you how to block emails on Outlook, whether you’re using the desktop app, the web version, or the mobile app. I’ll cover everything from blocking individual senders to setting up automatic rules to stop the flood of unwanted emails before they even reach your inbox.
This comprehensive guide provides step-by-step instructions on blocking emails in Outlook across various platforms. It covers basic blocking techniques, advanced rule creation, managing blocked sender lists, troubleshooting common issues, and additional tips for maintaining a clean inbox. By implementing these strategies, users can significantly improve their email management, enhance productivity, and ensure a more secure email environment.
By the end of this guide, you’ll have a clean inbox with no more spam or unsolicited offers. So, let’s dive in and learn step-by-step how to block emails on Outlook.
You can also refer How to Change Outlook View If you are interested to make your inbox more streamline and to transform a standard email interface into a powerful, personalized productivity tool that aligns perfectly with your unique needs and working style.
Table of Contents
Understanding Email Blocking in Outlook
Email blocking is a crucial feature in Outlook that allows users to prevent unwanted messages from reaching their inbox. It’s essential for maintaining a clean, organized email environment and protecting oneself from potential security threats. This section delves into the concept of email blocking, its importance, and the various options available in Outlook.
What is Email Blocking?
Email blocking is a process where an email client, in this case Outlook, prevents specific email addresses or domains from delivering messages to the user’s inbox. When an email is blocked, it’s typically redirected to the junk folder or deleted outright, depending on the user’s settings. This feature acts as a first line of defense against spam, phishing attempts, and other unwanted communications.
Importance of Email Blocking
The significance of email blocking cannot be overstated in today’s digital landscape. Here’s why it’s crucial:
- Productivity Enhancement: By filtering out unnecessary emails, users can focus on important messages, saving time and increasing productivity.
- Security: Blocking potentially malicious emails helps protect against phishing scams, malware, and other cyber threats.
- Reduced Stress: A cleaner inbox leads to less email-related stress and anxiety.
- Bandwidth Conservation: Blocking unwanted emails can save bandwidth, especially important for those with limited data plans.
- Privacy Protection: It helps prevent marketers and other unwanted senders from tracking email opens and interactions.
Types of Email Blocking Options in Outlook
Outlook offers several methods to block unwanted emails, catering to different needs and preferences:
- Sender Blocking: This option allows users to block specific email addresses. Any future emails from these addresses will be automatically sent to the junk folder.
- Domain Blocking: Users can block entire domains, preventing all emails from addresses associated with that domain.
- Content Filtering: Outlook can filter emails based on specific words or phrases in the subject line or body of the email.
- Junk Email Filter: This built-in feature automatically detects and filters out potential spam emails.
- Safe Senders and Blocked Senders Lists: Users can maintain lists of email addresses or domains they always want to receive (Safe Senders) or always want to block (Blocked Senders).
- Rules: Custom rules can be created to automatically handle emails meeting specific criteria, including blocking or redirecting them.
How to Block Emails on Outlook for Windows
Outlook’s desktop app gives you strong tools to manage your inbox and block unwanted emails. You can block specific addresses or domains, sending them straight to the junk folder. The desktop version of Outlook offers more control than mobile or web, letting you set up custom filters and rules for different emails.
Method 1: Block Email address by Selecting a Message From Your Inbox
Blocking a sender in the Outlook desktop app is quite simple, and the steps are similar across most versions of Outlook. Here’s how to do it:
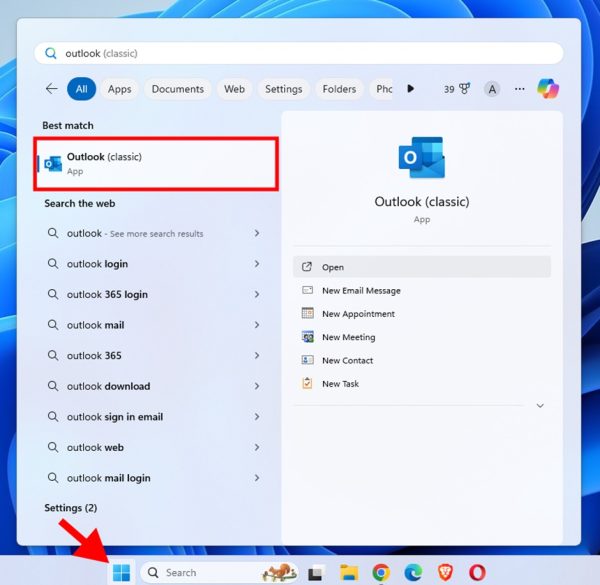
- Click on the Start Menu (the Windows icon in the taskbar) to bring up the main menu. Search “Outlook” and tap on it.
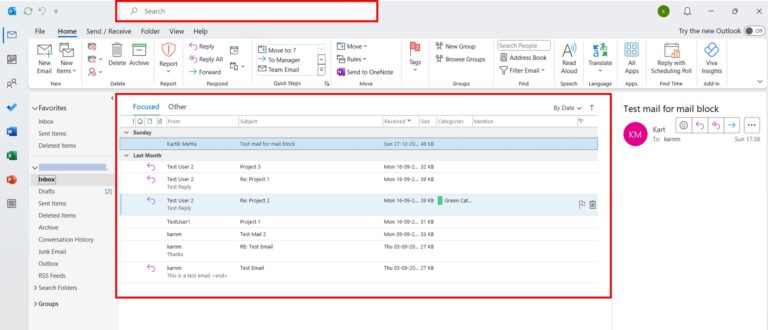
- Once you’re in the app, head straight to your inbox and locate the email from the sender you wish to block. You can scroll through your inbox or use the search bar at the top to quickly find the sender or email in question.
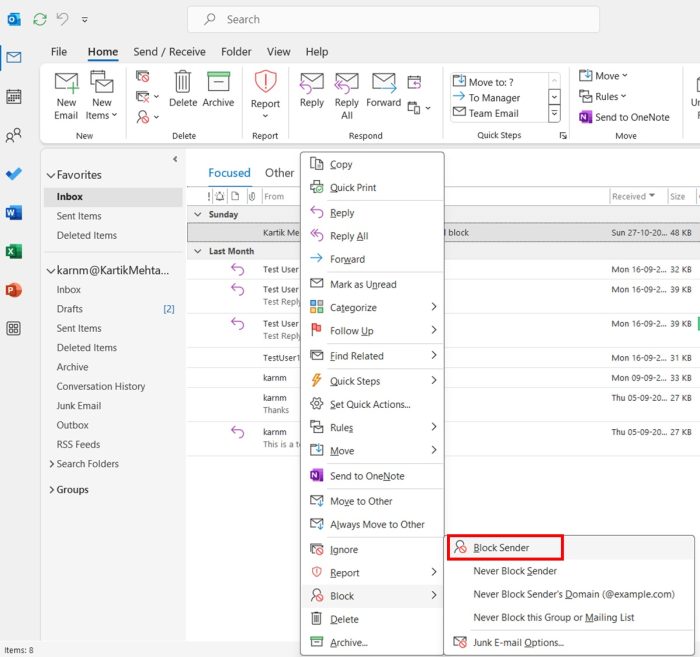
- Now that you’ve found the unwanted email, right-click on it. This will bring up a context menu with various options. From the menu, hover your cursor over the option labeled “Junk.” A submenu will appear that contains several choices.
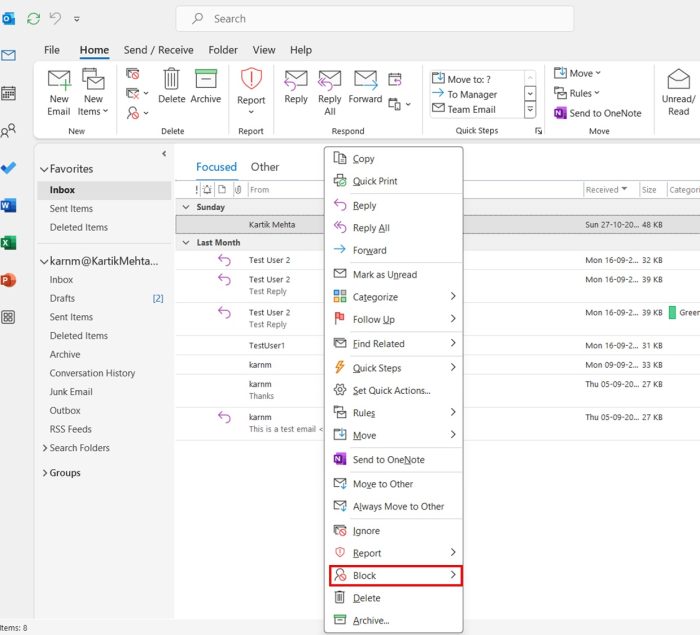
- In the Block submenu, you’ll see an option that says “Block Sender.” Click on this option to proceed.
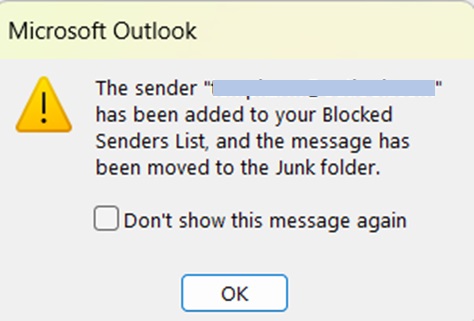
- A confirmation dialog will pop up, asking if you’re sure you want to block the selected sender.
After you click “Block Sender,” the email will immediately be moved to your Junk Email folder, and future emails from this sender will be automatically sent there without ever reaching your inbox.
By following these steps, you can easily block any email address you want, keeping your inbox free of distractions from that particular sender. It’s a fast and simple way to declutter.
Method 2: Creating Rules for Advanced Email Blocking in Outlook
Blocking individual senders works, but if you get a lot of unwanted emails, setting up email rules is more effective. These rules let you automate actions based on conditions like the sender’s address, keywords, or content. For example, you can block all emails from specific addresses or domains or send emails with certain subject words straight to the trash.
- Click on the “File” menu in your Outlook screen’s top-left corner.

- A dropdown menu will appear where you’ll see an option for “Manage Rules & Alerts.”
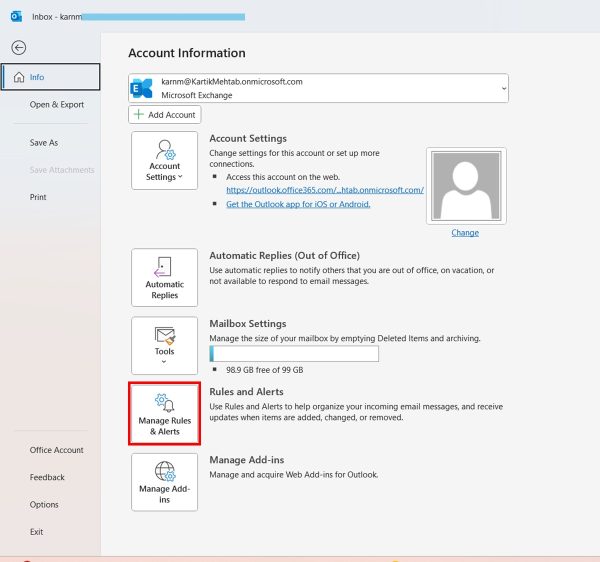
- Click on “Manage Rules & Alerts.” to open the Rules and Alerts window.
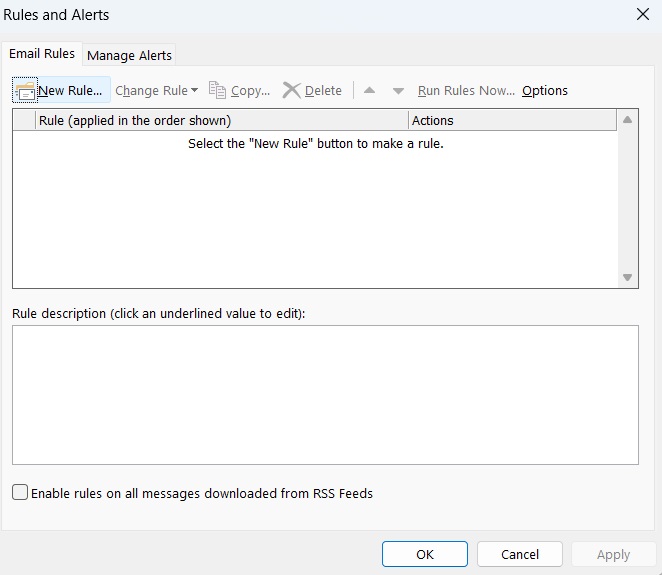
- In the Rules and Alerts window, click on New Rule.

- The Rules Wizard will open, where you can define the criteria for blocking specific emails. Choose “Apply rule on messages I receive” and click “Next.”
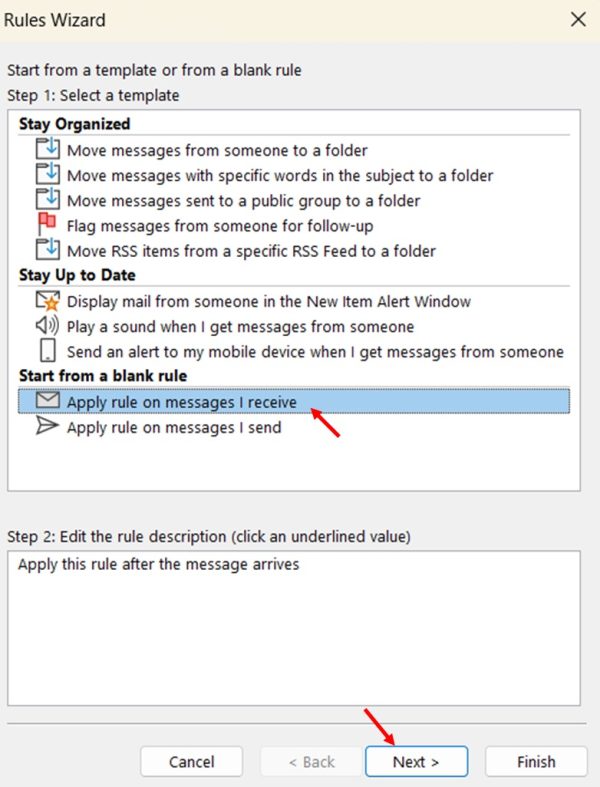
- Select the conditions for your rule. Some useful options include:
- From specific people or public distribution list
- With specific words in the subject or body
- With specific words in the sender’s address
After selecting conditions, click “Next.”
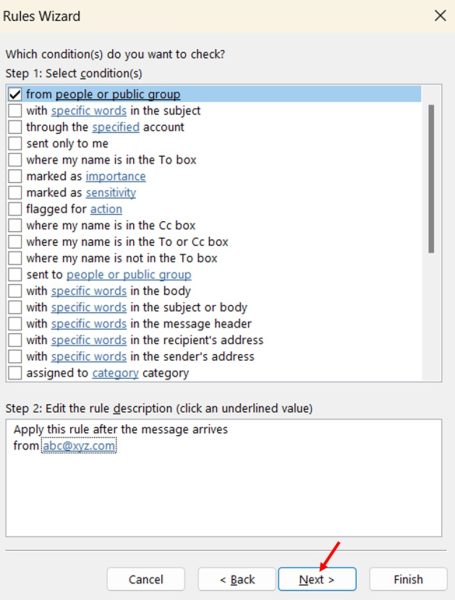
- Choose the action to take. For blocking, common actions are:
- Delete it
- Move it to the Junk E-mail folder
- Move it to a specified folder
And then click “Next”
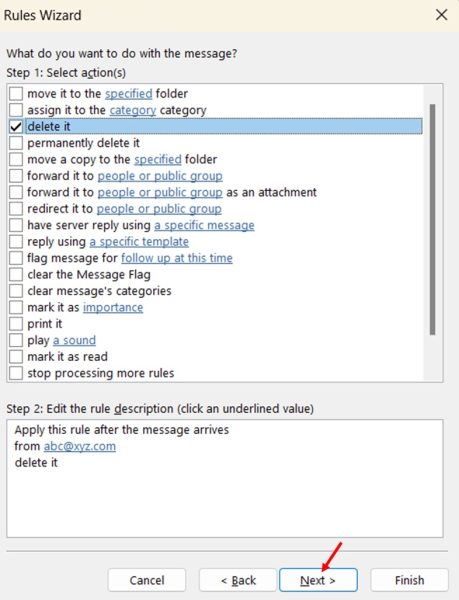
- Add any exceptions if needed.
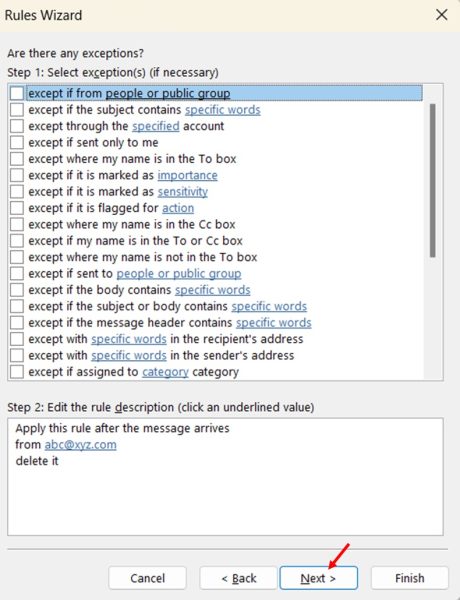
- Name your rule and turn it on. Click “Finish” to create the rule.
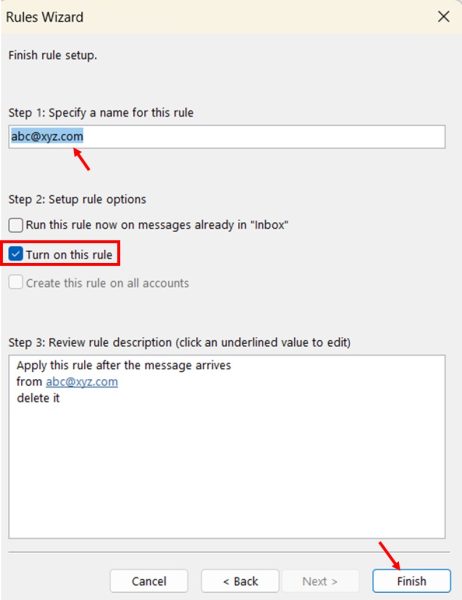
Examples of Advanced Blocking Rules
- Blocking emails containing specific keywords:
- Condition: With specific words in the subject or body (Keywords might include common spam terms or industry-specific jargon)
- Action: Move it to the Junk E-mail folder
- Blocking emails from an entire domain:
- Condition: With specific words in the sender’s address (Enter the domain name e.g., “@spammydomain.com”)
- Action: Delete it
Best Practices for Using Rules
- Start with broader rules and refine them over time.
- Use a combination of conditions for more precise filtering.
- Regularly review and update your rules to ensure they’re still relevant.
- Be cautious with “Delete” actions to avoid accidentally losing important emails.
- Use “Move to folder” actions for emails you want to keep but not in your main inbox.
Limitations and Considerations
- Rules are processed in the order they appear in the Rules Manager.
- Some rules may not work on mobile devices if they require Outlook to be running.
- Complex rules can potentially slow down Outlook’s performance.
- Rules don’t apply retroactively unless you manually run them on existing emails.
Managing Your Blocked Senders List In Outlook Desktop App (Windows)
Effectively managing your blocked senders list is crucial for maintaining control over your inbox. This section will guide users through the process of locating, reviewing, editing, and maintaining their blocked senders list in Outlook.
Locating the Blocked Senders List
- Click on the “Home” tab in the ribbon.

- Select “Block” > “Junk E-mail Options.”
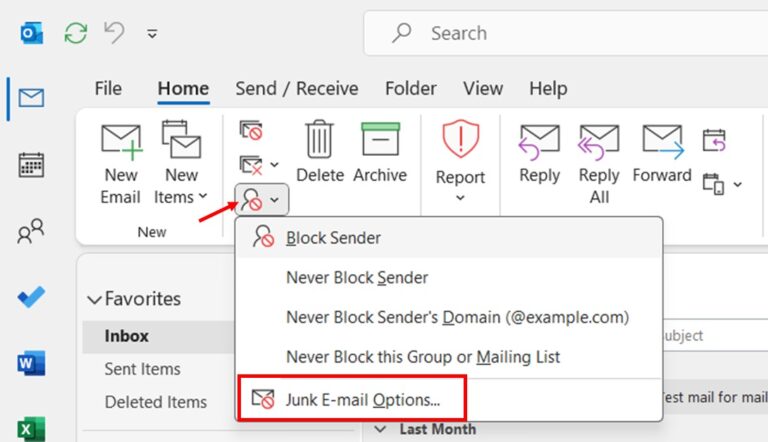
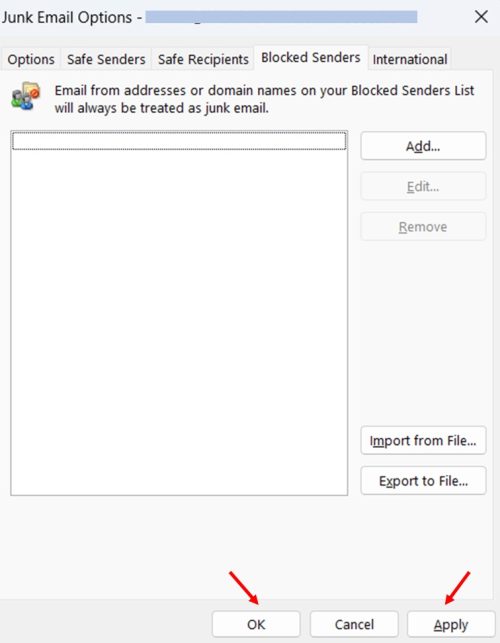
- In the dialog box that appears, click on the “Blocked Senders” tab.
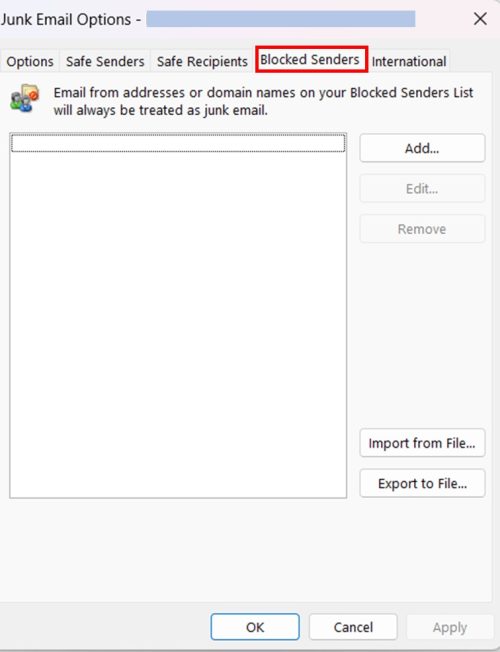
Reviewing Your Blocked Senders
- Once you’ve located the blocked senders list, take time to review it thoroughly.
- Look for any email addresses or domains you may have blocked accidentally.
- Check for outdated blocks that may no longer be necessary.
- Consider categorizing your blocked senders (e.g., spam, former contacts, newsletters) to help with future management.
Adding a New Blocked Sender
- In the blocked senders section, look for an “Add” button.
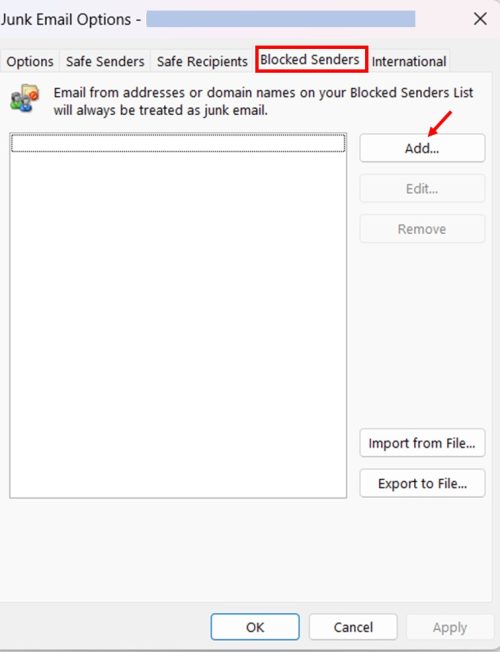
- Click it and enter the email address or domain you want to block.
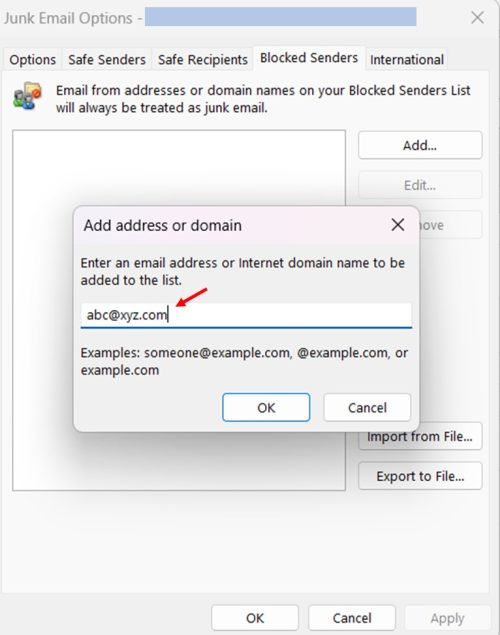
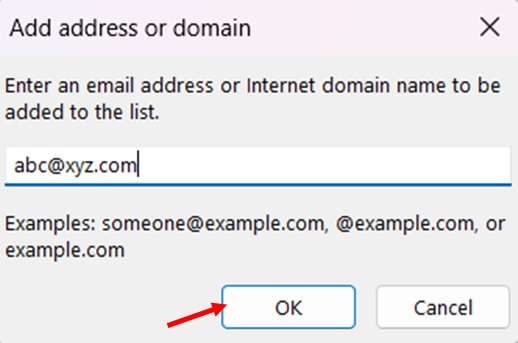
- Click “OK” to add it to your list.
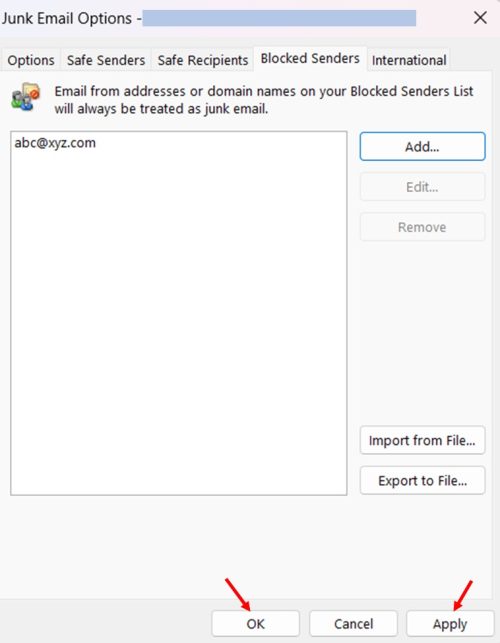
- In Junk Email Options window click “Apply” and then “OK”
Removing a Blocked Sender
- Find the email address or domain you want to unblock in your list.
- Select it and click “Remove” button.
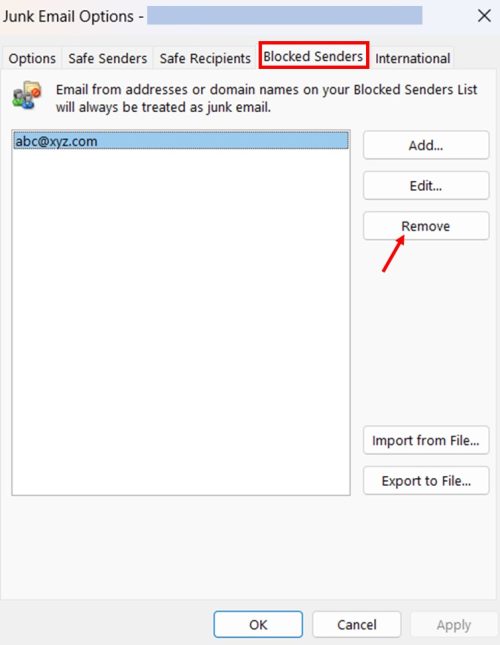
- Confirm the action by clicking “Apply” and then “OK”
Best Practices for Maintaining Your Blocked Senders List
- Regular Review: Set a reminder to review your blocked senders list monthly or quarterly.
- Be Specific: When possible, block specific email addresses rather than entire domains to avoid accidentally blocking legitimate senders.
- Use Temporary Blocks: For senders, you may want to hear from in the future, consider using rules to move their emails to a separate folder instead of blocking them outright.
- Keep Notes: If your version of Outlook allows, add notes to blocked entries to remind yourself why they were blocked.
- Sync Across Devices: Ensure your blocked senders list is synced across all devices where you use Outlook.
- Backup Your List: Periodically export your blocked senders list as a backup.
How to Block an Email Address in Outlook for Mac
Outlook for Mac has features similar to Windows, though some steps may differ. Blocking emails is just as easy, letting you keep unwanted messages out of your inbox.
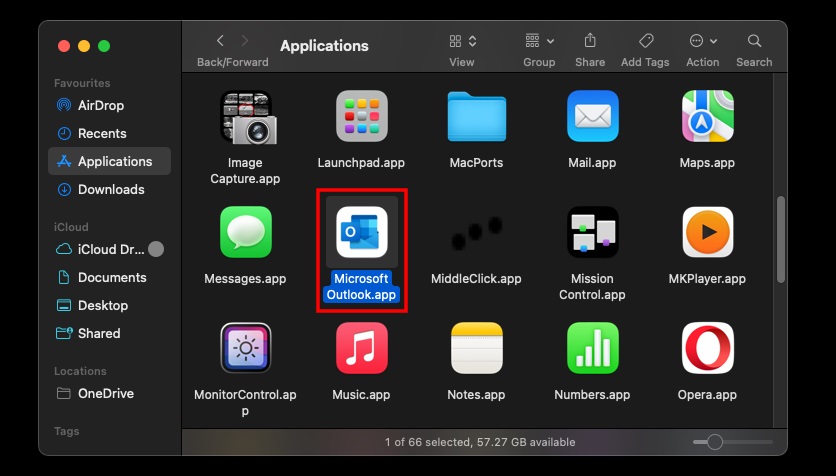
- Begin by launching the Microsoft Outlook application on your Mac. You can do this by either clicking on the Outlook icon in your Dock or finding it through Finder by navigating to your Applications folder.
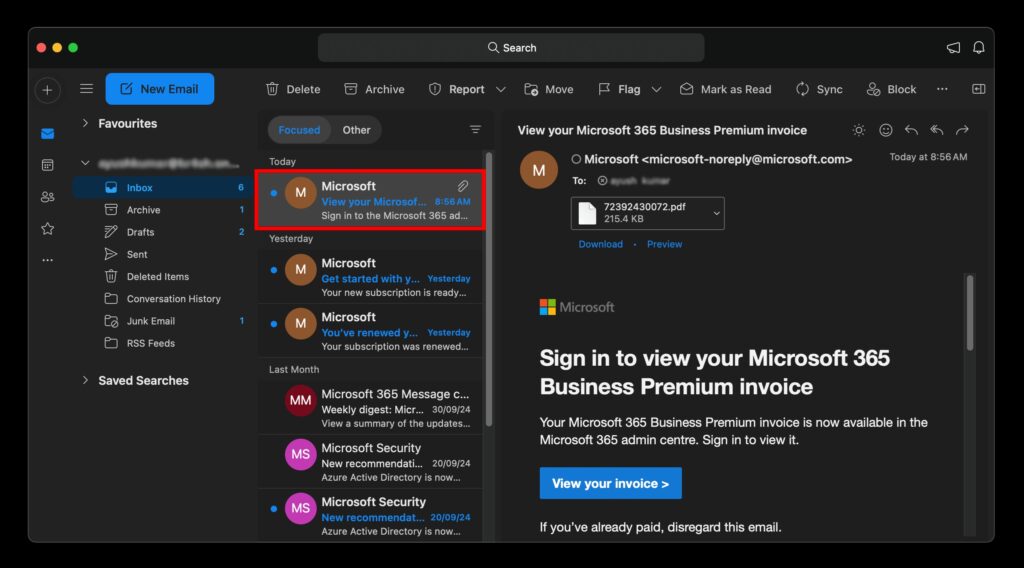
- Once Outlook is open, make sure you are viewing your inbox. You can easily get there by clicking on the “Inbox” folder in the left-hand panel where all your email folders are listed.
In your inbox, locate the email from the sender that you wish to block. Click on that email to select it.
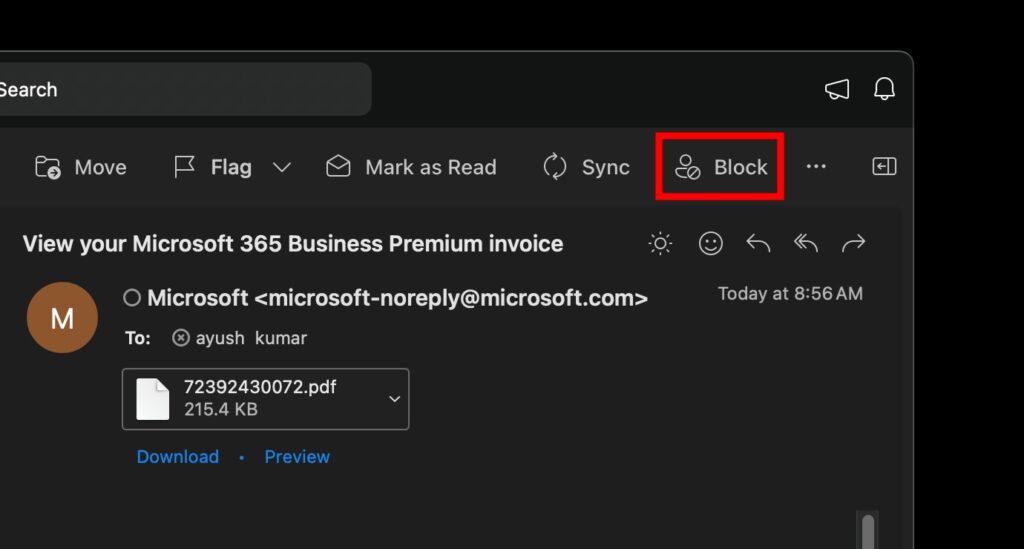
- Now, look at the top of the Outlook window where the menu bar is located. You should see a button labeled Block. Click on this button to block the sender of the selected email.
- After clicking the Block button, Outlook will ask you to confirm whether you want to block this sender. Review the confirmation message and click OK.
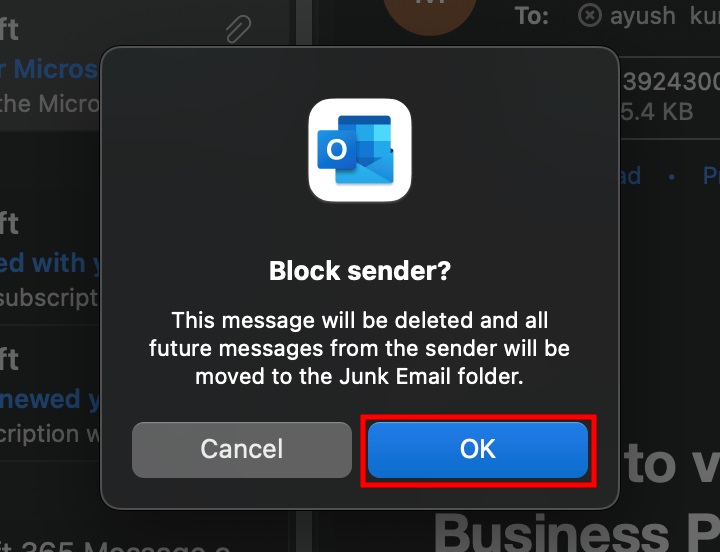
Once you’ve confirmed the Block, the sender will be immediately blocked from sending further emails to your Outlook account. Future emails from this address will be directed to your Junk folder, and you won’t have to see their emails in your main inbox again.
Blocking Emails on Outlook on Web
Outlook Web is great for users who need to check emails on multiple devices. Like the desktop app, it lets you block senders and manage unwanted emails.
Method 1: Block Email address by Selecting a Message From Your Inbox in Outlook on Web
Blocking individual senders works, but blocking an entire domain is more efficient if you’re getting many emails from the same source (e.g., xyz@unwantedmail.com). This helps catch all unwanted messages, especially spam, from companies or harmful sites.
- Start by opening your preferred browser, heading over to the Outlook website, and signing in with your Microsoft account credentials. This will take you to your Outlook inbox.
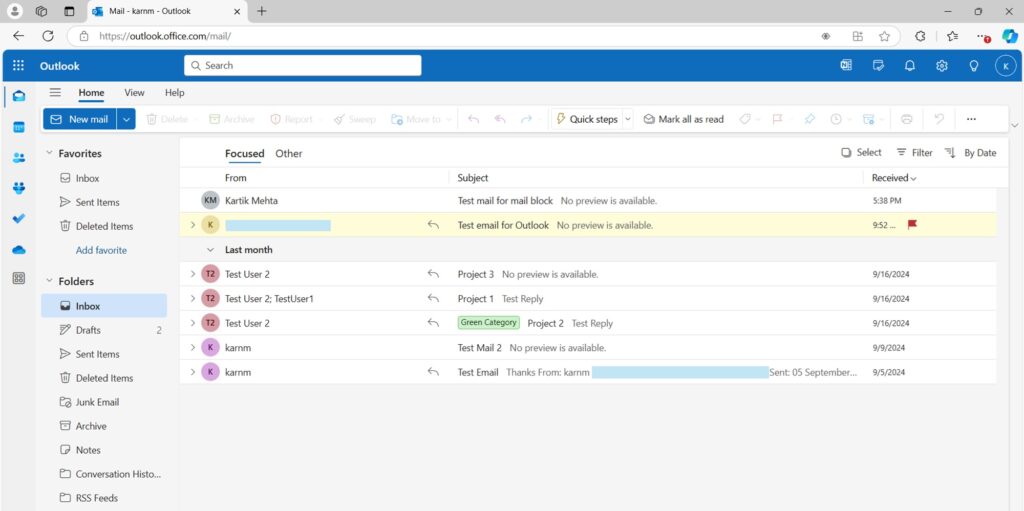
- Now, browse your inbox and find the email you want to block. Click on it to open.
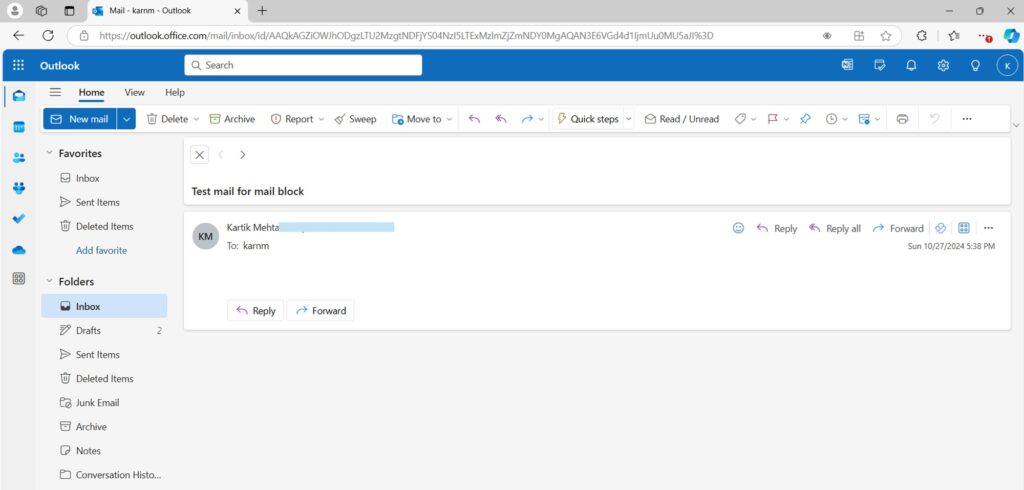
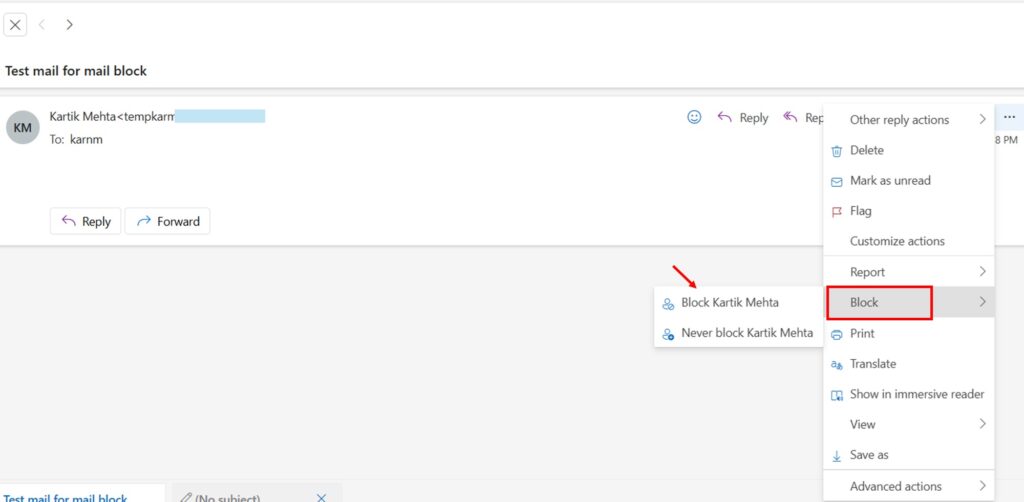
- In the top-right corner of the opened email, you’ll see three horizontal dots. This icon is your options menu. Click on it to open the dropdown menu.

- In the dropdown list, find the “Block” option and then click on Block (User Name). A pop-up message will appear, confirming that you want to block this sender.
- To finalize, click the “OK” button to confirm the block action in the pop-up window. Once confirmed, any future emails from this sender will be automatically moved to your junk folder, ensuring your inbox stays clutter-free.

By following these steps, you won’t have to deal with any further emails from that sender again, and they’ll no longer be able to contact you through Outlook.
Method 2: Using the Sweep Feature to Manage Unwanted Emails
Outlook Web’s Sweep feature helps you quickly manage unwanted emails by deleting or moving all messages from specific senders. It’s a handy way to declutter your inbox without blocking senders one by one.
Here’s how you can use the Sweep feature to block or delete emails from specific senders:
- As usual, navigate to the Outlook website, log in to your account, and head over to your inbox.
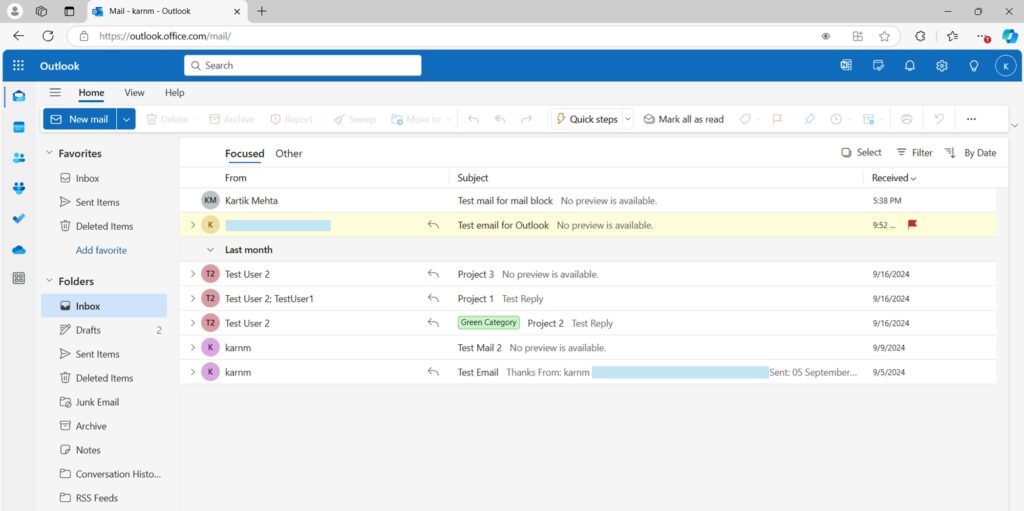
- Find the email you want to block or manage using the Sweep feature. Select it by clicking the checkbox next to it or opening it.
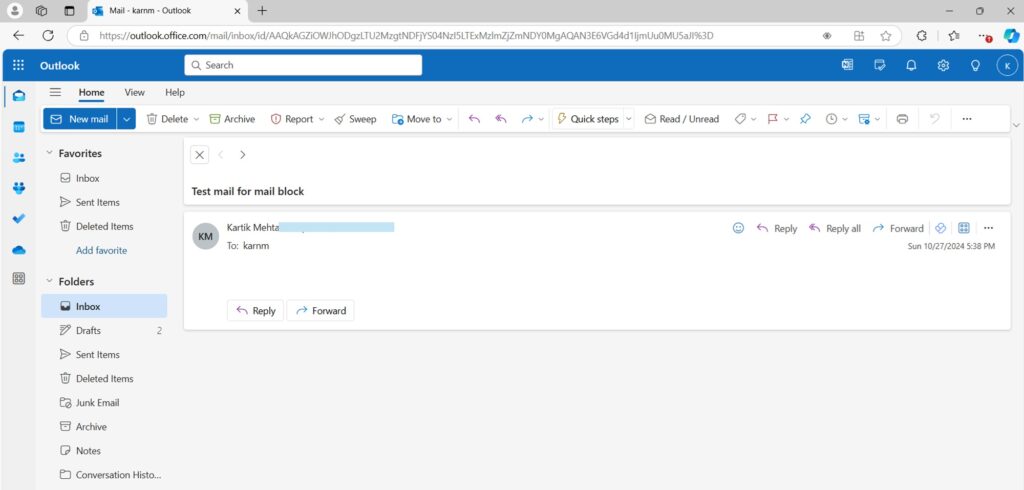
- At the top of your inbox, you’ll see a toolbar with several options. Look for the “Sweep” icon, which looks like a small broom, and click on it.

- When you click on the Sweep icon, a few options will pop up. You can select from:
- Move all messages from the inbox folder
- Move all messages from the inbox folder and any future messages
- Always keep the latest messages and move the rest from the inbox folder
- Always move messages older than 10 days from the inbox folder
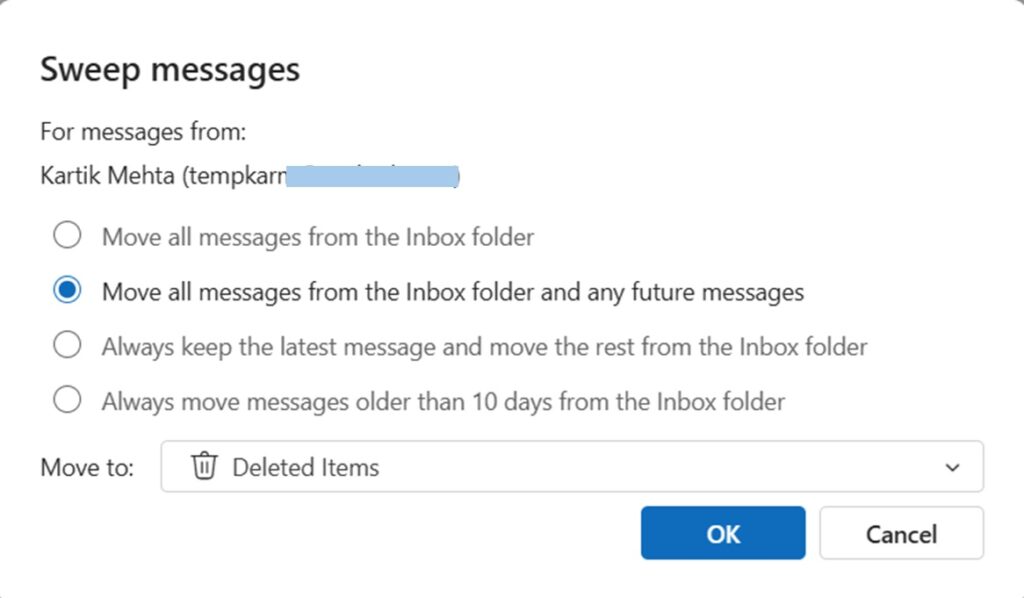
These options let you choose how to manage the emails from this specific sender. If you only want to block future messages, select the second option. Choose the first option if you want to delete all emails from the sender in one go.
- After selecting your preferred action, confirm it by clicking on “OK” or “Apply.” Your emails will be sorted, deleted, or blocked based on your choice.
Using the Sweep feature is great if you’re dealing with senders that have filled your inbox with dozens of messages over time or just want to clean up your inbox with a few simple clicks. It gives you more flexibility than simply blocking an individual sender.
Blocking Emails on Outlook Mobile App on Android
The Outlook mobile app for Android helps you stay organized, but unwanted emails can be a hassle. Luckily, blocking emails is simple and effective. Let’s look at how Android users can take control of their inboxes.
- First, launch the Outlook app on your Android. If you’re already logged in, you’ll see your inbox and recent emails.

- Scroll through your inbox and find an email from the sender you wish to block. Once you’ve found it, tap on the email to open it.
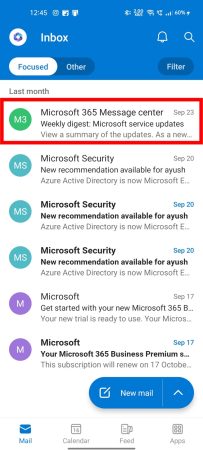
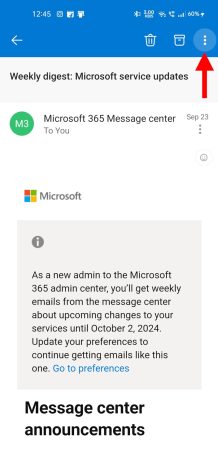
- After opening the email, look for three vertical dots (menu icon) located at the top-right corner of the screen. Tap on these dots to reveal additional options.
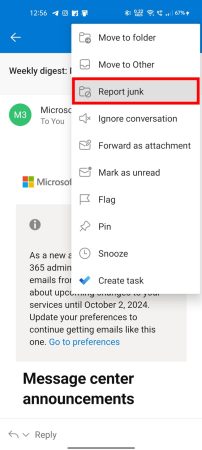
- In the dropdown menu, you’ll see several options for how to handle the email. Look for and tap on ‘Report Junk’. This option allows you to label the email as unwanted or spam.
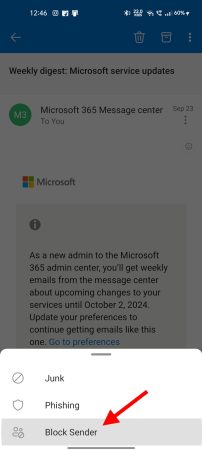
- a new set of options will appear once you select Report Junk. You will typically see choices like “Junk,” “Phishing,” and most importantly, “Block Sender.” Select ‘Block Sender’ to proceed with blocking the sender.
- A confirmation message will pop up, asking you to confirm whether you want to block the sender. The message usually says, “Are you sure you want to block this sender?” To finalize, tap ‘Block Sender’ again, permanently blocking the sender from your Outlook account.
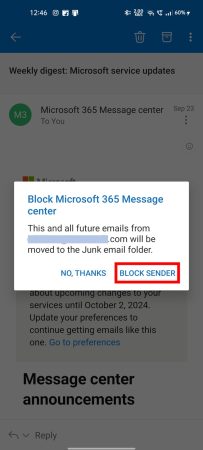
After you block the sender, you won’t receive any future emails from that address in your inbox. Instead, their emails will automatically be moved to your junk folder or completely blocked from reaching you.
Finding and Managing Blocking Options in the Outlook Mobile App
You may also need to customize how Outlook handles unwanted emails or need additional blocking options. Here’s how you can further fine-tune your spam protection and even create custom filters.
- Launch the Outlook app on your device. The interface remains fairly consistent whether you’re using Android, iOS, or any other version.

- Tap on your profile icon in the screen’s upper-left corner. The profile icon looks like either your profile picture or your initials. This will bring up a sidebar with multiple options.
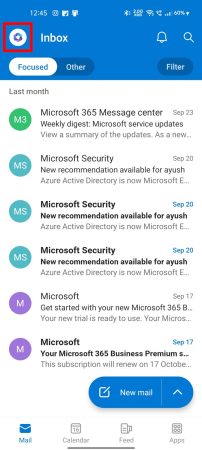
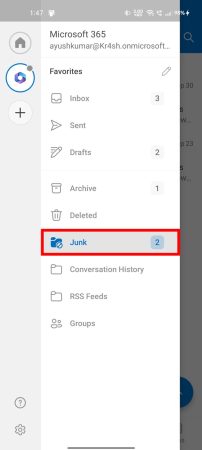
- In the sidebar menu, scroll through the options and look for “Junk”. This is where Outlook collects emails that are flagged as spam or unwanted. Tap on “Junk” to open the section and view all the emails that have been sent to this folder.
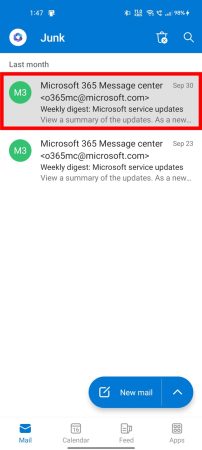
- Inside the Junk section, you’ll see a list of all the emails that have been marked as spam. This could include legitimate emails that have been incorrectly flagged or spam you want to eliminate. If you spot an email you want to restore to your inbox or mark as safe, follow the next steps. Tap on the email in question to open it.
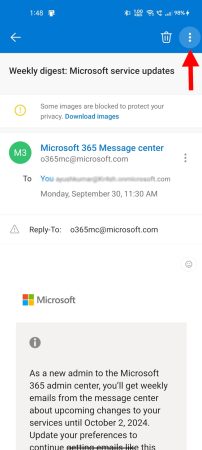
- Once the email is open, locate the three vertical dots (also known as the menu icon) in the top-right corner of the screen. Tapping on this icon will bring up a list of additional options for the selected email.
- From the dropdown menu, you’ll see several options like Move to folder, Report junk, Not junk, and more. If you want to remove the email from the junk section and mark it as safe, tap on “Not junk”. This action moves the email back to your inbox and prevents similar emails from being flagged as spam in the future.
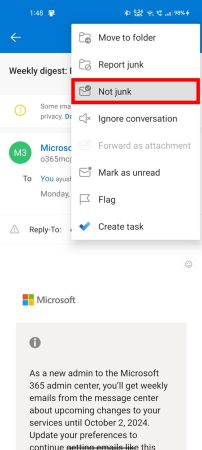
If you’re tired of receiving unwanted emails, you can use options like “Block” or “Report Junk” to permanently stop messages from specific senders. By taking these steps, you can effectively manage your junk email and ensure that only legitimate messages make it to your inbox.
Conclusion
Mastering email blocking in Outlook is a powerful skill for managing the daily influx of messages. This guide has covered the essential steps: blocking individual senders, creating advanced rules, managing blocked lists, and troubleshooting common issues. By implementing these techniques, users can significantly reduce unwanted emails, protect against potential security threats, and maintain a more organized inbox.
However, effective email management extends beyond blocking. Combining these blocking strategies with other Outlook features like Focused Inbox, filters, and categories and adopting good email habits creates a comprehensive approach to email organization. Regular maintenance of blocked lists and rules and periodic review of email practices ensure long-term effectiveness in managing email communication.
Frequently Asked Questions (FAQs)
If you decide to unblock a sender after blocking them, it’s a simple process. Just go to your Junk Mail settings, where you’ll find a list of blocked addresses. Look for the sender you want to unblock, remove their email from the list, and save your changes. Once you do this, their emails will start coming back to your inbox.
No, blocked emails aren’t deleted immediately; they go to your Junk or Spam folder. Based on your settings, they remain there temporarily before being automatically deleted after a specific time. If you prefer to remove them right away, you can manually empty your Junk folder.
Yes, you can block both individual email addresses and entire domains. This is especially useful if you’re receiving spam or unwanted messages from several senders within the same domain, like @xyz.com. To block a domain, just add it to your block list in the Junk Mail settings, and all emails from that domain will automatically go to your Junk folder.
Yes, blocking a sender in Outlook applies to all devices synced with your account. Whether you’re on a desktop, web browser, or mobile device, the blocked sender won’t be able to reach your inbox on any platform.
Outlook doesn’t set a limit on the number of email addresses you can block. You can block as many senders or domains as needed to keep your inbox clean and free from unwanted messages. So go ahead and block every spammer you encounter—there’s plenty of room!
