Let me show you how to change your default browser in Windows 11 and why it matters for a smoother, more personalized computing experience. As someone who’s spent years configuring Windows systems and optimizing browser setups, I can tell you that understanding how to set your preferred browser is one of the most effective ways to personalize your computer for daily productivity.
Whether you’re looking to use your favorite browser for all web activities or configure different browsers for different file types, you’ll find everything in this guide. I’ll walk you through what default browsers mean in Windows 11, step-by-step methods to change default settings, and advanced techniques for customizing your browsing experience.
Looking for the best CPU temperature monitoring tools for Windows 11? Find them all in my comprehensive guide: “How to Check CPU Temperature in Windows 11“
Table of Contents
What is a Default Browser in Windows 11?
Your default browser in Windows 11 is the application that automatically launches whenever you interact with web content on your computer. More specifically, it’s the program Windows designates to handle all web-related files and protocols without requiring you to choose which application to use each time. When you click a link in an email, open an HTML file from your downloads folder, or select a URL in a document, Windows automatically directs that action to your default browser.
This default designation serves as a critical time-saving function in your operating system. Without it, you’d need to manually select which program should open every web element you encounter. The default browser setting creates a seamless experience where your preferred browsing environment is consistently used across your entire system.
In Windows 11, Microsoft Edge is the default pre-configured browser during the initial setup. This means when you first install or upgrade to Windows 11, all web links, HTML files, and other web-related content will automatically open in Edge regardless of any other browsers you may install afterward. Microsoft has profoundly integrated Edge into the Windows 11 experience as part of their unified ecosystem approach, connecting it with other Microsoft services like Bing search, Microsoft account synchronization, and Microsoft 365 applications.
Understanding the default browser concept is essential because it affects virtually every internet-related interaction on your computer. Your choice of default browser influences where you view websites and your overall browsing experience, including performance, security features, extension capabilities, and how your browsing history and preferences are synchronized across devices.
If you’re interested in making your Windows 11 run faster, check out my comprehensive guide on “How to Speed Up Windows 11“
Browser Choice in Windows 11
Windows 11 supports a wide variety of browsers. Each offers distinct advantages that might better suit your specific needs:
Microsoft Edge: In Windows 11, Microsoft Edge serves as the pre-configured default browser during initial setup. Microsoft Edge has evolved dramatically since replacing Internet Explorer. Built on the Chromium engine (the same foundation as Chrome), modern Edge offers excellent performance, compatibility with Chrome extensions, and deep integration with Windows 11. Its standout features include efficiency mode for battery preservation, vertical tabs for better organization, Collections for grouping web content, and a robust PDF reader. Microsoft continues to enhance Edge with AI features like Copilot and emphasizes its security through features like Microsoft Defender SmartScreen.
Google Chrome dominates the global browser market share for a good reason. Its vast extension library, synchronization capabilities across devices, and integration with Google’s services make it appealing to many users. Chrome is particularly strong for those already invested in Google’s ecosystem.
Mozilla Firefox stands out for its focus on privacy and open-source development philosophy. Firefox includes robust tracking protection features, uses less memory than Chrome in many scenarios, and isn’t tied to a tech giant’s ecosystem.
Opera offers unique built-in features like a free VPN, ad blocker, and side panels for messaging apps and music services. It combines these conveniences with good performance.
Brave is designed with privacy as its core principle, automatically blocking trackers and ads while offering cryptocurrency features for those interested in that space.
Vivaldi excels in customization, allowing users to control nearly every aspect of their browsing experience, from tab management to keyboard shortcuts and UI layout.
Method 1: Changing Default Browser Through Windows Settings
Changing your default browser in Windows 11 requires navigating through the system settings. Microsoft has made this process more complex than in previous Windows versions, but with the right guidance, you can complete it successfully in just a few minutes. This method focuses on using the built-in Windows Settings app to change your default browser for all web-related activities.
Accessing the Default Apps Settings
Before diving into the specific steps, it’s important to understand that Windows 11 handles default apps differently from Windows 10. Instead of a simple “set as default” option for browsers, you must change settings for various web-related file types and protocols. Here’s how to navigate to the right place:
- Open the Start menu by clicking the Windows icon in the taskbar or pressing the Windows key on your keyboard. This brings up the central hub for accessing all your applications and settings.
- Click on the Settings icon, which resembles a gear. Alternatively, you can press Windows key + I as a keyboard shortcut to open Settings directly.
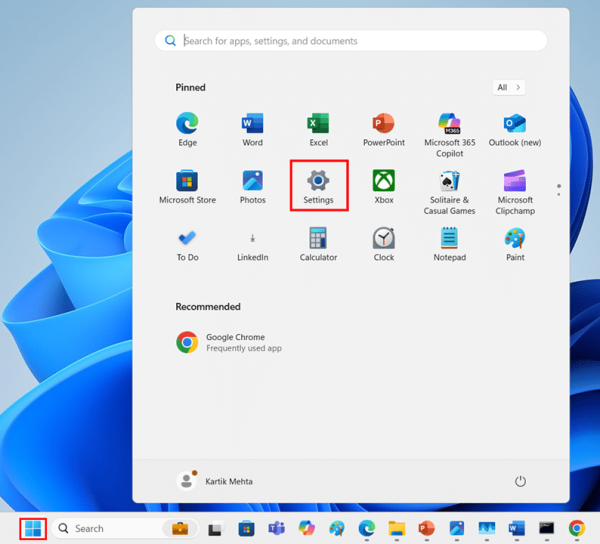
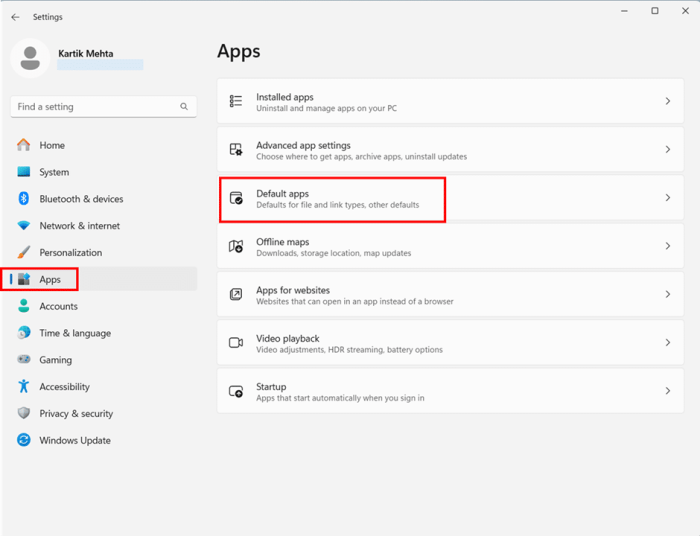
- In the Settings window, look for the Apps section in the left sidebar and click on it. This section contains all settings related to applications installed on your computer.
- Within the Apps menu, find and click on Default apps. This option is usually located about halfway down the right panel and controls which applications open specific file types.
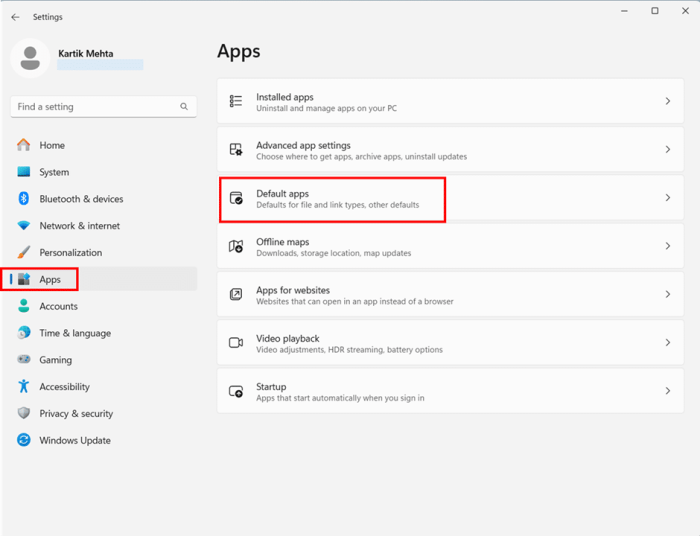
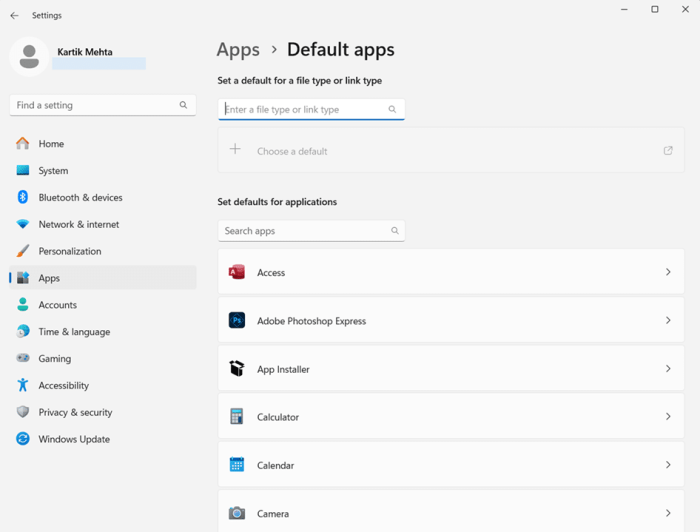
Now, you’re in the right place to begin changing your default browser settings. The screen you’re looking at allows you to set default applications by file type, file extension, or link type.
Setting Your Preferred Browser as Default
There are two main approaches within the Default Apps settings: searching for your browser directly or setting defaults by file type. Let’s start with the more straightforward method:
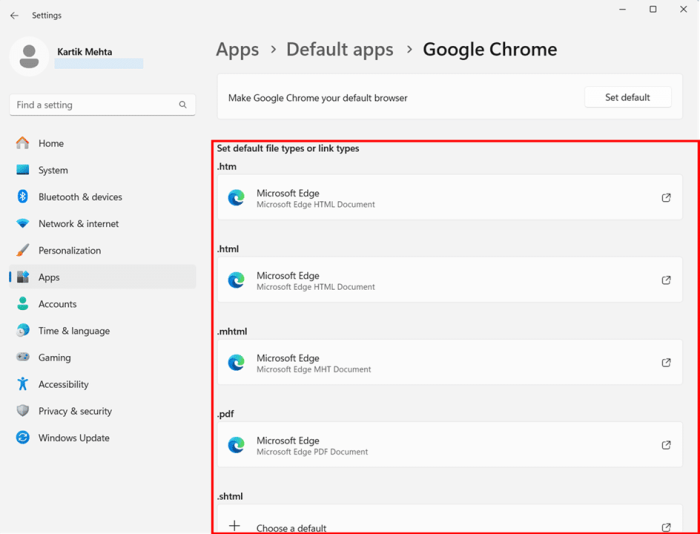
- In the search bar at the top of the Default apps screen, type the name of your preferred browser (e.g., “Chrome,” “Firefox,” or “Opera”). This filters the list to show only your selected browser.
- Click on the browser icon that appears in the search results. This will take you to a screen showing all the file types and link types that your browser can handle.
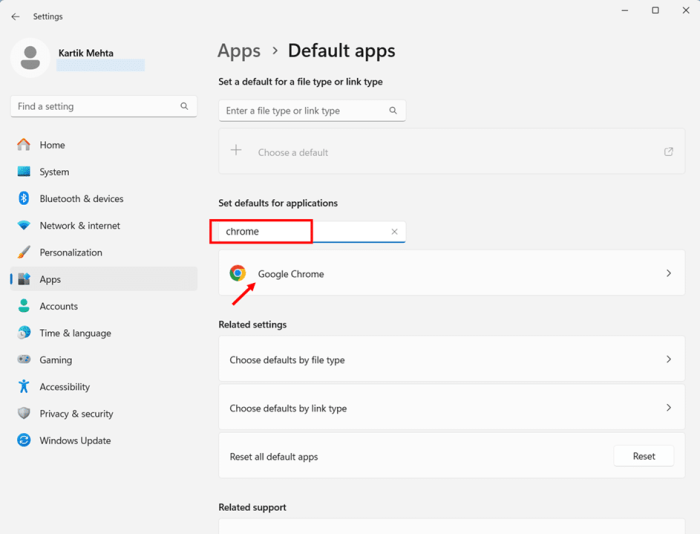
- Scroll through the list of file associations. Depending on your browser’s capabilities, you’ll see items like .HTML, .HTM, HTTP, HTTPS, and possibly PDF. These are the key file types and protocols that need to be assigned to your browser.
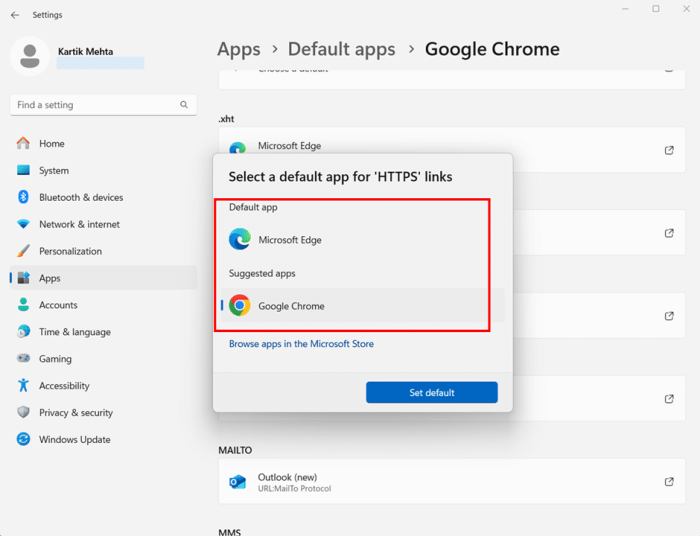
- Click on the current default app icon for each file type or protocol you want to assign to your browser. A small popup window will appear showing current default app and the alternative applications which you selected in suggested app.
- Select your preferred browser in the suggested application and then click Set default.
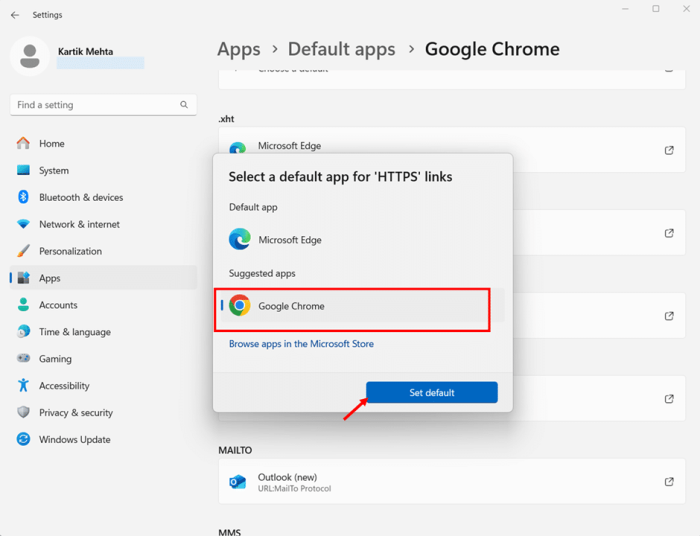
- Repeat steps 3, 4 and 5 for each web-related file type and protocol. The most important ones to change are:
- .HTML and .HTM files (web pages)
- HTTP protocol
- HTTPS protocol
- .PDF files (if you want to view PDFs in your browser)
- .SHTML files
- .XHTML files
- .FTP protocol (if you use FTP links)
This process may feel tedious, but it ensures that your preferred browser handles all web-related content correctly.
Verifying Your Changes
After setting your preferred browser for all relevant file types and protocols, it’s important to verify that the changes have taken effect:
- Close all Settings windows by clicking the X in the top-right corner of each window. This ensures that all changes are saved.
- Find any web link in an application outside your browser—for example, in an email, a document, or a chat program. A good test is to click on a hyperlink in a text document or email message.
- Click on the link and observe which browser opens. If your preferred browser launches, congratulations! Your default browser has been successfully changed.
If Microsoft Edge or another browser still opens instead of your preferred choice, you may have missed some file types or protocols. Return to the Default apps settings and double-check that all web-related file types are assigned to your preferred browser.
Method 2: Changing Default Browser for Specific File Types
Windows 11 offers a unique way to customize your browsing experience by allowing you to set different browsers for different file types and protocols. This approach gives you more granular control than simply setting one browser for everything. You might prefer using Chrome for general web browsing, Edge for PDFs, Firefox for secure sites, and Opera for media-heavy websites. This method walks you through the process of customizing these file-type associations to create a browsing experience tailored precisely to your needs.
Understanding File Type Associations in Windows 11
Before diving into the steps, it’s important to understand how Windows 11 handles web content. Rather than treating all web-related content as belonging to a single application, Windows breaks it down into individual file types and protocols:
- HTML/HTM files: Standard web pages saved to your computer
- HTTP/HTTPS protocols: Secure and unsecured web links
- PDF documents: Portable Document Format files
- SVG files: Scalable Vector Graphics used on websites
- FTP links: File Transfer Protocol links for downloading files
- WEBP images: Modern web image format
Different applications can handle each of these if you choose. This level of customization isn’t available on many other operating systems and represents an advanced way to optimize your browsing experience.
Accessing the File Type Association Settings
Let’s start by learning how to access the specific settings for file type associations:
- Click on the Start menu in the taskbar or press the Windows key on your keyboard to bring up the Start screen.
- Select the Settings app, which appears as a gear icon. Alternatively, press the Windows key + I as a keyboard shortcut to open Settings directly.
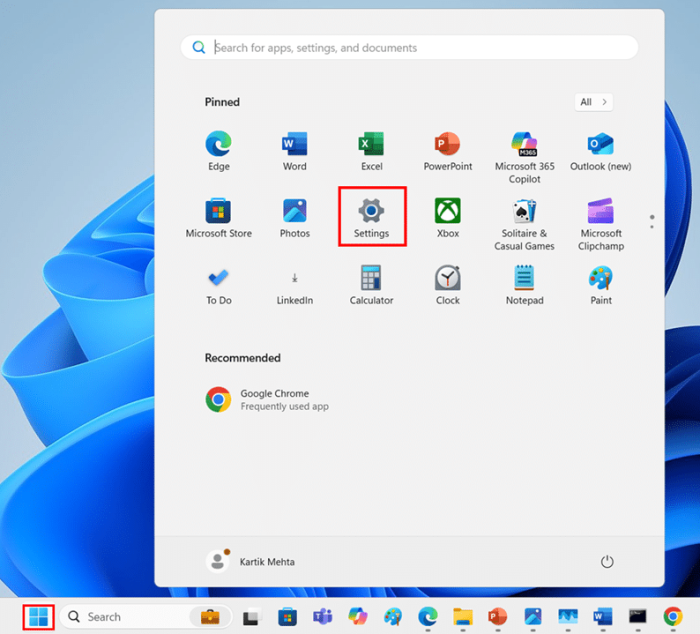
- In the Settings window, look for and click on Apps in the left sidebar. This section contains all application-related settings.
- Within the Apps menu, locate and click on Default Apps. This is where Windows 11 stores all file type association settings.
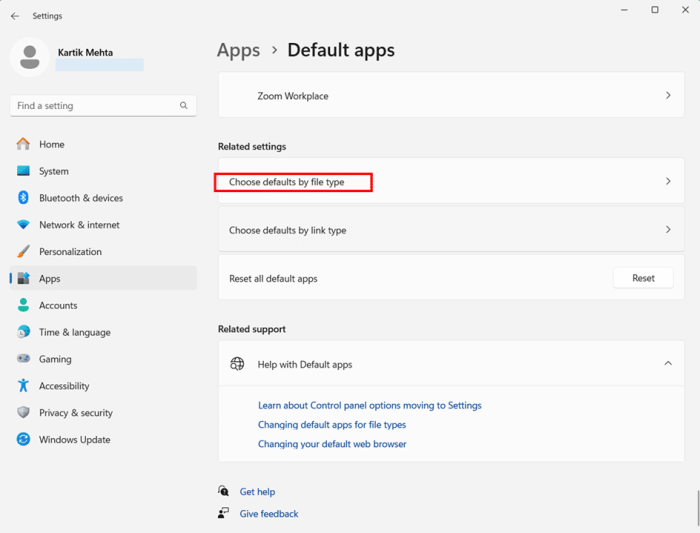
- Scroll down to the bottom of the Default apps screen and find the option labeled “Choose defaults by file type.” Click on this option to see the comprehensive list of file types.
- Set default for file types window will be displayed.
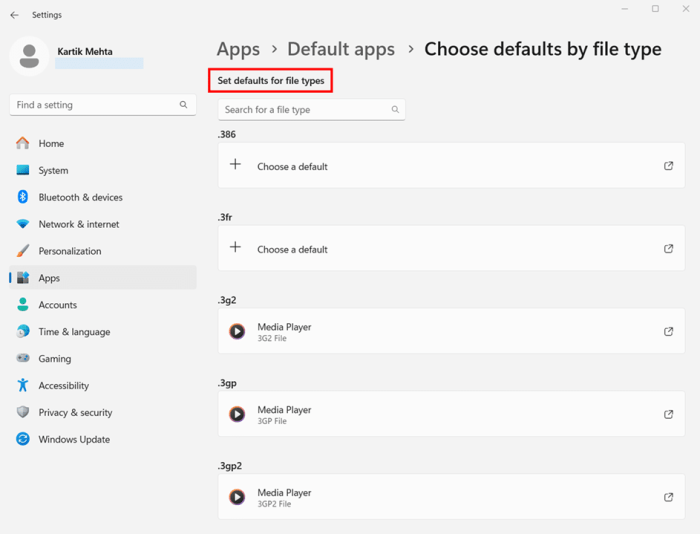
You’ve now reached the screen where you can set specific browsers for individual file types. The interface shows an alphabetical list of all file extensions registered on your system and the currently assigned application for each.
Setting Browsers for Specific File Types
Now, let’s assign different browsers to specific file types. We’ll work through several common web-related file types:
For HTML Web Pages:
- In the file type list, scroll down or use the search box to find .html and .htm file extensions or search for it. These represent web pages saved to your computer.
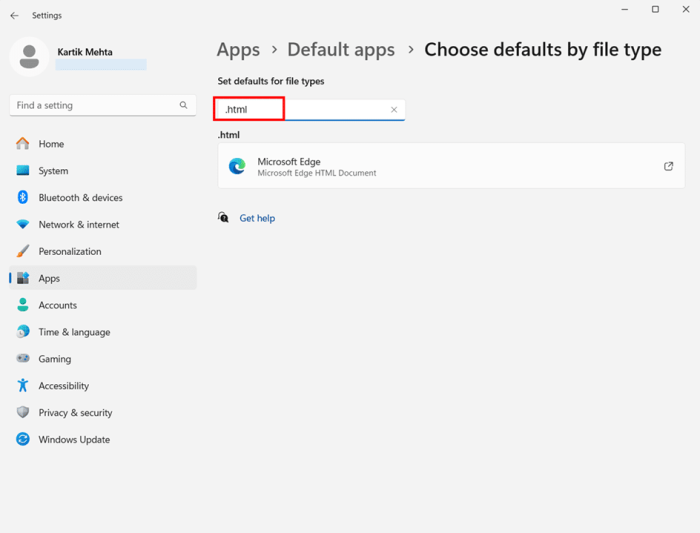
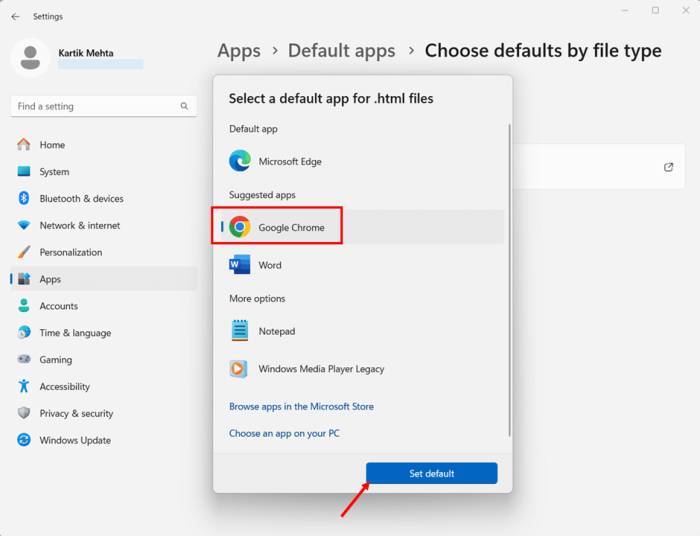
- Click on the current application shown next to the .html file type. A popup window will appear showing available applications.
- Select your preferred browser for viewing regular web pages from the list. For example, choose Google Chrome if you want to use Chrome for most general web browsing. Then click on Set default
For PDF Documents:
- Find the .pdf file type in the list. This controls which application opens PDF documents when clicked.
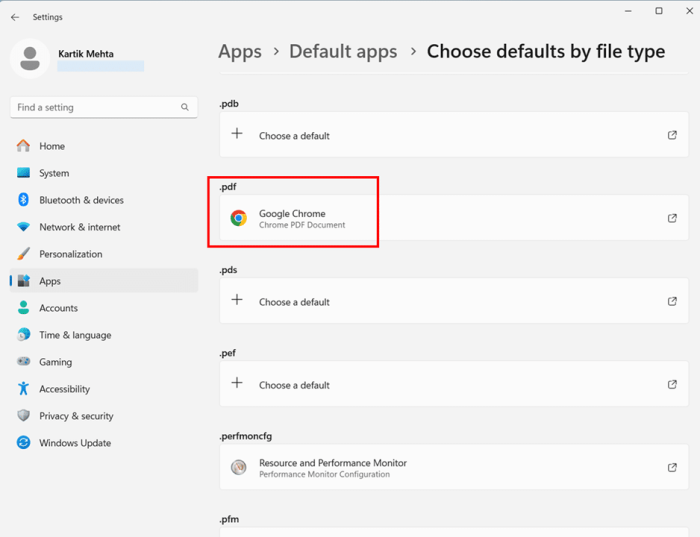
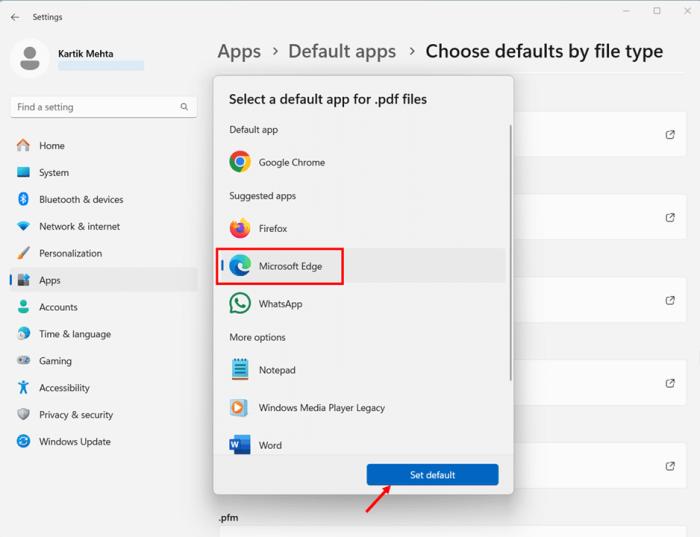
- Click on the current default application shown for PDF files. The selection window will appear with available PDF readers.
- Select Microsoft Edge if you prefer its PDF reader capabilities, or choose another browser or dedicated PDF application based on your preference.
Managing Your Multi-Browser Setup
Once you’ve set up different browsers for different file types, you’ll need to maintain this configuration:
- Create a note or document listing which browsers you’ve assigned to which file types. This reference helps you remember your custom setup.
- After Windows updates, check your file associations by returning to Settings > Apps > Default apps > Choose defaults by file type. Updates occasionally reset these settings.
- When installing new browsers or updating existing ones, decline their offers to become the default for all web content if you want to maintain your custom configuration.
Method 3: Changing Default Browser Using Link Types
Windows 11 offers a dedicated approach for setting default applications based on link types rather than file extensions. This method is significant for web browsers because it controls how protocols like HTTP and HTTPS are handled. These protocols determine which application opens when you click links in emails, documents, or other applications. Setting your preferred browser as the default for these protocols ensures web links consistently open in your chosen browser.
Accessing the Default Link Types Settings
- Open the Start menu by clicking the Windows icon in the taskbar or pressing the Windows key on your keyboard.
- Click on the Settings app (gear icon) or use the keyboard shortcut Windows key + I to open Settings directly.
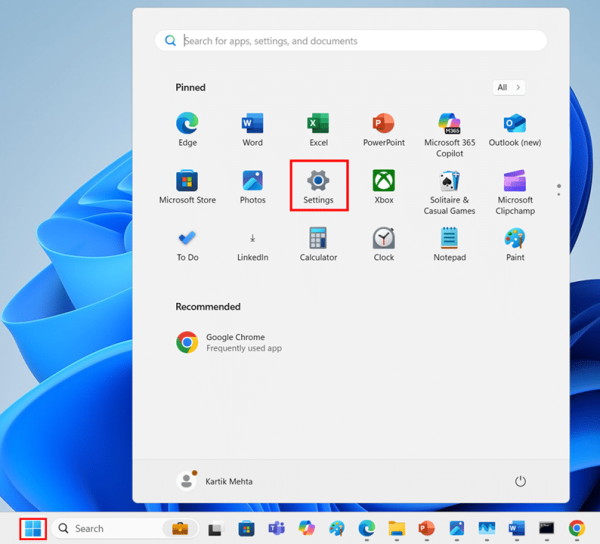
- In the Settings window, select Apps from the left sidebar to access application-related settings.
- Click on Default apps in the right pane to view and modify your default application assignments.
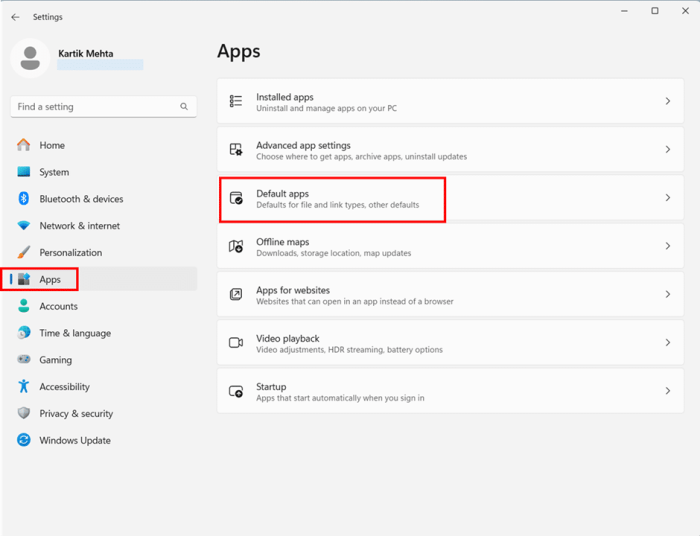
- Scroll down to the bottom of the Default apps screen and look for “Choose defaults by link type.” Click on this option to proceed.

- Set default for file link types window will be displayed
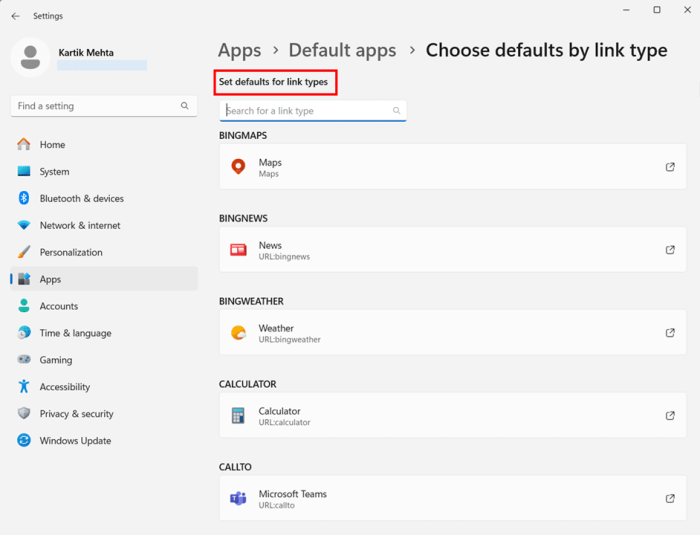
Setting Your Preferred Browser for Web Protocols
- Once the link types screen loads, scroll down or use the search function to locate the HTTP protocol in the alphabetical list. This protocol handles standard web links.
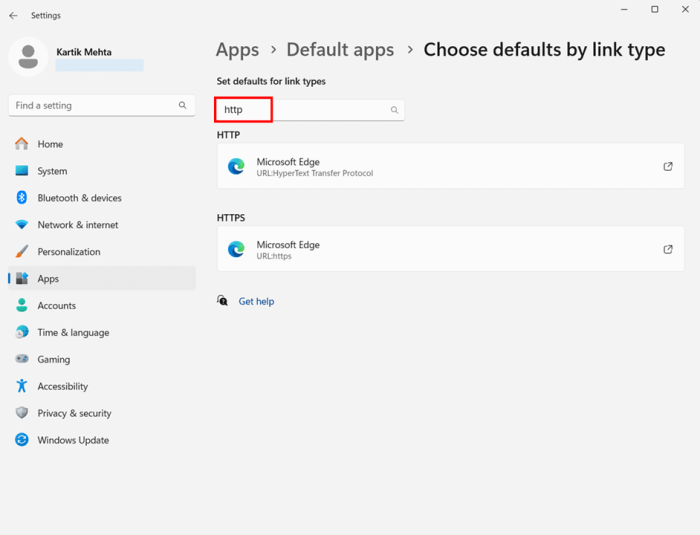
- Click on the application currently set as default for HTTP. A popup window will appear showing available browsers and applications.
- Select your preferred browser from the Suggested apps. If your required browser is not there then, click on “Browse apps in the Microsoft Store” to install required browser. Once the required Browser is selected then click on Set default
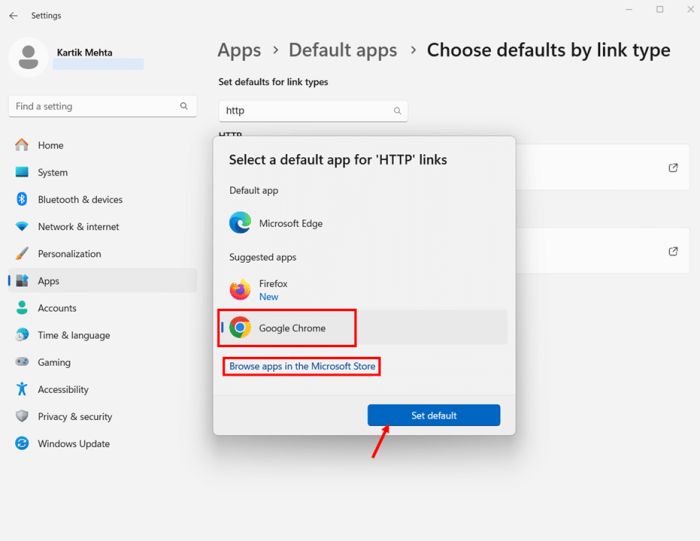
- Once select preferred Browser for HTTP, the same browser will be set default for HTTPS and vice versa
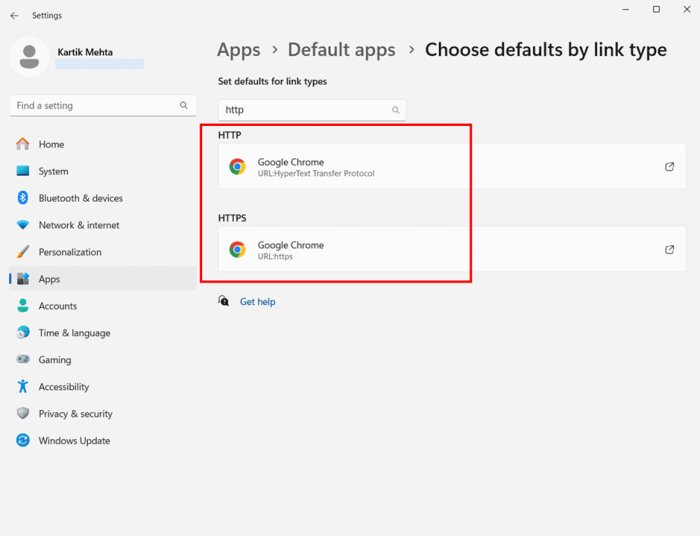
- For complete web protocol coverage, also locate and change these additional protocols if they appear in your list:
- HTTP-alt: Alternative HTTP connections
- HTTPS-alt: Alternative secure connections
- MAILTO: Email links
- WEBCAL: Calendar links
- FTP: File Transfer Protocol links
Conclusion
You now have multiple effective methods to change your default browser in Windows 11. Understanding what a default browser is and how Windows 11 handles web-related file types and protocols gives you the foundation to make informed choices about your browsing experience.
I recommend starting with Method 1 (Windows Settings) for a straightforward approach that works for most situations. Method 2 lets you assign specific browsers to different file types for more granular control, while Method 3 ensures all web links open in your preferred browser by directly managing protocol associations. Remember to verify your changes by testing links in different applications, and check your settings after major Windows updates, as they sometimes reset preferences.
If you want to understand what is Windows 11 startup folder and how to manage the Windows 11 startup applications you can checkout my Essential guide on Windows 11 Startup Folder
Frequently Asked Questions (FAQs)
Microsoft changed the default apps system in Windows 11 to a more granular, file-by-file approach. Instead of setting one browser as the default for all web activities, you must assign a browser to each file type and protocol individually. This design change makes the process more complex but also enables the file-specific customization.
Yes! Method 2 explains how to assign specific browsers to different file types. This allows you to use one browser for general web browsing and others for specific formats or protocols. Many users choose this approach to leverage different browsers’ strengths—using Edge for PDFs, Firefox for secure sites, or Chrome for web applications.
Yes, most major browsers like Chrome, Firefox, and Opera have built-in options to help you set them as default. These are typically found in their settings menus under “Default Browser” sections. When you click these options, they’ll direct you to the Windows Settings app, where you’ll still need to confirm your choice according to Windows 11’s requirements.
No, changing your default browser doesn’t change the search engine used by the Windows 11 taskbar search or widgets. Microsoft has designed these features to use Bing and open results in Edge regardless of your default browser settings. Some third-party tools can modify this behavior, but they’re separate from regular default browser settings.
Yes, but browser defaults are set per user account in Windows 11. Changing the default browser on your user account won’t affect other user accounts on the same computer. Users must set their browser preferences when logging into their account.
