Let me show you how to delete pages in Microsoft Word and why it matters for creating professional, polished documents. As someone who’s spent years creating and editing documents for businesses and publications, I can tell you that understanding page management in Word is one of the most effective ways to maintain control over your document’s appearance and structure.
Whether you’re looking to remove frustrating blank pages, delete content-filled pages without disrupting formatting, you’ll find everything in this guide. I’ll walk you through understanding page breaks and document structure, using the Navigation Pane for targeted page removal, utilizing keyboard shortcuts for efficiency, and managing section breaks that often cause the most stubborn page issues. By the end of this guide, you’ll have all the tools you need to take complete control of your Word documents and make unwanted pages disappear for good.
Looking to speed up your document editing? check out my comprehensive guide on using Microsoft Word Find and Replace
Table of Contents
Common Causes of Unwanted Pages
Understanding why unwanted pages appear helps you target the right solution:
Hidden Paragraph Marks
Even “empty” pages usually contain invisible elements like paragraph marks (¶) or section breaks. These hidden characters take up space and can force Word to create an additional page.
Improper Section Breaks
If you’ve inserted a Next Page, Even Page, or Odd Page section break, Word automatically creates a new page—even if you didn’t intend to.
Table Formatting Issues
Tables that split across pages can sometimes create strange pagination issues, especially if they have specific row properties set.
Page Setup and Margins
Sometimes your margin settings, paper size, or other page setup options force content onto additional pages, particularly when they don’t align with your content volume.
Headers and Footers
Large headers or footers can consume enough vertical space to push your content onto additional pages.
How to Reveal Hidden Formatting
Before attempting to delete any page, it’s crucial to see all the hidden formatting marks that might be causing the issue:
- Find the Home tab on the Word ribbon at the top of your screen. Click on this tab to access formatting options.
- Look for the Show/Hide button (represented by the ¶ symbol) in the Paragraph group. Click this button to toggle the display of formatting marks.
When you enable this feature, you’ll suddenly see all the hidden characters in your document:
- Paragraph marks (¶) appear at the end of paragraphs
- Small dots appear between words, representing spaces
- Section breaks are labeled clearly (e.g., “Section Break (Next Page)”)
- Manual page breaks are marked with a dotted line labeled “Page Break”
This visibility gives you the power to identify precisely what’s causing your unwanted page and which deletion method will be most effective.
Method 1: Delete a Blank Page by Removing Paragarph Mark
Blank pages at the end of a document are among the most common and frustrating issues in Microsoft Word. These pages often appear mysteriously and seem to resist simple deletion attempts. This section will guide you through effective methods to remove these stubborn blank pages once and for all.
Understanding Why Blank End Pages Exist
Before attempting to delete a blank page at the end of your document, it helps to understand why it’s there in the first place. Typically, these pages exist because of:
- Extra paragraph marks (¶) that push content onto a new page
- Unexpected section breaks
- Manual page breaks, you may have forgotten
- Specific page layout settings that create additional pages
The key to effectively removing these pages is to identify the underlying cause and address it directly.
Removing the paragraph mark to delete Blank end Pages
The simplest approach often works for basic blank page issues:
- Navigate to the View tab on the ribbon at the top of your screen. Locate and click the Show/Hide button (¶ symbol) in the Paragraph group to display all formatting marks.

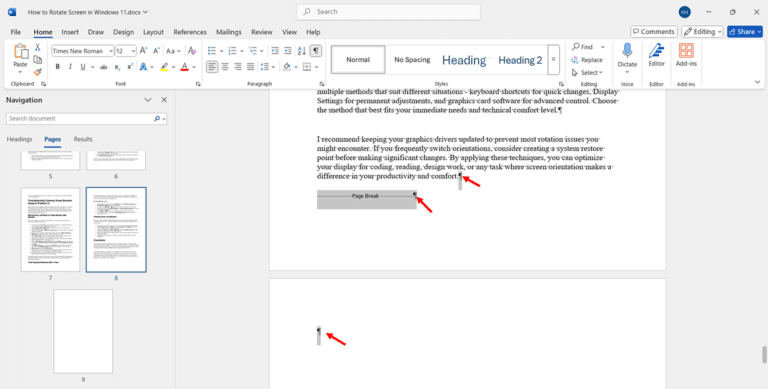
- Scroll to the blank page at the end of your document. Look for paragraph marks (¶), page breaks, or section breaks that may be causing the extra page.
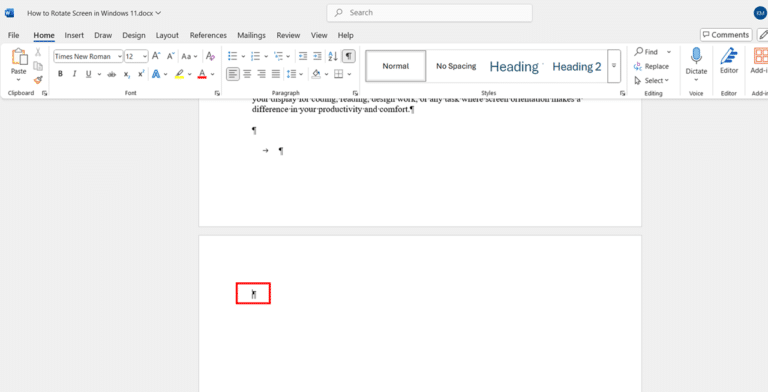
- Select all the paragraph marks or other formatting elements on the blank page by clicking and dragging your cursor over them.
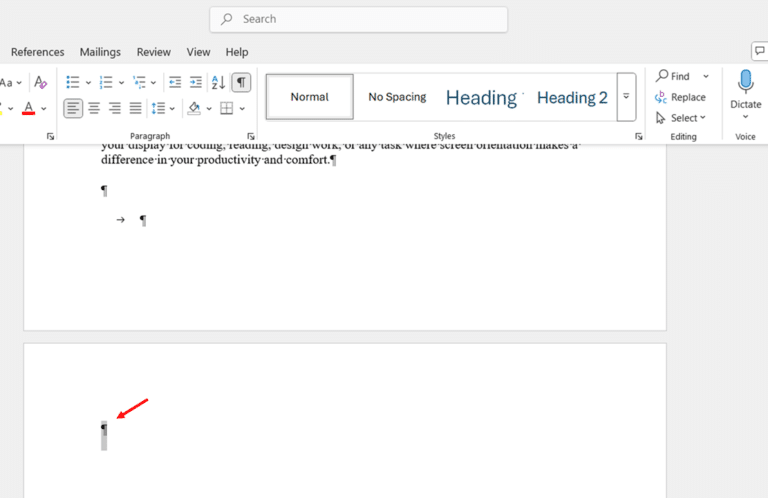
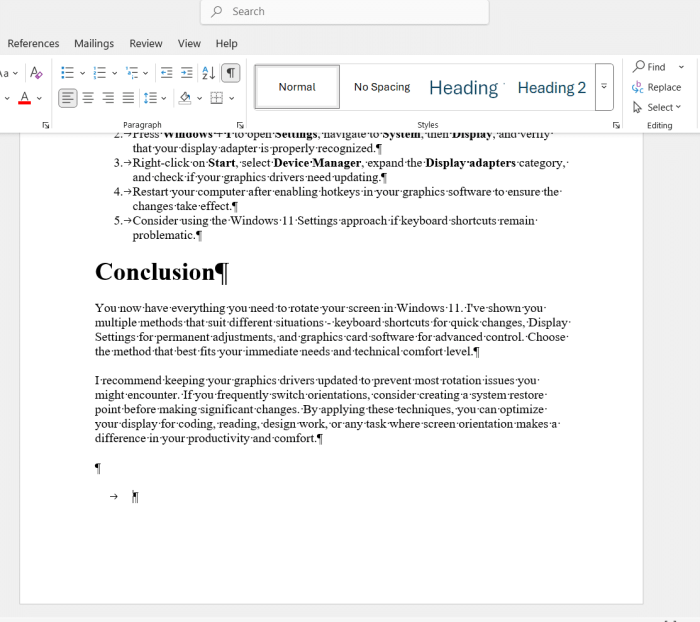
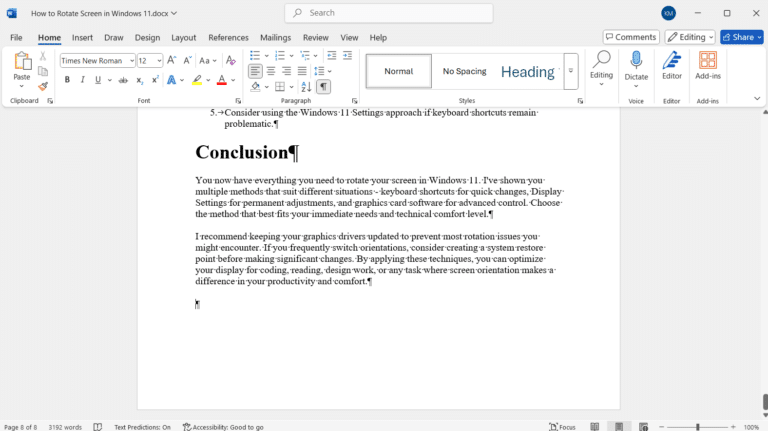
- Press the Delete key or the Backspace key on your keyboard to remove these elements. This should eliminate the blank page if it was caused by excessive paragraph marks.
Method 2: Delete a Blank Page by Removing Page Breaks
If your blank page is caused by a page break:
- Go to the View tab on the Word ribbon and click the Show/Hide button (¶ symbol) to reveal all formatting marks.

- Scroll to the blank page and look for text that says “Page Break”
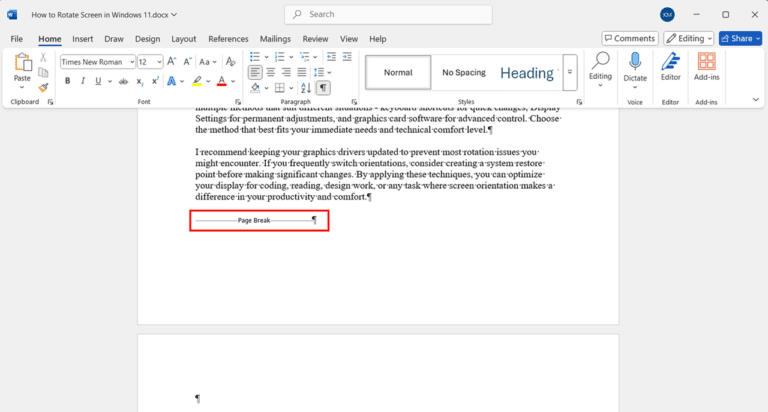
- Select all the page break line
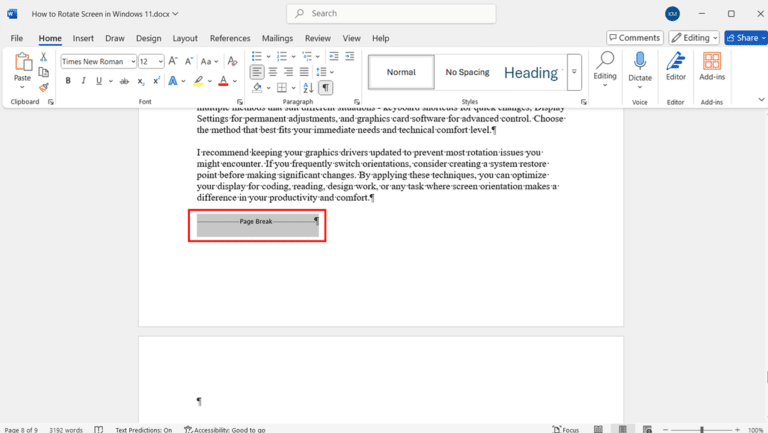
- Press the Delete key on your keyboard to remove the section break.
- Check your document’s formatting after removing the break to ensure everything looks correct. You may need to reapply some formatting settings.
Method 3: Removing Section Breaks to delete Blank end Pages
Section breaks and special formatting often create some of the most stubborn unwanted pages in Microsoft Word. These elements can be particularly challenging because they control not just where pages begin and end but also the underlying structure of your document. This section will guide you through identifying and safely removing these formatting elements to eliminate problematic pages while preserving your document’s integrity.
Understanding Section Breaks in Word
Section breaks are powerful formatting tools that divide your document into sections with different layouts and formatting. However, they can also cause unwanted pages that seem impossible to delete through standard methods.
Types of Section Breaks
Before attempting to remove section breaks, it’s important to understand the different types:
- Next Page Section Breaks: Force the next section to begin on a new page
- Continuous Section Breaks: Allow a new section to begin on the same page
- Even Page Section Breaks: Force the next section to begin on the next even-numbered page
- Odd Page Section Breaks: Force the next section to begin on the next odd-numbered page
Even and Odd Page section breaks are particularly notorious for creating blank pages that appear to serve no purpose but are actually enforcing the page numbering requirement.
Identifying Section Breaks in Your Document
- Navigate to the Home tab on the Word ribbon at the top of your screen. Look for the Show/Hide button (¶ symbol) in the Paragraph group.

- Click the Show/Hide button to display all formatting marks in your document. This makes section breaks visible as double dotted lines with text identifying the type of break.
- Scroll through your document to locate any section breaks, paying particular attention to the areas before unwanted pages. Section breaks will be clearly labeled with text such as “Section Break (Next Page)” or “Section Break (Continuous).”
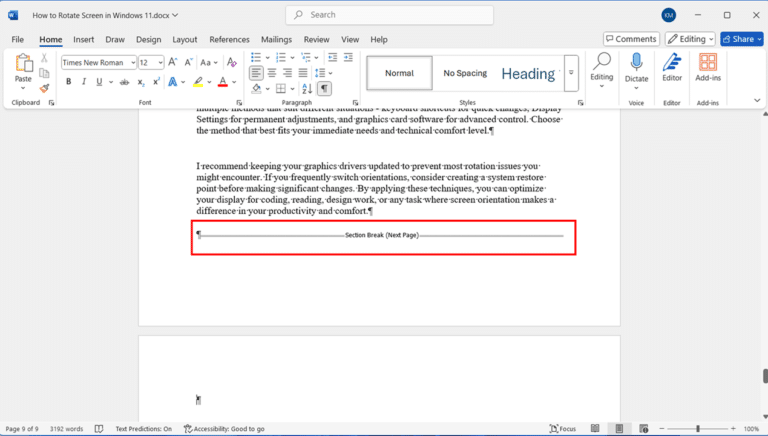
- Examine the positioning of these breaks to determine if they might be causing your unwanted page issue. Section breaks that precede blank pages are likely the culprit.
- Before deleting any section break, take note of any special formatting in each section, as removing the break may affect formatting.
Safely Removing Section Breaks
- Click directly on the section break you want to remove. Position your cursor just before or on the section break line so that it becomes selected.
- Press the Delete key on your keyboard to remove the selected section break. Watch carefully to see how this affects your document’s pagination.
- Check your document’s formatting immediately after removing a section break. When you delete a section break, the text before the break acquires the formatting of the text after the break.
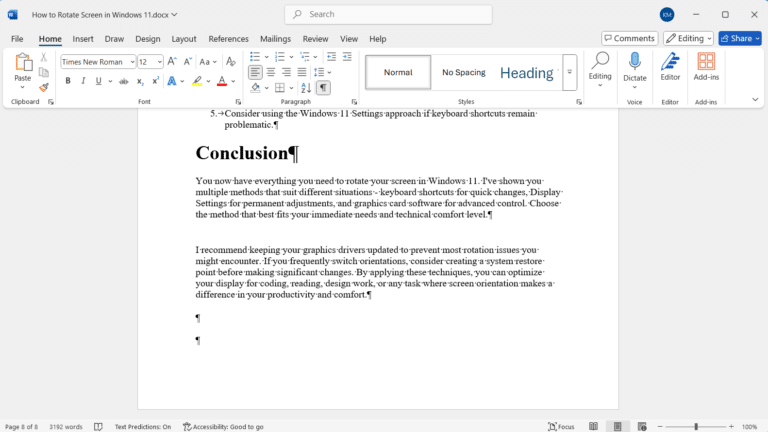
- Review any headers, footers, margins, or page orientation settings that might have changed after removing the section break. These may need to be adjusted manually.
- Save your document by clicking File, then Save, or pressing Ctrl+S on your keyboard to preserve your changes.
Method 4: Remove a Page Using the Navigation Pane
The Navigation Pane in Microsoft Word is a powerful but often overlooked tool that can make deleting specific pages much easier, especially in longer documents. This method is particularly useful when you need to remove a page from the middle of your document or when you want to target a specific page without scrolling through your entire document.
Why Use the Navigation Pane Method
The Navigation Pane method offers several advantages:
- You can quickly jump to any page in your document
- It provides a visual thumbnail of each page
- You can select and delete content from specific pages without affecting others
- It works well for documents of any length
- It’s ideal for removing pages that contain content (not just blank pages)
Opening the Navigation Pane
- Look for the View tab on the Word ribbon at the top of your screen. Click on this tab to access view options.
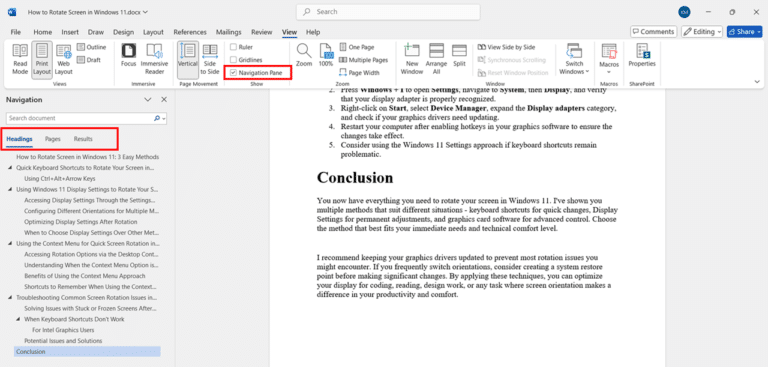
- Find the Show group in the View tab ribbon. Look for the checkbox labeled Navigation Pane and click it to activate the feature.
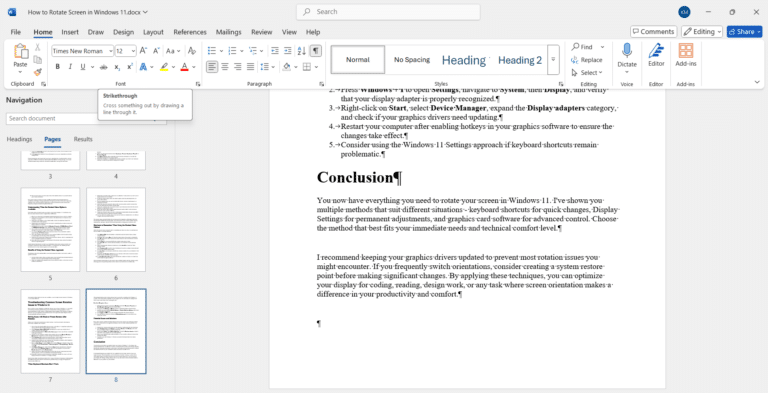
- Observe the Navigation Pane that appears on the left side of your Word window. This pane contains three tabs at the top: Headings, Pages, and Results.
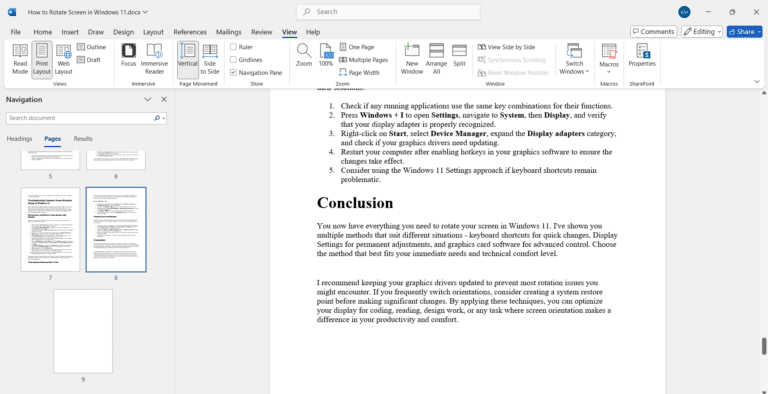
- Click on the Pages tab in the Navigation Pane. This will display thumbnail images of all pages in your document.
Locating and Deleting a Specific Page
- Scroll through the page thumbnails in the Navigation Pane until you find the page you want to delete. Click on the thumbnail to navigate directly to that page in your document.
- Look for the Show/Hide button (¶ symbol) in the Home tab if formatting marks aren’t visible. Click this button to display all formatting marks.
- Examine the page content carefully to determine what needs to be removed. Look for any section breaks, page breaks, or other formatting elements that might be creating the page.
- Select all content on the page you want to delete by clicking and dragging your cursor from the beginning to the end of the page content. Alternatively, place your cursor at the beginning of the page, hold down the Shift key, and then click at the end of the content you want to remove.
- Press the Delete key on your keyboard to remove the selected content. Check if the page has been successfully deleted from your document.
- Review your document to ensure that the deletion hasn’t affected the formatting or layout of other pages. Make any necessary adjustments to maintain the flow and appearance of your document.
When to Use This Method
The Navigation Pane method is most effective when:
- You need to delete a specific page in a multi-page document
- The page you want to delete contains content (not just blank space)
- You’re dealing with a lengthy document and need to quickly navigate to a particular page
- You need to find and remove specific formatting elements like page breaks or section breaks
- You want a visual way to manage your document’s pages
Method 5: Delete a Page Using Keyboard Shortcuts
Keyboard shortcuts provide one of the fastest and most efficient ways to delete pages in Microsoft Word. Whether you’re a casual user or a power user, mastering these shortcuts can significantly speed up your document editing process and help you quickly eliminate unwanted pages without reaching for your mouse.
Why Keyboard Shortcuts Are Valuable
Learning keyboard shortcuts offers several advantages:
- They provide much faster execution than using menus or the mouse
- They help maintain your workflow without interruption
- They work consistently across different versions of Word
- They allow for precise selection and deletion
- They can be combined in sequences for complex operations
Essential Keyboard Shortcuts for Page Deletion in Microsoft Word
Selecting an Entire Page
Before you can delete a page, you need to select its contents efficiently:
- Navigate to the beginning of the page you want to delete. Place your cursor at the very start of the page content.
- Hold down the Ctrl key on your keyboard and press the Down Arrow key to move to the beginning of the next paragraph. This helps ensure you’re at a proper starting point.
- Press and hold the Shift key on your keyboard. While holding Shift, press Ctrl+End to select from your current position to the end of the document or Ctrl+Page Down to select the end of the current page.
- Release all keys and check that you’ve selected exactly the content you want to delete. Adjust your selection if necessary by holding Shift and using the arrow keys.
- Press the Delete key on your keyboard to remove all selected content from your document.
Quick Deletion of a Blank Page
For a blank page caused by extra paragraph marks:
- Navigate to the blank page you want to delete by using the Page Down key or Ctrl+Page Down keyboard shortcut.
- Press Ctrl+End to move your cursor to the end of all document content. This allows you to see the paragraph marks or other elements causing the blank page.
- Press Backspace on your keyboard repeatedly to remove paragraph marks (¶) and other formatting elements until the blank page disappears.
- Check the document pagination to confirm the blank page has been successfully removed without affecting other content.
- Save your document by pressing Ctrl+S to preserve your changes.
Removing a Page Break in Microsoft Word
If your unwanted page is caused by a manual page break:
- Enable the display of formatting marks by pressing Ctrl+Shift+8 (or Ctrl+* on some keyboards). This allows you to see all hidden formatting elements.
- Locate the page break, which appears as a dotted line with “Page Break” text in the document.
- Click once to position your cursor just before the page break mark in your document.
- Press Delete on your keyboard to remove the page break. The content after the break should now flow continuously with the preceding content.
- Verify that the page has been properly removed and that your document flows as expected.
Delete Content and Maintain Document Structure
For deleting a page while preserving document formatting:
- Position your cursor at the beginning of the content you want to delete on the page. You can use Ctrl+Home to go to the document beginning, then use Page Down to reach your target page.
- Hold down the Shift key on your keyboard and use the arrow keys or mouse to select precisely the content you want to remove. Use Shift+Ctrl+Down Arrow to select whole paragraphs at a time for larger selections.
- Press Ctrl+X to cut the selected content (instead of Delete). This removes the content but places it in your clipboard in case you need to paste it elsewhere.
- Review your document to ensure the page has been removed and the flow of content makes sense. Make any additional adjustments as needed.
- Save your document by pressing Ctrl+S to preserve your changes.
Keyboard Shortcut Reference Table
Here’s a quick reference table of the most useful keyboard shortcuts for page deletion:
Operation | Windows Shortcut | Mac Shortcut |
Show/Hide formatting marks | Ctrl+Shift+8 | Cmd+8 |
Go to a specific page | F5 | Fn+F5 |
Select all content | Ctrl+A | Cmd+A |
Select the end of the document | Shift+Ctrl+End | Shift+Cmd+Down Arrow |
Select the end of the page | (Custom) | (Custom) |
Delete selected content | Delete | Delete |
Cut selected content | Ctrl+X | Cmd+X |
Undo the last action | Ctrl+Z | Cmd+Z |
Common Mistakes to Avoid while Using Keybord Shortcuts to Delete Page in Microsoft Word
- Always verify your selection before pressing Delete. Look for the highlighted text to confirm exactly what will be removed.
- Remember that Ctrl+A selects the entire document. Only use this if you intend to remove all content, which is rarely the case when deleting a single page.
- Use Ctrl+Z immediately if you accidentally delete more content than intended. This keyboard shortcut undoes your last action.
- Save your document (Ctrl+S) before attempting major deletions, creating a recovery point if needed.
- Consider using Ctrl+X (cut) instead of Delete when you’re unsure, as this preserves the content in the clipboard in case you need to restore it.
When to Use Keyboard Shortcut Method for Deleting Pages in Microsoft Word
Keyboard shortcuts are most effective when:
- You work on Word documents frequently and value efficiency
- You’re comfortable with memorizing and using keyboard commands
- You need to perform repeated deletion operations quickly
- You want to maintain your workflow without switching between keyboard and mouse
- You’re working with relatively simple document structures
By mastering these keyboard shortcuts, you’ll be able to delete pages in Word much more efficiently, saving time and reducing frustration when managing your documents.
Conclusion
Now, you have all the tools and techniques to delete any unwanted page in Microsoft Word. I’ve shown you five effective approaches: Removing the paragraph mark to handle complex section breaks. Remember that the best method depends on the specific situation you’re facing—some page issues require simple solutions like backspacing through paragraph marks, while others need more advanced section formatting management.
I encourage you to practice these techniques on your own documents. The more you work with Word’s page management features, the more intuitive they’ll become. Soon, you’ll be able to quickly identify what’s causing unwanted pages and apply the right fix without hesitation. Your documents will look more professional, and you’ll save time and frustration when preparing important work. Take control of your Word documents today; those annoying extra pages will never slow you down again.
Frequently Asked Questions (FAQs)
Blank pages at the end of documents typically occur because of hidden paragraph marks (¶) or section breaks. First, make these visible by clicking the Show/Hide button (¶) on the Home tab. Once visible, you’ll likely see multiple paragraph marks or a section break causing the extra page. Click directly on these marks and press Delete. If multiple paragraph marks exist, delete them one by one until the page disappears. For section breaks, be aware that removing them may affect document formatting since the preceding section will inherit the formatting of the following section.
To delete a middle page efficiently, use the Navigation Pane by going to the View tab and checking the Navigation Pane box. Click the Pages tab in this pane to see thumbnails of all pages. Click the page you want to delete to navigate directly to it. Once there, carefully select all content on that page by clicking and dragging or using Ctrl+A if focusing only on that page. Press Delete to remove the selected content. If the page contains section breaks, you’ll see them as dotted lines with text identifying the break type. Select and delete these separately. After deletion, check that your document flows properly and that no formatting issues were created.
Deleting a page removes visual content and/or the space occupied by a page in your document while deleting a section removes a structural element that controls formatting. Pages are purely visual divisions based on content volume and page setup settings. Sections are structural divisions that can each have unique formatting for margins, orientation, columns, headers/footers, and page numbering. When you delete a page that contains content but no section breaks, you’re simply removing that content. When you delete a section break, you’re merging two sections and applying the second section’s formatting to the first section’s content. This distinction is crucial—if you delete a section break to eliminate a page, be prepared for potential formatting changes throughout what was previously the first section.
Yes, but you need to be selective about what you delete. First, understand what’s causing the page to exist. Use the Show/Hide button to reveal formatting marks. If deleting content only, select just that content without including section breaks or special formatting marks. For pages caused by formatting issues rather than content, adjust the specific formatting element—like margins, paragraph spacing, or page breaks—rather than trying to delete the “page” itself. When dealing with sections, remember that each section can have unique formatting for margins, orientation, columns, and headers/footers. Deleting a section break combines two sections and applies the formatting of the latter section to the former.
The fastest method depends on the page type. For content-filled pages, use keyboard shortcuts: navigate to the beginning of the page, press Shift+Ctrl+Down Arrow repeatedly to select all content on the page (or Shift+Page Down), then press Delete. Alternatively, use the Navigation Pane to jump directly to the page, then select and delete its contents. For blank pages caused by formatting, display formatting marks, identify the specific cause (typically paragraph marks or section breaks), and then delete those elements. If you frequently delete pages, consider creating a macro with a custom keyboard shortcut that selects and deletes current page content.

