Do you need to access the Command Prompt in Windows 11 but do not know where to find it? Accessing the Command Prompt in Windows 11 is essential for executing commands, troubleshooting issues, and performing advanced system operations. Whether you’re a tech enthusiast, IT professional, or just someone needing to run a specific command, knowing the various ways to open Command Prompt can save you valuable time!
As someone who’s spent years working with Windows operating systems and guiding users through technical challenges, I can tell you that understanding these Command Prompt access methods is one of the most effective ways to boost productivity and solve computer issues independently.
I’ll walk you through multiple methods to access Command Prompt, explain when to use each approach, and show you how Command Prompt compares to other command-line tools in Windows 11. By the end of this guide, you’ll be able to access Command Prompt quickly and confidently, regardless of your technical experience level.
For a complete guide on optimizing your system’s performance by disabling background apps in Windows 11, visit my detailed article How to Turn off Background Apps in Windows 11
Table of Contents
Method 1: Open Command Prompt Using the Start Menu Search
The Start Menu Search is the most straightforward and beginner-friendly way to access Command Prompt in Windows 11. This method works on all Windows 11 installations regardless of configuration and requires no memorization of keyboard shortcuts. It’s particularly useful for occasional Command Prompt users or when you need to run the tool with administrator privileges.
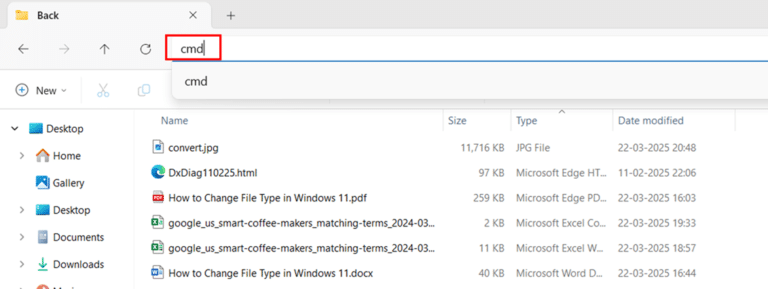
- Click the Start button located in the taskbar or press the Windows key on your keyboard. This opens the Windows 11 Start menu interface.
- Type “cmd” or “command prompt” in the search box at the top of the Start menu. As you type, Windows will begin displaying search results.

- Look for “Command Prompt” in the search results list under the Apps category. It appears with a black rectangular icon.
- Click “Command Prompt” from the search results to open the standard Command Prompt window. This launches the Command Prompt with normal user permissions.
- Alternatively, right-click on “Command Prompt” in the search results to reveal additional options. Look for and select “Run as administrator” if you need elevated privileges for system-level commands.

- Locate the “Pin to Start” option by right-clicking on “Command Prompt” in the search results. Click this option to add Command Prompt to your Start menu for quicker access in the future.

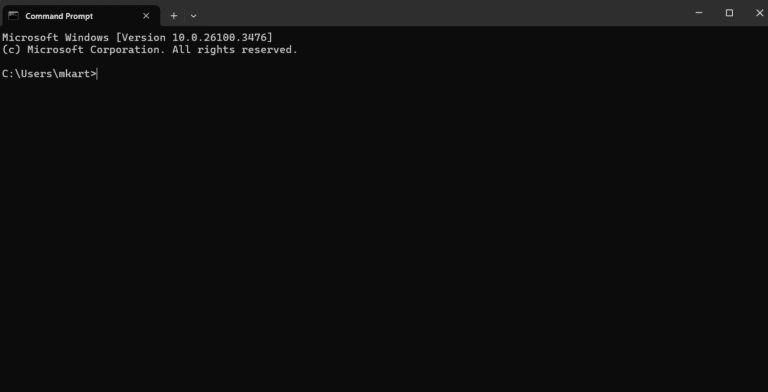
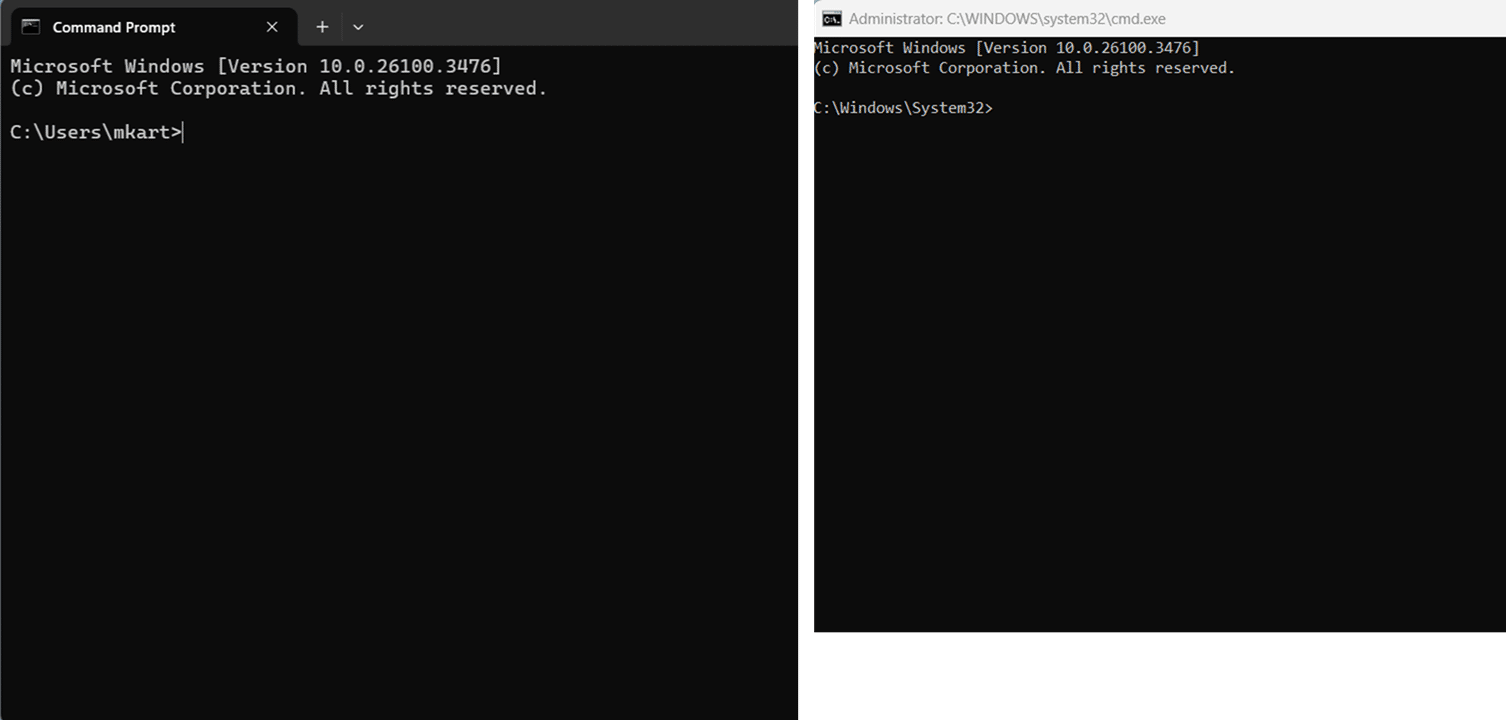
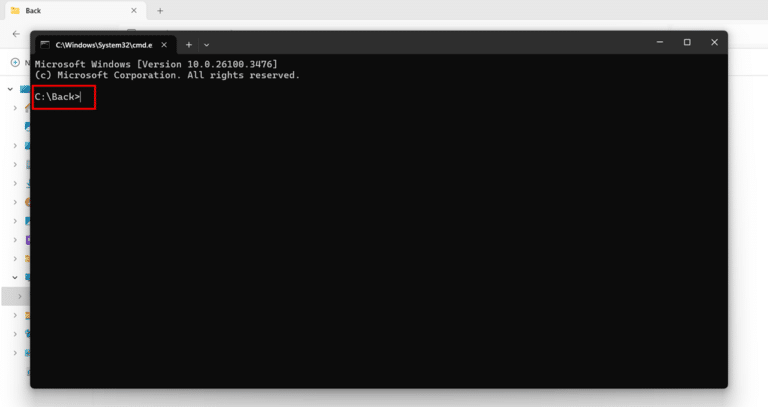
- Verify that the Command Prompt has opened successfully by looking for the black window with the title “Command Prompt” and a command line ending with a”>” character. This confirms you’re ready to enter commands.
Method 2: Open Command Prompt Using the Run Dialog Box
The Run dialog box provides one of the quickest ways to access Command Prompt in Windows 11, especially for keyboard-oriented users. This method has been available since early versions of Windows and remains unchanged in Windows 11, making it a reliable technique for power users. The Run command is particularly useful when you need to launch applications quickly without navigating through menus and requires minimal keystrokes. Many IT professionals and system administrators prefer this method due to its speed and efficiency.
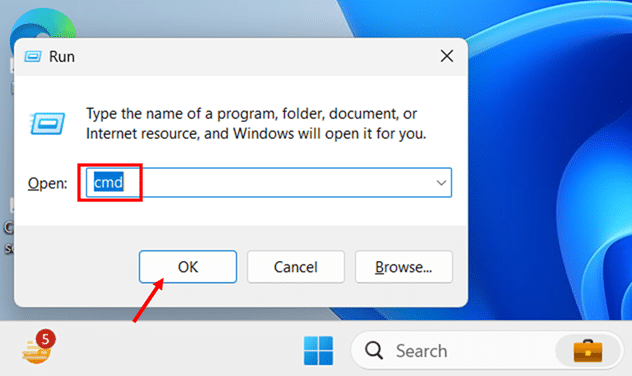
- Right click the Start button located in the taskbar and click Run in the context menu or press the Windows key + R keyboard shortcut simultaneously on your keyboard. This opens the Run dialog box in the lower-left corner of your screen.

- Type “cmd” in the Open: text field of the Run dialog box. Ensure there are no extra spaces before or after the text.
- Click the OK button or press Enter on your keyboard to execute the command. This launches the Command Prompt with standard user permissions.
- Alternatively, press Ctrl+Shift+Enter after typing “cmd” in the Run dialog box instead of clicking OK. This launches Command Prompt with administrator privileges.
- Look for the User Account Control dialog that appears when running as administrator. Click Yes when prompted to allow the app to make changes to your device.
- Verify that Command Prompt has opened by looking for the black window with a title bar displaying “Command Prompt” or “Administrator: Command Prompt” if you ran it with elevated privileges.
Method 3: Open Command Prompt Using Windows Terminal
Windows Terminal is Microsoft’s modern terminal application, introduced with Windows 11, which combines multiple command-line tools in one sleek interface. Unlike the traditional Command Prompt, Windows Terminal offers tabs, custom themes, GPU-accelerated text rendering, and Unicode character support. Windows Terminal provides a more efficient workflow for developers and IT professionals who frequently switch between Command Prompt, PowerShell, and other shells. This method is ideal for users who need more advanced features and customization options than the standard Command Prompt offers.
- Click the Start button located in the center of your taskbar or press the Windows key on your keyboard. This opens the Windows 11 Start menu.
- Type “terminal” or “Windows terminal” in the search box at the top of the Start menu. Windows will display matching results as you type.

- Look for “Windows Terminal” in the search results and click on it to open the application. Windows Terminal opens with your default shell (usually PowerShell).
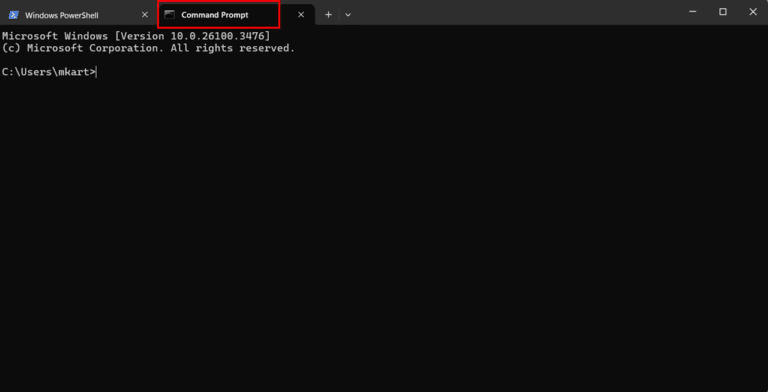
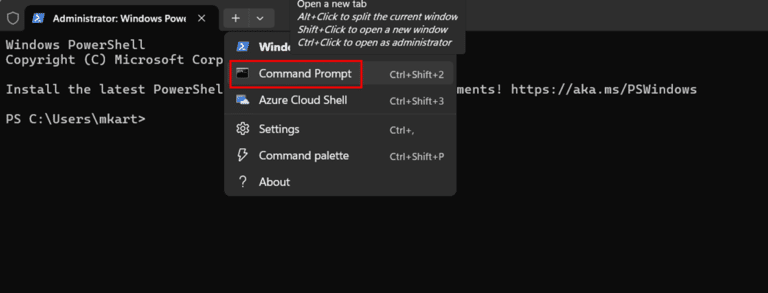
- Click the downward-facing arrow (▼) next to the tab in Windows Terminal. This reveals a dropdown menu with available shell options.

- Select “Command Prompt” from the dropdown menu. This opens a new Command Prompt tab within Windows Terminal.
- Alternatively, press Ctrl+Shift+2 keyboard shortcut while in Windows Terminal. This is the default keyboard shortcut to open Command Prompt directly.
- Right-click on the Windows Terminal icon in the taskbar and select “Run as administrator” if you need elevated privileges for system-level commands.

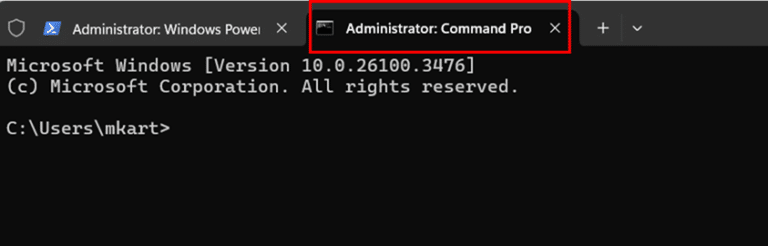
- Verify that Windows PowerShell has opened by looking for the black window with a title bar displaying “Administrator: Windows PowerShell” since you ran it with elevated privileges.
- Click the downward-facing arrow (▼) next to the tab in Windows Terminal. This reveals a dropdown menu with available shell options.

- Select “Command Prompt” from the dropdown menu. This opens a new Administrator: Command Prompt tab within Windows Terminal.

- Right-click on the Windows Terminal icon in the taskbar and select “Pin to taskbar” if you want quick access in the future. This permanently keeps Windows Terminal on your taskbar.

Method 4: Open Command Prompt Using the Power User Menu (Win+X)
The Power User Menu (sometimes called the Quick Link menu) provides fast access to advanced system tools and settings in Windows 11. This menu is designed specifically for power users and administrators who need quick access to system utilities without navigating through multiple menus. This method is particularly efficient for users who regularly need administrator access to Command Prompt, as it offers the admin option by default.
- Press the Windows key + X keyboard shortcut simultaneously on your keyboard. Alternatively, right-click on the Start button located in taskbar. This opens the Power User Menu.
- Look for “Windows Terminal” or “Windows Terminal (Admin)” in the menu that appears. The admin version will open with elevated privileges.
 step 1 and 2")
- Click on “Windows Terminal” or “Windows Terminal (Admin)” from the menu options. A User Account Control prompt will appear if you select the Admin option.
- Click Yes in the User Account Control dialog if you selected the Admin option. This grants the terminal administrative privileges.
- Click the downward-facing arrow (▼) in the Windows Terminal title bar to open the dropdown menu. This menu shows the available terminal options.
- Select “Command Prompt” from the dropdown menu list. This switches your current terminal tab to Command Prompt.
- Verify that the Command Prompt is running by looking at the prompt style and tab title. If you open with admin privileges, the title will display “Administrator: Command Prompt.”
- Alternatively, use the keyboard shortcut Ctrl+Shift+2 within Windows Terminal to open Command Prompt directly. This saves you from having to use the dropdown menu.
Method 5: Open Command Prompt Using File Explorer Address Bar
The File Explorer address bar method is particularly useful when you need to open Command Prompt at a specific location on your system. This technique saves time by eliminating the need to manually navigate to a specific directory after opening Command Prompt. This approach is especially valuable for developers, system administrators, and power users who work with files and folders in different locations and need to run commands against specific directories.
- Press the Windows key + E keyboard shortcut to open File Explorer. This launches the Windows 11 File Explorer application.
- Navigate to the folder where you want to open Command Prompt. Browse through your directories until you reach the desired location.
- Click once in the address bar at the top of File Explorer. The address bar is the long rectangular field showing your current location path.
- Type “cmd” in the address bar, replacing the current path text. Make sure to completely replace the existing text.
- Press Enter on your keyboard to execute the command. This opens a Command Prompt with the working directory already set to your current folder location.
- Verify that the Command Prompt has opened with the correct directory by examining the path displayed in the command line prompt. The path should match the folder you were viewing in File Explorer.
- Alternatively, hold the Shift key while right-clicking on any empty space in a folder. Look for “Open in Terminal” in the context menu that appears.
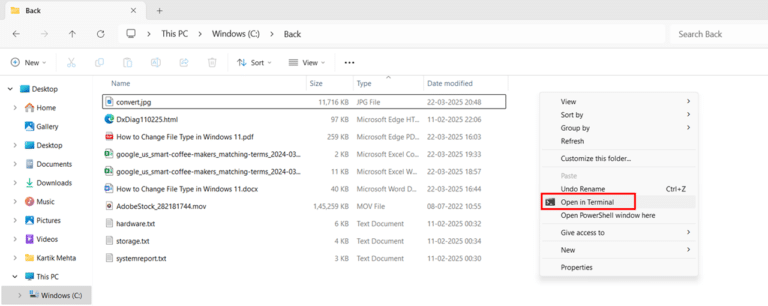
- Select “Open in Terminal” from the menu to open Windows Terminal at your current location. Once Windows Terminal opens, switch to Command Prompt using the dropdown menu if necessary.
Method 6: Open Command Prompt by Creating a Desktop Shortcut
Creating a desktop shortcut provides instant access to the Command Prompt with a double click. This method is ideal for users who frequently need Command Prompt and want the fastest possible access without keyboard shortcuts or menu navigation. A desktop shortcut can be customized to run with administrator privileges by default or to open at a specific directory. This approach is particularly useful for less technical users who prefer visual navigation over keyboard commands. Once created, the shortcut remains available regardless of Windows updates or system changes, providing consistent access to this essential tool.
- Right-click on any empty area of your Desktop. This opens the context menu with various options for creating new items.

- Hover over “New” in the context menu and click on “Shortcut” from the submenu that appears. This launches the Create Shortcut wizard.

- Type “cmd” or “%windir%\system32\cmd.exe” (without quotes) in the location field of the Create Shortcut wizard. The second option specifies the full path to ensure it works correctly.
- Click the Next button to proceed to the next step of the wizard. Windows will ask you to name your shortcut.

- Type “Command Prompt” or any preferred name in the name field of the wizard. This will be the label displayed beneath your shortcut icon.
- Click the Finish button to create the shortcut. The Command Prompt shortcut now appears on your desktop.

- Right-click on the newly created Command Prompt shortcut and select “Properties” from the context menu. This opens the Properties dialog with various settings.

- Click on the Shortcut tab in the Properties dialog if it’s not already selected. Click on the Advanced button.

- Click the checkbox next to “Run as administrator” under the Advanced options to make the shortcut always run with elevated privileges. This is optional but useful for system tasks.
- Click the OK button to save your changes to the shortcut properties. Your customized Command Prompt shortcut is now ready to use.

Method 7: Open Command Prompt Using Task Manager
Task Manager provides an alternative method to access Command Prompt, especially when other Windows interfaces are unresponsive, or you’re already working in Task Manager. This approach is particularly valuable during troubleshooting sessions when you need to monitor system resources while running commands. System administrators often use this method during maintenance or when addressing performance issues.
- Press the Ctrl+Shift+Esc keyboard shortcut to open Task Manager directly. Alternatively, right-click on the taskbar and select “Task Manager” from the context menu.

- Select “Run new task” from the dropdown menu. This opens the Create New Task dialog box.
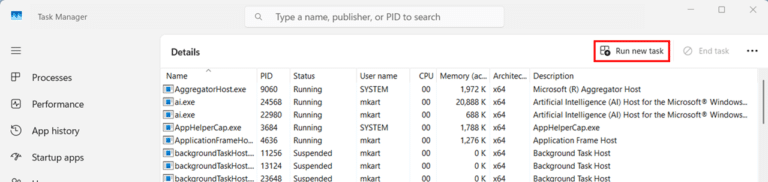
- Type “cmd” or “cmd.exe” in the Open: text field of the Create New Task dialog. This specifies that you want to run Command Prompt.
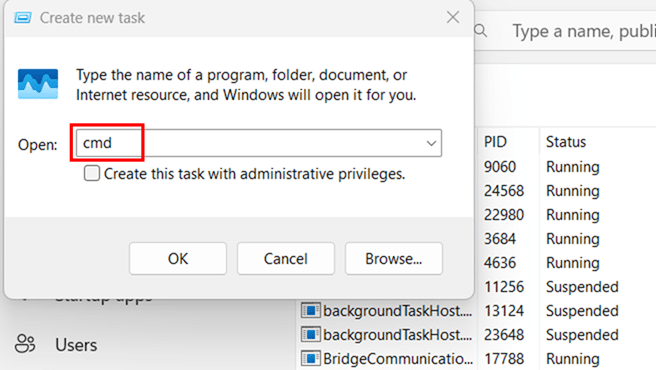
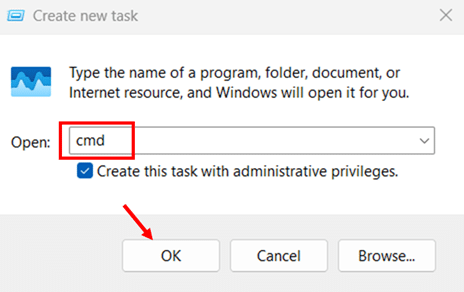
- Check the box labeled “Create this task with administrative privileges” if you need elevated permissions. This is equivalent to running Command Prompt as administrator.
- Click the OK button to execute the command and launch Command Prompt. If you selected administrative privileges, a User Account Control prompt might appear.
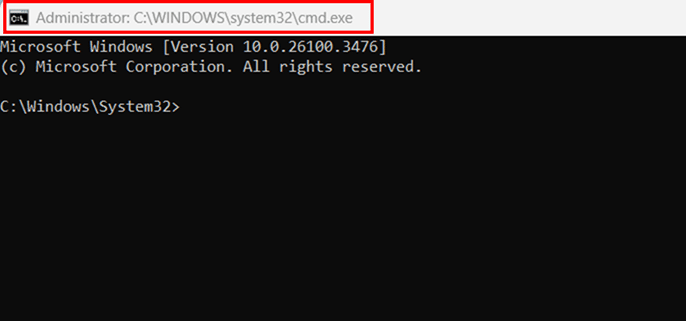
- Verify that the Command Prompt has opened successfully by looking for the black window with the command line interface. The window title will indicate if it’s running with administrator privileges.
For a detailed guide on accessing Task Manager in Windows 11, check out my article How to Open Task Manager in Windows 11
Command Prompt vs. PowerShell vs. Windows Terminal
Understanding the differences between these three command-line interfaces is essential for Windows 11 users. Each tool has distinct capabilities, use cases, and advantages. Command Prompt is the traditional Windows command-line interpreter dating back to the early days of Windows. PowerShell is a more powerful scripting environment that extends command-line capabilities with its object-oriented approach. Windows Terminal is not a command-line interpreter itself but rather a modern terminal application that can host multiple shells including Command Prompt and PowerShell. This comparison will help you choose the right tool for specific tasks and understand when each option is most appropriate.
Command Prompt
Command Prompt (cmd.exe) is Windows’ original command-line interpreter that executes commands and batch files. It’s ideal for:
- Review the compatibility of Command Prompt with legacy applications and scripts. Many older Windows batch files (.bat, .cmd) are designed specifically for Command Prompt’s syntax.
- Examine the simplicity of Command Prompt compared to alternatives. It has a straightforward interface with fewer features but requires less system resources and loads quickly.
- Consider the stability of Command Prompt when working with basic system tasks. It’s remained largely unchanged for decades, ensuring consistent behavior across Windows versions.
- Look at the limitations of Command Prompt’s text processing capabilities. It handles text as plain strings rather than structured objects, making complex data manipulation more difficult.
- Note that Command Prompt uses the older DOS-style commands like “dir,” “cd,” “copy,” and “del.” These commands are simpler but less potent than their PowerShell counterparts.
PowerShell
PowerShell is a more advanced command-line shell and scripting language designed for system administration. It’s preferable when:
- Evaluate the object-oriented approach of PowerShell compared to Command Prompt. PowerShell treats data as structured objects rather than text, enabling more sophisticated operations.
- Consider PowerShell’s scripting capabilities that allow for complex automation tasks. PowerShell scripts (.ps1) can perform advanced system administration tasks with fewer lines of code.
- Examine PowerShell’s integration with Windows and Microsoft products. It can directly interact with the Windows Management Instrumentation (WMI), .NET Framework, and Active Directory.
- Look at PowerShell’s pipeline functionality, which allows output from one command to be directly used as input for another. This enables chaining complex commands together efficiently.
- Review PowerShell’s cmdlet naming convention that uses verb-noun pairs (like Get-Process, Set-Location), making commands more intuitive and discoverable.
Windows Terminal
Windows Terminal is a modern terminal application introduced with Windows 11 that hosts multiple command-line interfaces. It excels at:
- Explore the multi-tab interface of Windows Terminal that allows you to run multiple shells simultaneously. This eliminates the need for separate windows for Command Prompt and PowerShell.
- Review the customization options available in Windows Terminal. You can modify color schemes, fonts, and background opacity and add background images for different profiles.
- Consider the modern text rendering capabilities of Windows Terminal. It supports GPU acceleration, Unicode characters, and emoji that traditional command-line interfaces cannot display properly.
- Look at Windows Terminal’s JSON-based settings that allow for advanced configuration. Technical users can edit these settings to create custom profiles and appearances.
- Examine the split-pane functionality that enables viewing multiple command-line interfaces side by side. This is particularly useful when comparing outputs or monitoring multiple processes.
- Note Windows Terminal’s support for keyboard shortcuts that can be customized to enhance productivity. These shortcuts make navigation between tabs and panes more efficient.
When to Use Each Option
Choose the appropriate tool based on your specific needs:
- Use Command Prompt when working with legacy batch files, performing basic file operations, or when you need a lightweight command-line interface that launches quickly.
- Select PowerShell when performing system administration tasks, creating scripts for automation, working with structured data, or integrating with other Microsoft products and services.
- Opt for Windows Terminal as your default terminal application in Windows 11, customizing it to launch either Command Prompt or PowerShell based on your needs. It provides the best user experience while allowing access to all command-line tools.
Conclusion
You now have seven reliable methods to open Command Prompt in Windows 11. I recommend trying each approach to find which fits your workflow best. The Start menu search works well for beginners, while keyboard shortcuts like Win+X or Win+R will save you time once memorized. For developers and IT pros, Windows Terminal offers the most flexibility.
Remember that running Command Prompt as administrator is necessary for system-level commands. If you frequently use specific commands, consider creating batch files or desktop shortcuts to further streamline your process. As Windows evolves, these core methods will likely remain functional, making them valuable skills worth mastering for any Windows user.
For a complete guide on multiple ways to get help in Windows 11, check out my detailed article “How to Get Help in Windows 11“
Frequently Asked Questions (FAQs)
Command Prompt still exists in Windows 11, but Microsoft has made Windows Terminal more prominent. Search for “cmd” or “command prompt” in the Start menu search. If it doesn’t appear, check if your system administrator has disabled it through Group Policy. Try running “cmd” from the Run dialog (Win+R) to verify it’s available. In corporate environments, Command Prompt might be restricted for security reasons
Command Prompt uses traditional DOS commands and processes text output as strings. PowerShell is object-oriented, processes structured data, and has more powerful scripting capabilities. PowerShell can run most Command Prompt commands, but Command Prompt cannot run PowerShell-specific cmdlets. PowerShell has better integration with Windows management features and Microsoft services, while Command Prompt provides better compatibility with legacy batch files and simpler syntax for basic tasks.
Administrator privileges are required for commands that modify system files and registry settings or perform actions that affect all users. Windows protects these critical areas to prevent accidental or malicious changes. Commands like DISM, SFC, net user /add, and system service controls need elevated permissions to function. Always use administrator privileges cautiously, as incorrect commands can damage your system configuration or compromise security.
Yes. Right-click the Command Prompt title bar and select Properties. The Options tab lets you modify cursor size and command history. The Font tab allows changing text size and font family. The Layout tab controls window size and screen buffer. The Colors tab enables customizing text and background colors. Windows Terminal offers even more customization options, including opacity, background images, and color schemes, through its settings.json file.
Command Prompt text size is controlled through its Properties dialog. Right-click the Command Prompt title bar, select Properties, then go to the Font tab. Here, you can change both the font and size. Windows 11’s high-DPI displays sometimes cause scaling issues with Command Prompt. To fix this, right-click the Command Prompt shortcut, select Properties, go to the Compatibility tab, click “Change high DPI settings,” and experiment with override options. Windows Terminal offers better high-DPI support if text scaling remains problematic.
Type “cls” and press Enter to clear the Command Prompt screen. This doesn’t delete your command history; it clears the visible display.
Type “exit” and press Enter, or click the X in the upper-right corner of the window. You can also type “exit” followed by an exit code for scripts: “exit 0” for success.