Have trouble with inconsistent mouse movements ruining your gaming sessions or graphic design work? You’re not alone! Mouse acceleration in Windows 11 can make your cursor move erratically, especially when you need pixel-perfect precision.
Let me show you how mouse acceleration in Windows 11 works and why it matters for your gaming performance and professional accuracy. Mouse acceleration creates an inconsistent relationship between physical mouse movement and on-screen cursor behavior, making it harder to develop muscle memory and achieve precise control. Understanding how to turn off this feature is one of the most effective ways to improve your accuracy in competitive gaming, graphic design, and technical documentation.
Whether you’re looking to improve your gaming precision, enhance your professional design work, or simply want consistent cursor behavior across all applications, you’ll find everything you need in this comprehensive guide. I’ll walk you through the fastest Settings method, the reliable Control Panel approach, and the powerful Registry Editor solution that works when nothing else will.
Tired of accidental Sticky Keys activation? Learn how to disable it permanently in my guide How to Turn Off Sticky Keys in Windows 11
Table of Contents
What Is Mouse Acceleration and Why It's Problematic
Mouse acceleration, also known as pointer acceleration or mouse smoothing, is a feature embedded in Windows operating systems that modifies how your cursor behaves based on the speed of your physical mouse movement.
When mouse acceleration is active, your computer essentially becomes a mind reader, attempting to predict what you want based on how fast you move your mouse. Move slowly, and your cursor creeps across the screen. Flick your wrist quickly, and the cursor flies farther than expected.
This variable response creates unpredictable cursor behavior. The same physical one-inch mouse movement produces different screen distances depending on speed. Windows calculates acceleration by applying velocity-based multipliers – 1:1 for slow movements, potentially 3:1 or higher for fast movements. This inconsistency prevents the development of reliable muscle memory.
Microsoft originally implemented acceleration for smaller monitors and basic navigation. Microsoft implemented it to help users navigate across their entire screen without requiring large mouse movements. The idea was that users could make small, precise movements for detailed work, then quickly flick their mouse to reach distant corners of the screen.
Modern computing demands consistent, reliable input methods. With high-resolution displays and precision-dependent software, acceleration’s inconsistency becomes a major hindrance.
Understanding these fundamental problems justifies disabling acceleration entirely. Whether pursuing gaming excellence, professional accuracy, or simply reliable computing interaction, eliminating this unpredictable behavior restores natural cursor control and builds true muscle memory.
Method 1: Turn Off Mouse Acceleration Through Windows Settings
The simplest and most straightforward way to turn off mouse acceleration in Windows 11 is through the built-in Settings application. This method works well for users who prefer the modern Windows interface and don’t need advanced customization. When navigating through Windows Settings, you’re accessing a modern interface that Microsoft designed to make system adjustments user-friendly.
- Click the Start button located in the taskbar or press the Windows key on your keyboard. This opens the Windows 11 Start menu interface.
- Click on Settings (the gear icon) in the Start menu, or use the keyboard shortcut Windows + I to open the Settings app directly.

- Click on “Bluetooth & devices” in the left navigation panel. This section contains all settings related to external hardware devices, including mouse, keyboards, printers, and wireless peripherals.
- Scroll down in the center panel and click on “Mouse” to open the mouse-specific settings page where all cursor-related configurations are housed.

- Click on the “Additional mouse settings” link near the bottom of the Mouse settings page.

- Click on the “Pointer Options” tab at the top of the Mouse Properties window. This tab contains all the settings related to cursor movement, visibility, and behavior.

- Click on the “Enhance pointer precision” checkbox in the Motion section to uncheck it.

- Click “Apply” to save your changes without closing the window yet. This allows you to test the new setting immediately to ensure it works as expected.
- Click “OK” to close the Mouse Properties window and return to the Settings application.

Method 2: Turn Off Mouse Acceleration Using Control Panel
The Control Panel method offers the most direct path to mouse settings, bypassing the multi-layered navigation of the Settings app. For users who value efficiency, this approach reaches the same Mouse Properties dialog in fewer clicks.
- Click the “Start” button on your taskbar or press the Windows key on your keyboard. This opens the Start menu where you can access search functionality.

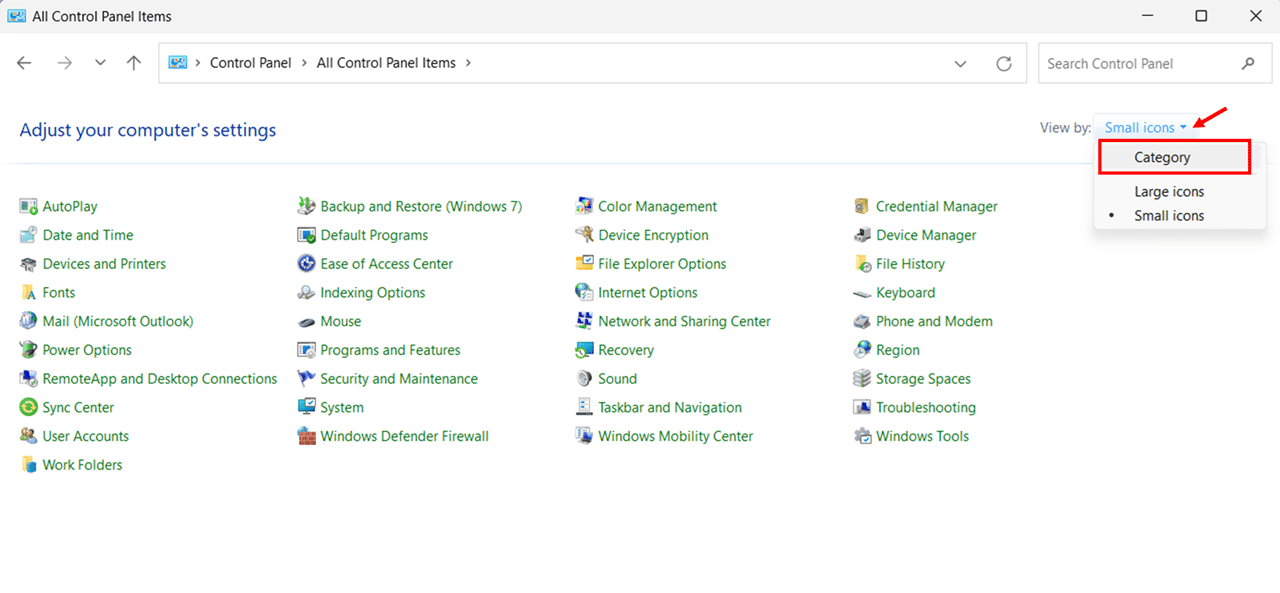
- Type “Control Panel” in the search field. As you type, Windows will display matching results, with Control Panel typically appearing at the top of the list.

- Click the “View by:” dropdown menu in the top-right corner of the Control Panel window and select “Category” if not already selected. This ensures you can see the organized groupings of settings.
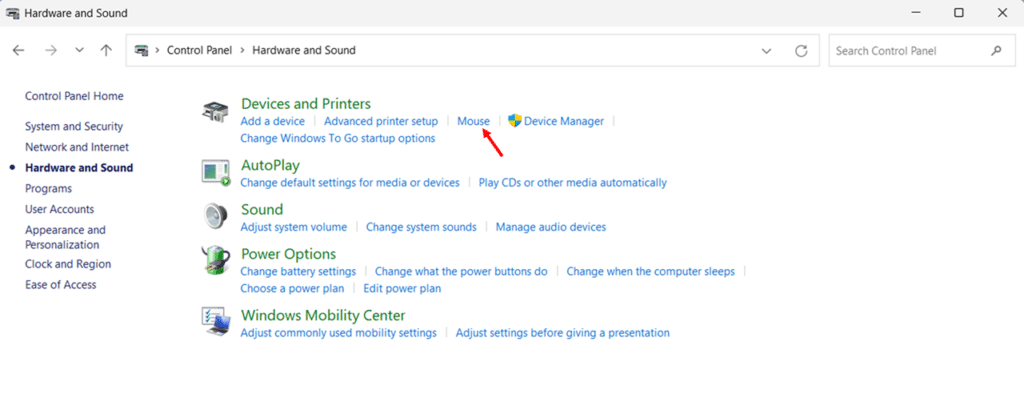
- Category view of Control Panel will be displayed. Click on the “Hardware and Sound” category from the main Control Panel window. This category groups all hardware-related settings, including display devices, sound devices, power options, and input peripherals.

- Click on “Mouse” under the Devices and Printers section. This action opens the Mouse Properties dialog box, which contains all the configuration options for your pointing device.
- Click on the “Pointer Options” tab at the top of the Mouse Properties window. This tab specifically deals with your mouse cursor’s behavior, including speed, visibility, and acceleration settings.

- Click on the “Enhance pointer precision” checkbox in the Motion section to uncheck it.

- Click “Apply” to save your changes.
- Click “OK” to close the Mouse Properties window and confirm all changes.

Method 3: Turn Off Acceleration Using Registry Editor
The Registry Editor method provides the most comprehensive control over mouse acceleration settings by directly modifying Windows’ core configuration.
This method requires administrative privileges but offers advantages beyond simple settings adjustments
The Windows Registry is a hierarchical database that stores low-level settings for the operating system and applications that opt to use it. When it comes to mouse acceleration, the Registry contains specific values that determine exactly how Windows calculates cursor movement. By directly modifying these values, you’re bypassing all user interfaces and making changes at the system level, which is why this method can be more effective when other methods fail to completely eliminate acceleration.
Understanding why you might need the Registry method is crucial. Some applications or third-party mouse software can override Windows settings, creating situations where mouse acceleration persists despite your attempts to turn it off through standard methods. The Registry method addresses this by setting values that most applications respect, creating a system-wide configuration that’s harder for programs to bypass.
IMPORTANT: Before proceeding with Registry modifications, create a system restore point or back up your Registry. Incorrect modifications can cause system instability or prevent Windows from starting properly. If you’re uncomfortable with these risks, stick to Methods 1 or 2.
- Press and hold the “Windows” key and press “R” to open the Run dialog box. This universal shortcut works across all Windows versions and provides quick access to system utilities.
- Type “regedit” in the Run dialog box and press Enter.

- Click “Yes” when prompted by User Account Control.
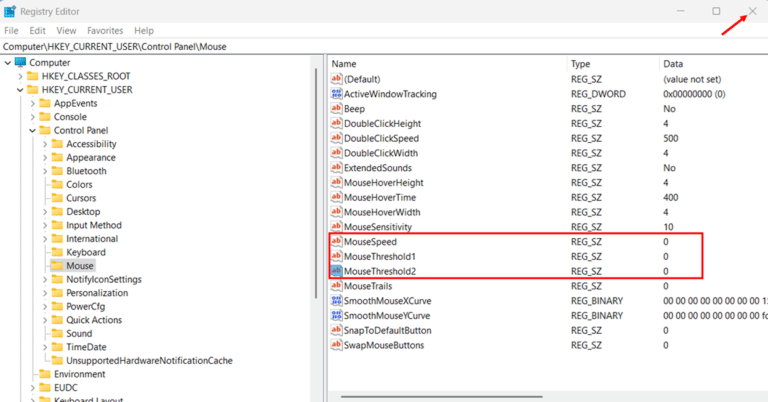
- Navigate to HKEY_CURRENT_USER\Control Panel\Mouse by clicking through the folder structure in the left panel of the Registry Editor. This path houses all mouse-related settings for your user profile.
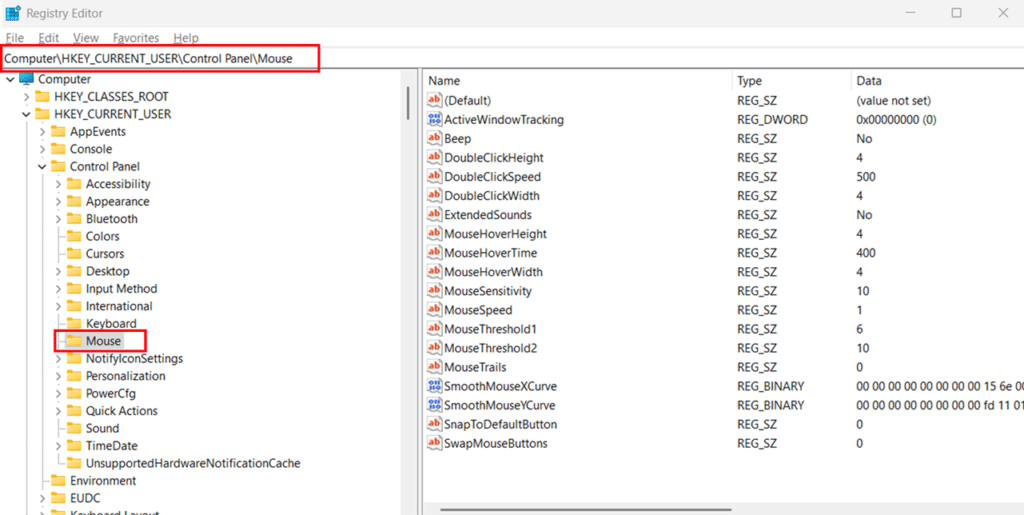
- Double-click on “MouseSpeed” in the right panel of the Registry Editor. This value controls the acceleration curve applied to your mouse movements.

- Change the value data from its current setting to “0” and click “OK“. Setting MouseSpeed to 0 essentially tells Windows to apply no acceleration scaling to your mouse movements.

- Double-click on “MouseThreshold1” and change its value to “0“. This parameter defines the first threshold at which acceleration begins to apply – setting it to 0 turns off the threshold entirely.

- Double-click on “MouseThreshold2” and change its value to “0“. This parameter represents the second acceleration threshold – removing it ensures no acceleration is applied at any movement speed.

- Close the Registry Editor by clicking the “X” button.
- Restart your computer to ensure changes take effect.
Conclusion
You now have three powerful methods to eliminate mouse acceleration from Windows 11 and take complete control of your cursor behavior. The Settings method gets you there quickly, the Control Panel provides the reliable standard, and the Registry approach gives you absolute control when other methods fall short. I’ve given you everything you need to permanently banish that frustrating, unpredictable mouse movement.
Remember, disabling acceleration is just the beginning. You might need to adjust your DPI settings or pointer speed to find what feels natural now that your movement is 1:1 consistent.
Don’t be surprised if your cursor feels different at first. Your muscle memory has been compensating for acceleration, and now you’re working with pure, linear movement. The consistency you’ll gain is worth the brief adjustment period.
For different methods to adjust screen brightness in Windows 11, check out my detailed article “How to Change Brightness on Windows 11“.
Frequently Asked Questions (FAQs)
Many games have their own internal acceleration algorithms that bypass Windows settings. First-person shooters often include acceleration for controller players that affects mouse users. Look for “Raw Input” options, which read directly from mouse hardware and bypass all software. If unavailable, navigate to the game’s installation folder, find configuration files (config.cfg, user.ini), and search for variables like “m_acceleration,” “mouse_smooth,” or “enhance_pointer_precision.” Set these to 0 or false.
Windows Settings and Control Panel methods work with standard user accounts. However, Registry Editor requires administrative privileges because it modifies system-level settings. On corporate networks, group policies may restrict Registry access. In such cases, ask IT administrators to apply the registry changes or use methods 1 and 2.
The registry method provides the most persistent solution because it modifies the lowest-level Windows settings that applications and drivers typically respect. Updates are less likely to override Registry values compared to GUI settings. Combine Registry changes with generic HID drivers and regular backups for ultimate reliability.
No, scrolling settings are separate from pointer acceleration. Mouse wheel behavior remains unchanged when you turn off acceleration.
Windows lacks built-in profiles, but third-party mouse software or the Raw Accel application allows multiple acceleration profiles switchable via shortcuts.