
Have you ever felt like your Windows 11 is loaded with junk more than a teenage bedroom? More often than not, we download various unnecessary apps and programs. But don’t worry! This guide will turn you into a sort of digital Marie Kondo, teaching you how to uninstall apps on your Windows 11 PC. Let’s turn your Windows 11 into a state where it sparks joy again!
Windows is very flexible in most things. With continued effort from Microsoft, I found the OS to be very functional. Windows 11 gives you many ways to uninstall apps, including preferences and skill levels.
Below, we present the 8 most effective methods for uninstalling apps on your Windows 11 system. Whether you are the average computer user who just wants to rid yourself of unwanted software or a highly technical person who wants to optimize your system’s performance, this guide has something for you.
If you are interested to know different methods to turn off background apps you can refer How to Turn off Background Apps in Windows 11
Table of Contents
Uninstall Apps and Programs on Windows 11 with the Start Menu
The Windows Start menu lists most desktop and Universal Windows Platform (UWP) apps installed on your device. Here’s a step-by-step guide to removing software via the Start menu.
- Locate and click on the Star button (a button with a Windows logo) on the Taskbar. This will open the Start menu, revealing a plethora of options and features.
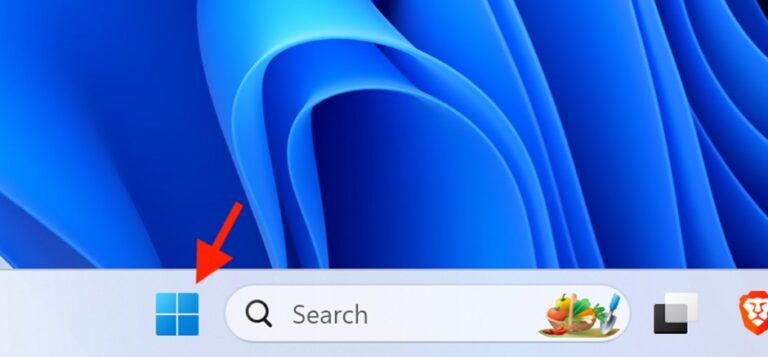
Alternatively, you can also press the Windows key on your keyboard to access the Start Menu. Much like the Taskbar Start button, it is a key with a Windows logo.
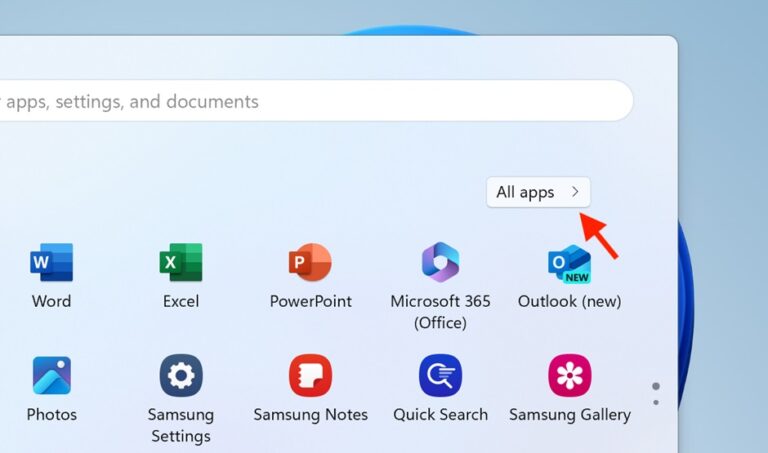
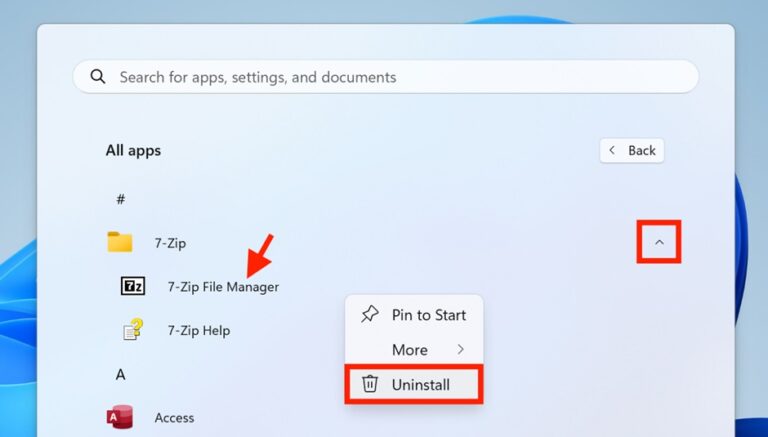
- Once the Start menu is open, look for the “All apps” option. Clicking on “All apps” will expand a comprehensive list of all the applications installed on your computer, both desktop and UWP apps.
- As you scroll through the list of applications, identify the one you wish to remove from your computer. Right-click on it. A context menu will appear next to your cursor. From the available options, select “Uninstall.” This action prompts Windows to initiate the uninstallation process for the selected software.

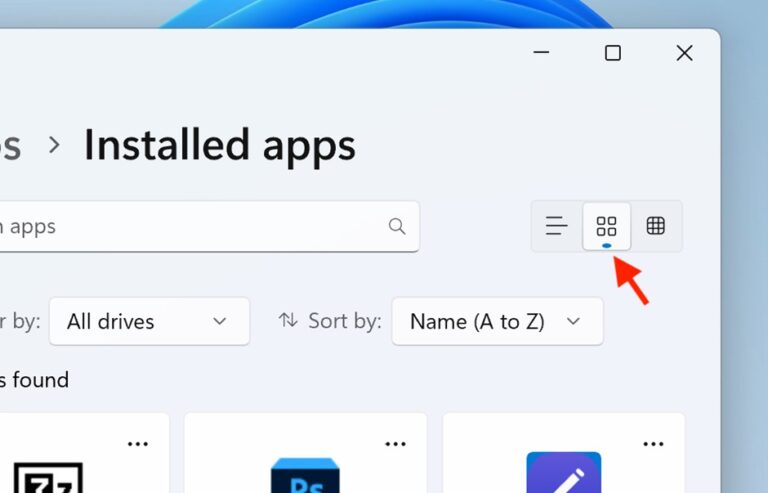
- After selecting “Uninstall,” the Installed Apps window will open. Switch to the grid view to make it convenient to access the Uninstall option.
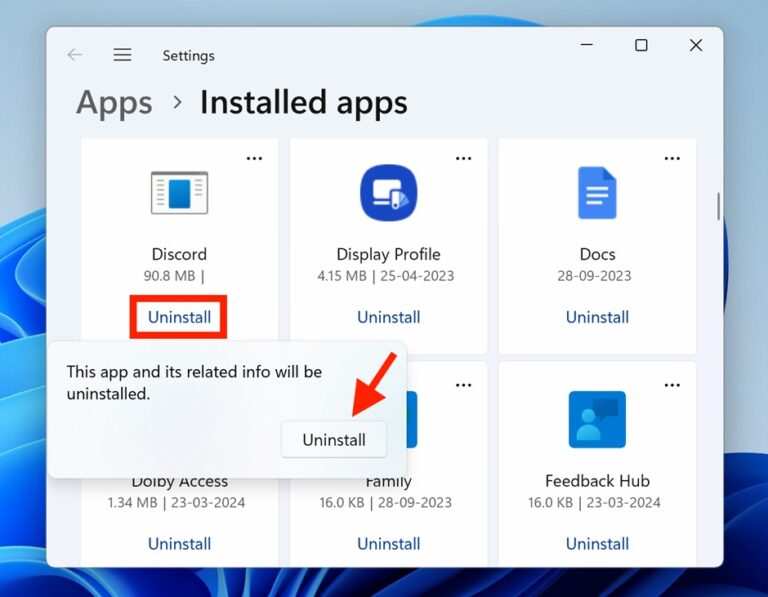
- Now, click on the blue “Uninstall” link associated with the app and then again click on the Uninstall button to confirm the selection.
Note: Some applications might be grouped within folders in the Start menu. If the software you want to uninstall is within a folder, click on the folder to expand it and view its contents.
Then, find the specific application you wish to remove, right-click on it, and choose the “Uninstall” option from the context menu that appears.
Uninstall Apps and Programs on Windows 11 with the Settings App
With almost all the apps available on the Microsoft Store and installed from there, using Windows Settings has become a recommended way to uninstall such apps. This is primarily because these apps are Universal Windows Platform (UWP) applications, designed to work across a wide range of Windows devices and thus integrated more deeply into the Windows operating system.
Here’s a step-by-step guide, tailored for complete beginners, on how to navigate this process smoothly and efficiently using the Settings menu:
- Begin by accessing the Settings menu on your Windows device. You can do this quickly and easily by pressing the Windows and I keys simultaneously (Win + I).
- Once the Settings menu is open, locate and click on the Apps tab in the left pane and then select the “Installed apps” option.
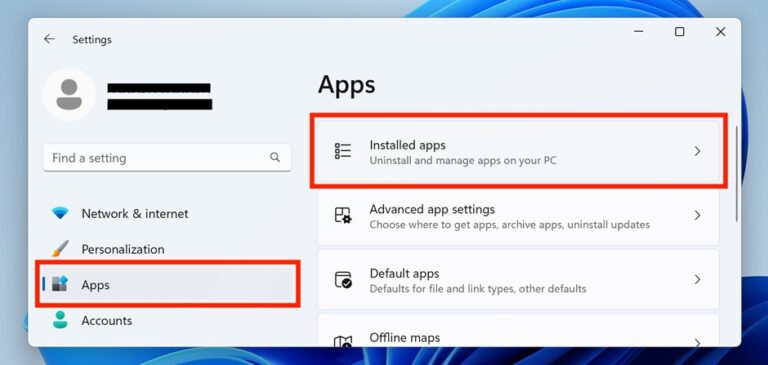
You can manage these installed apps here, including uninstalling any unwanted Microsoft Store apps.
- You’ll now be presented with a list that details every piece of software installed on your device. Click on the Grid view option to list these apps in grids. This view offers a direct Uninstall button.

- Now, locate the app you want to uninstall and click on the “Uninstall” button, followed by the Uninstall button again for confirmation. This will initiate the app uninstallation process.

Tips:
- If the Uninstall button is greyed out, it means the app is a built-in app that Windows does not typically allow to be uninstalled. However, there might be workarounds or third-party tools that can achieve this for specific apps.
- Some apps may ask for confirmation or present additional uninstallation options once you click Uninstall. Follow any additional prompts to complete the process.
Uninstall Apps and Programs on Windows 11 with the Control Panel
The Control Panel houses the “Programs and Features” applet, a vital tool for removing desktop applications that operate on computers with the x86 system architecture. However, it’s important to note that “Programs and Features” is gradually showing its age, especially compared to some of the third-party uninstallers available today.
One of its main drawbacks is its inability to completely remove all traces of uninstalled software, including files, folders, and registry entries, potentially leaving residual data behind. Additionally, Microsoft has not updated this applet to manage UWP (Universal Windows Platform) apps, limiting its utility in certain cases.
Despite these limitations, “Programs and Features” remains a useful tool for uninstalling traditional desktop software. Here’s a step-by-step guide to using this applet, tailored for complete beginners:
- Press the Windows + R key combination on your keyboard to launch the Run utility program. In the Run dialog box’s text field, type “appwiz.cpl” (without quotes) and press Enter.
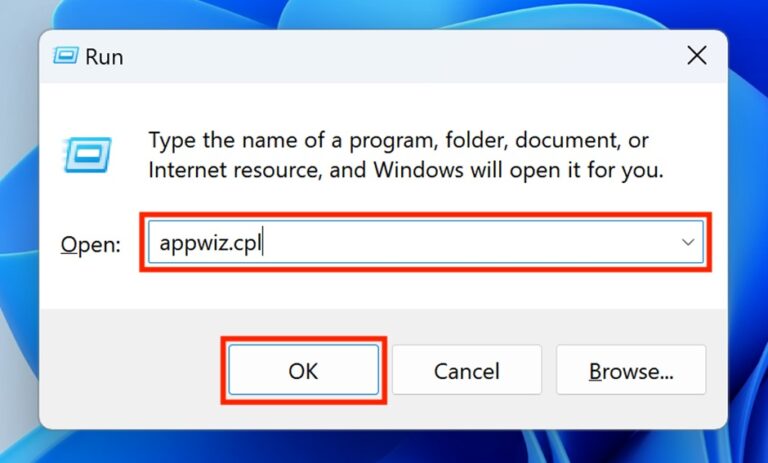
This command is the direct line to opening the “Programs and Features” window.
- Within the “Programs and Features” window, browse through the list of installed software and locate the software you wish to uninstall.
Once you’ve found the software, click on it to select it. Locate and click the “Uninstall” button. This button is typically found above the list of installed software or by right-clicking on the selected software.

- Following the above steps, an uninstaller wizard for the selected software might appear. This wizard guides you through the final steps of the uninstallation process.
Follow the prompts provided by the uninstaller wizard, selecting the necessary options to fully remove the software from your computer.
Uninstall Apps and Programs on Windows 11 with Windows Terminal or Command Prompt
Both Command Prompt and Terminal support the Windows Management Instrumentation Command-line utility (WMIC), which you can use to uninstall apps on Windows 11. If you are more into command-line methods, you can use the WMIC tool to remove apps.
I am using Command Prompt for demonstration purposes, while you can also use Windows Terminal. The steps are exactly the same.
Now, follow the below steps to get started:
- Press the Window key on your keyboard (or the Start button on the Taskbar) to open the Start menu. In its search bar, type in “Command Prompt” or “Terminal” to search for the application. Either of these will lead you to the command-line interpreters available in Windows 11.
Click on the Run as administrator option from the search results to launch the app with elevated rights.

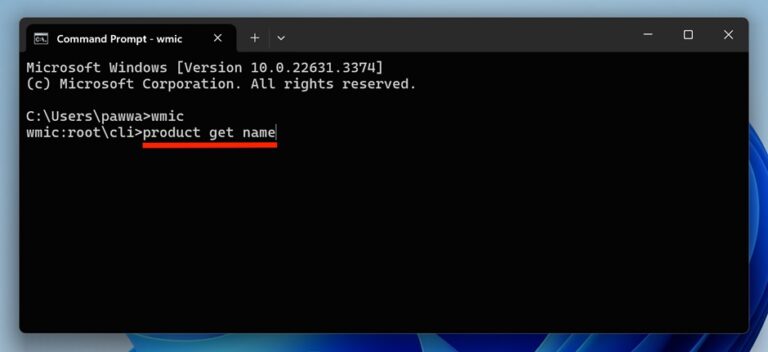
- Once the Command Prompt or Terminal window is open, type the following command and press the Enter key.
wmic
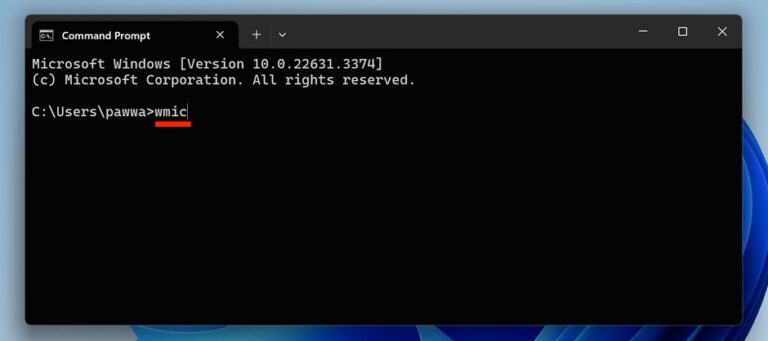
This command launches the Windows Management Instrumentation Command-line utility, which we’ll use to uninstall the software.
- Next, you’ll want to list all installed software to find the exact program name you wish to uninstall. To do this, enter the following command and press Enter.
product get name
- A list of installed software will appear. Browse this list and note the exact software name you intend to uninstall.
- With the name of the software in hand, it’s time to execute the uninstall command. To do so, execute the following command and hit the Enter key:
product where name=”Name of Your Software” call uninstall
Make sure to replace “Name of Your Software” with the exact name you noted earlier.
For instance, here I am uninstalling PuTTY, the command in my case would be as follows:
product where name=”PuTTY release 0.79 (64-bit)” call uninstall
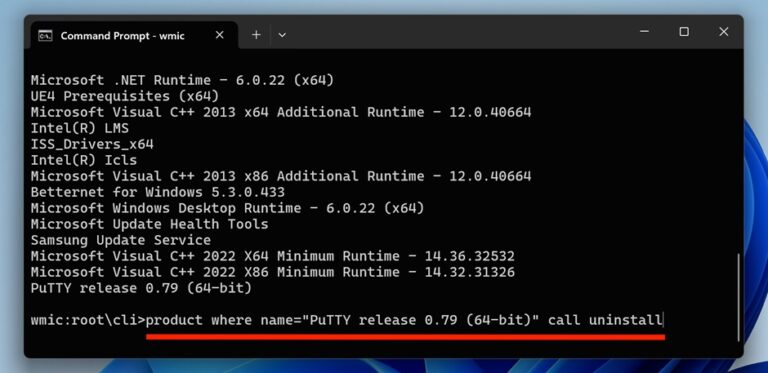
- After executing the uninstall command, you’ll be prompted to confirm the action. Simply press the Y key and then Enter to proceed with the uninstallation.
Uninstall Apps and Programs on Windows 11 with File Explorer
Uninstalling desktop software can also be done using the uninstall.exe file in the software’s installation directory. Below are the steps to take you through the process of removing software via File Explorer:
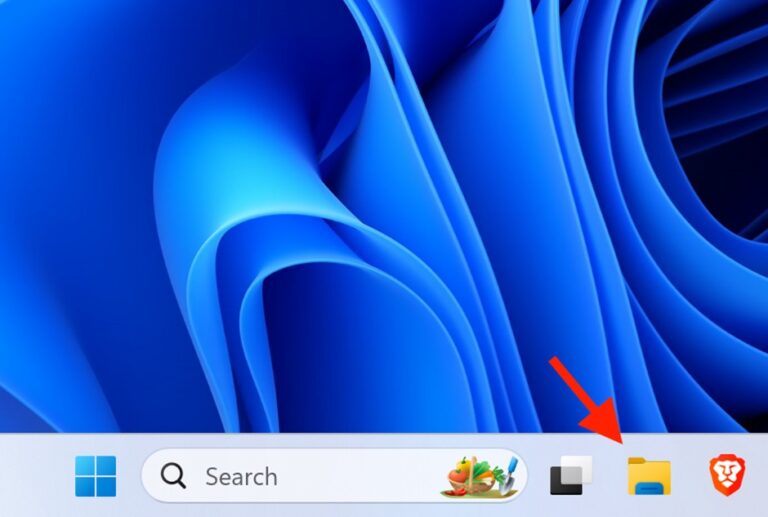
- Start by launching File Explorer on your Windows PC. This can be done easily by pressing the Windows key + E key combination on your keyboard. Alternatively, you can click on the File Explorer icon in the Taskbar.
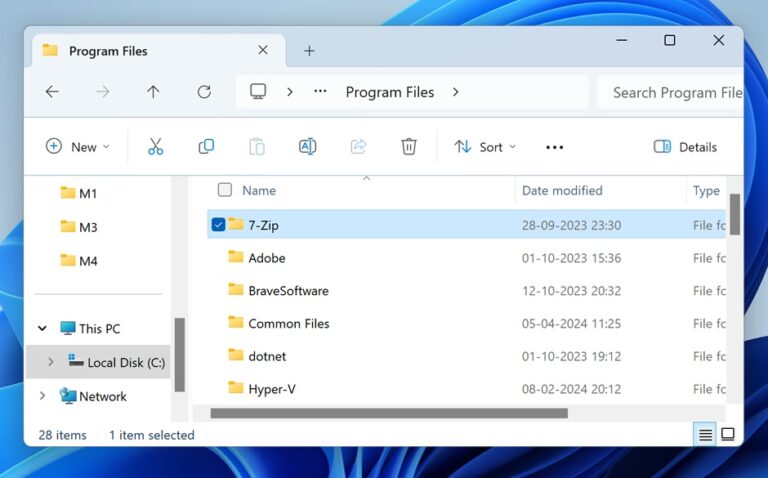
- With File Explorer open, your next task is to locate the installation folder of the software you intend to uninstall. If you haven’t specified a custom installation directory during the software’s installation, it’s likely located in the “Program Files” folder at C:\Program Files.
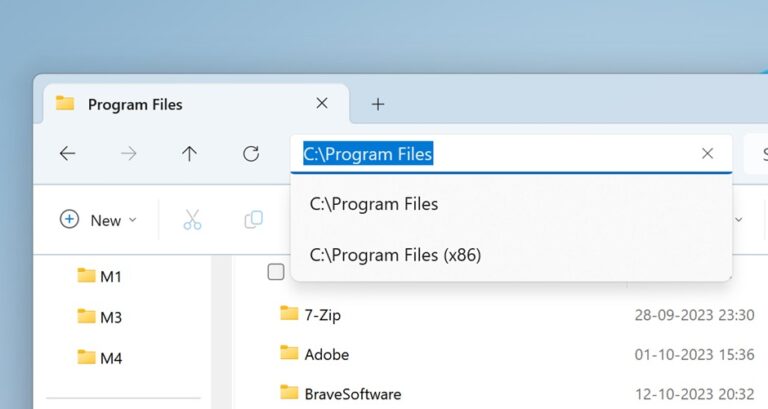
- Once inside the “Program Files” folder, browse through the list of folders to find the one related to the software you’re looking to uninstall.
For instance, if I am uninstalling 7-Zip then I have to go inside the 7-Zip folder inside Program Files.
- Within the software’s folder, your goal now is to locate a file named uninstall.exe and double-click on it to initiate the uninstallation process. Look for this file by scrolling through the folder’s contents or using the search function within File Explorer (top-right corner) to search for “uninstall.exe.”
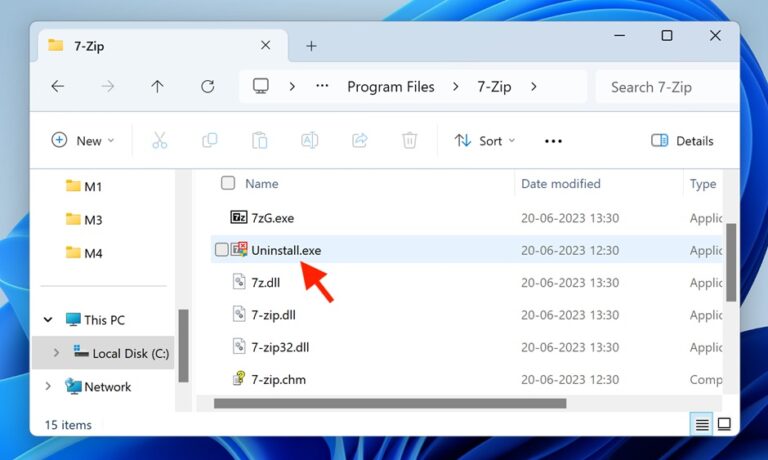
- This action will open an uninstallation window, which will present you with a series of prompts or options related to the software’s removal and guide you through the necessary steps to remove it from your computer.
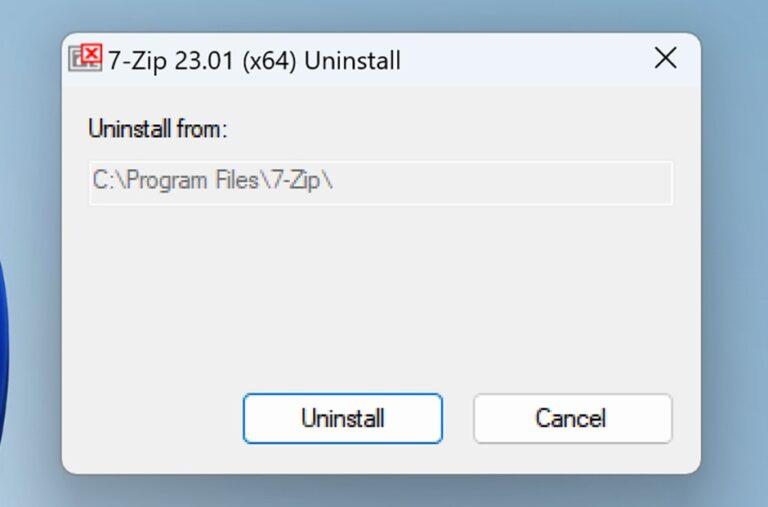
Once this process is complete, the software will be removed from your PC.
Remove Apps and Programs on Windows 11 with PowerShell
While it’s straightforward to uninstall many applications through the Settings menu, Windows 11 has certain built-in apps, such as Camera and Photos, that are not as easily removable through conventional means.
However, with the PowerShell command-line tool, you can remove these apps if you no longer need them. Here’s a step-by-step tutorial on how to do it:
- Press the Windows key (Win) on your keyboard and search for PowerShell in the search bar. Then, from the search results, click on the “Run as administrator” option to run PowerShell with enough rights to uninstall the system apps.

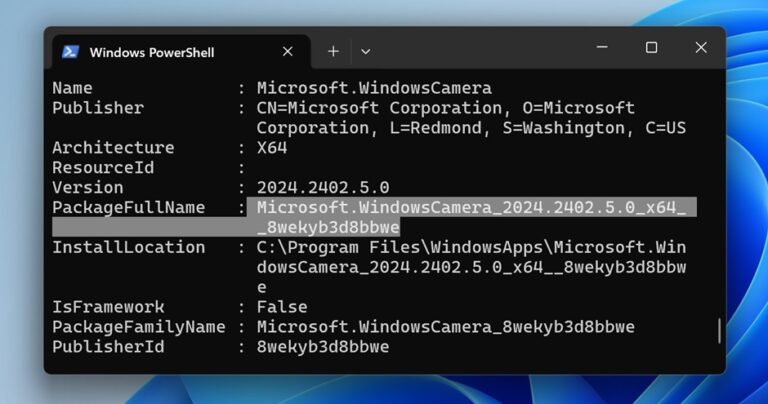
- With PowerShell open and running with administrator rights, you’re ready to see a list of all installed apps, including the built-in Windows apps. Enter the following command and press Enter to execute it:
Get-AppxPackage
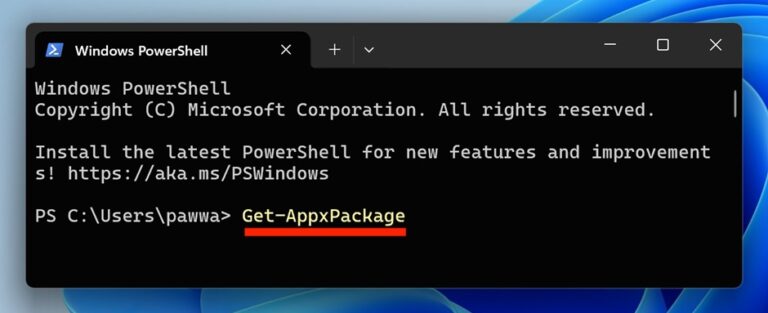
- Scroll through the list of apps displayed until you find the one you wish to uninstall. Take note of the PackageFullName associated with this app. This is a unique identifier for each app. To copy the PackageFullName, simply select the text and use the Ctrl + C keyboard shortcut.
- Now, to uninstall the app, you’ll use the following command and hit enter to execute it:
Remove-AppxPackage [App Name]
Replace [App Name] with the actual PackageFullName of the app. For example, in my case, if I am uninstalling a Microsoft Windows camera, its package name is
Microsoft.WindowsCamera_2024.2402.5.0_x64__8wekyb3d8bbwe, my command would be:
Remove-AppxPackage Microsoft.WindowsCamera_2024.2402.5.0_x64__8wekyb3d8bbwe
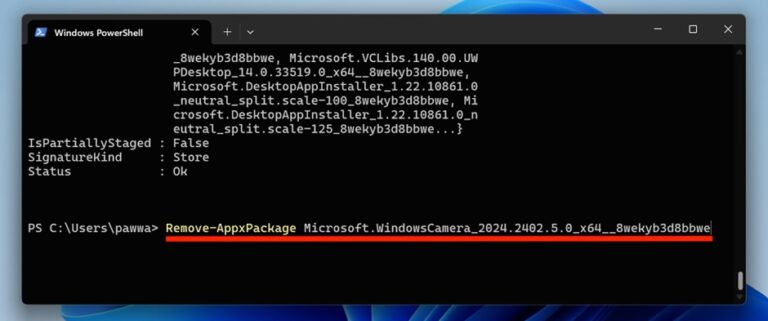
- After replacing [App Name] with the appropriate PackageFullName, press Enter to execute the command. This will uninstall the specified app from your system.
Uninstall Apps and Programs on Windows 11 with the Search Tool
If you haven’t noticed yet, Windows search also provides you with the option to directly uninstall apps from the search results. This can be a quick and convenient way to uninstall the programs on your Windows 11 PC with just a few clicks. Follow the below steps to start with this method:
- First up, launch the Windows search. You can do this in two different ways.
One by pressing the Windows key on your keyboard or clicking the Start button on the Taskbar to fire up the Start menu and use the Search bar on the top.
The second is to directly click on the search icon on the Taskbar located beside the Start button.
Alternatively, you can use the Windows + S keyboard shortcut for search.
- Now that the search tool is open, type in the name of the software or program you wish to uninstall. For example, I searched for Telegram because I wanted to uninstall it.
- Once you see the software you want to remove in the search results. Right-click on the app in the search results and select “Uninstall.“

Alternatively, you can also click on the ‘Uninstall‘ option beneath the app’s name in the search results right pane.

Clicking ‘Uninstall‘ will initiate the process of removing the software from your system. To complete the process, follow the on-screen uninstallation steps.
Uninstall Apps and Programs on Windows 11 with the Registry Editor and Run
Removing software packages using the Registry Editor is a technique not commonly considered by many users. However, this method can be particularly effective when dealing with software that encounters errors during uninstallation.
By leveraging the power of the Registry Editor alongside the Run application, you can manually remove stubborn software from your system.
Here’s a step-by-step guide on how to uninstall apps on Windows 11 using the Registry Editor and Run command:
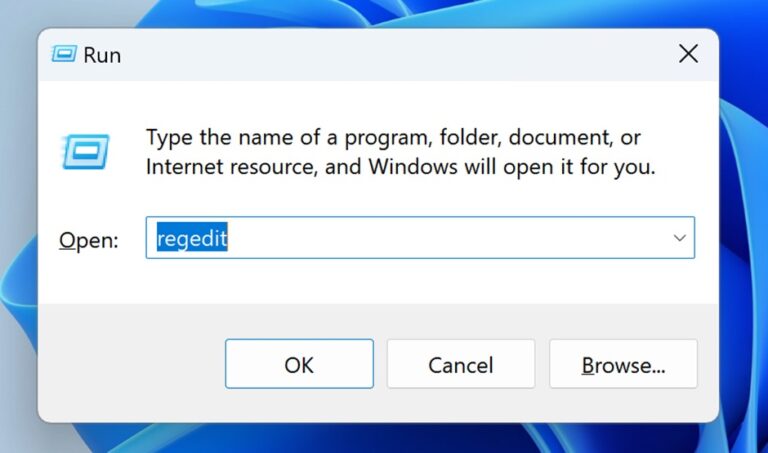
- To start with, we’ll first have to launch the Windows Registry Editor. This can be done by searching for “Registry Editor” in your Windows search bar and then clicking on the Run as administrator option.

You can also use the regedit command in the Run dialog box. Simply press Windows key + R to open the Run dialog, then type regedit and press Enter.
- Once the Registry Editor is open, you’ll need to navigate to a location where software uninstallation information is stored. Use the left-side panel to go to the following path:
Computer\HKEY_LOCAL_MACHINE\SOFTWARE\Microsoft\Windows\CurrentVersion\Uninstall
This path contains keys for each software installed on your computer.
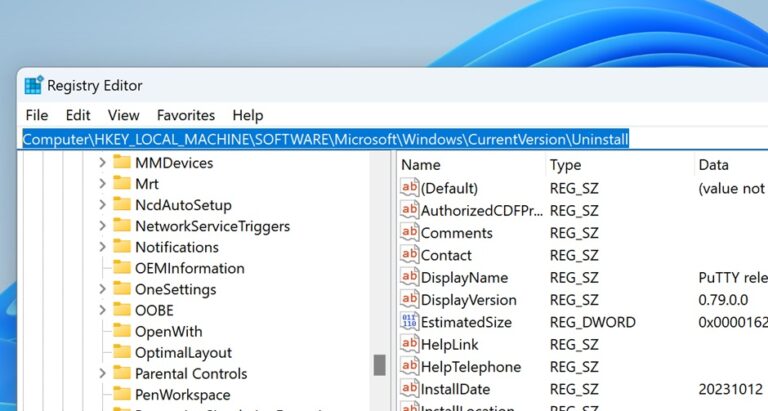
Tip: For convenience, you can also simply copy and paste the above path into the address bar of the Registry Editor
- Scroll through the list of keys until you find one that corresponds to the software you wish to uninstall. The keys might be named after the software, but sometimes, they are represented by alphanumeric codes that don’t immediately reveal which software they belong to.
In that case, you’ll have to go through every key and check for the data value of the “DisplayName” registry entry.
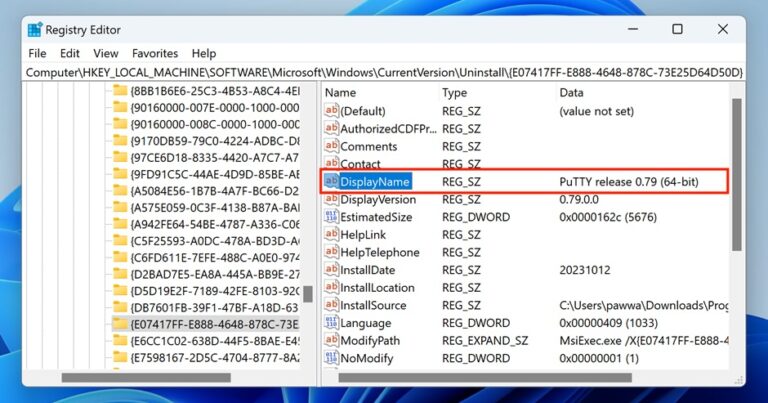
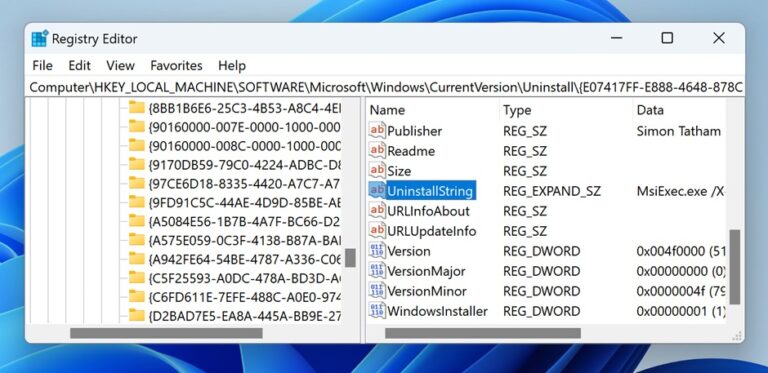
- After locating the correct key for the software you intend to remove, double-click on the UninstallString entry within that key.
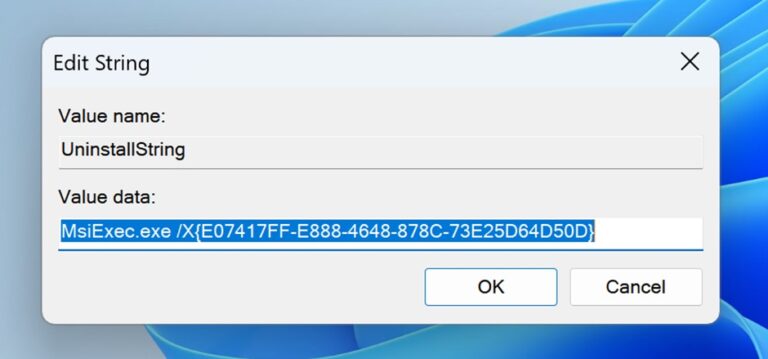
- A window will pop up, allowing you to edit the string. Here, you’ll see a line of text in the “Value data” box; this is the command that your computer uses to uninstall the software. Select this text and press Ctrl + C to copy it.
Now click on “OK” to close the Edit String popup window and then exit the Registry Editor.
- Press the Windows key + R to open the Run dialog. This small utility is a quick way to execute commands in Windows. In the Run dialog’s text field, press Ctrl + V to paste the previously copied UninstallString value and click “OK” or press Enter.
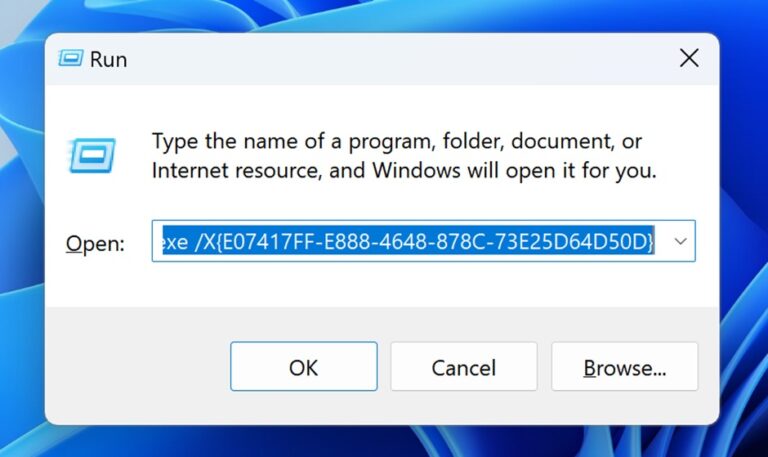
This action will initiate the software’s uninstallation process, typically opening a window where you can follow prompts to remove the software.
- Follow the on-screen instructions to complete the uninstallation process. This may involve confirming your intention to uninstall and waiting for the uninstaller to remove the software from your system.
Conclusion
With these tips, uninstalling apps and programs from Windows 11 should be easy—or at least not as difficult as getting that pie stain out of your couch. Remember that keeping your PC isn’t all about free space; it’s about ensuring it runs securely and efficiently without hitches.
If you want to understand what is Windows 11 startup folder and how to manage the Windows 11 startup applications you can checkout my Essential guide on Windows 11 Startup Folder
Frequently Asked Questions (FAQs)
Q1. Can I reinstall an app after uninstalling it?
Yes, you can. As long as the app is still available in the Microsoft Store or from the original source, it can be reinstalled easily.
Q2. What if I accidentally uninstall a necessary program?
Most essential programs can be reinstalled. For Windows-native apps, you can find them in the Microsoft Store.
Q3. Will uninstalling apps improve my PC’s performance?
It can, especially if the apps you uninstall are resource-heavy or run in the background.
Q4. How to uninstall programs on Windows 11 that cannot be uninstalled?
Uninstalling the apps that can’t be uninstalled depends on the reason. If the application you are trying to uninstall is not a system app, it is presumably because it is running in the background. To check this, press Ctrl + Shift + Esc to open Task Manager. There, check if the app is running. If it is, select the app and click the End Task button. Once the app is closed, you should be able to uninstall it now.
However, if the program is a system app, you’ll have to get help from more technical methods like the Command Prompt, Windows Terminal, PowerShell, or Windows Registry. All of these methods have been explained in the guide above.
