
Tired of staring at the same Outlook layout day after day? Do you ever feel like you could be more productive if your Inbox looked a little different? You’re not alone! Many people don’t realize how easily they can change their Outlook view to match their workflow. Whether you’re trying to get a handle on an overloaded inbox or streamline how you view your calendar, changing the Outlook view can make a noticeable difference.
The importance of a personalized email interface cannot be overstated. As we navigate countless messages daily, how our email client presents information can significantly impact our productivity and stress levels. The default Outlook view, while functional, may not cater to everyone’s unique working style or organizational needs. This is where the ability to change your Outlook view becomes invaluable.
In the following sections, we’ll explore the concept of Outlook views, provide a step-by-step guide to changing and customizing these views, and offer advanced tips for power users. We’ll also address common troubleshooting issues related to Outlook views effectively.
For understanding other day to day features of Outlook, you can refer How to Schedule an Email in Outlook, How to Set Out of Office in Outlook, How to Recall an Email in Outlook
Table of Contents
Why Customize Your Outlook View?
Consider this: How much time do you spend sifting through emails, trying to locate important messages, or prioritizing your tasks? What if you could tailor your Outlook interface to highlight what matters most to you at a glance?
Common frustrations with default email views often include:
- Cluttered interfaces that make it difficult to focus on priority items
- Inability to quickly distinguish between different types of emails
- Limited visibility of crucial information without opening each message
- Lack of personalization options to suit individual work styles
By learning how to change your Outlook view, you can address these pain points and transform your email experience. The benefits of customizing your Outlook view extend far beyond mere visual appeal:
- Increased Productivity: A well-organized inbox means less time spent searching for emails or appointments. A cluttered view can slow you down, while a streamlined layout helps you focus on the tasks that matter most.
- Easier Navigation: Having the right folders, columns, and panes in place makes navigating Outlook much smoother. No more scrolling through endless menus or tabs to find what you need
- Enhanced Focus: By hiding unnecessary elements or changing how information is displayed, you can reduce distractions and focus on what’s important. A cleaner layout means fewer visual distractions, helping you to stay on task.
- Personalized Workflow: Everyone works differently. You may prefer to see your calendar in a full month view, while someone else might need a detailed daily breakdown. Customizing your View helps you tailor Outlook to your specific needs.
Change the Predefined Outlook View
- Open Outlook: First, launch the Outlook application on your computer.
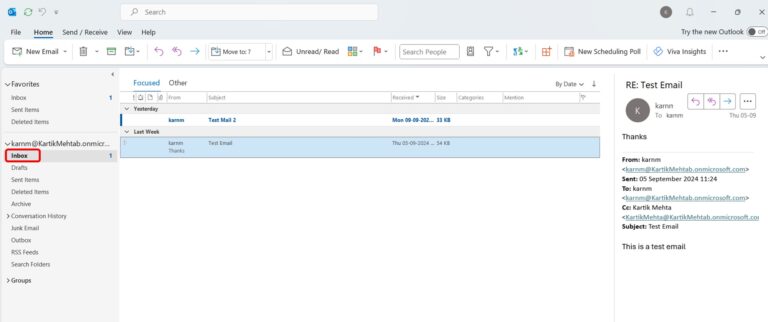
- Go to the Inbox: Navigate to your Inbox or the folder you want to customize.
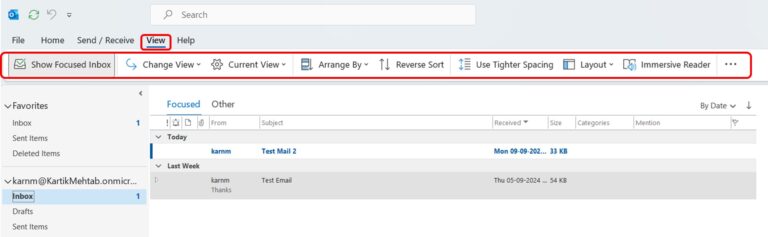
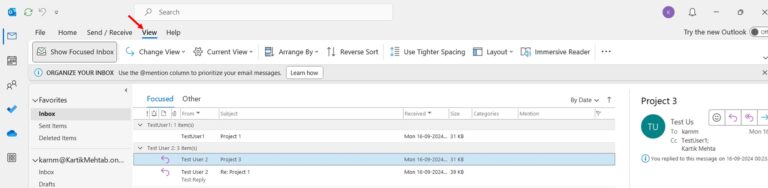
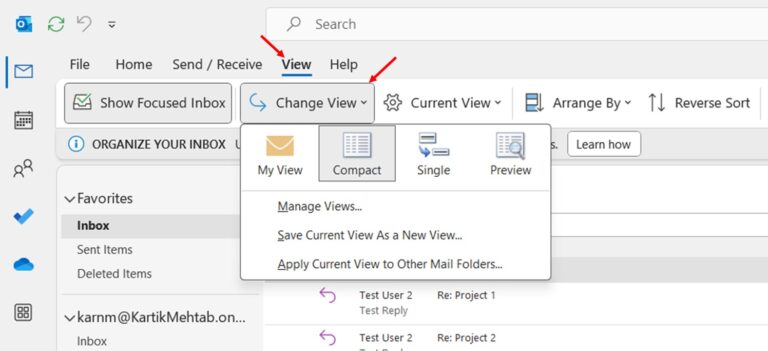
- Click the “View” Tab: At the top of the Outlook window, you’ll see a ribbon with several tabs. Click on the View tab.
- Click “Change View”: In the View tab, look for the Change View button located on the left side of the ribbon. This button gives you access to various preset views.
Select a Predefined View:
- Compact: This is the default view in Outlook, displaying emails in a tight, two-line format. It’s useful if you want to see many emails at once.
- Single: This View displays each email on a single line, which might be better for users who prefer a cleaner look.
- Preview: In this View, a preview of the email content is displayed alongside the subject and sender, which can be helpful if you need to skim through emails without opening them fully.
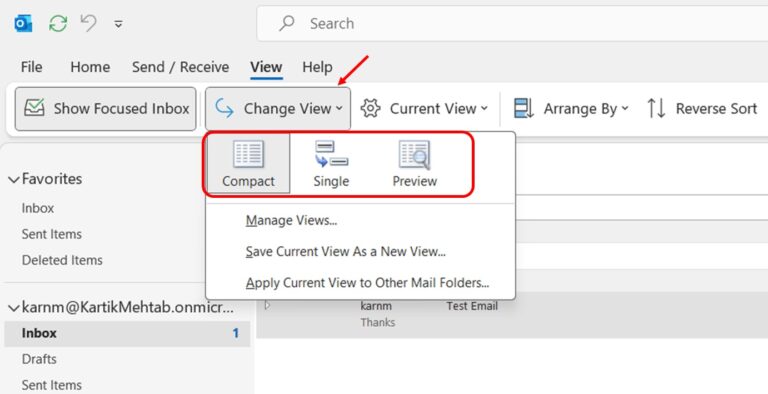
Switch Views: Click on any of these options to see how they change the inbox layout. You can always revert to the previous View if necessary.
Customizing Predefined Outlook Views
Customize Columns in the Inbox View
Columns in Outlook represent the information displayed for each email, such as the subject, sender, received date, and more. You can add, remove, and rearrange columns to prioritize the most important information.
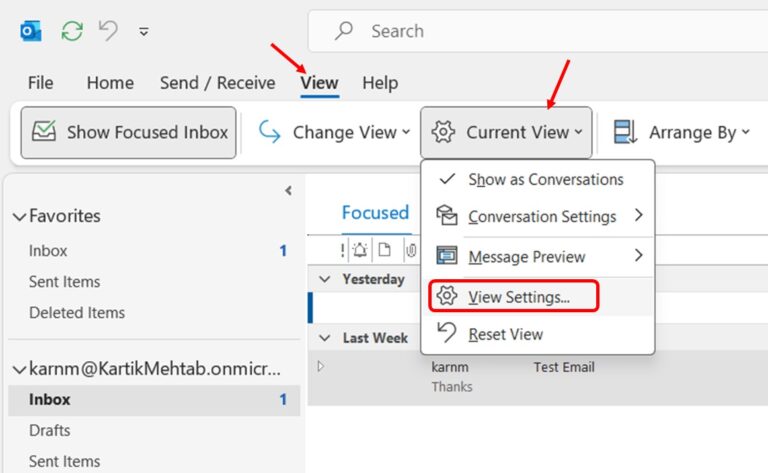
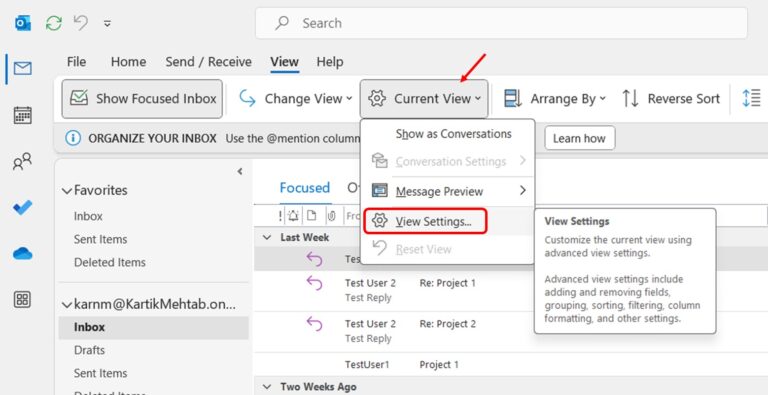
- Click “View Settings”: In the View tab, click on the Current View. In the menu that appears click on View Settings. This will open a window where you can further customize the View.
- Click “Columns”: In the View Settings window, click the Columns button to open the settings for which columns (or fields) are displayed.
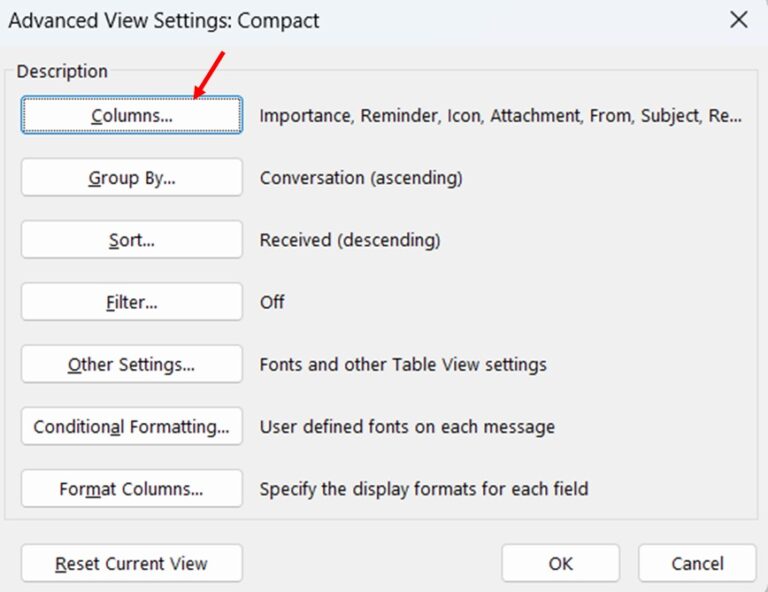
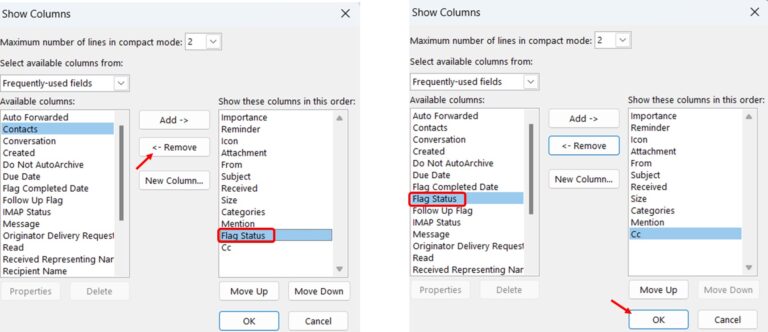
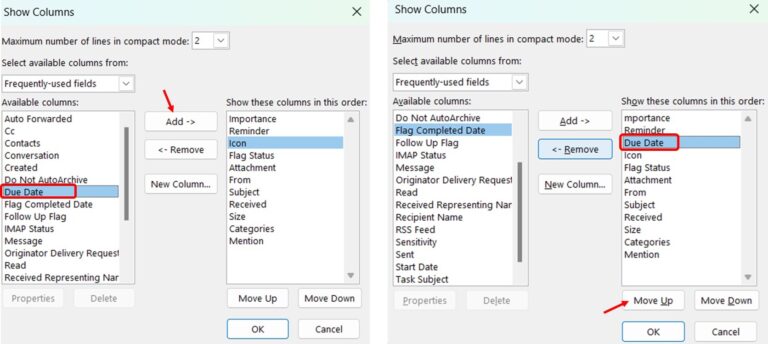
- Add or Remove Columns:
- To add a column, click the Add A list of available columns (fields) will appear. Select the ones you want to display (such as “Size” or “Categories”) and click Add.
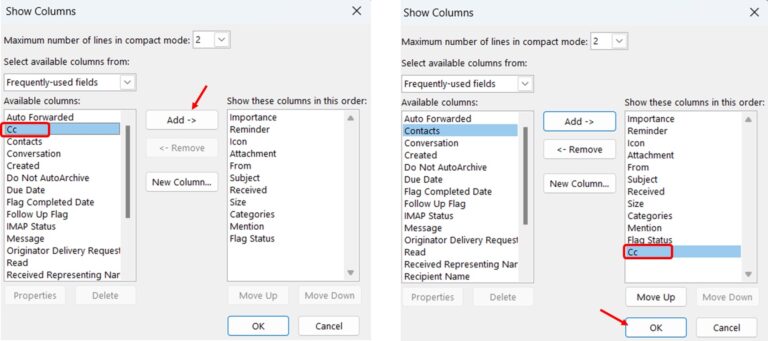
- To remove a column, select the column name from the list on the right side (e.g., “Importance” or “Flag”) and click Remove.
Sort Emails in the Inbox View
Sorting emails allows you to control the order in which they are displayed, whether by date, sender, subject, or size. This is useful for organizing your Inbox based on specific priorities, like showing the most recent emails at the top or grouping emails from the same sender.
- Click “Sort” in View Settings: In the View Settings window, click the Sort button.
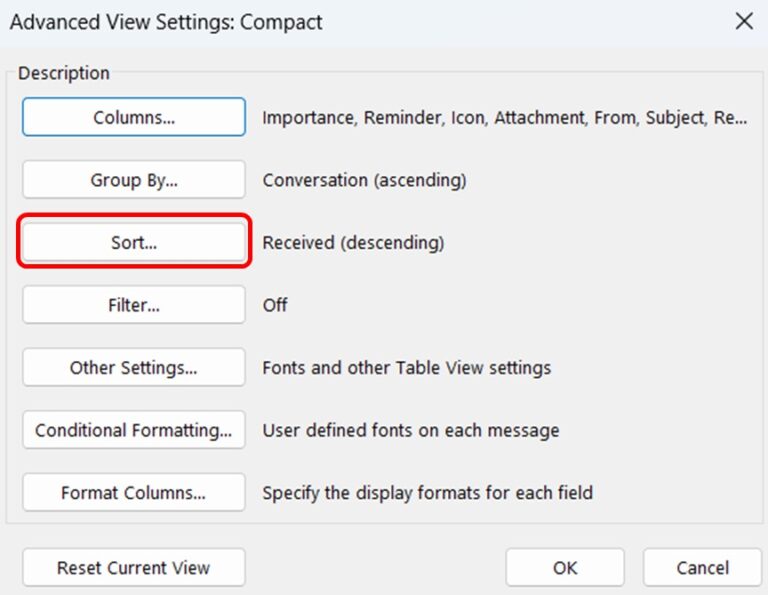
- Choose a Sorting Criterion:
- In the Sort Items By dropdown menu, choose how you want to sort your emails. Common sorting criteria include:
- Date: Displays emails by when they were received or sent.
- From: Groups emails by the sender.
- Size: Sort emails based on their file size.
- Subject: Groups emails based on the email’s subject line.
- In the Sort Items By dropdown menu, choose how you want to sort your emails. Common sorting criteria include:

- Choose whether to sort the items in Ascending (e.g., oldest to newest) or Descending (newest to oldest) order.

- Click OK: Once you’ve selected your sorting preferences, click OK to apply the changes to your Inbox.

Apply Filters to Show Only Specific Emails
Filters allow you to narrow down your Inbox by showing only emails that meet specific criteria, such as unread emails, flagged emails, or emails from specific contacts. Here’s how to set filters in your Inbox:
- Click “Filter” in View Settings: In the View Settings window, click on Filter.

- Set Your Filter Criteria:
In the Messages tab, you can choose from several predefined filters and then click OK:
- Unread Messages: Shows only unread emails.
- Flagged Items: Shows only emails that you’ve flagged for follow-up.
- Important Messages: Shows emails that have been marked as important.
- Received from a Specific Person: If you only want to see emails from a certain sender, enter their name or email address.
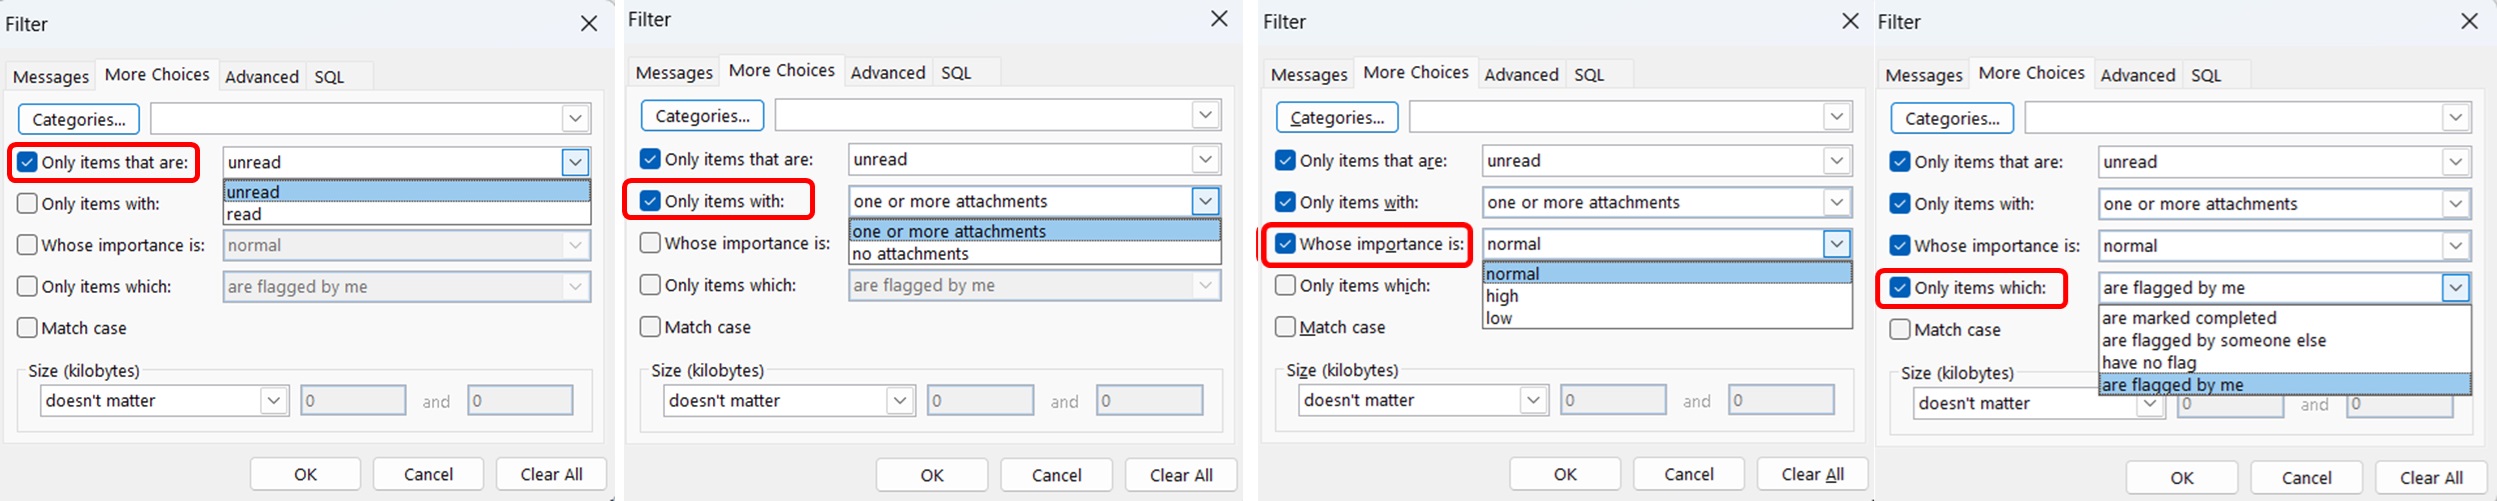
- Use the Advanced Tab (Optional): You can set more complex filters under the Advanced tab if the basic filters aren’t enough. For example, you can filter emails based on specific user in CC or subject contains certain words.

- Click OK: Once you’ve set your filters, click OK to apply them. Your Inbox will now only show the emails that meet the filter criteria.

Group Emails by Criteria
Grouping emails is another way to organize your Inbox, making it easier to follow email threads or see messages from specific senders grouped together. Here’s how you can group emails in Outlook:
- Click “Group By” in View Settings: In the View Settings window, click on Group By.

- In Group By window de-select Automatically group according to arrangement so that you can customize your own grouping criteria
Choose Grouping Criteria: In the Group items by dropdown, select how you want to group your emails. Common options include:
- From: Groups emails by sender.
- Conversation: Group emails that are part of the same email thread.
- Received: Group emails based on the date they were received.
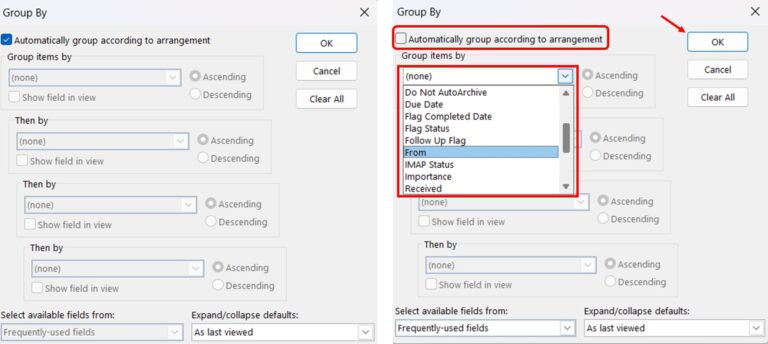
- Choose Ascending or Descending: You can choose whether to group in ascending or descending order. Click on OK

- Click OK to apply the changes.

Reset to Default View
If you ever want to go back to the default Outlook view or undo any changes, you can easily reset the View to its original settings.
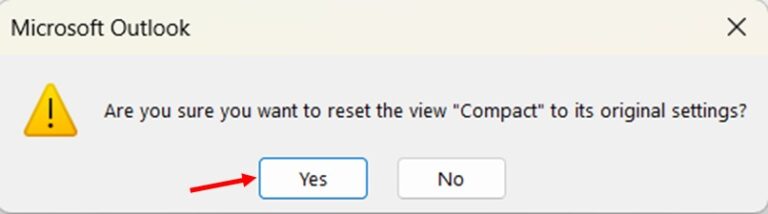
- Go to the “View” Tab: In the ribbon, click on the View
- Click “Reset View”: In the ribbon click Current View, and in the drop-down menu click Reset View.
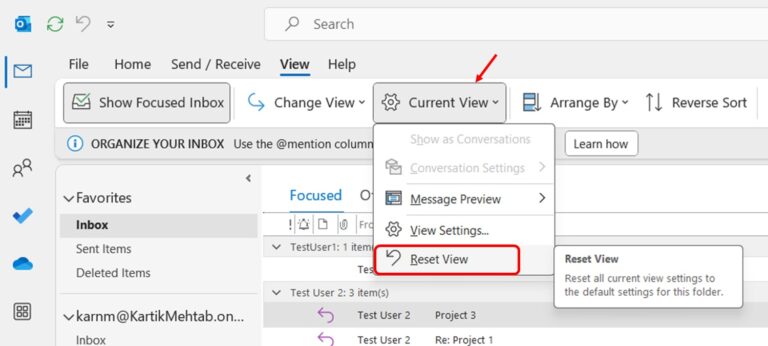
- Confirm the Reset: Outlook will prompt you to confirm if you want to reset the View. Click Yes, and your Inbox will return to its default layout.
Save Your Custom View
Once you’ve customized your inbox layout, columns, sorting, filtering, and grouping to your liking, you may want to save this View so you can quickly switch to it later or apply it to other folders.
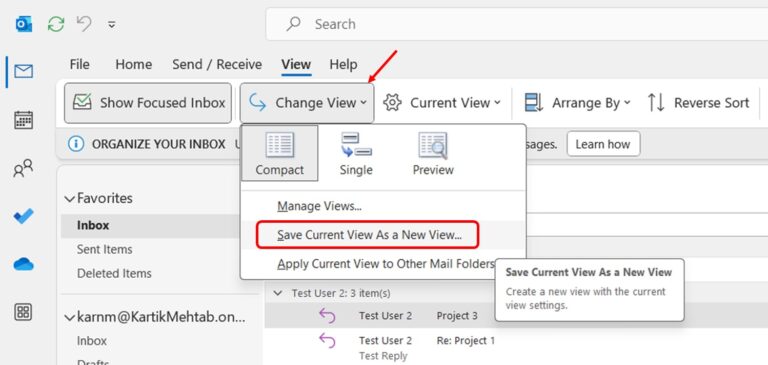
- Go to the “View” Tab: In the ribbon at the top, click on the View tab.

- Click “Change View”: Select Change View from the left side of the View tab.
- Select “Save Current View As a New View.” From the dropdown menu, select Save Current View As a New View.
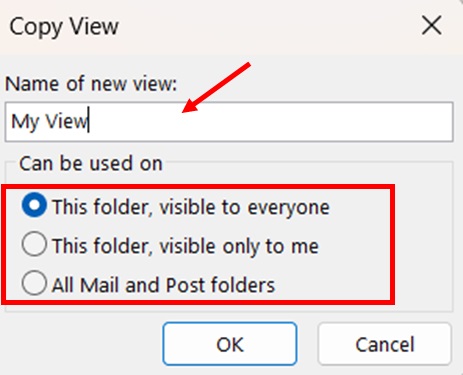
- Name Your Custom View: In the new pane that appears Enter a descriptive name for your custom view (e.g., “Compact Work View” or “Detailed Inbox”).
- Choose Where to Apply the View: You can choose to apply this View to the current folder or all similar folders.
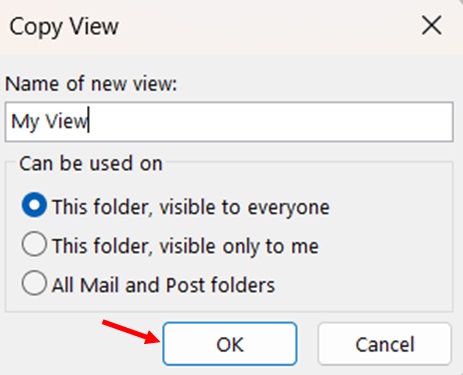
- Click OK: Once you’ve named your View, click OK to save it.
Creating and Saving New Views
If the existing views don’t quite meet your needs, you can create a completely new view:
- Go to the “View” tab and click on “Change View.”
- Select “Manage Views” from the dropdown menu.
- In the “Manage All Views” dialog box, click “New.”

- Give your new View a name and choose a view type to base it on. Then click on OK

- The view settings pane will open, use it to customize your new View.
- Once satisfied, click “OK” to save your new View.

To apply your newly created View:
- Go back to the “Change View” button.
- Your new View should now appear in the list of available views.
- Click on it to apply it to your current folder.
Remember to save your customized views. This allows you to quickly switch between different layouts depending on your current task or mood.
Tips for Effective View Management
- Start with a predefined view closely matching your needs, then customize from there.
- Create different views for different purposes (e.g., a “Triage” view for quickly sorting through new emails and a “Deep Work” view for focused email tasks).
- Regularly review and update your views to ensure they continue to meet your evolving needs.
- Use descriptive names for your custom views to remember their purpose easily.
- Take advantage of the “Reset View” option to start over with a clean slate.
Advance Outlook View Configuration
For those seeking to optimize their Outlook experience, delving into advanced customization options can yield significant productivity gains. These features allow for a more nuanced and tailored approach to email management, catering to specific workflow needs and personal preferences. Let’s explore some of the more sophisticated customization techniques available in Outlook.
Conditional Formatting for Better Organization
Conditional formatting allows you to visually distinguish different types of emails based on specific criteria:
- In “View Settings,” click on “Conditional Formatting.”

- Click “Add” to create a new rule.

- Name your rule and click “Font” to set the visual style.

- Click “Condition” to define the criteria for applying this formatting.

You might create rules to:
- Highlight emails from your boss in red
- Make unread emails from a specific project team bold
- Italicize low-priority newsletters
Creating Custom Views for Specific Purposes
While we touched on creating new views earlier, advanced users can take this further by designing views for specific scenarios:
- Project Views: Create a view that groups emails by project categories and includes columns for deadlines and assigned team members.
- Client Communication View: Design a view that prioritizes emails from clients, groups them by company, and includes a column for the last response date.
- Action Item View: Develop a view that filters for emails flagged for follow-up, sorted by due date, with a column for the required action.
Utilizing Search Folders for Dynamic Views in Outlook
Search Folders are virtual folders that contain views of all email items matching specific search criteria:
1. Right-click on “Search Folders” in your folder pane and select “New Search Folder.”
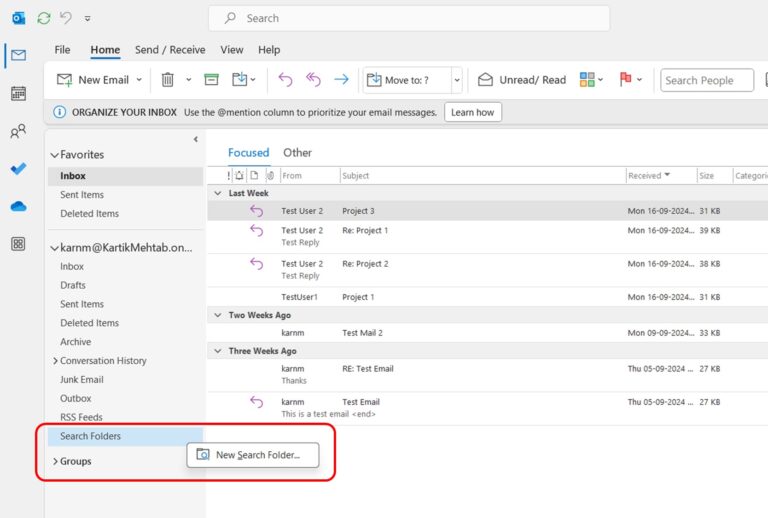
2. Choose a predefined Search Folder or create a custom one.

3. Define your search criteria.

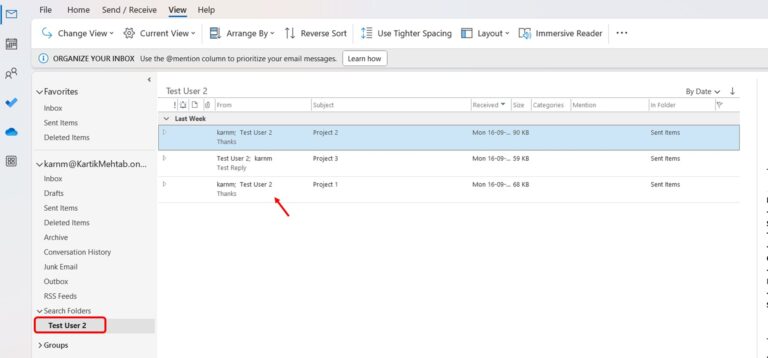
- As per our selection New search folder been created with all the mails sent by Test User 2 in it
Utilizing Categories for Visual Organization in Outlook
Categories provide a flexible way to organize emails visually across different views:
- Right-click on an email and select “Categorize.”
- Choose an existing category or select “All Categories” to create new ones.
- Assign colors and hotkeys to your categories for quick application.
In your custom views, you can then:
- Group or sort by category
- Use conditional formatting based on categories
- Create filters that include or exclude specific categories
This creates a dynamic view that automatically updates as new emails meet the criteria. For instance, you could create a Search Folder for:
- All emails from a specific client or project team
- Unread messages older than a week
- Emails with attachments larger than a certain size
Search Folders provide a powerful way to create persistent, automatically updating views based on complex criteria.
Troubleshooting Common Outlook View Issues
Customizing your Outlook views is an excellent way to optimize your workflow and organize your information more effectively. However, sometimes things don’t go as planned, and you may encounter issues with your Outlook view—such as missing columns, incorrect layouts, or even a view that becomes too cluttered or complex to manage. Fortunately, most Outlook view problems can be easily fixed by resetting the View, adjusting display settings, or addressing configuration issues.
Issue 1: Missing Columns or Panes in the Inbox
One of the most common issues users face is missing columns or panes in their Inbox. For example, you may notice that the From or Date column has disappeared or the reading pane isn’t displaying as expected. Here’s how to fix this:
Steps to Restore Missing Columns:
- Open the Folder Where Columns Are Missing: Go to the folder (e.g., Inbox or Sent Items) where you notice the missing column.
- Go to the “View” Tab: In the top menu, click the View tab to access customization options.
- In the ribbon, click on “Current View” and in the menu that apears click on “View Settings.” This will open a window where you can adjust how your View is configured.
- Select “Columns”: Click the Columns button. A list of available columns will appear.

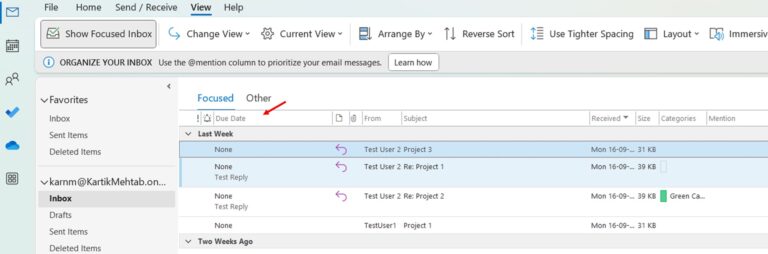
- Add Missing Columns: If a column such as “From,” “Received,” or “Subject” is missing, you can add it back. Click Add, choose the column you want from the list.
- Rearrange Column Order (Optional): To change the order of the columns, you can move them up or down using the arrow buttons on the Columns screen.
- Click OK: After making changes, click OK to return to your customized View with the missing columns restored.

- In the View Setting pane click OK.

- You can see the selected column in your folder view
Steps to Restore the Missing Reading Pane:
- Open the Folder with the Missing Pane: Navigate to the folder (e.g., Inbox) where the reading pane isn’t visible.
- Go to the “View” Tab. In the ribbon, click on View.
- Click “Reading Pane”: Look for the Reading Pane button in the View tab. It will show options for where to position the pane.
- Choose a Position: Depending on where you want the reading pane to be displayed, select either Right, Bottom, or Off. The pane will reappear in the chosen location.
Issue 2: Display Problems Across Multiple Monitors
Using Outlook on multiple monitors can sometimes lead to display issues, such as windows not appearing where expected, incorrect scaling, or Outlook opening on the wrong monitor. Here’s how to fix these common multi-monitor issues.
Steps to Resolve Outlook Display Issues on Multiple Monitors:
- Check Monitor Settings: Right-click on your desktop and select Display Settings. Make sure that both monitors are set to the same resolution and scaling settings, as different resolutions or scaling percentages can cause display issues in Outlook.
- Move Outlook to the Correct Monitor: If Outlook opens on the wrong monitor, simply drag the window to the correct screen. Once you’ve positioned it, close Outlook. The next time you open the app, it should remember its position and open on the same monitor.
- Maximize Outlook on the Correct Monitor: If Outlook doesn’t open maximized, move the window to the desired monitor, maximize it, and close the app. Reopening Outlook will keep it maximized on the correct monitor.
- Check Display Modes: If using different display modes (e.g., Extend vs. Duplicate), make sure you’ve chosen Extend These Displays in the Display Settings. This allows Outlook to recognize both monitors and adjust accordingly.
Issue 3: Conditional Formatting Not Working as Expected
Conditional formatting allows you to highlight certain emails based on rules you set (e.g., unread emails appear in bold). If conditional formatting isn’t working correctly, here’s how to troubleshoot it.
Steps to Fix Conditional Formatting Issues:
- Check Conditional Formatting Settings: Go to the folder where the conditional formatting isn’t working. In the View tab, click View Settings.
- Click on “Conditional Formatting”: In the View Settings window, click Conditional Formatting. This will open the list of rules you have set up.
- Ensure the Rules Are Active: Check that the rules you want to use are enabled (i.e., they have a checkmark next to them). If a rule isn’t checked, it won’t be applied.
- Check Rule Criteria: If the rule is enabled but not working, click on it and then click Condition. Review the criteria to ensure it matches the emails you want to format. For example, if you want unread emails to appear in bold, ensure the Condition is set to filter unread messages.
- Save and Apply Changes: After adjusting the conditional formatting rules, click OK to save and apply the changes to your View.
Conclusion
Mastering Outlook views is a powerful way to transform your email management experience and boost productivity. From the efficient Compact View to the relationship-centric People View, each layout offers unique benefits that cater to different work styles and needs.
By understanding the strengths of each view and learning how to customize them, you can create an email environment that aligns perfectly with your workflow, whether you’re triaging a busy inbox, managing complex projects, or nurturing important professional relationships.
The true power of Outlook views lies not just in using them individually but in combining them strategically to address various aspects of your work. Remember, the key to success with Outlook views is experimentation and personalization.
Take the time to explore different configurations, regularly refine your setup, and don’t hesitate to adjust your views as your needs evolve. With a tailored Outlook environment, you’ll be well-equipped to handle the challenges of modern professional communication.
