As someone who has spent 24 years working in enterprise IT, managing endpoints, securing devices across large organizations, and responding to security incidents involving stolen laptops and improperly decommissioned PCs, I can tell you that enabling BitLocker is one of the most effective things you can do to protect your Windows 11 PC.
Forrester Research’s 2023 State of Data Security report found that lost or stolen devices account for 17% of all data breaches, yet only 7% of security leaders treat it as a primary concern.
More recently, Blancco’s 2025 State of Data Sanitization Report, based on 2,000 IT and cybersecurity leaders globally, found that stolen devices and drives (41%) are now a more common cause of data loss than ransomware (32%) or stolen credentials (36%). The same report found that 17% of breach victims had data compromised through devices that were redeployed or recycled with sensitive data still on them.
That is exactly what happens when a laptop is sold, sent in for repair, or recycled without encryption in place. BitLocker closes that exposure entirely. It takes minutes to set up, costs nothing, and is already built into your operating system. Most users never turn it on, and that is a mistake worth fixing today.
Whether you are setting up a new laptop and want encryption active from day one, securing a work device that holds sensitive files, or just trying to get BitLocker running without hitting confusing errors mid-setup, this guide has you covered.
I will walk you through everything you need to check before enabling BitLocker, and then show you how to turn it on using four different methods: Control Panel, the Settings app, PowerShell, and Command Prompt, so you can pick whichever method works best for your situation.
Each method includes step-by-step instructions verified against a live Windows 11 system, with clear guidance on choosing the right encryption mode and scope for your specific setup. No guesswork, no filler.
BitLocker protects your data at rest, but it does not remove existing virus and malware threats. Running regular antivirus scans alongside BitLocker ensures your device is protected against viruses, malware, and data theft. Learn how to run a Windows Defender scan on Windows 11 if you are using the built-in option.
Table of Contents
What You Need Before Enabling BitLocker on Windows 11
Before you enable BitLocker, it’s worth spending 5 minutes to make sure your system is ready. Skipping this step is the number one reason people hit confusing errors mid-setup — or worse, get locked out of their own drive. The good news? Every check on this list takes under a minute to complete.
Here is everything you need to have in place before enabling BitLocker on Windows 11.
1. The Right Windows 11 Edition
Full BitLocker management is only available on Windows 11 Pro, Enterprise, and Education. Windows 11 Home does not include BitLocker; instead, it offers a lighter version called Device Encryption. If you’re on Windows 11 Home, skip ahead to the Windows 11 Home section of this guide.
How to check your Windows 11 edition:
- Press Windows key + R, type winver, and press Enter.
- Look for the edition name next to Windows 11, it should say Pro, Enterprise, or Education to confirm BitLocker is available on your device.

2. A TPM 2.0 Chip
TPM 2.0 (Trusted Platform Module) is a hardware security chip that stores BitLocker’s encryption keys. Since Windows 11 requires TPM 2.0, your PC almost certainly has one, but it may be turned off in your BIOS/UEFI firmware, especially on older or custom-built systems.
Depending on your system, the TPM may appear as Intel PTT (Platform Trust Technology) on Intel systems, or AMD fTPM (Firmware TPM) on AMD systems. These are firmware-based implementations that work the same way as a discrete TPM chip.
How to check your TPM status:
- Press Windows key + R, type tpm.msc, and press Enter to open the TPM Management console.

- Check the Status section — it should read “The TPM is ready for use.”

- Check Specification Version under TPM Manufacturer Information and confirm it shows 2.0.
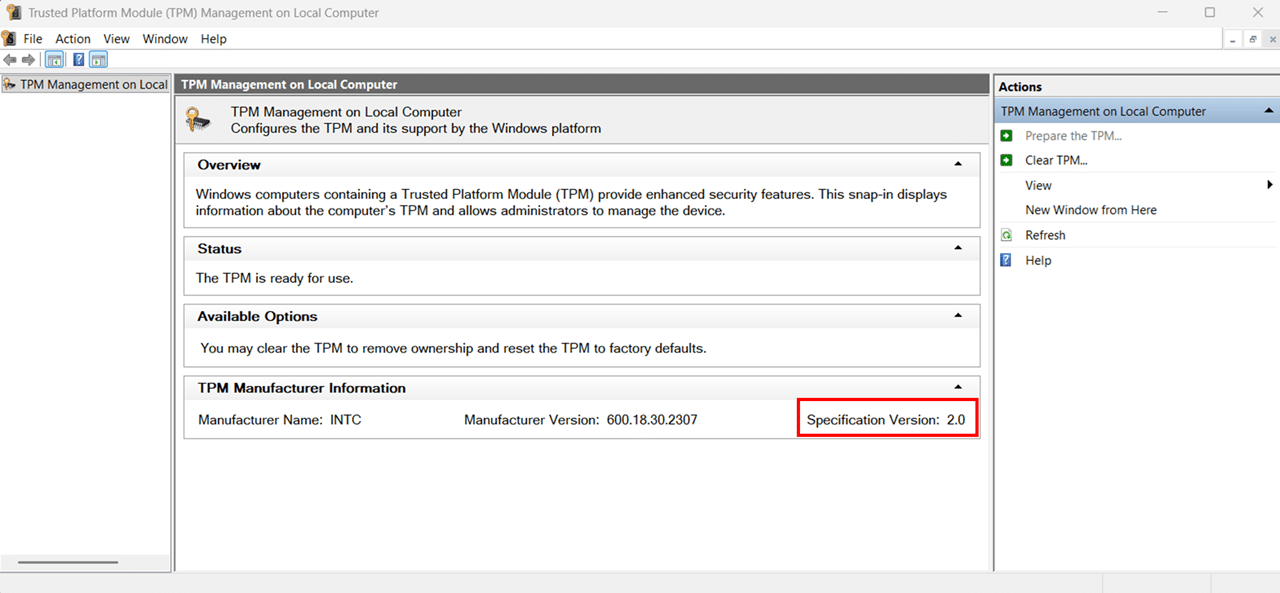
Note: If the console says “Compatible TPM cannot be found,” your TPM is likely disabled in BIOS/UEFI rather than absent entirely. Restart your PC, enter BIOS/UEFI (usually by pressing F2, F10, Del, or Esc during startup), navigate to the Security settings, and enable TPM, fTPM, or PTT depending on your system. Save and exit, then recheck tpm.msc.
3. An Administrator Account
You must be signed in as a local administrator to enable BitLocker. A standard user account does not have the permissions needed to change encryption settings. This is a common stumbling block on shared PCs or workplace devices where your account may have limited privileges.
How to check your account type:
- Press Windows key + I to open Settings, then navigate to Accounts > Your info.
- Look below your account name: it should say Administrator. If it says Standard User, you’ll need to switch to or sign in with an administrator account before proceeding.

4. UEFI Firmware
BitLocker works best and TPM 2.0 only functions correctly when your PC uses UEFI firmware instead of the older Legacy BIOS mode. According to Microsoft, TPM 2.0 is not supported in Legacy or Compatibility Support Module (CSM) modes of the BIOS. If your PC runs Windows 11, it almost certainly boots in UEFI mode already, since UEFI is a Windows 11 system requirement.
How to confirm your firmware mode:
- Press Windows key + R, type msinfo32, and press Enter.

- Look for BIOS Mode in the right-hand panel — it should say UEFI. If it says “Legacy,” you’ll need to switch your firmware to UEFI mode in your motherboard settings before BitLocker will work correctly.

5. A Plan for Your Recovery Key
This is arguably the most important prerequisite of all. Before you enable BitLocker, you need to decide where you’ll save your recovery key — a 48-digit numerical key that unlocks your drive if something goes wrong. If you ever lose access to this key and BitLocker locks you out, your data is gone permanently. There is no back door.
Windows 11 offers four recovery key backup options:
- Save to your Microsoft account — Easiest and most reliable option for personal PCs. The key is accessible from any browser at account.microsoft.com.
- Save to a USB flash drive — Good for air-gapped or offline systems. Store the USB drive safely and separately from your laptop.
- Save to a file — Saves a text file to a location you choose, ideally a separate drive or cloud storage like OneDrive.
- Print the recovery key — A physical printout stored in a secure place is a solid backup, especially as a secondary copy.
- Save to Active Directory or Microsoft Entra ID — For enterprise or domain-joined devices, this is the standard approach. IT admins can retrieve keys centrally from Entra ID or AD DS.
Recommendation: Use at least two backup methods. Saving to your Microsoft account plus printing a copy is a practical combination for most users. For enterprise devices, Active Directory or Microsoft Entra ID backup should be the primary method, with a file backup as a secondary.
6. A Stable Power Source
Encrypting a drive is an intensive process that can take anywhere from a few minutes to a couple of hours, depending on the drive’s size and the amount of data it contains. If your laptop loses power partway through encryption, you risk drive corruption. Before starting, plug your laptop into a power source and keep it connected until the encryption process completes.
Desktop PCs don’t carry this same risk, but it’s still good practice to avoid initiating encryption during periods when you might need to restart, such as when pending Windows updates are installed.
How to Turn On BitLocker in Windows 11 via Control Panel
The Control Panel method is the most complete way to enable BitLocker on Windows 11. It walks you through every option — recovery key backup, encryption scope, and encryption mode — giving you full visibility and control over the setup process. If you’re enabling BitLocker for the first time, this is the method I’d recommend starting with.
This section covers enabling BitLocker on your OS drive (C:) and on secondary data drives separately, since the setup wizard behaves slightly differently for each.
How to Enable BitLocker on Your OS Drive (C:) via Control Panel
Your OS drive is the drive where Windows 11 is installed — almost always the C: drive. Encrypting it protects your operating system files, user data, applications, and everything else stored on your primary drive.
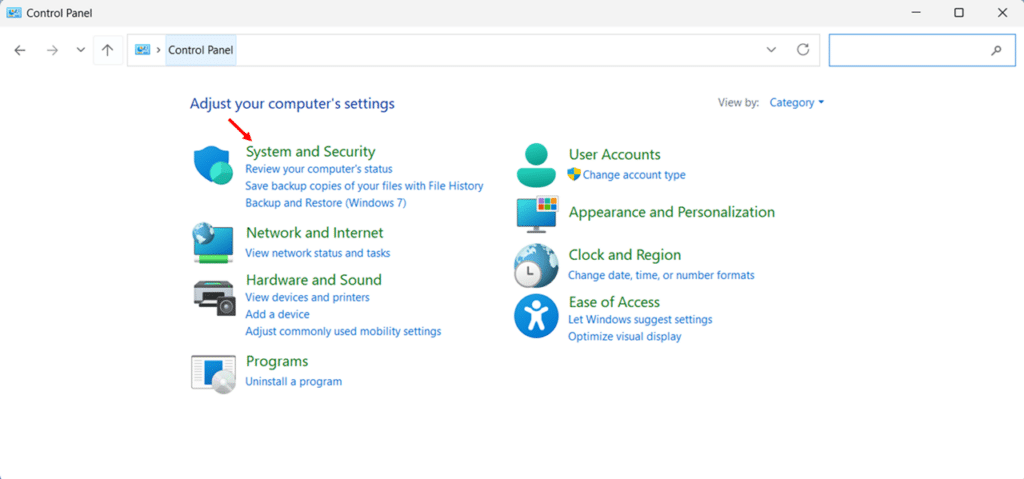
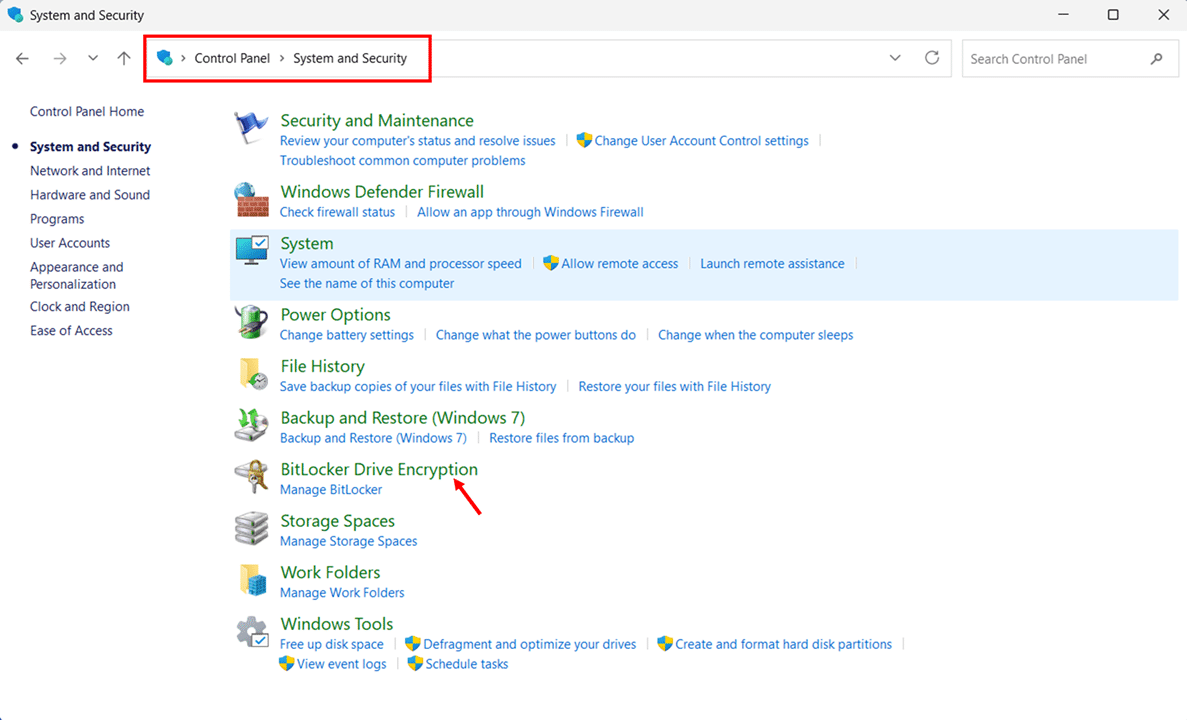
- Press Windows key + R, type control, and press Enter to open the Control Panel.

- Click System and Security to expand the category.
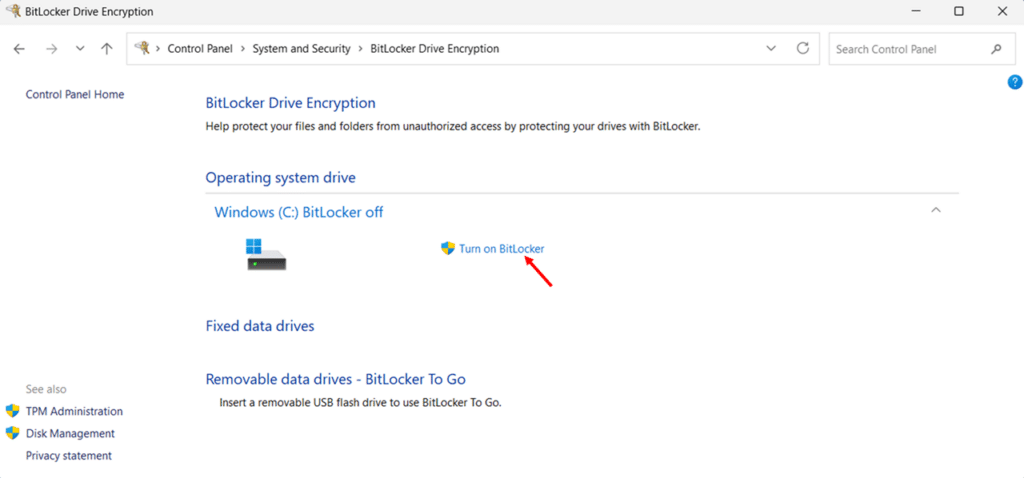
- Click BitLocker Drive Encryption. The BitLocker management page opens, showing the encryption status of all drives on your system.

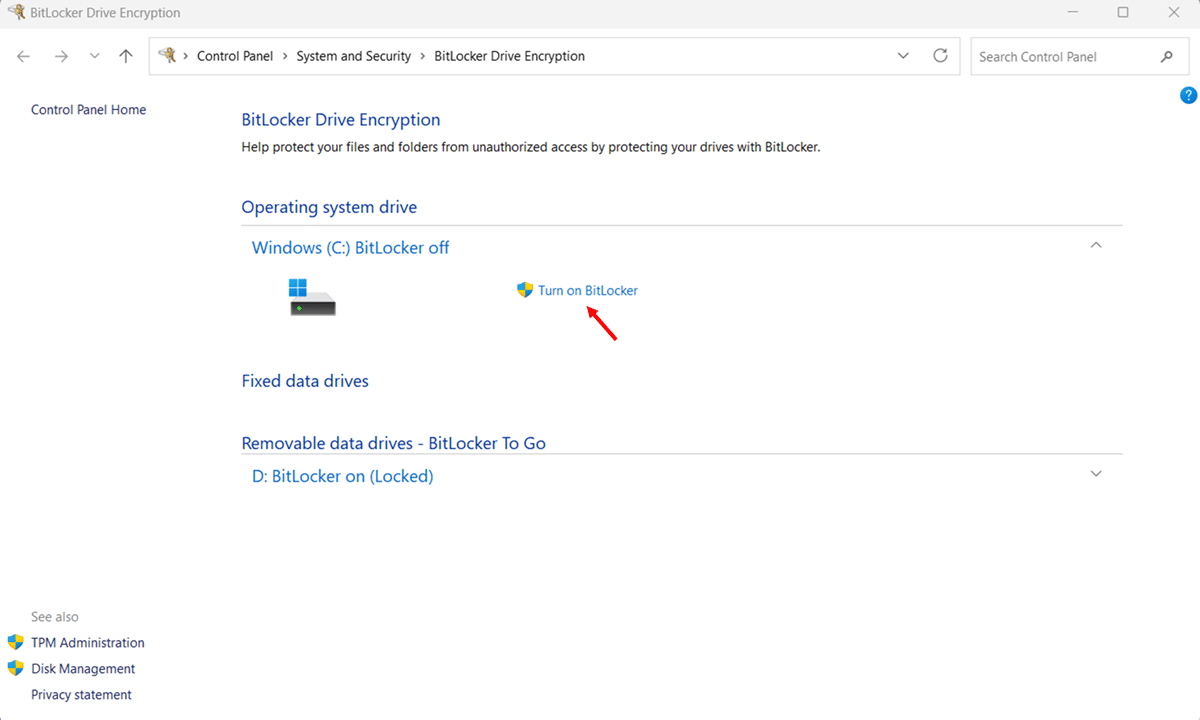
- Under the Operating System drive, click Turn on BitLocker next to your C: drive. Windows will run a quick system check before the wizard opens.
- Choose how to back up your recovery key from the options shown and click Next. You will see up to four options: Save to your Entra ID account, Save to your Microsoft account, Save to a file, and Print the recovery key.
Note that Save to your Entra ID account will appear in the wizard even if your device is not Entra ID joined. But selecting it on a non-joined device will return an error. Only use this option if your device is actually joined or registered to Microsoft Entra ID.

Important: Do not skip this step. Your recovery key is the only way to regain access to your drive if BitLocker locks you out. Save it in at least two places — for example, your Microsoft account and a printed copy stored safely.
- Choose how much of your drive to encrypt, then click Next.
- Encrypt used disk space only — Faster. Best for new PCs or clean Windows installations where the unused space has never held sensitive data.
- Encrypt entire drive — Slower but more thorough. Best for PCs already in use, where deleted files may still be recoverable from unencrypted free space.

- Choose your encryption mode, then click Next.
- New encryption mode (XTS-AES) — Recommended for OS drive and any internal fixed drives. This is the stronger, more modern encryption algorithm and is fully supported on Windows 10 and Windows 11.
- Compatible mode (AES-CBC): Use this only for removable drives (USB or external) that you might plug into older Windows systems. It’s compatible with Windows 7 and 8.1, but uses an older encryption standard.

- Leave the “Run BitLocker system check” checkbox selected, then click Continue. This check verifies that BitLocker can read your recovery key before encrypting the drive — skipping it is not recommended.

- Click Restart now. Your PC will restart, run the system check, and begin encrypting the drive automatically after Windows loads.

- Monitor encryption progress by clicking the BitLocker Drive Encryption icon in the system tray, or by returning to Control Panel > BitLocker Drive Encryption. You can use your PC normally during the encryption process.

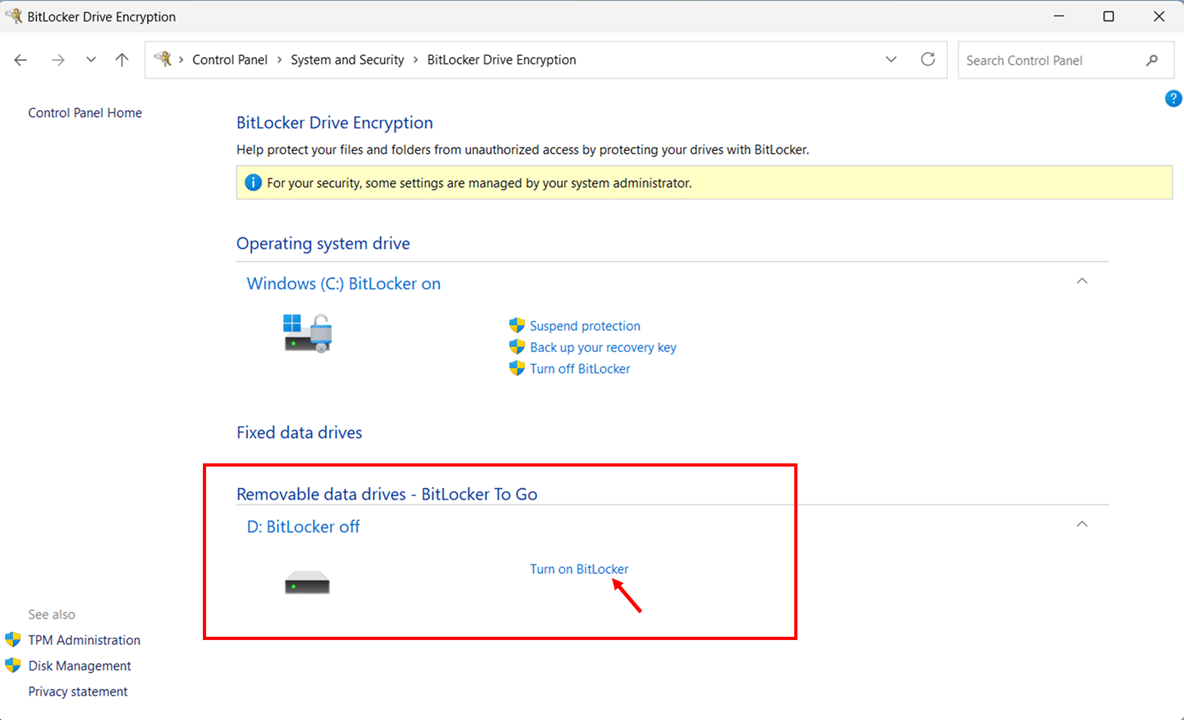
How to Enable BitLocker on a Secondary Data Drive via Control Panel
If you have a secondary internal drive (D:, E:, etc.) or an external drive you want to encrypt, the process is similar but includes an extra step of choosing how the drive unlocks. Unlike your OS drive, which unlocks automatically via the TPM at boot, a data drive requires a password or a smart card to unlock after you log in.
- Open Control Panel > System and Security > BitLocker Drive Encryption.
- Under Fixed data drives or Removable data drives, locate your target drive and click Turn on BitLocker.
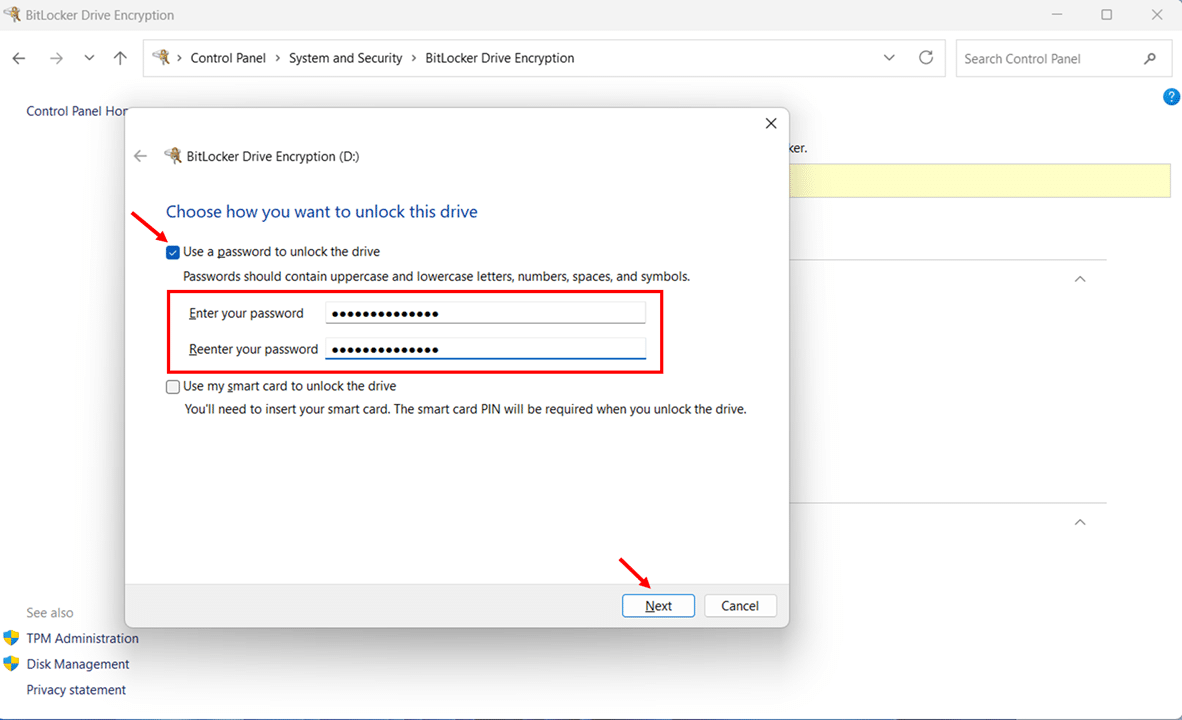
- Select Use a password to unlock the drive, enter a strong password in both the Enter your password and Reenter your password fields, then click Next.
- Choose how to back up your recovery key and click Next.

- Select how much of the drive to encrypt: Encrypt used disk space only or Encrypt entire drive and click Next.

- Choose your encryption mode. Select New encryption mode for internal fixed drives, or Compatible mode for removable drives you use across multiple Windows systems, then click Next.

- Click Start encrypting. Encryption begins immediately — no restart is required for data drives.

How to Turn On BitLocker in Windows 11 via the Settings App
The Settings app offers an alternative path to enabling BitLocker on Windows 11. The Device encryption page in Settings shows a simple on/off toggle. Toggling it On starts encryption in the background immediately, no wizard, no extra steps. The recovery key is backed up silently to your Microsoft account.
It is also the only built-in route available to Windows 11 Home users, who access encryption through the Device Encryption toggle rather than the full BitLocker management interface.
How to Turn On BitLocker via the Settings App (Toggle Switch)
These steps apply to both Windows 11 Pro and Windows 11 Home. The Device encryption page and toggle work the same way on both editions.
- Press Windows key + I to open the Settings app.
- Select Privacy & security from the left-hand navigation panel.
- Click Device encryption under the Security section.
 step 1, 2 and 3")
- Toggle Device encryption to On. The page shows “Encryption is in progress” while encryption runs in the background.
 step 4")
Important: When you turn on Device encryption via the Settings toggle, there is no wizard or prompt asking where to save the recovery key. It is backed up automatically and silently depending on how your device is joined
Microsoft Entra ID joined device: Recovery key is backed up to your organisation’s Entra ID tenant. Retrievable by your IT admin from the Entra admin center.
Active Directory domain joined device: Recovery key is backed up to Active Directory Domain Services (AD DS). Retrievable by your IT admin from the domain controller.
Personal device with Microsoft account (not domain or Entra joined): Recovery key is backed up to your Microsoft account. Verify it was saved at account.microsoft.com/devices/recoverykey.
Windows 11 Home requirements for Device Encryption: You must be signed in with a Microsoft account (not a local account), and your device must have a TPM 2.0 chip with UEFI Secure Boot enabled. Device Encryption is not available on devices using local accounts. Windows needs your Microsoft account to automatically store the recovery key.
How to Turn On BitLocker via Setting App (BitLocker Drive Encryption)
On Windows 11 Pro, Enterprise, and Education editions, the BitLocker drive encryption link under Related on the Device encryption page opens the full BitLocker Drive Encryption management panel in Control Panel. This gives you more control over recovery key backup options. You can save the key to a file, print it, or save it to your Microsoft or Entra ID account. This method is not available on Windows 11 Home.
- Press Windows key + I to open the Settings app.
- Select Privacy & security from the left-hand navigation panel.
- Click Device encryption under the Security section on the right.
 step 1, 2 and 3")
- In the Device encryption page, click BitLocker drive encryption under the Related section. The BitLocker Drive Encryption management panel opens in Control Panel.
 step 4")
- Click Turn on BitLocker next to the C: drive under Operating system drive. The BitLocker Drive Encryption wizard opens.
- Complete the wizard: back up your recovery key, choose encryption scope and mode, run the system check, and restart. These steps are identical to those in the Control Panel section.
How to Turn On BitLocker in Windows 11 via PowerShell
PowerShell is the go-to method for enabling BitLocker when you need speed, consistency, or automation. IT admins use it to deploy BitLocker across dozens or hundreds of machines without manually touching each one. Power users rely on it for scripting and precise control over encryption settings. And compared to GUI methods, PowerShell gives you direct access to all BitLocker parameters in one place.
This section covers the most practical PowerShell scenarios: enabling BitLocker on an OS drive with TPM, adding a PIN for stronger pre-boot security, enabling it on a data drive, checking encryption status, and backing up recovery keys to a file, Active Directory, or Microsoft Entra ID.
Best suited for: IT administrators managing BitLocker across multiple devices, power users who prefer command-line control, and anyone deploying BitLocker silently via scripts or automation tools such as Microsoft Intune or Group Policy. For single-device home use, the Control Panel or the Settings app methods are simpler.
Open PowerShell as Administrator
All BitLocker PowerShell commands require an elevated session. There are two ways to open PowerShell as Administrator:
- Press Windows key + S, type PowerShell, right-click Windows PowerShell in the results, and select Run as administrator.
- Alternatively, press Windows key + X and select Terminal (Admin) or Windows PowerShell (Admin) from the quick menu.

Note: Click Yes on the User Account Control (UAC) prompt when it appears. If the UAC prompt does not appear, your PowerShell session is likely not elevated and BitLocker commands will fail with an access denied error.
Enable BitLocker on the OS Drive (TPM + Recovery Password)
This is the recommended approach for most Windows 11 devices. It uses the TPM chip to unlock the drive automatically at boot, and generates a recovery password as a backup protector in case the TPM check fails. According to Microsoft, adding a recovery password to an OS volume before enabling BitLocker is considered best practice.
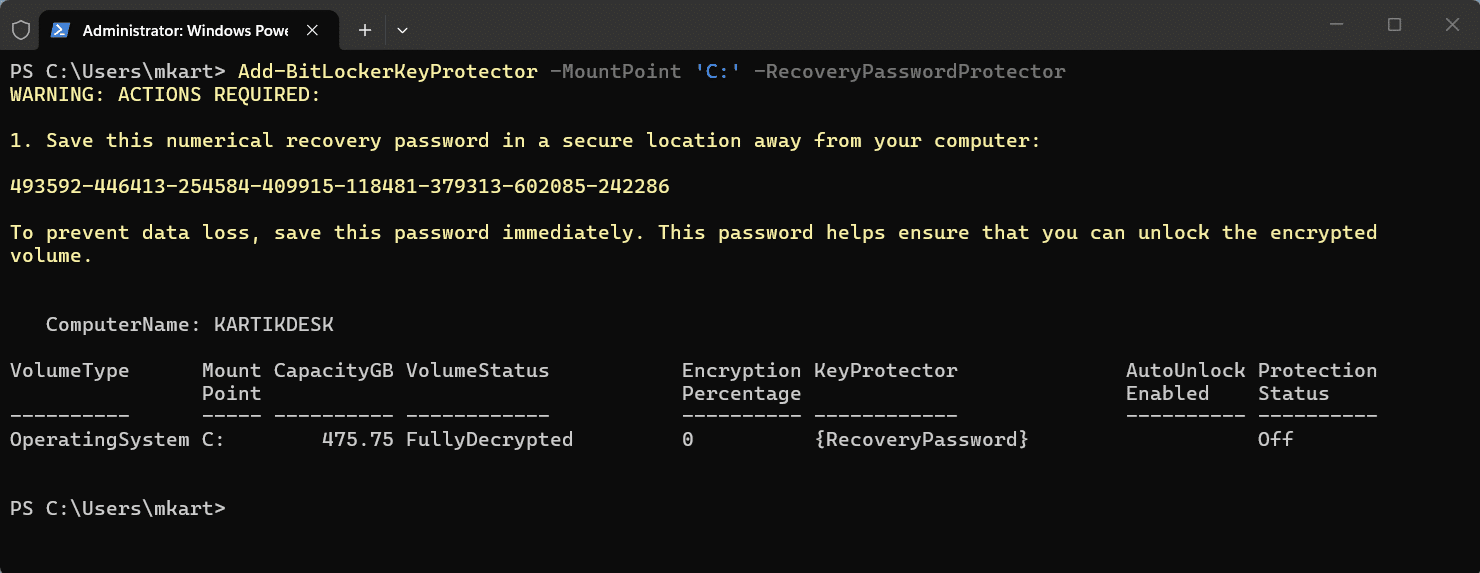
- Add a recovery password protector to the C: drive by running the following command:
Add-BitLockerKeyProtector -MountPoint ‘C:’ -RecoveryPasswordProtector
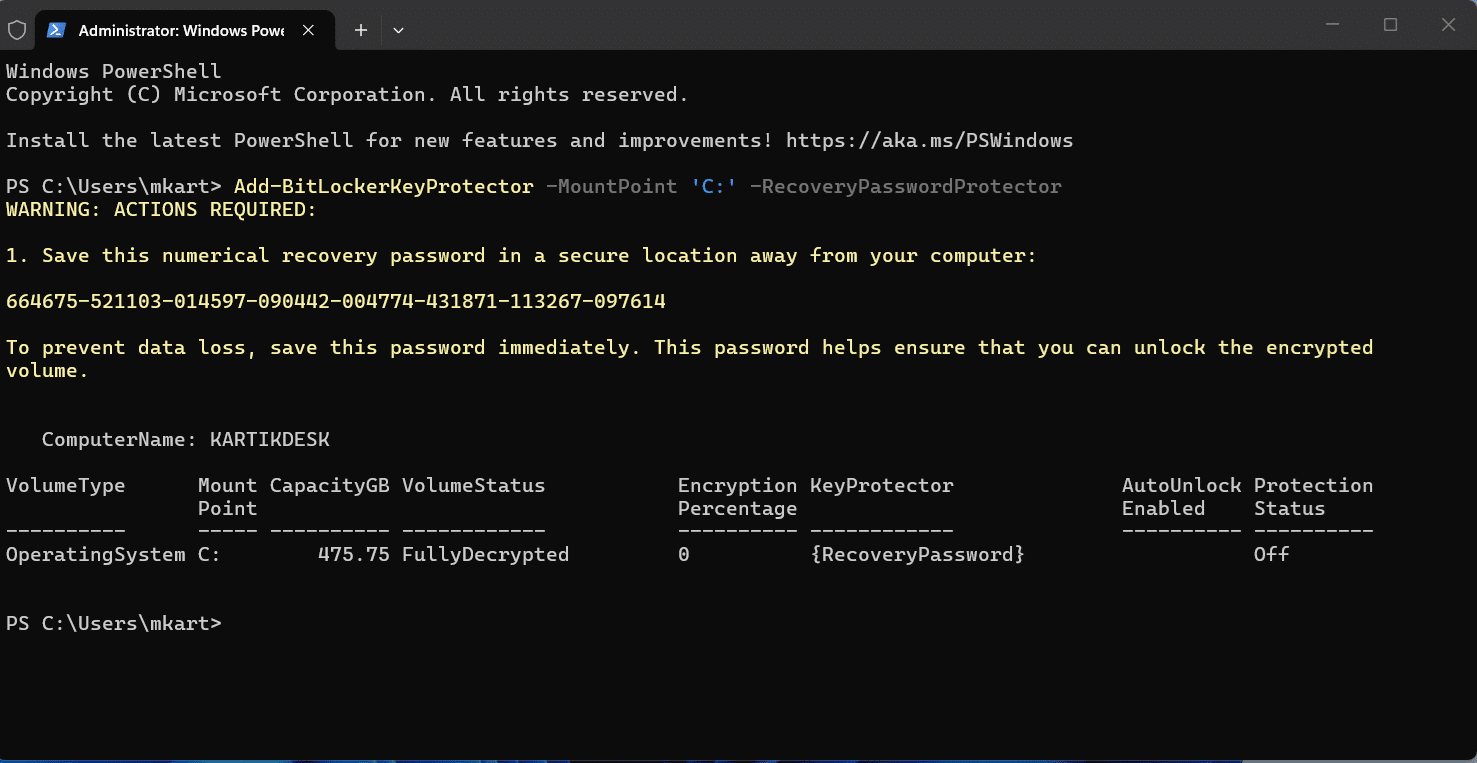
PowerShell will output a recovery password. Copy it and store it securely before moving to the next step.
- Enable BitLocker on the C: drive using the TPM protector:
Enable-BitLocker -MountPoint ‘C:’ -EncryptionMethod XtsAes256 -TpmProtector

The -EncryptionMethod XtsAes256 flag specifies XTS-AES 256-bit encryption, the strongest available option and the recommended choice for OS and fixed drives on Windows 11. Replace with XtsAes128 if your policy requires 128-bit.
- Restart your PC. BitLocker runs a hardware test on the first boot to verify the TPM can correctly read the encryption key before committing to full encryption. Encryption begins automatically after the restart completes and Windows loads.
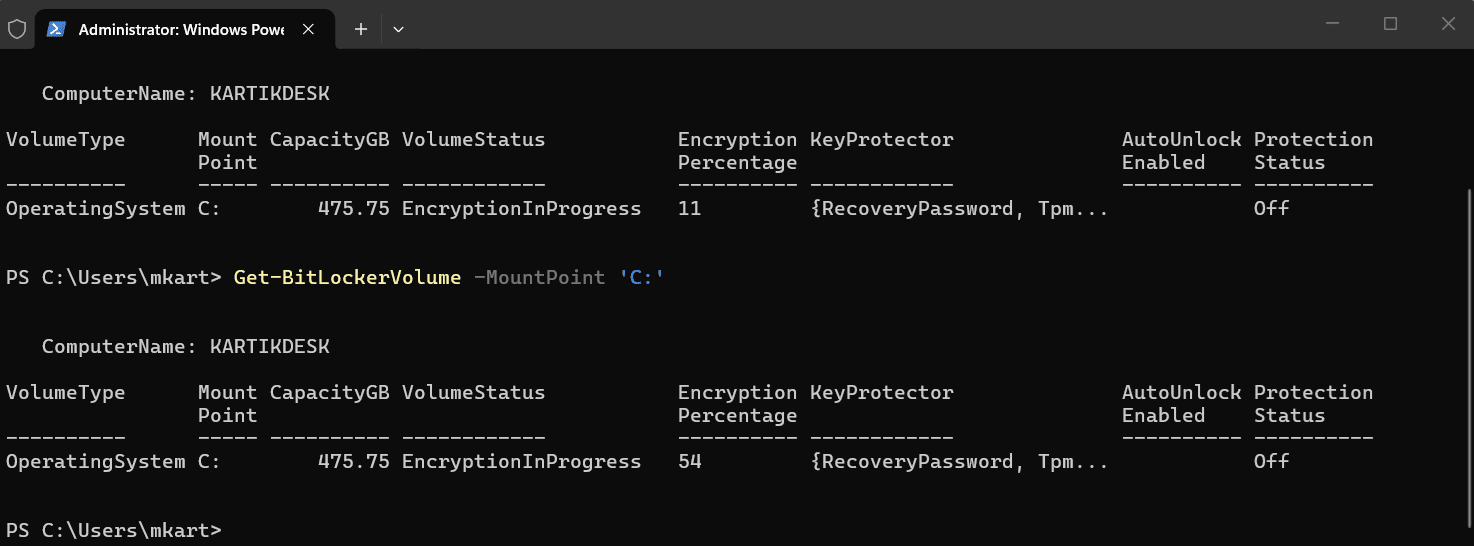
- Verify encryption has started by checking the volume status:
Get-BitLockerVolume -MountPoint ‘C:’
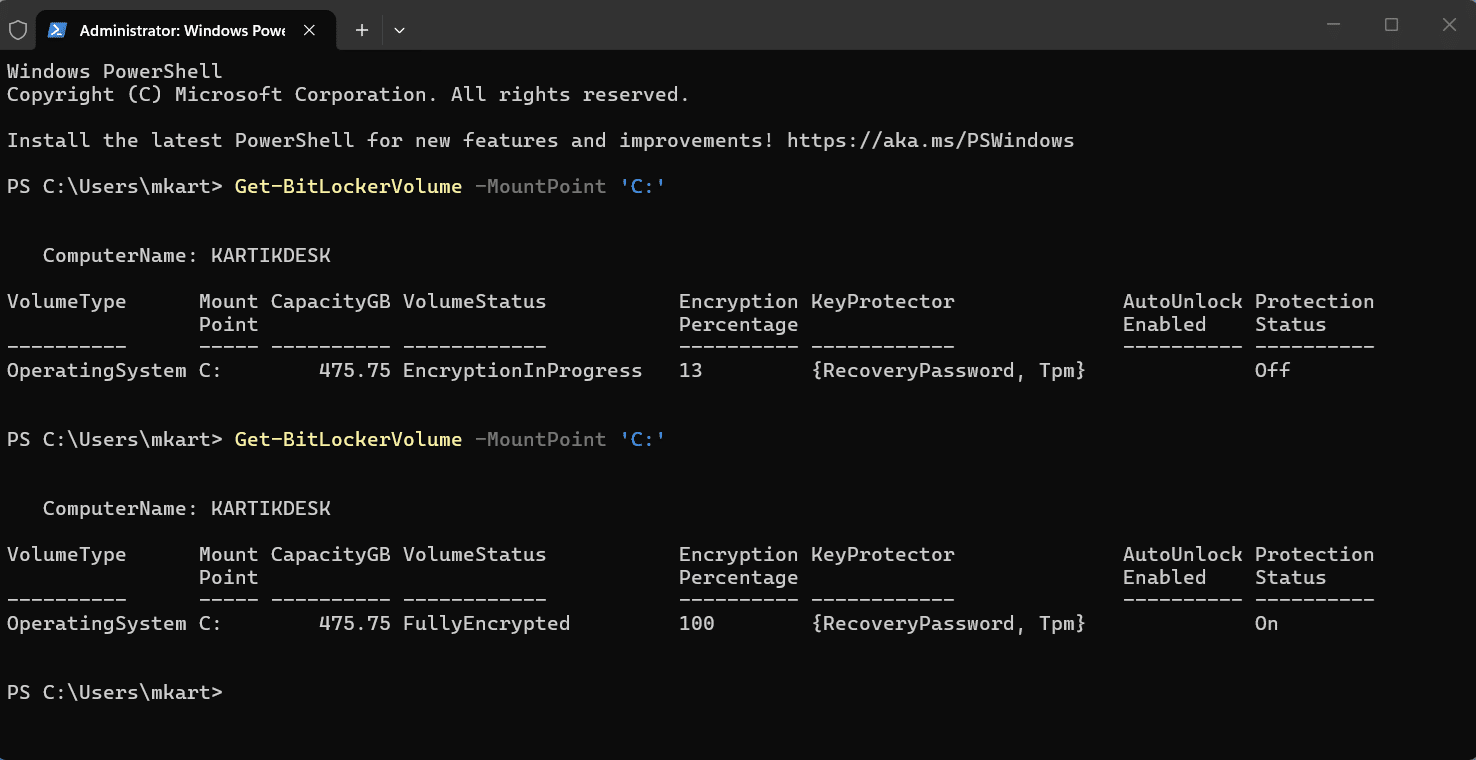
Look for VolumeStatus: EncryptionInProgress and the EncryptionPercentage field to track progress. When complete, VolumeStatus will show FullyEncrypted.
Enable BitLocker with TPM and a Pre-Boot PIN via PowerShell
Adding a PIN to BitLocker means the drive will not unlock at boot until the user enters the correct PIN, even if the TPM check passes. This is a stronger security posture for high-risk environments, since it adds a second authentication factor that is not stored on the device. The PIN must be between 4 and 20 digits.
- Create a secure string to hold the PIN — this keeps the PIN out of plain-text command history:
$SecurePin = ConvertTo-SecureString ‘123456’ -AsPlainText -Force

Replace ‘123456’ with your chosen PIN. Use a strong, memorable number. This will be required at every boot.
- Add a recovery password protector as a backup:
Add-BitLockerKeyProtector -MountPoint ‘C:’ -RecoveryPasswordProtector
Save the recovery password output before continuing.
Prerequisite: Enable PIN via Group Policy first – By default, Windows Group Policy does not permit a PIN at startup. Skipping this step will return error 0x80310060. Complete the following steps before running the PowerShell commands below.
- Press Windows key + R, type gpedit.msc, and press Enter.
- Navigate to Computer Configuration > Administrative Templates > Windows Components > BitLocker Drive Encryption > Operating System Drives.
- Double-click Require additional authentication at startup. Select Enabled at the top of the window. The dropdown options below — including Configure TPM startup PIN — are only visible after selecting Enabled. They will not appear while the policy is set to Not configured.
- In the Configure TPM startup PIN dropdown, select Allow startup PIN with TPM. Click Apply then OK.
- Open an elevated Command Prompt and run gpupdate /force to apply the policy immediately.

- Enable BitLocker using TPM and PIN as the combined key protector:
Enable-BitLocker -MountPoint ‘C:’ -EncryptionMethod XtsAes256 -Pin $SecurePin -TPMandPinProtector
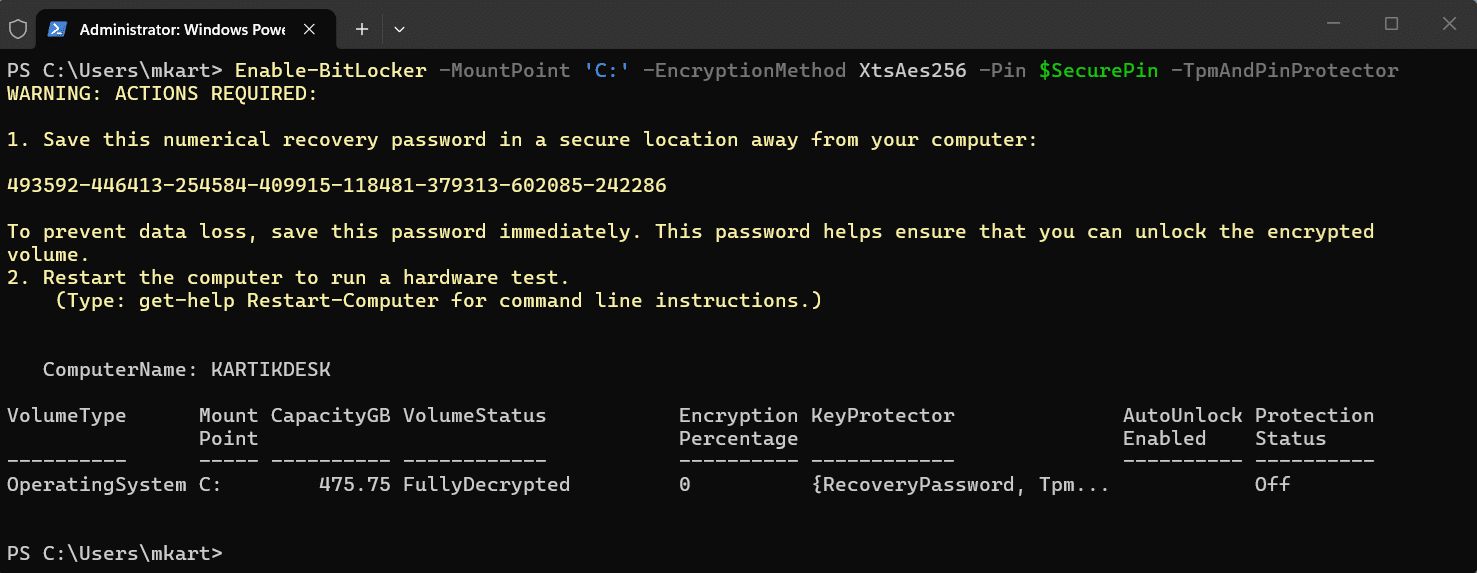
- Restart the PC this is required for two reasons: it runs the hardware test to verify the TPM can read the encryption key, and it activates the PIN prompt at pre-boot. After the restart, enter your PIN when prompted, this confirms the configuration is working correctly. Encryption then begins automatically in the background as Windows loads.
Enable BitLocker on a Data Drive
Data drives use a password protector instead of TPM, since the TPM is tied to the OS boot process. The drive will prompt for a password each time it is accessed after login.
- Create a secure string for the drive password:
$SecurePass = ConvertTo-SecureString ‘YourStrongPassword’ -AsPlainText -Force

Replace the placeholder with your chosen password.
- Enable BitLocker on the data drive — replace D: with your drive letter:
Enable-BitLocker -MountPoint ‘D:’ -EncryptionMethod XtsAes256 -Password $SecurePass -PasswordProtector
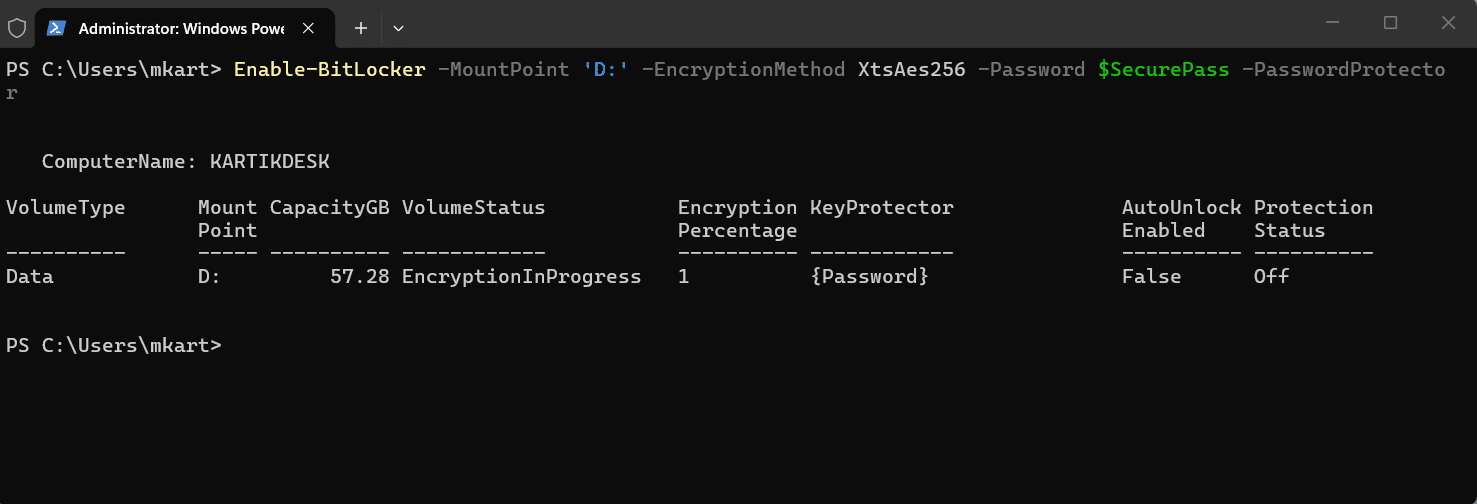
Encryption begins immediately. No restart is required for data drives.
Deployment at scale: PowerShell BitLocker scripts can be deployed across domain-joined devices using Group Policy startup scripts or directly through Microsoft Intune as a native PowerShell script deployment. There is no additional packaging required. This makes PowerShell the preferred choice for enterprise-wide BitLocker rollouts in both traditional Active Directory and modern cloud-managed environments.
How to Turn On BitLocker in Windows 11 via Command Prompt
Command Prompt has been managing BitLocker through the manage-bde utility since Windows Vista. It is lean, fast, and works in environments where PowerShell execution policies are locked down, making it a reliable fallback for IT admins and a practical option for anyone comfortable with a terminal. Every major BitLocker action you can perform in the GUI is also available here.
This section covers enabling BitLocker on an OS drive with TPM and a recovery password, adding a pre-boot PIN for stronger security, encrypting a secondary data drive, checking encryption status, and retrieving and backing up your recovery key, all using manage-bde.
Open Command Prompt as Administrator
All manage-bde commands require an elevated Command Prompt. Use either of the following methods:
- Press Windows key + S, type cmd, right-click Command Prompt in the results, and select Run as administrator.
- Alternatively, press Windows key + X and select Terminal (Admin), then switch to the Command Prompt tab by pressing Ctrl + Shift + 2.
Note: Click Yes on the User Account Control prompt. If the title bar of the Command Prompt window does not show Administrator, the session is not elevated, and manage-bde commands will return an access denied error.
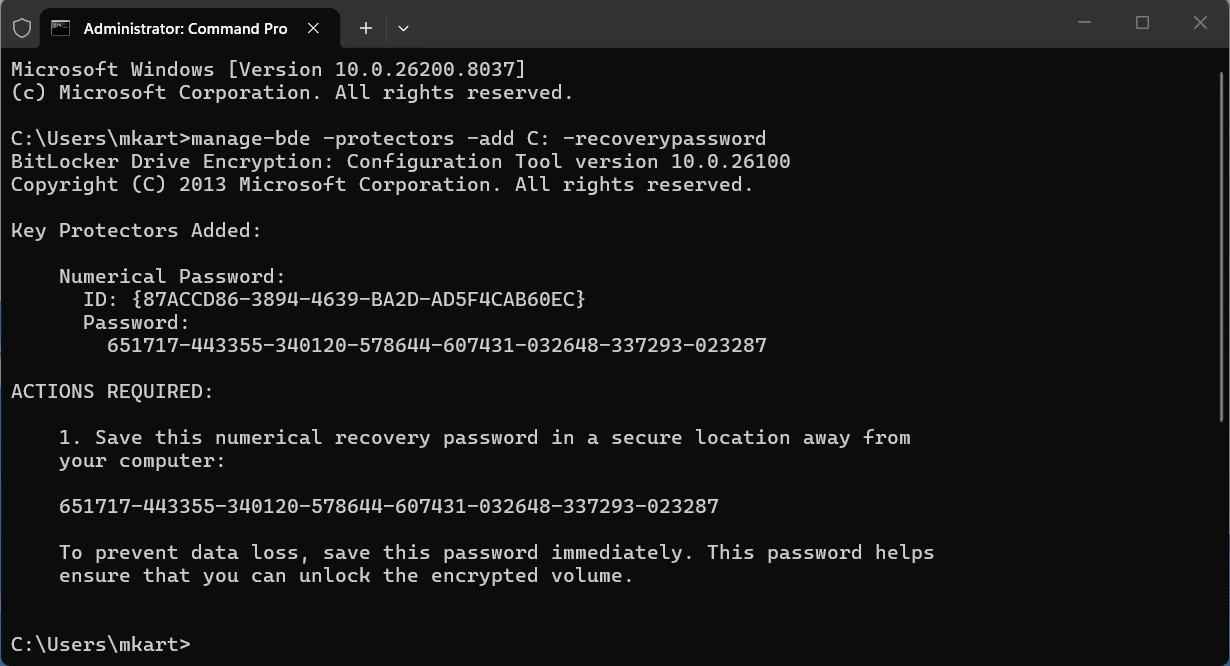
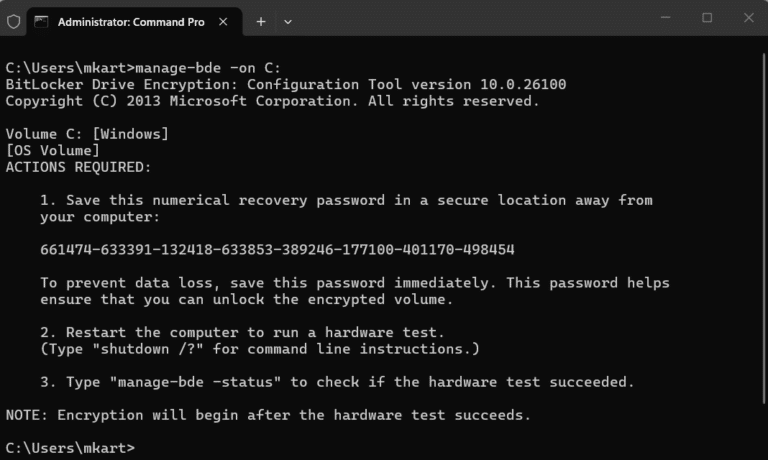
Enable BitLocker on the OS Drive (TPM + Recovery Password)
This two-step approach first adds the key protectors — the TPM and a recovery password — then turns encryption on. Separating these steps is best practice and mirrors what the BitLocker setup wizard does behind the scenes.
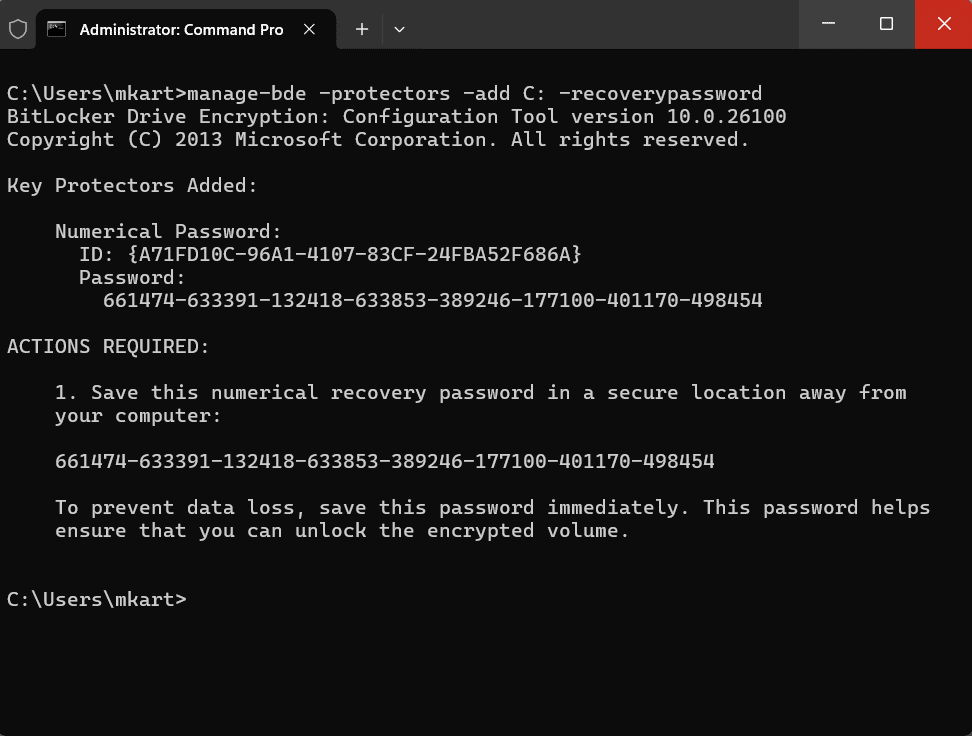
- Add a recovery password protector to the C: drive:
manage-bde -protectors -add C: -recoverypassword
Command Prompt will generate and display a 48-digit numerical recovery password. Copy this immediately and store it somewhere safe. This is the only time it is displayed in the terminal. The format is eight hyphen-separated blocks of six digits.
- Add the TPM as a key protector:
manage-bde -protectors -add C: -tpm
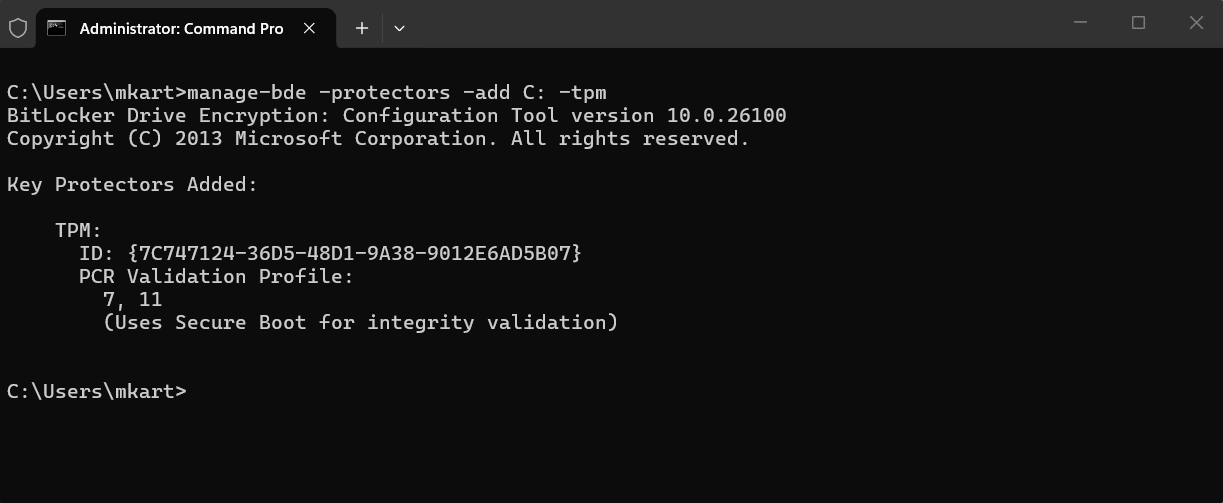
This registers the TPM chip as the primary unlock method, so the drive decrypts automatically at boot without prompting for a password.
- Enable BitLocker encryption on the C: drive:
manage-bde -on C:
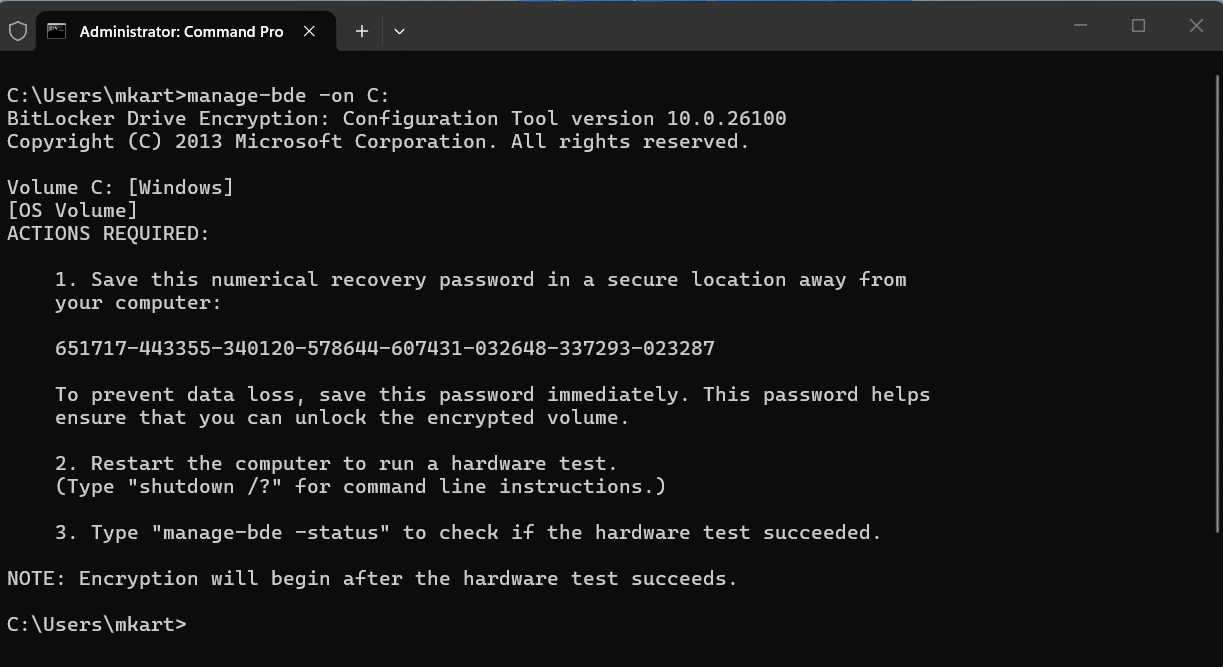
Restart your PC. BitLocker runs a hardware test on the first boot to verify the TPM can correctly read the encryption key before committing to full encryption. Encryption begins automatically after the restart completes and Windows loads normally.
Enable BitLocker with TPM and a Pre-Boot PIN via Command Prompt
A pre-boot PIN adds a second authentication layer. The drive will not unlock at startup until the user enters the correct PIN at the boot screen, even if the TPM is present and healthy. The PIN must be between 4 and 20 digits.
- Add a recovery password protector first:
manage-bde -protectors -add C: -recoverypassword
Save the recovery password output before continuing.
- Add the TPM and PIN as a combined key protector:
manage-bde -protectors -add C: -tpmandpin
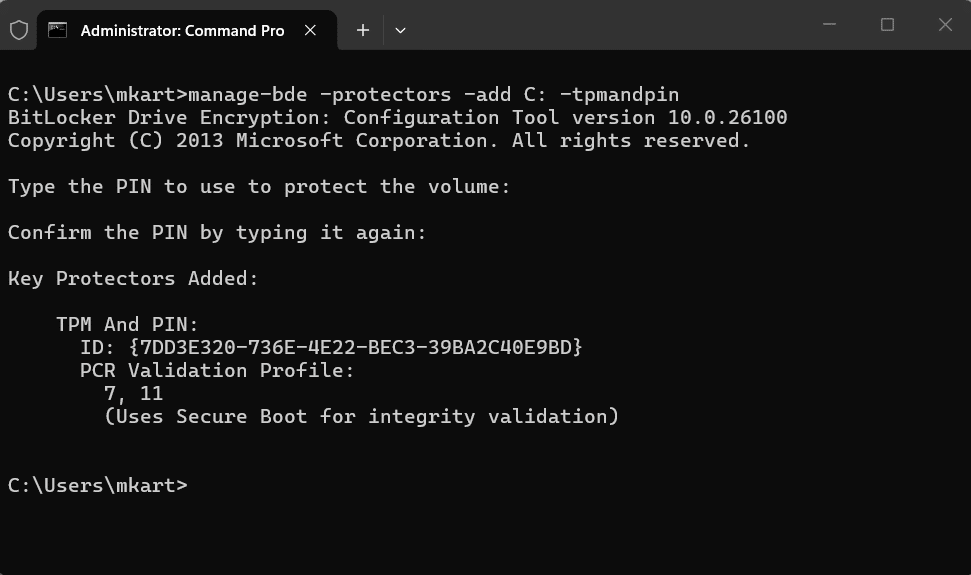
Command Prompt will prompt you to enter and confirm the PIN interactively. The PIN is not visible as you type.
- Enable BitLocker on the drive:
manage-bde -on C:
Restart the PC this is required for two reasons: it runs the hardware test to verify the TPM can read the encryption key, and it activates the PIN prompt at pre-boot. After the restart, enter your PIN when prompted, this confirms the configuration is working correctly. Encryption then begins automatically in the background as Windows loads.
Enable BitLocker on a Secondary Data Drive
Data drives use a password protector rather than TPM, since the TPM only protects the OS boot volume. Replace D: in the commands below with your actual drive letter.
- Add a password protector to the data drive:
manage-bde -protectors -add D: -password
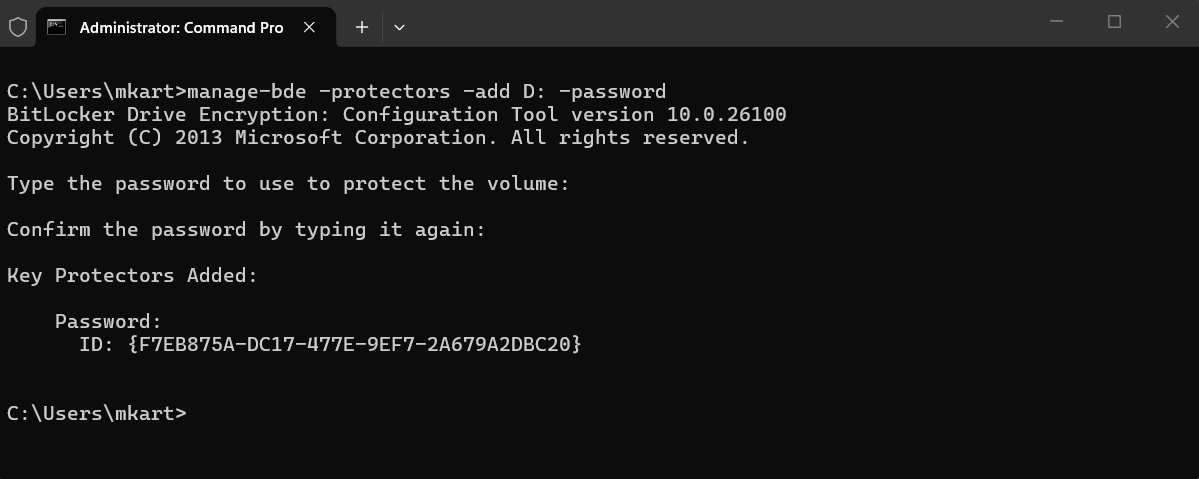
Command Prompt will prompt you to enter and confirm a password interactively. Choose a strong, unique password. This will be required every time the drive is accessed after login.
- Enable BitLocker on the data drive:
manage-bde -on D:
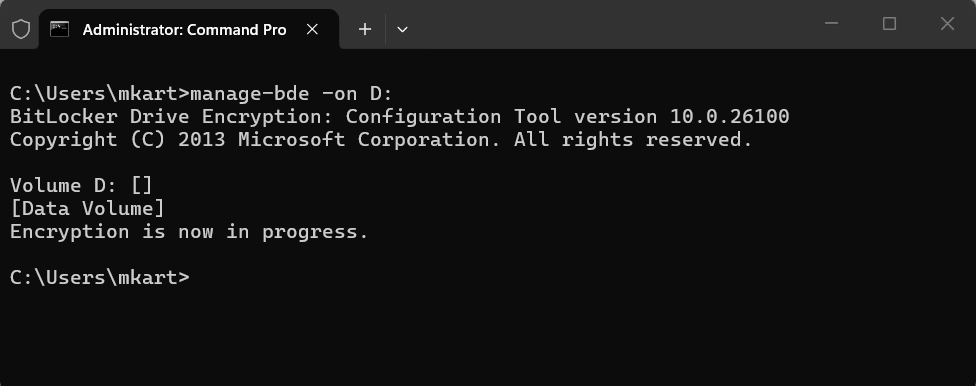
Encryption starts immediately on data drives, no restart required. You can monitor progress with the status command covered in the next section.
How to Check BitLocker Encryption Status
Use manage-bde -status to monitor encryption progress and confirm BitLocker is fully active.
- Check BitLocker status for all drives on the system:
manage-bde -status
- Check status for a specific drive:
manage-bde -status C
The output includes several key fields to check:
- Conversion Status: Shows “Fully Encrypted” when complete, or “Encryption In Progress” while running.
- Percentage Encrypted: Tracks encryption progress as a percentage.
- Protection Status: Should read Protection On. If it shows Protection Off, BitLocker is suspended. Run manage-bde -protectors -enable C: to resume it.
- Key Protectors: Lists all active protectors, you should see at minimum a TPM protector and a Numerical Password protector.
Deployment at scale: manage-bde commands can be wrapped into a batch file (.bat or .cmd) and deployed across domain-joined devices using Group Policy startup scripts. In Intune-managed environments, batch files are not supported natively as script deployments; they must be packaged as a Win32 app using the Microsoft Win32 Content Prep Tool before deployment. If you are managing devices primarily through Intune, PowerShell is the simpler path.
Conclusion
You now have four working methods to enable BitLocker on Windows 11, along with a clear checklist of everything your system needs before you start.
If you are a home user setting up a single device, the Control Panel or Settings app will get the job done in a few clicks. If you are an IT admin deploying BitLocker at scale, both PowerShell scripts and Command Prompt batch files can be deployed via Group Policy startup scripts. In Intune-managed environments, PowerShell has the advantage of running natively as a script deployment, whereas batch files require packaging as a Win32 app first. Either way, your drive is now encrypted, and your data is protected.
Which method worked best for your setup: Control Panel, Settings, PowerShell, or Command Prompt? And if you run into a specific error or scenario this guide did not cover, drop it in the comments, happy to help you troubleshoot.
Now that your drive is encrypted, keeping your system optimized is the next step. Our guide on how to speed up Windows 11 covers everything from startup management to hardware upgrades.
Frequently Asked Questions (FAQs)
No. BitLocker is available only on Windows 11 Pro, Enterprise, and Education. Windows 11 Home has Device Encryption — a simplified version that turns on via Settings > Privacy & security > Device encryption and requires a Microsoft account to save the recovery key.
No. BitLocker encrypts your existing data in place. Your files remain intact throughout the process.
This usually happens after a hardware change, BIOS or firmware update, or a TPM reset. BitLocker detects the change as a potential security risk and locks the drive until the recovery key is entered. This is expected behavior, not a fault.
Without the recovery key, there is no way to access the encrypted drive. This is why saving the recovery key in at least two places before enabling BitLocker is critical..
Yes. Decrypting the drive reverses the process completely. The time it takes depends on the drive size and how much data is on it.
Reinstalling Windows on a BitLocker-encrypted drive will ask for the recovery key during setup. Always decrypt the drive first or have the recovery key ready before reinstalling.
Yes. A BIOS or firmware update changes the hardware configuration that the TPM measures at boot. If BitLocker is active during the update, it may trigger a recovery key prompt on the next restart. Suspend BitLocker before applying firmware updates, then resume it afterward.
Yes. BitLocker is built into Windows 11 Pro, Enterprise, and Education at no additional cost. No third-party software or license is required.
