As someone who is the Digital Workspace (DWS) architect and who’s spent years working with Windows security tools and enterprise endpoint management, I can tell you that knowing how to run a manual virus scan on Windows 11 is a fundamental skill every PC user should have, regardless of which antivirus you rely on.
Microsoft Defender Antivirus is pre-installed and activated on every Windows 11 machine. If you haven’t installed a separate antivirus, Defender is your primary protection and it’s capable, scoring a perfect 6.0 out of 6.0 for protection in AV-TEST’s independent evaluation for Windows 11 (AV-TEST, December 2025).
If you do use a third-party antivirus, Defender automatically steps aside to avoid conflicts, though you can enable periodic scanning to use it as a second-opinion scanner alongside your primary solution. Either way, knowing how to run Defender scans manually is a skill worth having.
Whether you’re looking to run a quick routine check on your system, scan a suspicious file you just downloaded, or perform a deep full scan to hunt down stubborn malware, this guide on how to run a Windows Defender scan on Windows 11 covers everything you need.
I’ll walk you through every scan method available, from the simple one-click approach in the Windows Security app, to targeted right-click scans in File Explorer, to advanced Command Prompt and PowerShell techniques that give you full control over how Defender operates.
If you ever get stuck with any Windows 11 feature, not just Defender, our guide on how to get help in Windows 11 walks you through every built-in support option available to you.
Table of Contents
How to Run a Windows Defender Scan Using Windows Security App on Windows 11
The Windows Security app is the most straightforward way to run a Windows Defender scan on Windows 11. No command lines, no technical knowledge required, just a few clicks and you’re done. This is the method I’d recommend to anyone who wants to manually check their system for viruses, malware, or other threats.
Before we get into the steps, let me confirm one thing. The Windows Security app is your one-stop dashboard for everything security-related on your Windows 11 PC. The scan itself is powered by the Microsoft Defender Antivirus engine running under the hood. You interact with the app; the engine does the heavy lifting.
Running a Quick Scan in Windows Defender Using Windows Security App
A Quick Scan is the fastest way to check your PC for threats. It targets the areas where malware is most commonly found i.e. startup folders, registry keys, temporary files, and other high-risk locations. It typically finishes in just a few minutes and is perfect for a routine check.
- Click the Start button on the taskbar or press the Windows key on your keyboard, type Windows Security, and select the Windows Security app from the search results.

- Click Virus & threat protection from the left sidebar or from the main dashboard.

- Scroll down to the bottom of the page and click Antivirus Microsoft Defender options to expand it.

- Toggle the Periodic scanning switch to On.

- Click Yes on the User Account Control (UAC) prompt if it appears.
- Click the Quick scan button displayed under the Current threats section.

- Wait for the scan to complete. A progress bar shows the status, along with how many files have been scanned so far.
Once finished, you’ll see one of two results. If your system is clean, the screen will display a “No current threats” message along with the scan time and number of files scanned. If threats are found, Windows Security will list them with recommended actions
Running a Full Scan in Windows Defender Using Windows Security App
A Full Scan examines every single file, folder, and running program on your hard drive. It’s the most thorough scan option available and the one you should run when you suspect something is wrong, when you’ve recently been exposed to a potential threat, or as a monthly maintenance check.
- Open the Windows Security app and click Virus & threat protection.
- Click Scan options located just below the Quick scan button, under the Current threats section.

- Select the radio button next to Full scan.
- Click Scan now to begin the scan.

- Keep the Windows Security window open while the scan runs, you can minimize it, but do not close it.

The scan will work through your entire system. Once complete, the results screen will show the total number of files scanned, time elapsed, and any threats detected.
Running a Custom Scan in Windows Defender Using Windows Security App
A Custom Scan lets you target a specific file, folder, or drive instead of scanning the entire system. This is incredibly useful in situations where you’ve just downloaded a file from an unfamiliar source, plugged in an external USB drive, or want to check a particular directory without waiting for a full system scan.
- Open the Windows Security app and click Virus & threat protection.
- Click Scan options under the Current threats section.

- Select the radio button next to Customised scan.
- Click Scan now, a File Explorer window will open automatically.

- Navigate to the file, folder, or drive you want to scan, select it, and click Select Folder.

Windows Security will then perform a quick scan limited to the location you selected. This is the fastest way to verify whether a specific download or external device is safe without scanning your entire system.
How to Run Windows Defender Scan Using Command Prompt on Windows 11
For most everyday users, the Windows Security app is more than enough. But if you’re a power user who prefers typing commands over clicking buttons, Command Prompt is a solid alternative.
It also lets you create simple batch files that update definitions and run scans with a single double-click, giving you direct, no-nonsense control over Microsoft Defender Antivirus without navigating through any menu
Opening Command Prompt as Administrator
- Click the Start button or press the Windows key, type Command Prompt in the search boxat the top of the Start menu. Right-click the “Command Prompt” from the search results, and select Run as administrator.

- Click Yes on the User Account Control (UAC) prompt to confirm.
Navigating to the Defender Directory
You’ll now have an elevated Command Prompt window ready to go. There’s one more step before running scans: navigate to the correct directory where the MpCmdRun.exe tool is located.
The MpCmdRun.exe utility is inside the Windows Defender platform folder, and the exact subfolder name changes with each platform update. Instead of hunting for the exact version number, you can use a wildcard to navigate there automatically.
- Type the following command into the elevated Command Prompt and press Enter:
cd C:\ProgramData\Microsoft\Windows Defender\Platform\4*
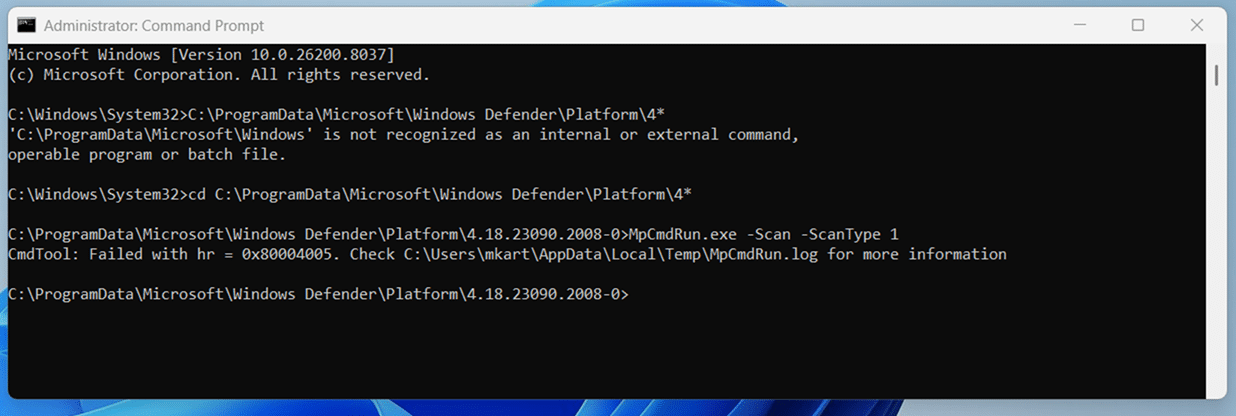
This command navigates to the latest Defender platform folder. The 4* wildcard matches the current version directory (which starts with “4.18” followed by the build number). Once you’re in this directory, all the scan commands below will work directly.
Note: If you have a third-party antivirus installed, Microsoft Defender is disabled by default and these scan commands will not work.
You need to enable Periodic scanning first through the Windows Security app as described in the “How to Run a Windows Defender Scan Using Windows Security App” section of this guide.
Running a Quick Scan in Windows Defender Using Command Prompt
The Quick Scan checks all the common locations where malware typically hides — startup folders, running processes, registry keys, and recently modified files. It’s the fastest option and finishes in a few minutes.
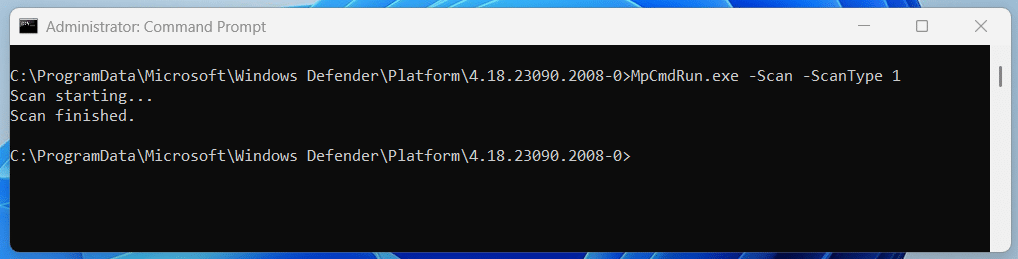
- Open Command Prompt as administrator and navigate to the Defender directory as described above.
- Type the following command and press Enter:
MpCmdRun.exe -Scan -ScanType 1
- Wait for the scan to complete — you’ll see a “Scan starting…” message followed by “Scan finished.” when it’s done.
Running a Full Scan in Windows Defender Using Command Prompt
The Full Scan examines every file, folder, and running program on your system. It takes significantly longer but provides the most thorough coverage.
- Open Command Prompt as administrator and navigate to the Defender directory.
- Type the following command and press Enter:
MpCmdRun.exe -Scan -ScanType 2
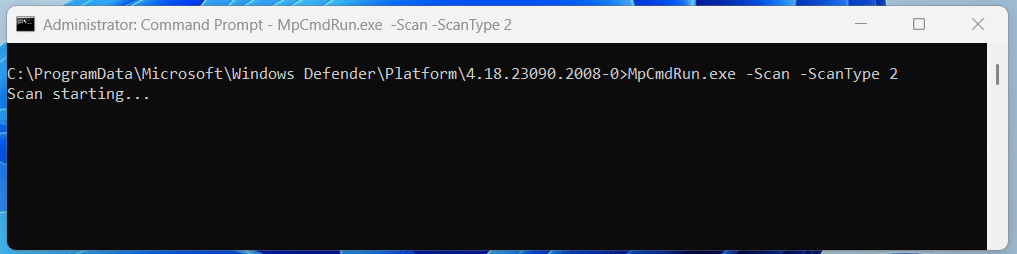
- Wait for the scan to finish — this can take anywhere from 30 minutes to several hours, depending on your system’s data volume and hardware speed.
Running a Custom Scan in Windows Defender on a Specific Folder or File Using Command Prompt
The Custom Scan lets you target a particular directory or file, ideal for scanning downloaded files, USB drives, or specific folders without running a full system sweep.
- Open Command Prompt as administrator and navigate to the Defender directory.
- Type the following command, replacing the path with your target location, and press Enter:
MpCmdRun.exe -Scan -ScanType 3 -File “C:\Users\mkart\Documents”

- To scan an individual file instead of a folder, provide the complete file path, including the file name and extension:
MpCmdRun.exe -Scan -ScanType 3 -File “C:\Users\mkart\Downloads\STFC_installer.exe”

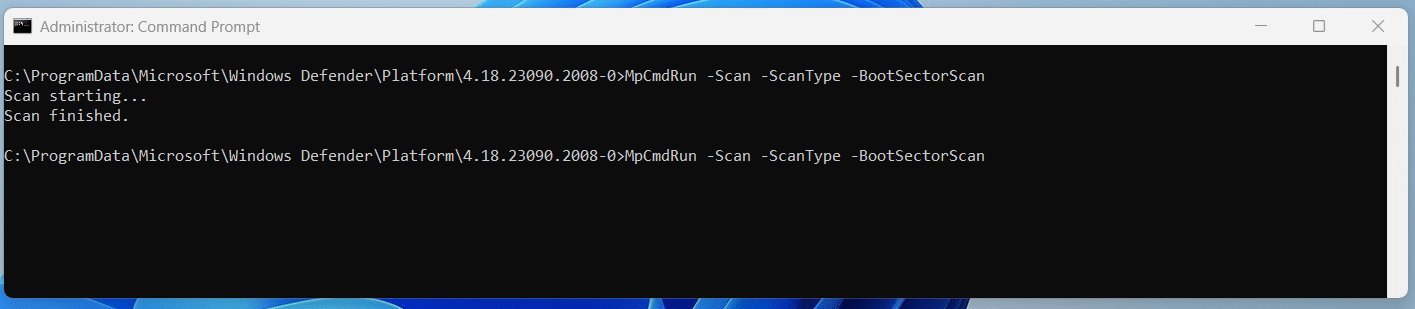
Running a Boot Sector Scan in Windows Defender Using Command Prompt
This is a lesser-known option that most guides skip entirely. The boot sector scan specifically targets the Master Boot Record (MBR) and boot sector of your drive, areas where bootkits and boot-sector viruses hide.
- Open Command Prompt as administrator and navigate to the Defender directory.
- Type the following command and press Enter:
MpCmdRun -Scan -ScanType -BootSectorScan
How to Run Windows Defender Scan Using PowerShell on Windows 11
Opening PowerShell as Administrator
Like Command Prompt, PowerShell requires elevated privileges to run Defender scans and management commands. Here’s how to launch it with the right permissions.
- Click the Start button or press the Windows key, type PowerShell, right-click Windows PowerShell in the search results, and select Run as administrator.

- Click Yes on the User Account Control (UAC) prompt.
Alternatively, on Windows 11, you can right-click the Start button and select Terminal (Admin), which opens Windows Terminal with PowerShell as the default shell — already elevated.
Note: If you have a third-party antivirus installed, Microsoft Defender is disabled by default and these scan commands will not work.
You need to enable Periodic scanning first through the Windows Security app as described in the “How to Run a Windows Defender Scan Using Windows Security App” section of this guide.
Running a Quick Scan in Windows Defender Using PowerShell
The Quick Scan checks startup folders, registry keys, running processes, and other high-risk locations where malware commonly hides. It finishes in a few minutes and is ideal for routine checks.
- Open PowerShell as administrator.
- Type the following command and press Enter:
Start-MpScan -ScanType QuickScan
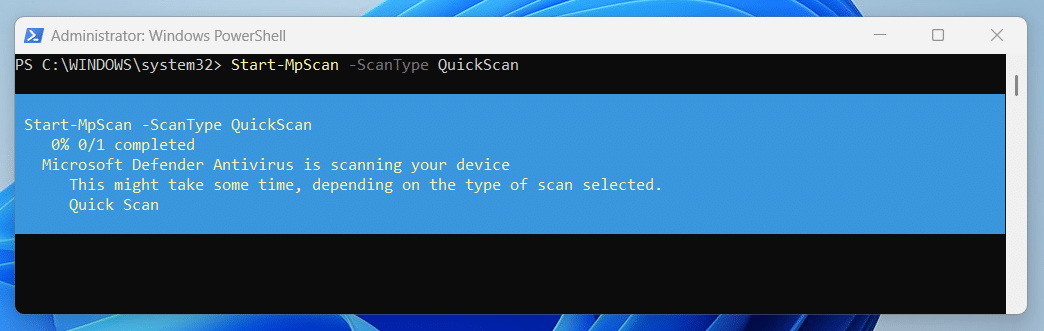
- Wait for the scan to complete. PowerShell will appear to “hang” while the scan runs, then return you to the prompt when it finishes.
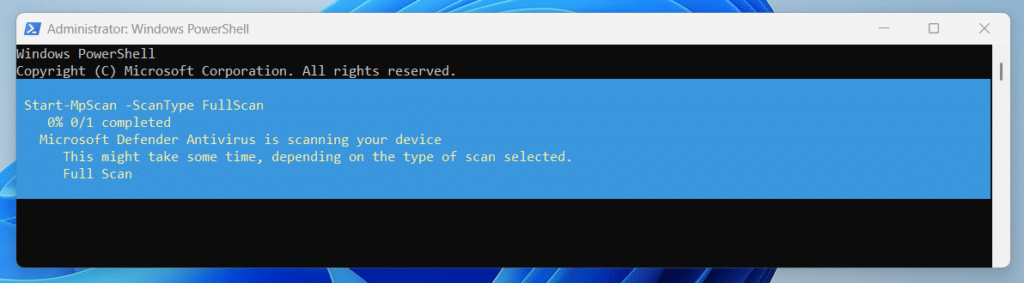
Running a Full Scan in Windows Defender Using PowerShell
The Full Scan examines every file, folder, running program, and mounted drive on your system. It’s the most thorough option and can take 30 minutes to several hours.
- Open PowerShell as administrator.
- Type the following command and press Enter:
Start-MpScan -ScanType FullScan
Since a Full Scan can take a long time and locks up your PowerShell session, you might want to run it as a background job so you can continue using the terminal for other tasks. Add the -AsJob flag:
Start-MpScan -ScanType FullScan -AsJob
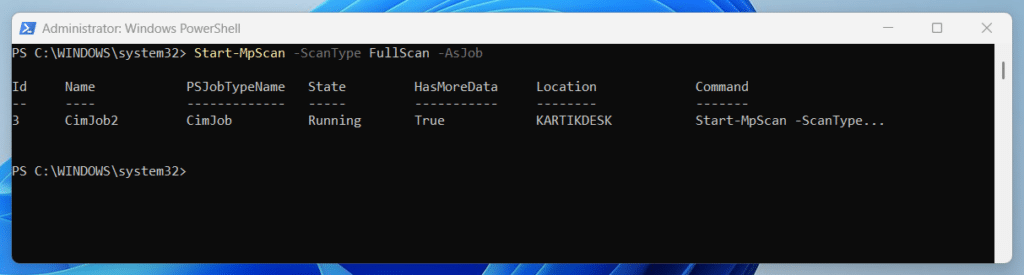
This immediately returns you to the PowerShell prompt while the scan runs in the background. You can check the job’s status at any time by typing Get-Job and pressing Enter. When the job shows “Completed” under the State column, the scan is done.
Running a Custom Scan in Windows Defender on a Specific Folder or File Using PowerShell
The Custom Scan targets a specific location on your system — perfect for scanning a suspicious download, an external USB drive, or a particular directory.
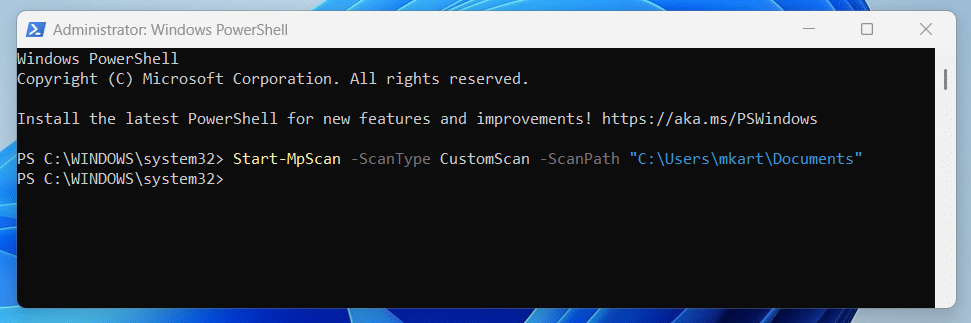
- Open PowerShell as administrator.
- Type the following command, replacing the path with your target location, and press Enter:
Start-MpScan -ScanType CustomScan -ScanPath “C:\Users\mkart\Documents”
- To scan an individual file, provide the full file path including the file name and extension:
Start-MpScan -ScanType CustomScan -ScanPath “C:\Users\mkart\Downloads\STFC_installer.exe”

Running an Offline Scan in Windows Defender Using PowerShell
The Offline Scan restarts your PC and runs the scan from the Windows Recovery Environment — ideal for detecting rootkits, bootkits, and persistent malware that hides during normal operation.
Important: Save all your work before running this command. Your computer will restart immediately without further warning.
- Open PowerShell as administrator.
- Type the following command and press Enter:
Start-MpWDOScan
- Your PC will display a sign-out warning and restart into the Offline Scan environment automatically.
The scan takes approximately 15 minutes. After it completes, your PC restarts back into normal Windows. View the results in the Windows Security app under Virus & threat protection > Protection history.
How to Cancel a Running Scan in Windows Defender
Here’s a nuance that catches many users off guard, PowerShell doesn’t have a native cmdlet to cancel an ongoing Defender scan. Pressing Ctrl + C in the terminal window stops PowerShell output, but the underlying scan continues running in the background.
To actually stop a scan that’s in progress, you need to use the MpCmdRun.exe tool from an elevated Command Prompt (not PowerShell):
- Open Command Prompt as administrator.
- Type the following command and press Enter:
MpCmdRun.exe” -Scan -Cancel
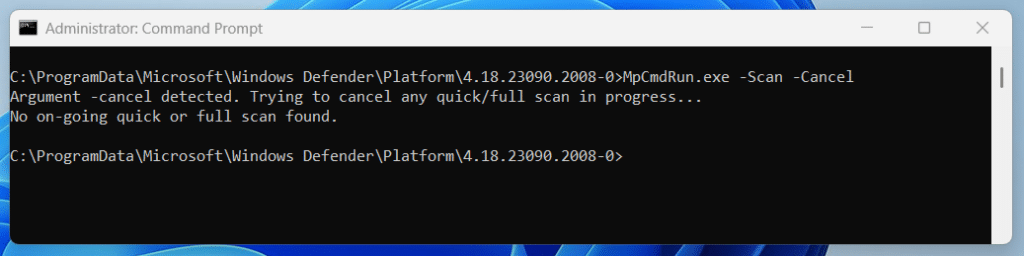
This sends a cancellation signal to the Defender engine, stopping the active scan.
How to Scan Individual Files and Folders Using the Right-Click Context Menu
Of all the methods we’ve covered so far, this one is by far the fastest for everyday use. No opening the Windows Security app, no navigating through Scan Options, no typing commands into a terminal. You simply right-click a file or folder directly in File Explorer, choose the scan option, and Defender gets to work immediately.
This is the method I find myself using the most in practice. Someone sent me a file I’m not sure about. Right-click, scan. I plug in a USB drive? Right-click the drive, scan. I downloaded a free tool from a website I don’t fully trust. Right-click it before opening. It becomes second nature once you build the habit, and it takes seconds literally.
How to Scan a File or Folder Using Right-Click Context Menu
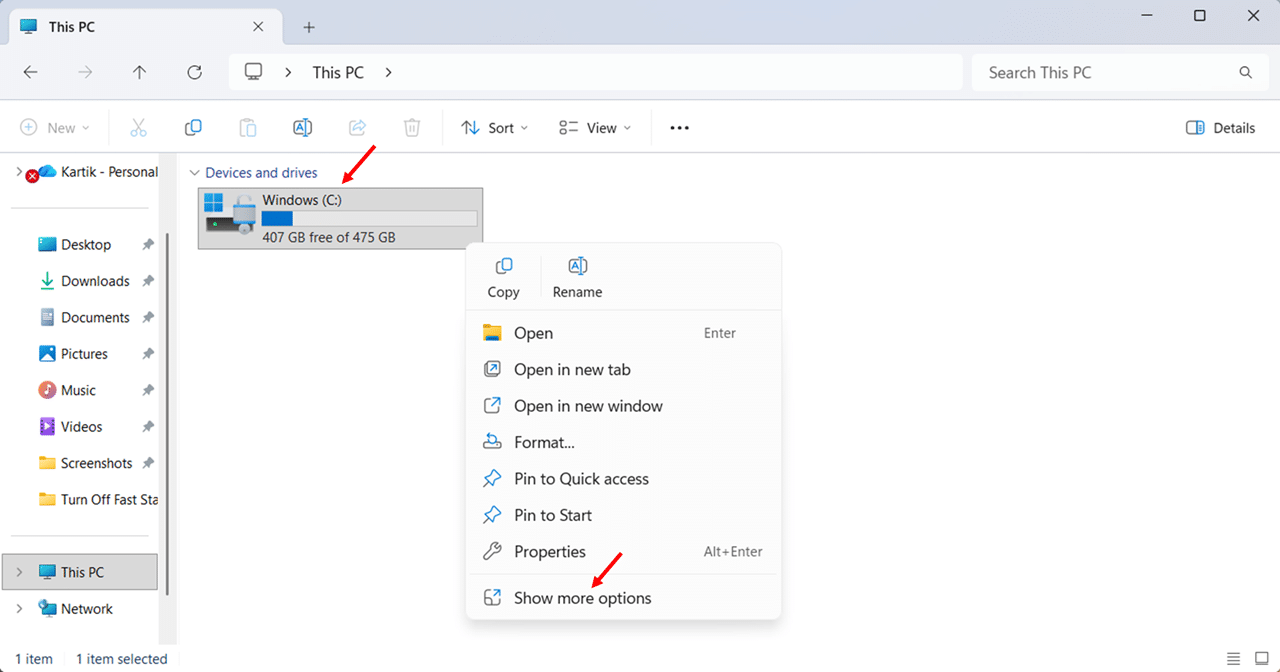
Here’s the thing about Windows 11 that catches many people off guard — the Scan with Microsoft Defender option doesn’t appear in the default right-click menu. Windows 11 introduced a simplified, shorter context menu, and the Defender scan option lives in the extended legacy menu. You need one extra click to reach it.
- Open File Explorer by pressing the Windows key and holding it, then pressing E alternatively open File Explorer by clicking the folder icon on the taskbar.
- Navigate to the file, folder, or drive you want to scan.
- Right-click the item to open the context menu.
- Click Show more options at the bottom of the menu to expand the full legacy context menu.

- Click Scan with Microsoft Defender… from the expanded menu.
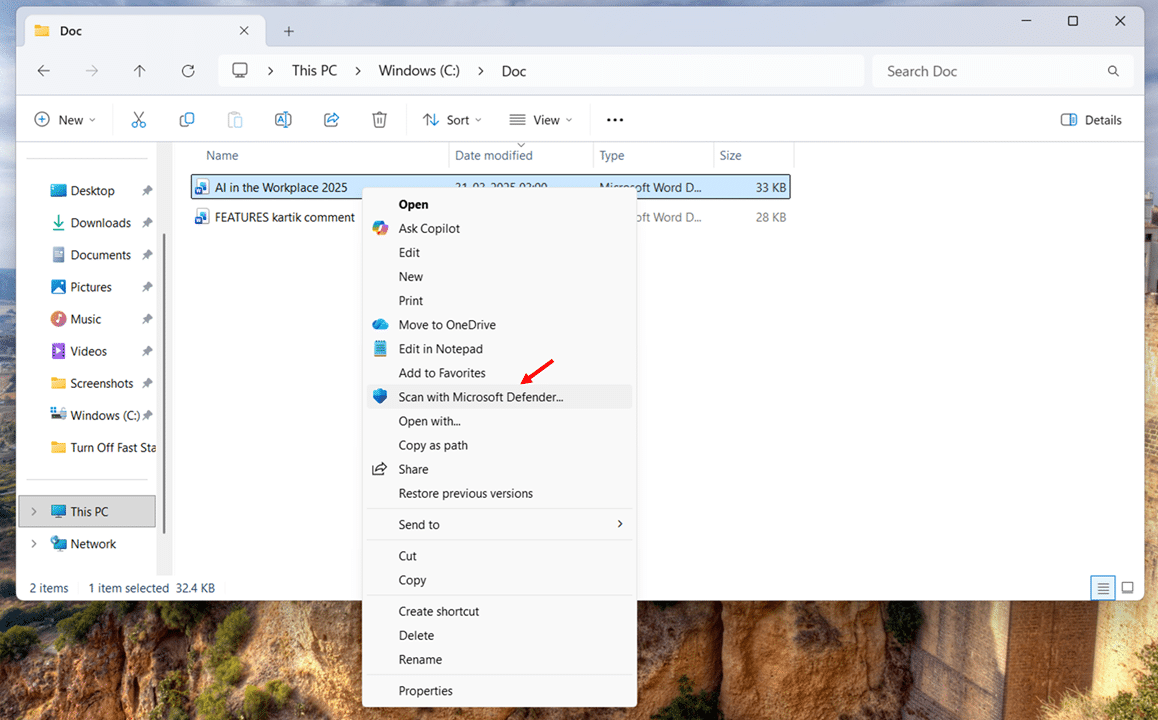
- The Windows Security app will open automatically on the Virus & threat protection page, showing the scan progress and results.

Scanning Multiple Files or Folders at Once Using Right-Click Context Menu
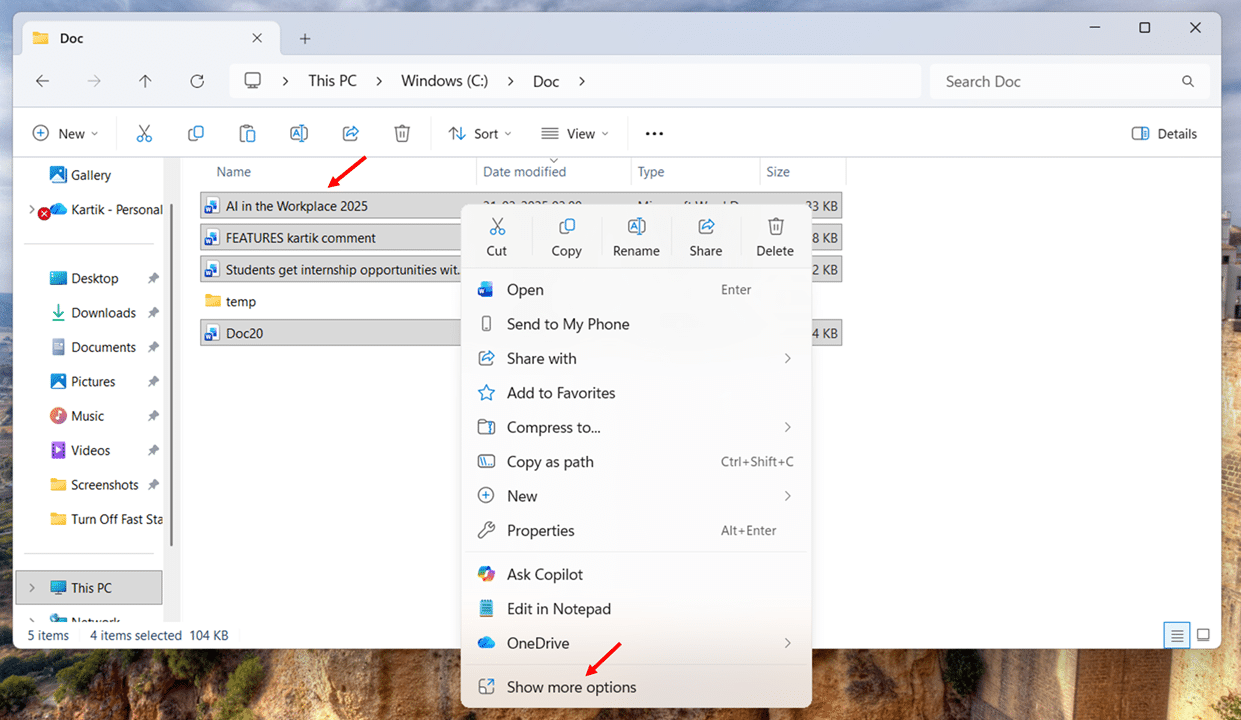
You don’t have to scan items one at a time. Windows lets you select multiple files or folders and scan them all in a single pass.
- Open File Explorer and navigate to the location containing the items you want to scan.
- Hold the Ctrl key and click each file or folder you want to include in the scan or hold Shift and click to select a continuous range.
- Right-click the selected items, click Show more options, at the bottom of the menu to expand the full legacy context menu.
- Click Scan with Microsoft Defender from the expanded menu.

- Defender will scan all selected items together, and the results will display in the Windows Security app.

This is particularly handy when you’ve downloaded multiple files from the same source and want to verify them all before opening any of them.
Scanning an Entire Drive Using Right-Click Context Menu
The right-click method works on drives, files, and folders. This is especially useful for scanning external USB drives, SD cards, or secondary internal drives.
- Open File Explorer and click This PC in the left sidebar to see all connected drives.
- Right-click the drive you want to scan (for example, your USB drive’s letter, like D: or E:).
- Click Show more options, at the bottom of the menu to expand the full legacy context menu.
- Click Scan with Microsoft Defender from the expanded menu.
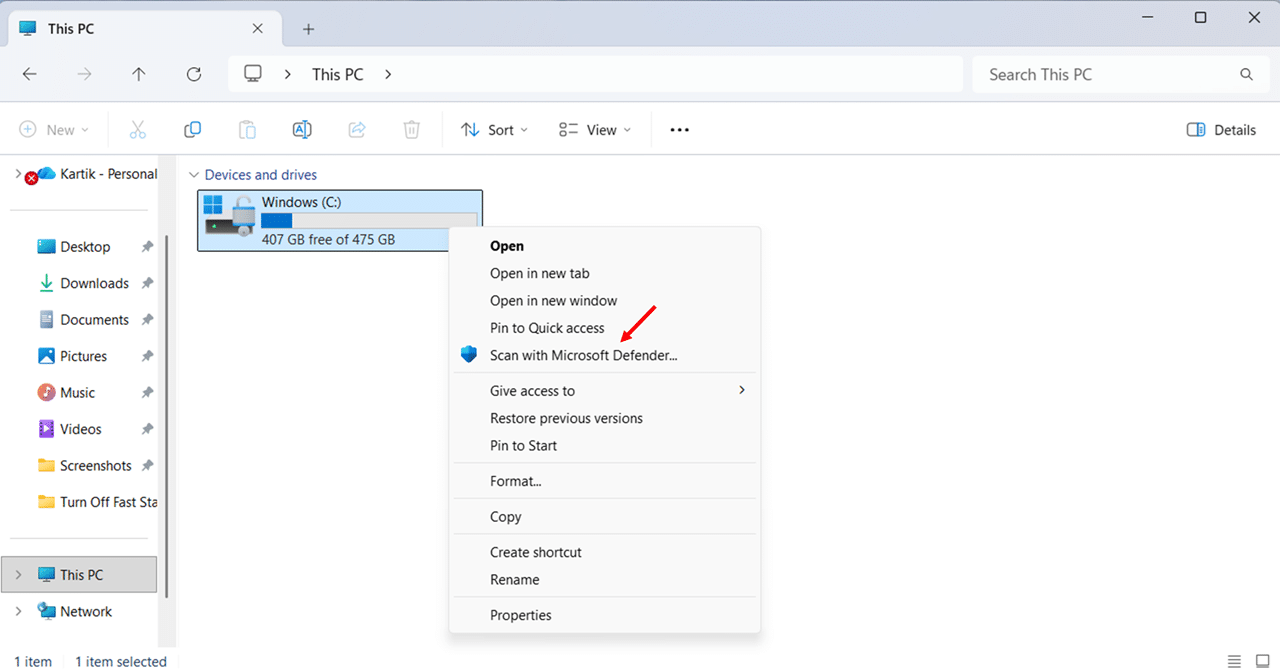
- Defender will scan the entire contents of the drive, including all folders, subfolders, and files.

Running scans during idle time helps, but if your system is already slow, optimizing it first will improve scan performance too. Here is our guide on how to speed up Windows 11.
Conclusion
You now have every method available to run a Windows Defender scan on Windows 11, from the one-click Quick Scan in the Windows Security app, to Custom Scans for specific files and folders, to Full Scans that check your entire system, to Offline Scans that catch rootkits hiding in your boot sector.
You also know how to run scans through Command Prompt and PowerShell when you need command-line control, how to use the right-click context menu for instant file verification, and how to schedule automatic scans. Hence, your system stays protected without you having to remember a thing.
If I could leave you with one takeaway, it’s this, don’t wait until something feels wrong to scan your PC. Build a simple routine: run a Quick Scan weekly, schedule a Full Scan once a month, update your virus definitions before each manual scan, and always right-click and scan any file you download from an unfamiliar source before opening it. These habits take seconds but can save you from hours of cleanup and data loss.
Windows Defender is already on your PC, now you know exactly how to use it. If you found this guide helpful, bookmark it for future reference and share it with anyone who’s ever wondered whether they really need to run a manual virus scan. The answer is yes, and now they’ll know how.
Frequently Asked Questions (FAQs)
Yes. You can continue working, browsing, or streaming during any scan. Quick Scans have minimal performance impact. Full Scans may cause noticeable slowdowns since Defender is actively reading every file on your system. For best results, run Full Scans during idle time or off-hours.
It depends on your hardware and the amount of data on your drives. On a modern PC with an NVMe SSD and 200-500 GB of data, expect 30 minutes to 2 hours. Systems with traditional hard drives or multiple terabytes of data can take significantly longer.
Yes, but with limitations. When a third-party antivirus is installed, Defender automatically disables itself. You can enable Periodic scanning through the Windows Security app to let Defender run occasional background scans as a second-opinion scanner. However, Defender will not provide real-time protection in this mode.
This happens when a third-party antivirus is installed. The right-click scan option is only available when Defender is the active primary antivirus. Enabling Periodic scanning does not restore it. To scan a specific file with Defender while using a third-party antivirus, use the Custom Scan option in the Windows Security app, or run a targeted scan from Command Prompt or PowerShell.
Run a Quick Scan once a week. Schedule a Full Scan once a month. Run a Custom Scan immediately after downloading files from unfamiliar sources. Use an Offline Scan only when standard scans detect threats they cannot remove, or when your PC shows persistent suspicious behaviour despite clean scan results.
Yes. Connect the drive to your PC, open File Explorer, right-click the drive letter under This PC, click Show more options, and select Scan with Microsoft Defender. If you have a third-party antivirus installed, use the Custom Scan option in the Windows Security app and select the external drive as the target location.
