

In April 2022, Panos Panay, then Microsoft’s Chief Product Officer, summed up the impact of tabs in one line: “You can also pin files and create tabs in File Explorer, bringing what used to take six clicks to get to an important file to one.” With that one feature, Microsoft transformed how millions of Windows users manage their files every day.
This is the reality across thousands of corporate environments. Design engineers are copying CAD drawings between three open File Explorer windows. Marketing managers are dragging campaign assets across four cluttered folder windows. Support analysts hunting through stacks of overlapping windows just to attach a single log file to a ticket. Multiply those few wasted seconds across thousands of endpoints in a typical enterprise, and you are looking at significant productivity loss every single week.
Microsoft fixed this in October 2022 with the release of Windows 11 version 22H2, which introduced tabs to File Explorer for the very first time. Now properly polished in Windows 11 25H2, tabs have genuinely transformed how teams work with files.
This how to use file explorer tabs in Windows 11 guide will walks you through everything: opening tabs five different ways, mastering keyboard shortcuts, reordering tabs, dragging files between them, unlocking hidden panes like Compact view and Preview pane, and troubleshooting common tab problems
Table of Contents
What File Explorer Tabs Actually Do
At their simplest, File Explorer tabs work just like the tabs in your web browser. Instead of opening a separate File Explorer window for each folder you want to view, you can open multiple folders in a single File Explorer window, each represented as a tab at the top.
Here is what tabs let you do, in plain English:
- Open multiple folders inside one File Explorer window
- Switch between folders with a single click or keyboard shortcut
- Drag and drop files directly from one tab to another
- Reorder tabs along the tab bar by dragging them
- Detach a tab into a new window by dragging it away
- Combine multiple File Explorer windows by dragging tabs between them
Tabs vs Multiple Windows: The Real Difference
You might be wondering, why use tabs at all when you can just open multiple File Explorer windows? Excellent question. Here are the three biggest advantages tabs offer over the old multi-window approach:
- Lower memory usage: All tabs share a single File Explorer process, which uses noticeably less RAM than spawning a separate process for every window. On systems with 8 GB of memory or less, this difference is genuinely noticeable.
- Cleaner taskbar: One File Explorer icon in the taskbar instead of five or six, which makes it far easier to find your other open applications without endless Alt-Tab cycling.
- Faster file transfers: Drag-and-drop between tabs is significantly faster than aligning two windows side by side. You also avoid the frustration of accidentally dropping files onto the wrong window.
For IT professionals managing dozens of folders across mapped network drives, OneDrive locations, and local SSDs, the difference is genuinely transformative. I have personally cut my file management time by roughly half since switching to a tabs-first workflow.
Why This Matters More Than Ever in 2026
In Windows 11 24H2 (Build 26100.3037 onwards), Microsoft added a feature called “Restore previous folder windows at logon,” which automatically reopens your tabs when you sign back in to Windows. That single addition turned File Explorer tabs from a nice-to-have feature into a serious productivity tool, especially for anyone who works with the same set of folders every single day.
Combined with the refreshed Start menu in Windows 11 25H2, File Explorer tabs form the backbone of a modern productivity workflow.
How to Open a New Tab in File Explorer
File Explorer offers five distinct ways to open a new tab, each suited to different situations. Whether you live on the keyboard like most IT professionals, prefer the comfort of a mouse, or use a healthy mix of both, you will find a method here that fits your workflow perfectly.
Before You Begin: Verify Your Windows 11 Version
Take a quick moment to confirm you are running Windows 11 22H2 or later. Without this version, tabs will not appear in File Explorer at all.
- Press Windows + R to open the Run dialog.
- Type winver and press Enter to open the About Windows dialog.

- Check the version number, which should display 22H2 or higher (ideally 25H2 for the most polished experience).
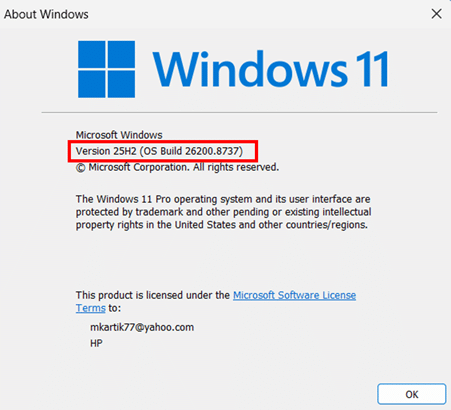
If you are on an older version, run Windows Update first, then return to this guide once your system is up to date.
Method 1: Open a New Tab in File Explorer by Clicking the Plus (+) Icon
This is the most discoverable method and the one most users find first. The + icon sits in plain sight on the tab bar.
- Open File Explorer by pressing Windows + E.
- Locate the + icon on the tab bar to the right of your current tab.
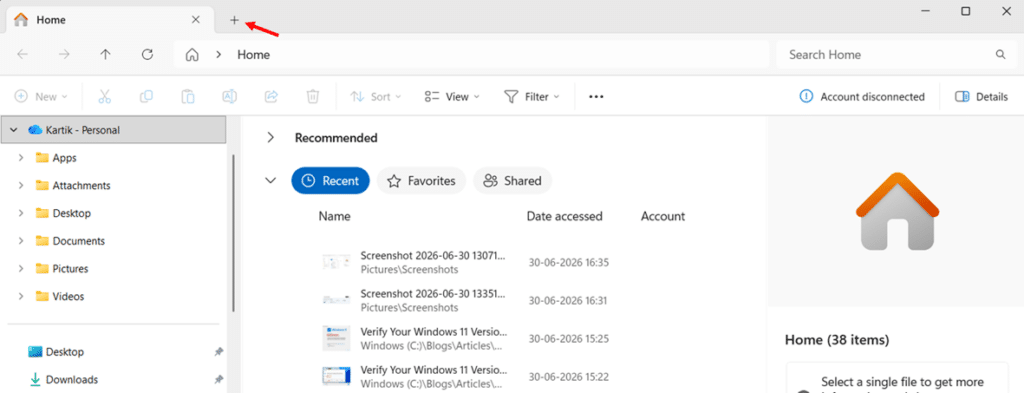
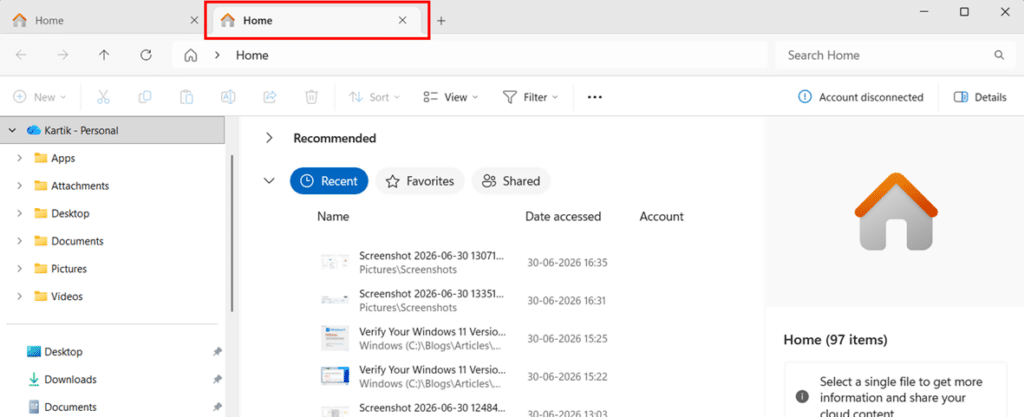
- Click the + icon to open a new tab, which will load the Home page by default.
Method 2: Use the Ctrl + T Keyboard Shortcut
If you spend most of your day on the keyboard, this is the fastest method available. It also matches the muscle memory you already have from web browsers like Microsoft Edge or Google Chrome.
- Make sure File Explorer is the active window on your screen.
- Press Ctrl + T to instantly open a new tab without touching the mouse.
- Navigate to your desired folder using the address bar or the navigation pane on the left.
Method 3: Middle-Click on a Folder
This method is brilliant when you want to open a folder in a new tab without disturbing your current view. Power users absolutely love this one.
- Locate the folder you want to open in either the main view or the navigation pane on the left.
- Hover your mouse over the folder and press the scroll wheel down (middle-click) to open that folder directly in a new tab.
- Click the newly created tab on the tab bar to view its contents.
Quick tip: If middle-click does not work, you may have disabled the modern Windows 11 context menu through a registry edit. Restoring the default context menu will fix the issue.
Method 4: Right-Click and Select Open in New Tab
When you want precise control, the right-click context menu is your best friend. This method works equally well on folders, drives, and items in the navigation pane.
- Right-click any folder or drive in the main view or in the navigation pane on the left.
- Select Open in new tab from the context menu that appears.
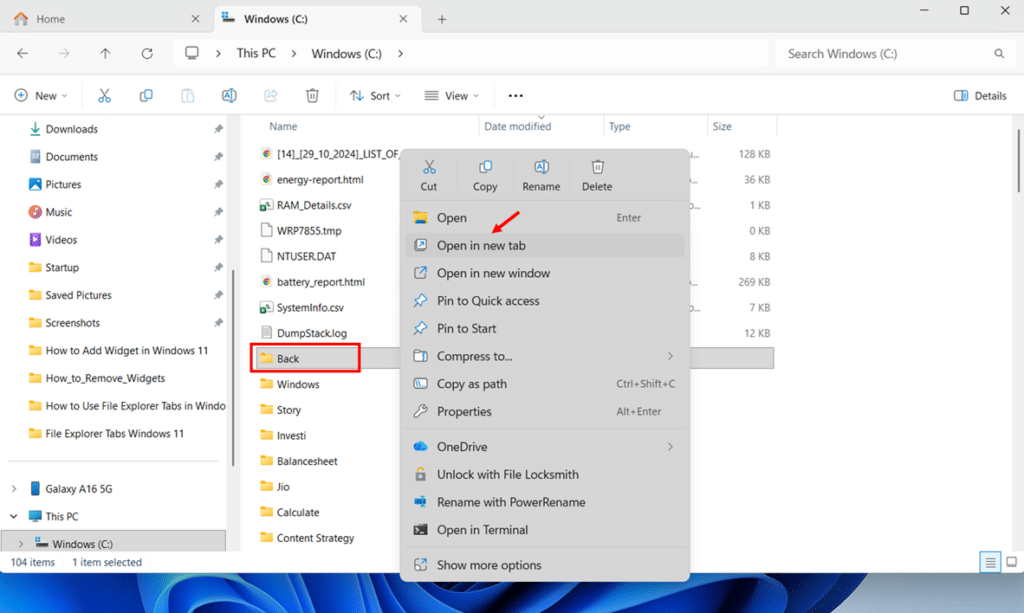
- Click the newly opened tab on the tab bar to switch to it.
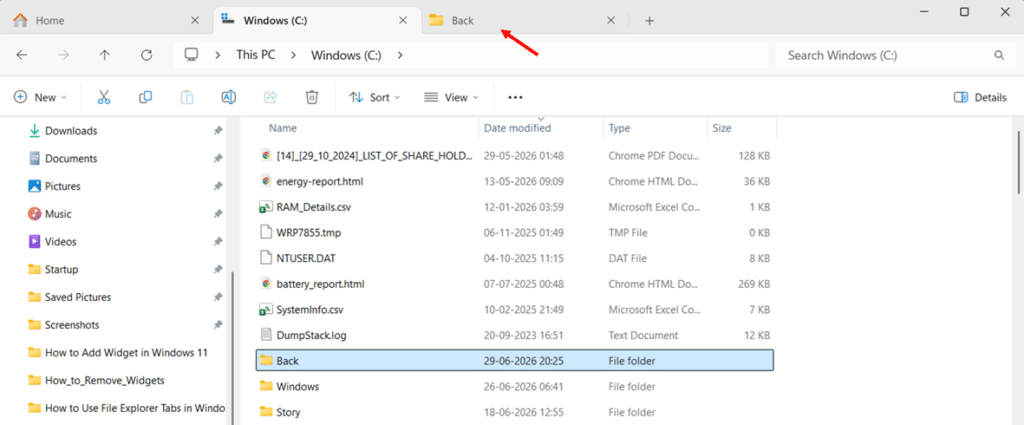
Method 5: Right-Click an Existing Tab and Choose Duplicate Tab
This method opens an exact copy of your current tab, which is incredibly useful when you need to compare two views of the same folder side by side or work on parallel file operations.
- Right-click the tab you want to duplicate on the tab bar.
- Select the Duplicate tab from the context menu.
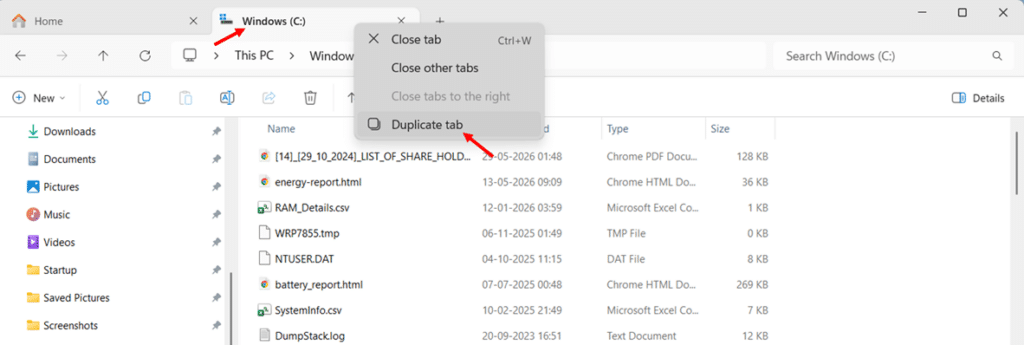
- Work freely in the duplicated tab without affecting your original one.
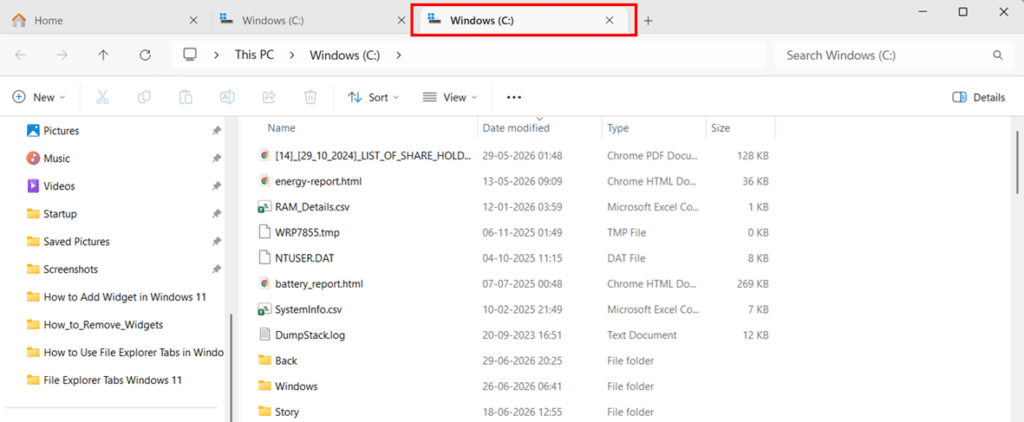
Note: The Duplicate tab option requires Windows 11 Build 22631.3958 or later, which means most current 23H2, 24H2, and all 25H2 installations support it natively.
Essential File Explorer Tab Keyboard Shortcuts for Tab Management
If you live on your keyboard like most IT professionals do, mastering these five core shortcuts will turn File Explorer tabs into a serious productivity weapon. The best part? They mirror the exact shortcuts you already use in Microsoft Edge and Google Chrome, so your muscle memory transfers instantly. Every shortcut works on Windows 11 22H2 onwards, and they all rely on the number row at the top of your keyboard, not the numpad.
Ctrl + T: Open a New Tab
Press Ctrl + T and a fresh tab loads instantly, showing the Home page by default. You can keep pressing Ctrl + T to open as many tabs as you need, since Windows 11 places no hard limit on tab count. I have tested up to 30 tabs without any performance hiccups in my own work.
Ctrl + W: Close the Current Tab
Press Ctrl + W to close whichever tab is currently active. If only one tab remains open, this shortcut closes the entire File Explorer window. To close all tabs in one go, press Alt + F4 instead; it closes the entire window regardless of how many tabs are open.
Ctrl + Tab: Switch to the Next Tab
Press Ctrl + Tab to cycle forward through your open tabs, moving one tab to the right with every press. When you reach the rightmost tab, the next press loops you back to the first tab on the left. This shortcut is incredibly useful when you have four or five tabs open and want to walk through them quickly without aiming your mouse.
Ctrl + Shift + Tab: Switch to the Previous Tab
Press Ctrl + Shift + Tab to cycle backward through your open tabs, moving one tab to the left with each press. Combined with Ctrl + Tab, you can navigate any number of tabs in either direction without ever touching the mouse. This pairing alone is worth committing to memory.
Ctrl + 1 to Ctrl + 9: Jump Directly to a Specific Tab
This is where File Explorer tabs really start to feel powerful. Pressing Ctrl + 1 jumps you instantly to the first tab on the left. Ctrl + 2 takes you to the second tab, Ctrl + 3 to the third, and so on, all the way up to Ctrl + 9 for the ninth tab in your tab bar.
Important caveat: Unlike in web browsers, Ctrl+9 in File Explorer does NOT jump to the very last tab. It always jumps to the ninth tab position specifically. If you have only six tabs open, pressing Ctrl+9 does nothing. This is a deliberate design choice by Microsoft and one of the few places where File Explorer behaves differently from a standard browser.
Also, remember to use the number row at the top of your keyboard rather than the numpad on the right side, since the numpad keys will not register for tab navigation.
How to Move and Reorder File Explorer Tabs
Once you have several tabs open, you will want to reorder them, detach one into its own window, or clean up the bar with one click. Here is how each task works in Windows 11 25H2.
Reorder Tabs by Dragging Them
- Click and hold the tab you want to move, drag it left or right along the tab bar, and release the mouse button to drop it into the new position.
Keep your most-used tab on the far left so Ctrl + 1 always lands you there.
Clean Up the Tab Bar with One Click
Right-click any tab on the tab bar to reveal three clean-up options. Each one serves a different purpose, so pick the method that matches what you want to keep open.
Close a Single Tab
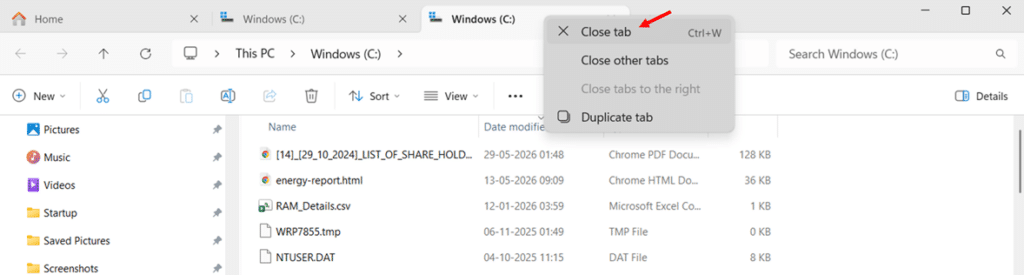
- Right-click the tab you want to close and select Close tab from the context menu.
Close Every Tab Except One
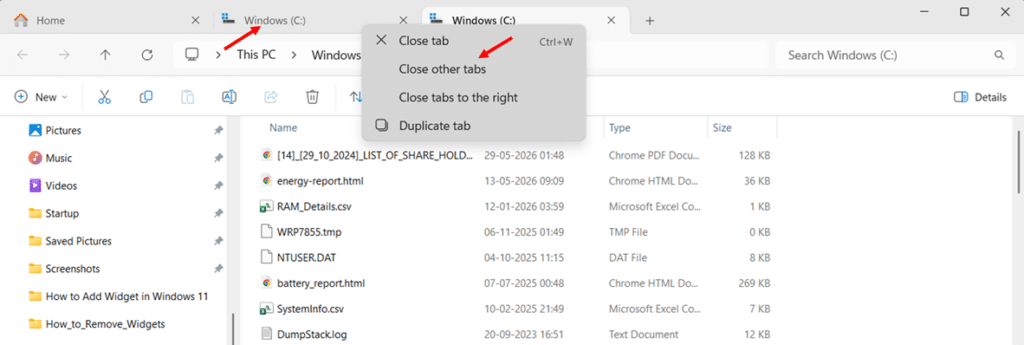
- Right-click the tab you want to keep open and select Close other tabs from the context menu to clear everything else in one click.
Close All Tabs to the Right
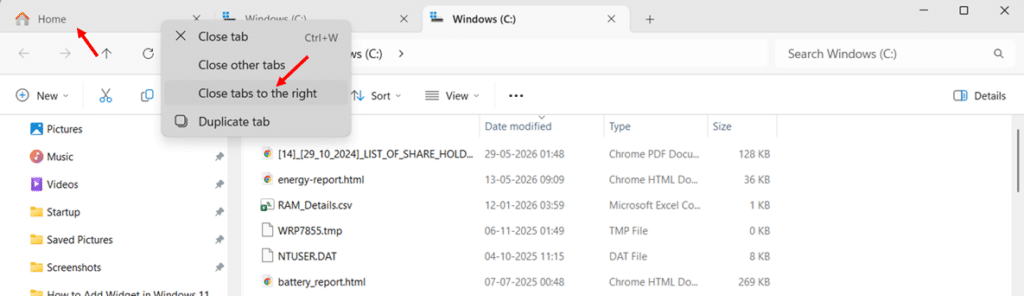
- Right-click the tab that should remain as your rightmost tab and select Close tabs to the right to close every tab sitting to its right.
Quick Tab Organization Tips
- Anchor your primary folder on the far left for instant Ctrl + 1 access
- Group related folders next to each other to use Ctrl + Tab between them quickly
- Cap your tab count at 8 per window to keep all tabs visible without scrolling
- Use a second File Explorer window via Windows + E when you need more than 8 active locations
Drag and Drop Files Between File Explorer Tabs
The most useful productivity feature that tabs unlock is moving files between folders without juggling multiple windows. Here are four ways to do it, depending on whether you prefer the mouse or the keyboard.
Drag a File from One Tab to Another
- Click and hold the file or selection of files you want to move in your source tab.
- Drag the file up over the destination tab on the tab bar and pause for about one second until the destination tab activates and its contents appear.
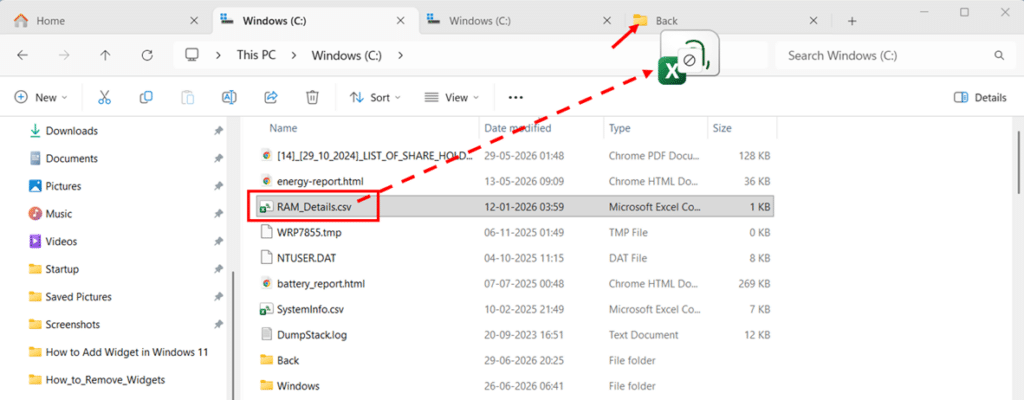
- Continue dragging the file into the folder area of the now-active tab and release the mouse button to drop it.
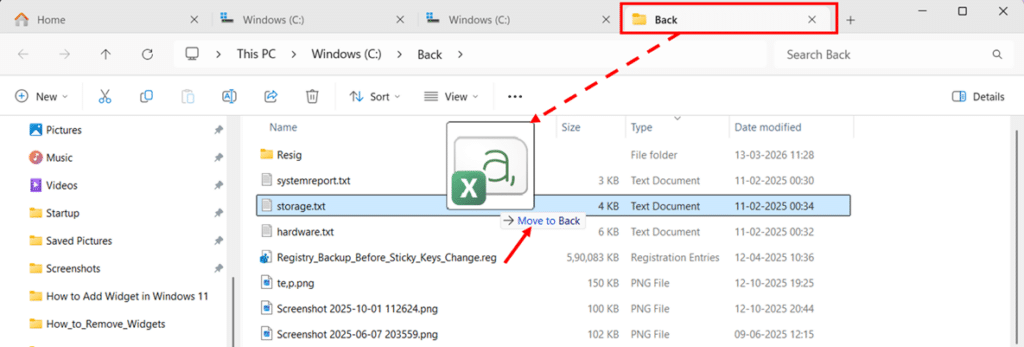
By default, dragging within the same drive moves the file, while dragging across drives (for example, C: to D:) copies it. Watch the cursor tooltip for Move to or Copy to to confirm which action will happen before you release the mouse.
Copy or Move Files Using Copy/Cut and Paste
- Select the files in your source tab and press Ctrl + X to cut or Ctrl + C to copy.
- Switch to your destination tab using Ctrl + Tab or by clicking the tab on the tab bar.
- Press Ctrl + V to paste the files into the destination folder.
Control Copy, Move, or Shortcut with Modifier Keys
Hold a modifier key while dragging to force a specific action regardless of which drive the source and destination sit on:
- Hold Ctrl while dragging to copy the file
- Hold Shift while dragging to move the file
- Hold Alt while dragging to create a shortcut in the destination folder
Watch the cursor tooltip change to confirm the action before you release the mouse button.
Right-Click Drag for a Menu Choice
When you want to decide what happens only after you reach the destination, use right-click drag.
- Right-click and hold the file in your source tab, then drag it over the destination tab on the tab bar.
- Wait for the destination tab to activate, then drag the file into the folder area.
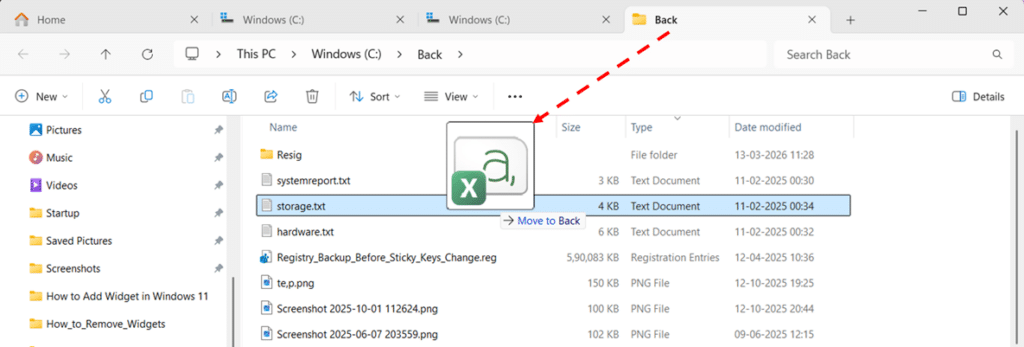
- Release the right mouse button to reveal a context menu, then select Copy here, Move here, or Create shortcuts here.
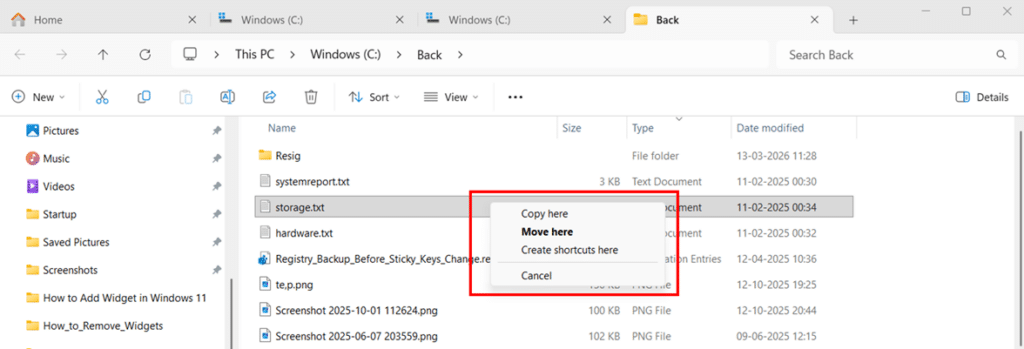
This method is the safest way to transfer critical files because you commit to the action only at the very last moment.
Hidden File Explorer Features Worth Enabling: Compact View, Preview Pane, and Details Pane
Three features hide in plain sight inside File Explorer and pair beautifully with tabs. Compact view fits more files on screen, the Preview pane shows file contents without opening them, and the Details pane displays metadata at a glance. All three take seconds to enable.
Enable Compact View to Fit More Files on Screen
Compact view reduces the vertical spacing between items in the main file list, letting you see roughly 30 percent more files without scrolling. It is especially useful on laptops, smaller monitors, and folders containing hundreds of items. In Windows 11 25H2, this setting lives inside Folder Options rather than the View dropdown.
- Open File Explorer with Windows + E.
- Click the three dots (See more) in the command bar and select Options to open the Folder Options dialog.
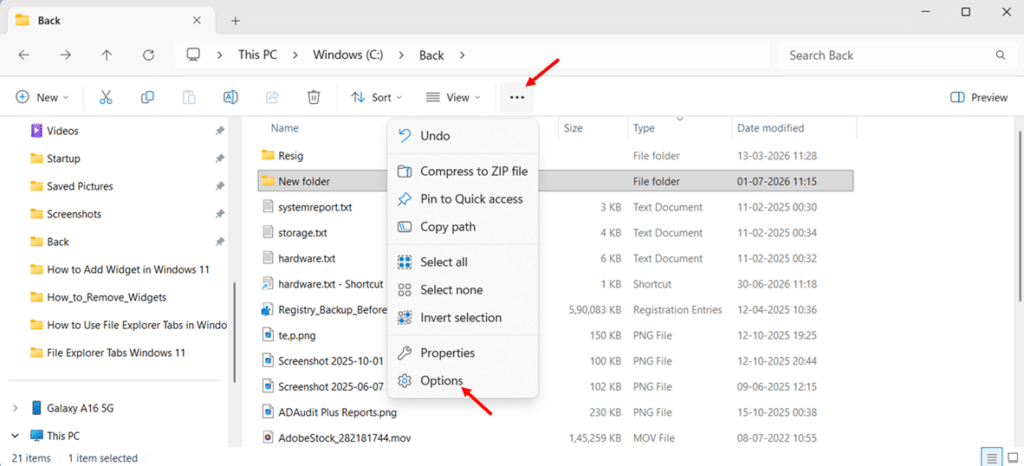
- Switch to the View tab and tick Decrease space between items (compact view) in the Advanced settings list.
- Click Apply and then OK to save the change.
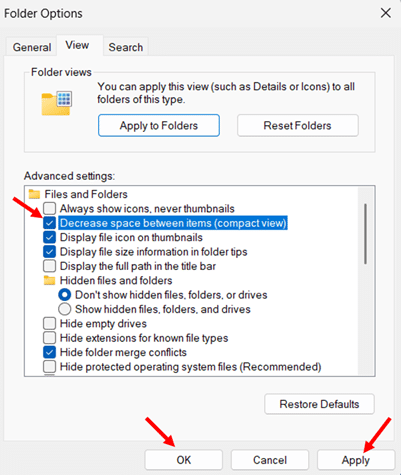
To turn Compact view off, repeat the same path and untick Decrease space between items (compact view).
Enable the Preview Pane to See File Contents at a Glance
The Preview pane displays the contents of the selected file in a sidebar on the right side of the File Explorer window. It works for images, PDFs, Microsoft Office documents, text files, and several other common file types.
- Open File Explorer with Windows + E and click any file in the main view.
- Press Alt + P to toggle the Preview pane on or off instantly..
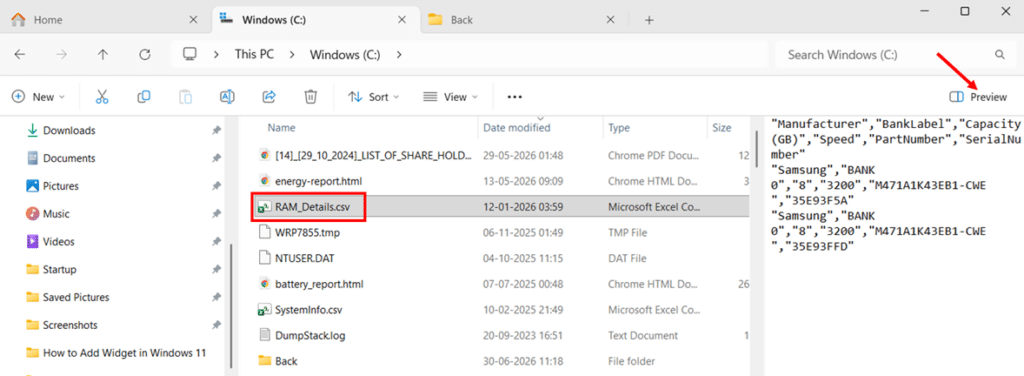
- Use the divider on the left edge of the pane to resize it to your preferred width.
Quick tip: The Preview pane uses CPU and memory to render previews. If File Explorer feels sluggish in large folders, turn the pane off with another Alt + P press.
Enable the Details Pane to See File Metadata
The Details pane shows file metadata on the right side of File Explorer, including size, type, date created, date modified, and image dimensions where applicable. It is invaluable for photographers, video editors, and anyone managing files with rich metadata.
- Open File Explorer with Windows + E and select any file in the main view.
- Press Alt + Shift + P to toggle the Details pane on or off instantly.
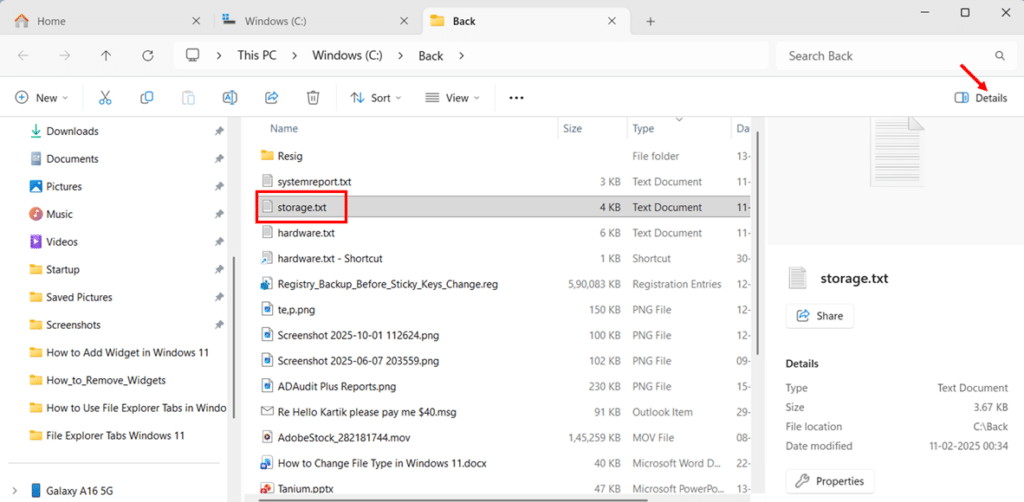
- Click any editable metadata field in the pane to update tags, comments, authors, or other properties, then click Save.
Troubleshooting File Explorer Tabs Not Working
If tabs have disappeared from File Explorer or never appeared in the first place, work through these fixes in order. Each one takes only a minute or two, and one of the first three usually solves the issue.
Verify Your Windows 11 Version
- Press Windows + R to open the Run dialog.
- Type winver and press Enter to open the About Windows dialog.
- Confirm the version reads 22H2 or higher. If it shows Windows 10 or an older Windows 11 build, tabs are not available on your system.
Install All Pending Windows Updates
Tabs sometimes disappear because an update was partially installed. Force a check:
- Press Windows + I to open Settings.
- Navigate to Windows Update and click Check for updates to install any pending cumulative updates.

- Restart your PC when prompted, then open File Explorer to confirm tabs are back.
Restart File Explorer via Task Manager
A stale explorer.exe process is the most common cause of tabs failing to appear.
- Press Ctrl + Shift + Esc to open Task Manager.
- Find Windows Explorer in the Processes tab, right-click it, and select Restart.

- Wait for the taskbar to refresh, then open File Explorer to test.
Run System File Repair Commands
Corrupted system files can break the modern File Explorer UI. Two commands fix most issues:
- Right-click Start and select Terminal (Admin) to launch an elevated PowerShell window.
- Type sfc /scannow and press Enter, then wait for the scan to finish (usually 5 to 15 minutes).
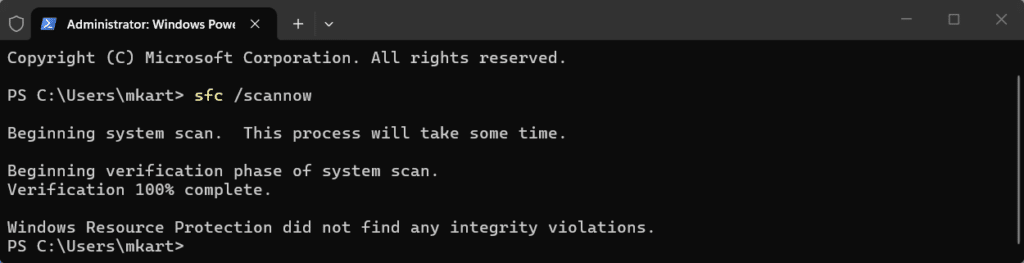
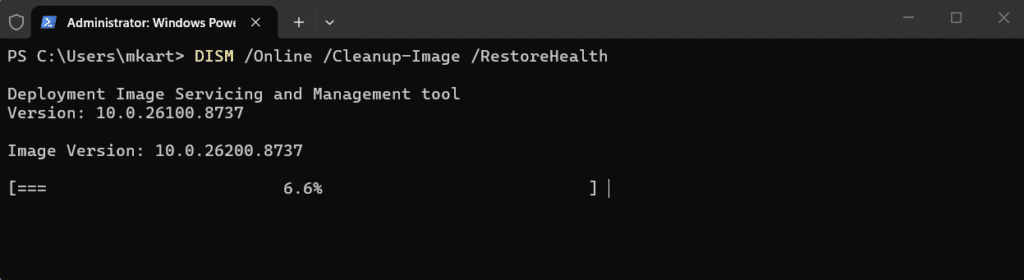
- Type DISM /Online /Cleanup-Image /RestoreHealth and press Enter, then restart your PC once both commands complete.
Uninstall a Problematic Recent Update
The June 2026 cumulative update KB5094126 has been reported to revert File Explorer to the classic Windows 10 style on some 25H2 systems, removing tabs entirely. Microsoft released KB5095093 on 23 June 2026 to resolve several related issues. If tabs disappeared right after a recent update, try this fix:
- Open Settings, navigate to Windows Update, and click Update history.
- Scroll to the bottom and click Uninstall updates.
- Locate KB5094126 or the most recent suspect update, click Uninstall, and restart your PC.
Conclusion
File Explorer tabs solve the one problem that has plagued Windows users for decades: juggling multiple folder windows. With the techniques in this guide, you can now open tabs five different ways, navigate them entirely from the keyboard, drag and drop files between them, and unlock the hidden Preview and Details panes that turn File Explorer into a genuine power-user tool.
The best part is that everything you have learned here works on your existing Windows 11 installation. No downloads, no licenses, no registry hacks required. Master these techniques, and you will move through your files faster than 90 percent of Windows users around you.
Once you have tabs mastered, pair them with Focus Sessions in Windows 11 to eliminate distractions during deep work and turn File Explorer into part of a complete productivity system.
Which tab technique from this guide will you start using first? Let me know in the comments below, and share this article with anyone still juggling multiple File Explorer windows.
Frequently Asked Questions (FAQs)
Yes. Open File Explorer, click the three-dot See more menu, select Options, switch to the View tab, and tick Restore previous folder windows at logon. From now on, Windows will restore your open tabs when you sign back in after a restart.
The Restore previous folder windows at logon setting is turned off by default. Enable it using the steps in the previous question to keep your tabs across restarts. Note that this feature only works for graceful shutdowns and restarts, not for system crashes or forced shutdowns.
No hard limit. Windows 11 does not cap the number of tabs you can open. Once you have more tabs than fit visibly on the tab bar, scroll arrows appear at the edges so you can navigate to off-screen tabs.
Yes. File Explorer tabs work identically with local drives, mapped network drives, UNC paths such as \\server\share, OneDrive folders, and SharePoint-synchronized folders. You can drag and drop files between local and network tabs without any special configuration.
Microsoft has shipped several performance improvements throughout the 24H2 and 25H2 update cycle, including faster launch times, smoother scrolling in large folders, improved thumbnail rendering, and a reduced memory footprint. A dedicated article covering all the File Explorer 2026 performance improvements is in preparation on kartikmehtablog.com.