
Some Windows 11 users love widgets. Others want them gone. If you are in the second group, this guide is for you.
In my 24 years of enterprise IT work, I have helped countless users tame their Windows desktops to fit their actual workflow. Removing widgets in Windows 11 takes anywhere from one click to a few minutes, depending on how completely you want them gone. There are five verified methods, each suited to a different need.
This how to remove widgets in Windows 11 guide walks you through every safe method in order, starting with removing one widget and ending with disabling the feature system-wide. Pick the one that fits your goal. You do not need to apply all four. Everything in this guide has been verified on a live Windows 11 Pro 25H2 machine in June 2026.
Curious what widgets can actually do before you remove them? Take a quick look at my guide on how to add widgets in Windows 11.
Table of Contents
Why You Might Want to Remove Widgets
Here are the most common reasons people remove widgets:
- Taskbar clutter: The Widgets icon takes valuable taskbar real estate.
- Performance: Widgets refresh in the background, which consumes CPU and RAM on older machines.
- Privacy preferences: Widget content is personalized using your Microsoft account activity.
- Minimal aesthetic: Some users prefer a clean, distraction-free Windows experience.
- Just not your style: You may have tried widgets and decided they are not for you.
Whatever your reason, you have five options.
Method 1: Hide a Single Widget from the Widgets Board
If just one or two widgets are bothering you (like Sports or Esports), hide them individually rather than removing them entirely. This is the lightest touch and the easiest to reverse.
- Press the Windows key + W to open the Widgets board.
- Hover over the widget you want to hide and click the More options (…) button in the upper-right corner of that widget.
- Select Hide this widget from the dropdown menu.
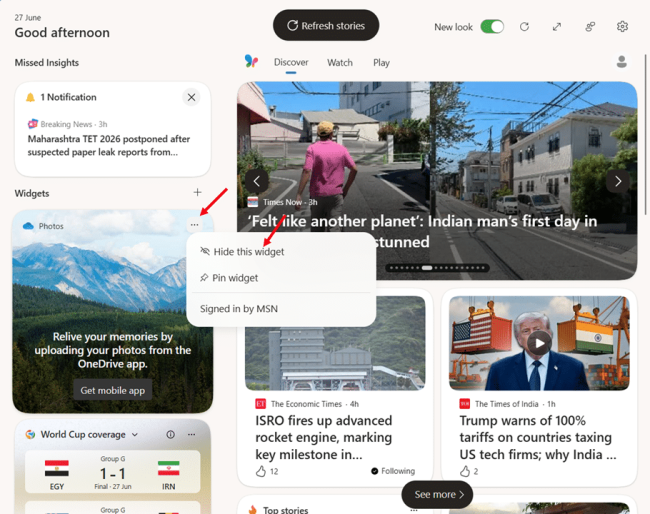
- The widget disappears from your board immediately.
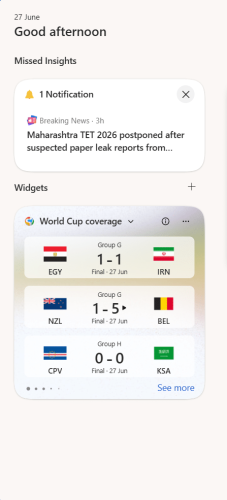
You can bring it back at any time through the Pin widgets window.
Note: According to Microsoft Support, hiding a widget completely removes it from the Widgets board. Unpinning, on the other hand, may still let Windows resurface the widget if it is relevant to your interests. Hide is the more permanent action.
Method 2: Hide the Widgets Icon from the Taskbar
This is the fastest and most reversible removal option. It hides the Widgets icon from your taskbar but leaves the feature accessible via Windows key + W if you ever need it.
- Press the Windows key + I to open the Settings app.
- Select Personalization in the left pane, then click Taskbar in the right pane.
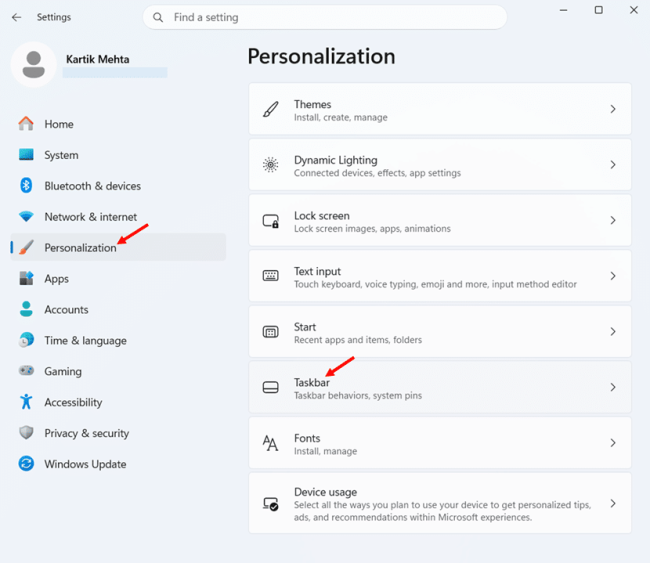
- Locate the Taskbar items section and toggle Widgets to Off.
- The Widgets icon disappears from your taskbar immediately. No restart required.
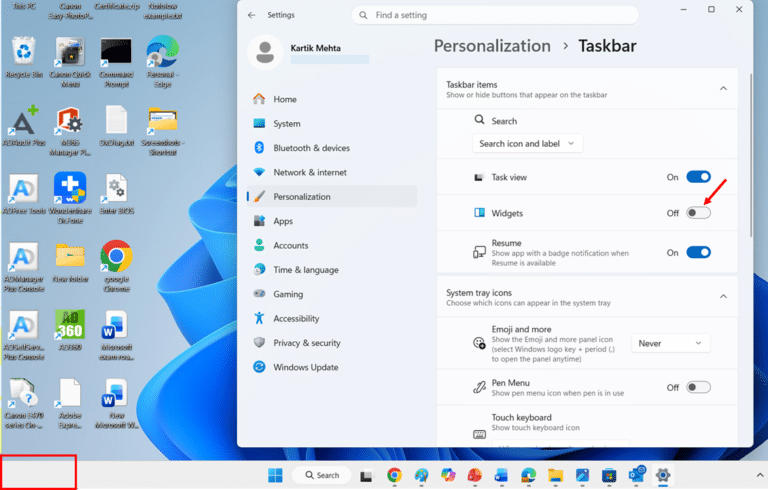
Note: This is a “hide,” not a “disable.” Background widget infrastructure is still loaded. You can still open the Widgets board with Windows key + W. To truly disable the feature, continue to Method 3 or 4.
Method 3: Disable Widgets via Group Policy Editor
This method completely blocks the widgets feature, so even the Windows key + W shortcut stops working. The policy survives sign-ins, restarts, and most Windows updates.
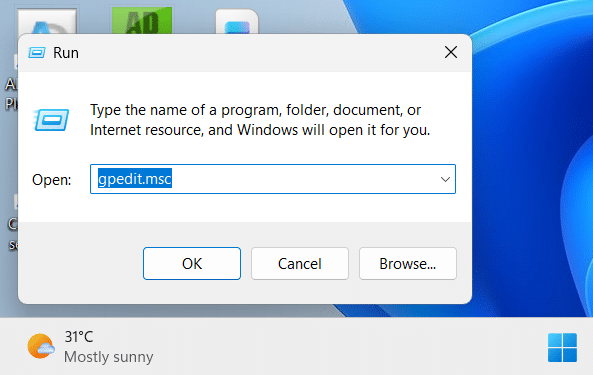
- Press the Windows key + R, type gpedit.msc, and press Enter to open the Local Group Policy Editor.
- Navigate to Computer Configuration > Administrative Templates > Windows Components > Widgets in the left pane.

- Double-click the Allow widgets policy on the right side to open its configuration window.
- Select Disabled, click Apply, then click OK to save the policy.

- Open Command Prompt as administrator and run gpupdate /force to apply the policy if not applied,immediately , or sign out and back in.
Note: This method only works on Windows 11 Pro, Enterprise, and Education editions. If you have Windows 11 Home, skip to Method 4.
Method 4: Block Widgets via Registry Editor
If you are on Windows 11 Home, you do not have the Group Policy Editor. This registry method achieves the same result. It also works on Pro and Enterprise editions.
Warning: Incorrect editing of the registry can cause system issues. Always back up your registry before making changes.
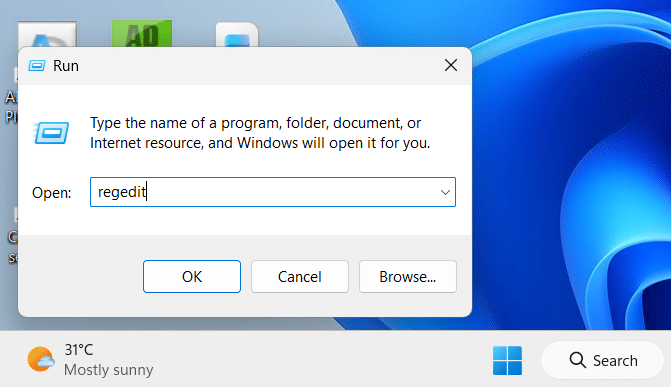
- Press the Windows key + R, type regedit, and press Enter to open the Registry Editor.
- Navigate to HKEY_LOCAL_MACHINE\SOFTWARE\Policies\Microsoft in the left pane tree, right-click the Microsoft key, and select Export.
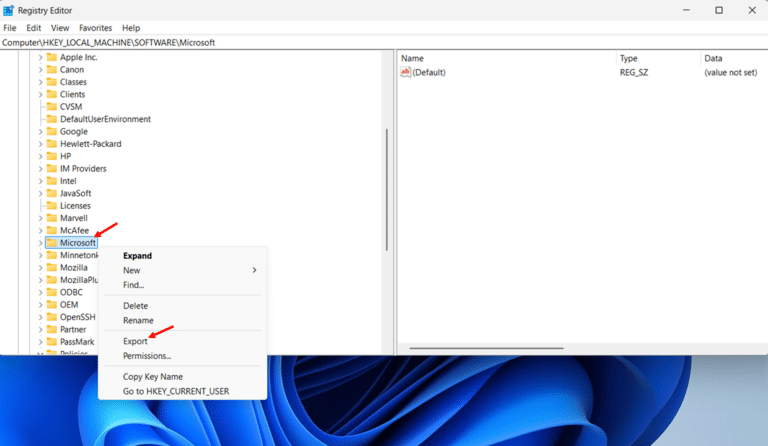
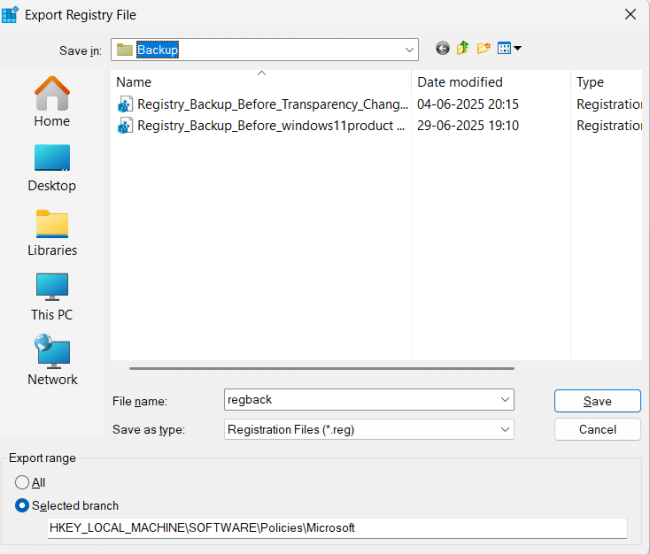
- Choose a safe location, enter a filename like Microsoft-key-backup, confirm Export range shows Selected branch, and click Save.
- Navigate to HKEY_LOCAL_MACHINE\SOFTWARE\Policies\Microsoft\Dsh using the left pane tree.
- If the Dsh key does not exist under the Microsoft key, right-click the Microsoft key, select New > Key, and name it Dsh.
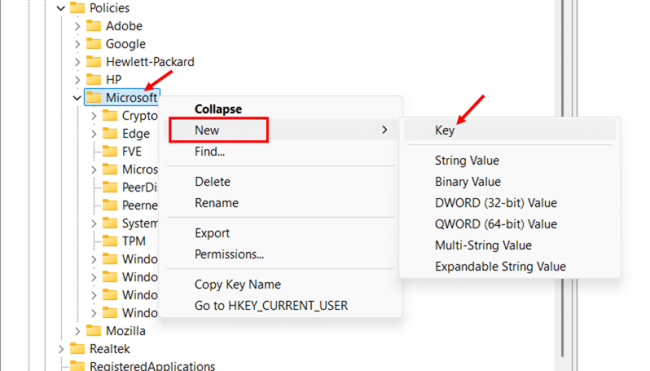
- Right-click the Dsh key, select New > DWORD (32-bit) Value, and name it AllowNewsAndInterests.

- Double-click AllowNewsAndInterests, set its value data to 0, and click OK.
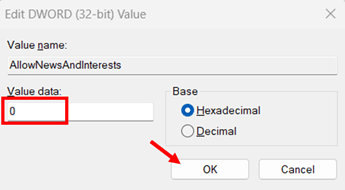
- Close the Registry Editor and restart your PC to apply the change.
After the restart, the Widgets icon disappears, and the Widgets toggle in Taskbar settings becomes grayed out.
Note: Use the HKEY_LOCAL_MACHINE path, not HKEY_CURRENT_USER. Policy enforcement only works at the machine level in this setting.
Troubleshooting: Widgets Won't Remove
If widgets keep appearing despite your efforts, try these fixes:
Group Policy method does not work:
- Verify the Allow widgets policy is set to Disabled in the Local Group Policy Editor, not Enabled.
- Open an elevated Command Prompt and run gpupdate /force to push the policy.
The Registry method does not work:
- Confirm you edited the HKEY_LOCAL_MACHINE path, not HKEY_CURRENT_USER, in the Registry Editor.
- Verify that the value is named exactly “AllowNewsAndInterests” and that the value data is set to 0.
- Restart your PC because the change does not take effect without a restart.
Conclusion
You now have four safe and verified ways to remove widgets in Windows 11. For most users, Method 1 (hide a single widget) or Method 2 (hide the icon from taskbar) is enough. Power users on Windows 11 Pro can use Method 3 for a system-wide disable. Windows 11 Home users have Method 4 for the same effect.
Now it is your turn. Pick the method that matches your goal, follow the steps, and tell me in the comments which one you chose. I will share my own setup too.
Want to take your Windows 11 productivity setup further? Once your taskbar is clean, learn how to organize your workspace with my detailed guide on Snap Layouts and Snap Groups in Windows 11.
Frequently Asked Questions (FAQs)
Method 1 removes one specific widget from the Widgets board. Method 2 removes the icon from your taskbar, but the feature still opens with Windows key + W.
Hiding (Methods 1 and 2) leaves the underlying feature working. Disabling (Methods 3 and 4) blocks the feature so even Windows key + W stops working.
Not recommended. Microsoft confirms it can break Windows. Use Method 3 or Method 4 to achieve the same result safely.
On older PCs with limited RAM, yes. On modern machines with 16GB or more RAM, the difference is negligible.
No. Methods 3 and 4 only affect widgets. Notifications from other apps continue to work normally through the Windows Action Center.
It means a Group Policy (Method 3) or Registry value (Method 4) is enforcing the setting. Reverse the policy or registry change to re-enable it.