

As someone who has spent 24 years working in enterprise IT, managing endpoints, securing devices across large organizations, and configuring privacy policies for hybrid workforces, I have tested every one of the 15 privacy settings in this guide on my daily driver Windows 11 Pro 25H2 machine.
The 15 settings in this guide let you take back control of what your PC shares with Microsoft, apps, and websites. Each setting takes seconds to change, costs nothing, and is already built into Windows 11. Most users never touch them, and that is a mistake worth fixing today.
I will walk you through 15 privacy settings across seven categories: the Advertising ID, diagnostic data, Activity History, app permissions, Copilot and Cloud search, Windows Recall, Microsoft Edge privacy, and Start menu suggestions. Each setting includes step-by-step instructions with clear guidance on which toggles matter most and which to leave alone.
Privacy settings protect what data leaves your PC, but the strongest data protection also requires encrypting your drive so that lost or stolen laptops do not expose your files. Learn how to turn on BitLocker in Windows 11 to complete your security posture.
Table of Contents
Disable the Advertising ID and Personalized Ads (Settings 1 to 2)
Both settings in this section are on one page: Privacy and security, and then Recommendations and offers. On older Windows 11 builds, that page is still called General, but the toggles are identical.
Setting 1: Turn off the Advertising ID
Windows generates a unique Advertising ID for every user on your PC. Apps use it to build a profile of your interests and serve targeted ads, much like a browser cookie but system-wide. Microsoft’s own documentation confirms this ID follows you across every Microsoft Store app you use.
- Press Windows + I to open Settings, then select Privacy and Security from the left sidebar.
- Click Recommendations and offers (or General on older builds) under Windows permissions.
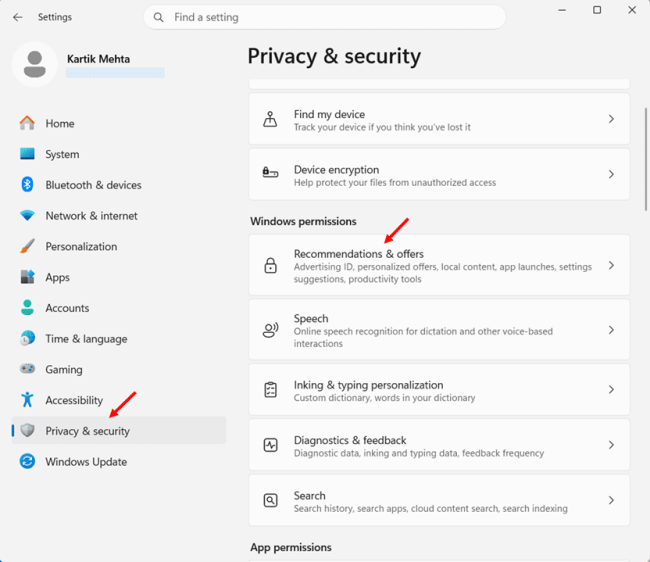
- Toggle Let apps show my personalized ads by using my advertising ID to Off.
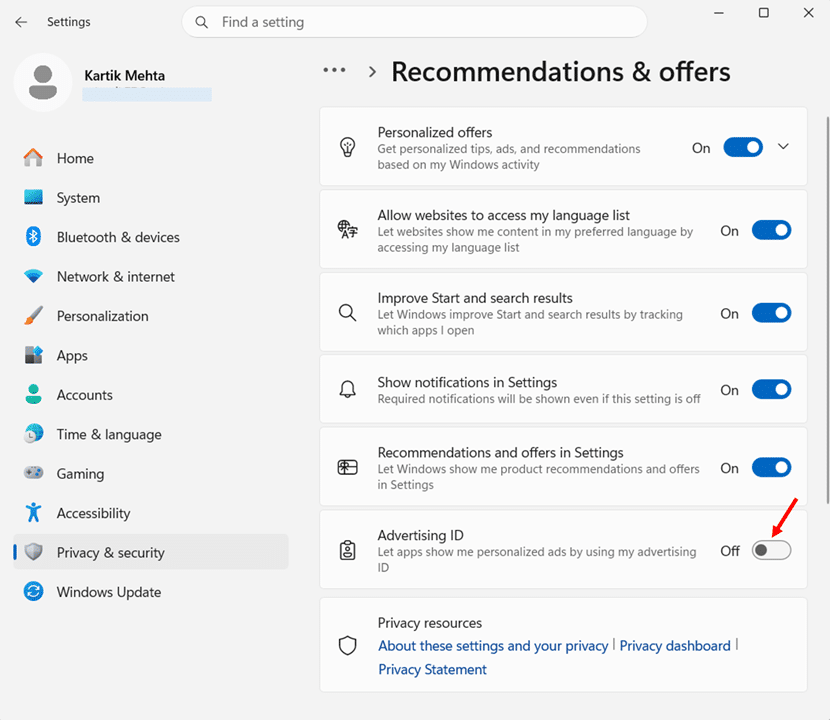
You will still see ads, but they will no longer be personalized to you. Microsoft’s documentation is clear on this: switching the Advertising ID off does not reduce ad volume; it just breaks the profiling link. And here is a useful bonus. If you toggle it off and then back on later, Windows resets your Advertising ID, giving you a clean slate.
Setting 2: Turn off Personalized Offers
Microsoft used to call this “Tailored experiences” and buried it under “Diagnostics and feedback“. In newer 25H2 builds, it moved to Recommendations and Offers and got renamed to Personalized Offers: same feature, more visible location.
When this toggle is on, Microsoft uses your diagnostic data to serve personalized tips, in-Settings promotions, and cross-product recommendations for OneDrive, Microsoft 365, and Store apps.
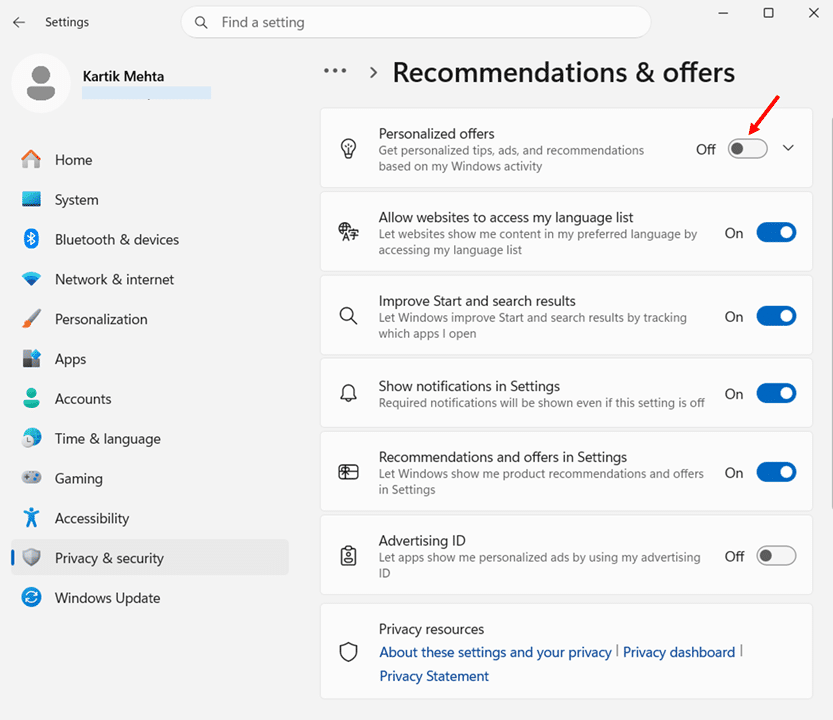
- Stay on the Recommendations and offers page from Setting 1.
- Toggle Personalized offers to Off.
Bonus: Reset your Microsoft account Ad preferences
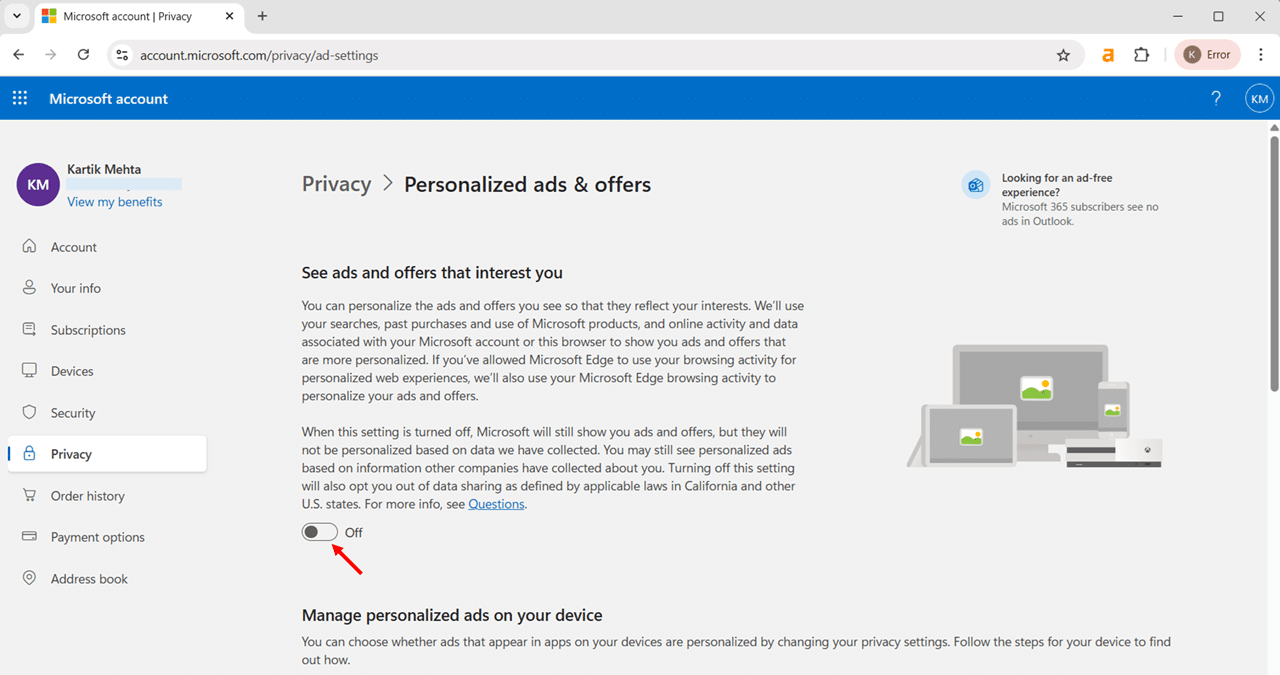
This turns off personalised ads at the Microsoft account level. The setting follows you across every Windows PC and Microsoft product you sign into.
- Open a browser and go to the Microsoft account Ad settings page.
- Sign in with your Microsoft account.
- Toggle See ads and offers that interest you to Off.
Disable Diagnostic Data and Telemetry (Settings 3 to 4)
Both settings in this section are on one page: Settings, Privacy and Security, and Diagnostics and Feedback. This is where the largest data pipeline from your PC originates, so pay attention.
Setting 3: Turn off Optional Diagnostic Data
Windows 11 collects diagnostic data in two categories: Required and Optional. Required covers basic device information, quality data, app compatibility, and Microsoft Store activity. Optional goes much further, sending usage patterns, browsing behavior, richer crash details, and app activity that Microsoft uses for Personalization and product improvement.
You cannot disable Required (it stays on for security and updates). But you can stop the Optional stream.
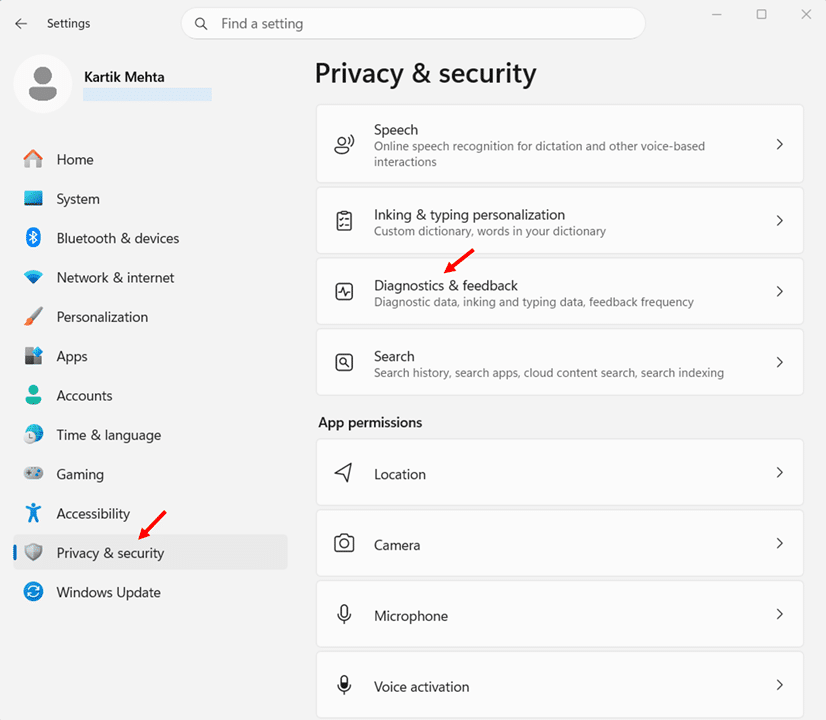
- Press Windows + I to open Settings, select Privacy and Security, then click Diagnostics and Feedback.
- Expand Diagnostic data at the top of the page.
- Toggle Send optional diagnostic data to Off.
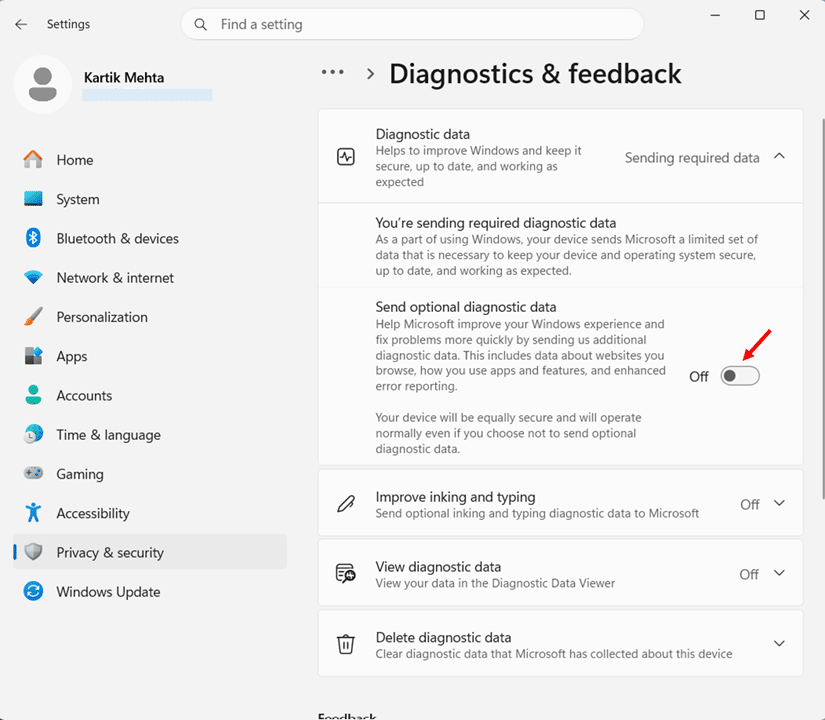
Microsoft’s documentation confirms your device will be just as secure and operate normally when only sending Required diagnostic data.
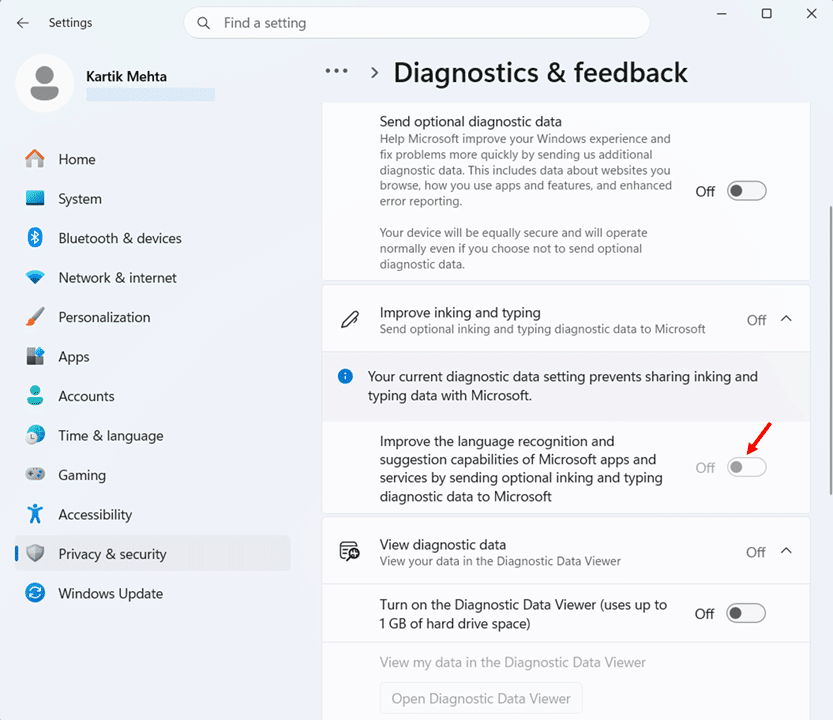
Note: Turning this off also disables Setting 4 (Improve inking and typing) automatically. If you want to keep Optional diagnostic data on but Turn off Improve Inking and Typing specifically, then perform complete Setting 4.
Setting 4: Turn off Improve Inking and Typing
When this toggle is on, Microsoft sends samples of your handwriting and typed text to its servers to improve recognition models. On a shared or family PC, that is worth switching off.
Note: This toggle is dependent on Optional diagnostic data. If you already completed Setting 3, this is automatically off. To disable this independently while keeping Optional diagnostic data on, then do this step.
- Stay on the Diagnostics and feedback page.
- Locate Improve inking and typing and toggle it to Off.
Note: Major Windows Feature Updates (such as the annual 25H2 or 26H1 rollouts) may reset the Send optional diagnostic data toggle to On. Set a reminder to revisit this page after every big update. It takes 30 seconds and saves you months of unwanted data collection.
Voice and Speech Privacy (Setting 5)
Voice data is uniquely valuable to advertisers and AI training models because it captures who you talk to, what you say, and even what plays in the background of your home. Setting 5 stops Windows from sending voice samples to Microsoft’s cloud speech services.
Setting 5: Turn off Online Speech Recognition
When Online speech recognition is on, Windows sends samples of your voice to Microsoft’s cloud services to improve speech recognition and dictation. This affects features like Windows dictation, Voice Access, and Cortana voice commands. If you do not use voice features on your PC, or prefer not to have voice samples leave your device, turn it off.
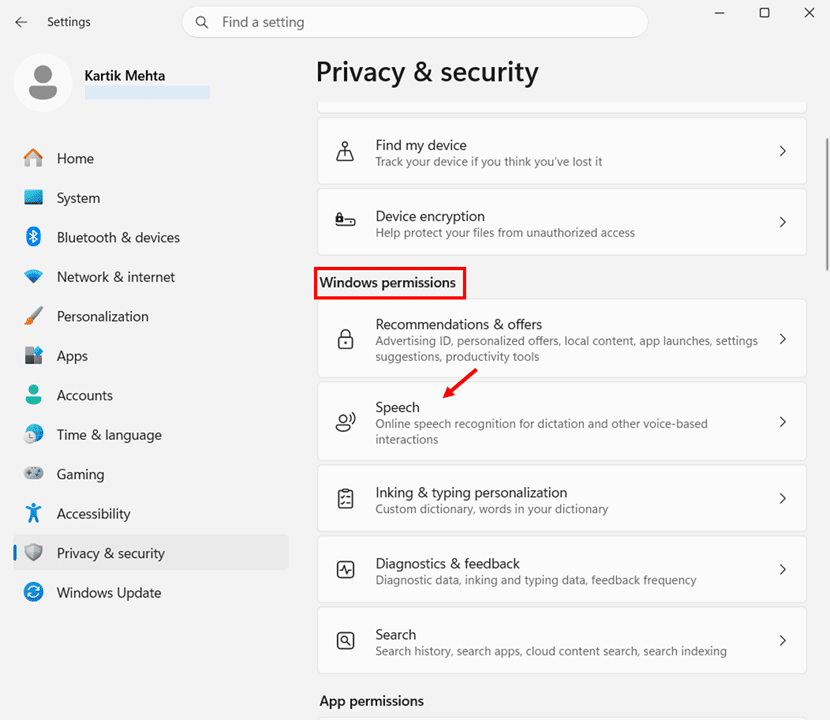
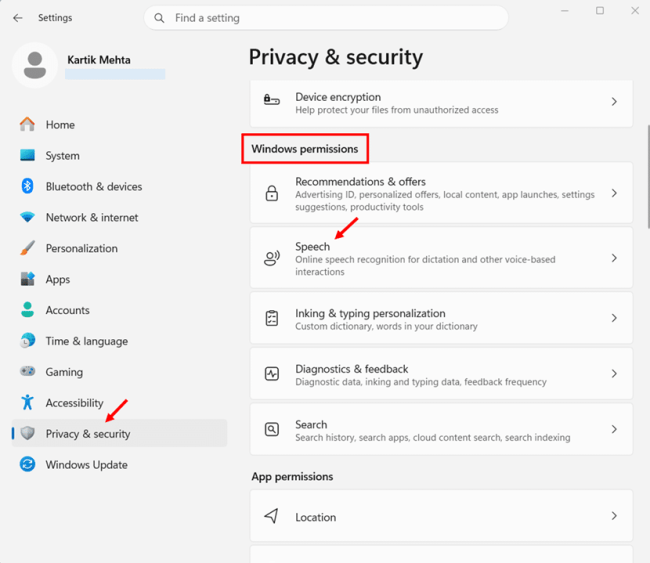
- Press Windows + I to open Settings, then select Privacy and security.
- Click Speech under Windows permissions.
- Toggle Online speech recognition to Off.
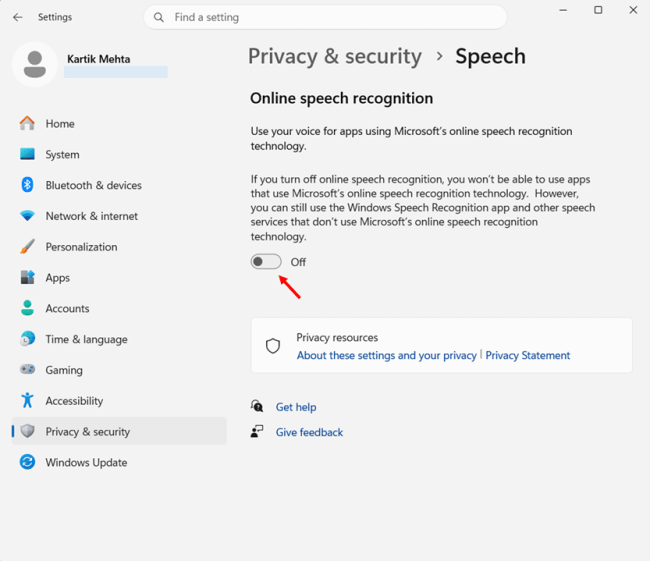
Turning this off disables Windows dictation, Voice Access, and Cortana voice commands. Voice typing in Word and other Microsoft 365 apps continues to work because those apps use a different speech service. Only switch it off if you rarely use system voice input.
Lock Down App Permissions for Sensitive Data (Settings 6 to 9)
This section closes the biggest privacy hole in Windows 11: which apps can reach your camera, microphone, location, and contacts. On a fresh Windows 11 install, dozens of pre-loaded Microsoft Store apps and desktop apps have access to these sensors by default. Most of these apps will never need to use your webcam or read your address book. But because they have permission, some of them do access these sensors quietly in the background.
All four settings in this section use the same two-layer model. First, a global OS-level toggle controls whether Windows can use the resource at all. Second, a per-app list decides which specific apps get access. Once you understand this pattern, every permission page in Windows 11 will feel familiar.
Setting 6: Restrict Camera Access
Your webcam is one of the most sensitive pieces of hardware on your PC. Windows 11 shows a small taskbar indicator whenever an app uses your camera, but that only alerts you after access has already happened. It is better to prevent unwanted access than to catch it after the fact.
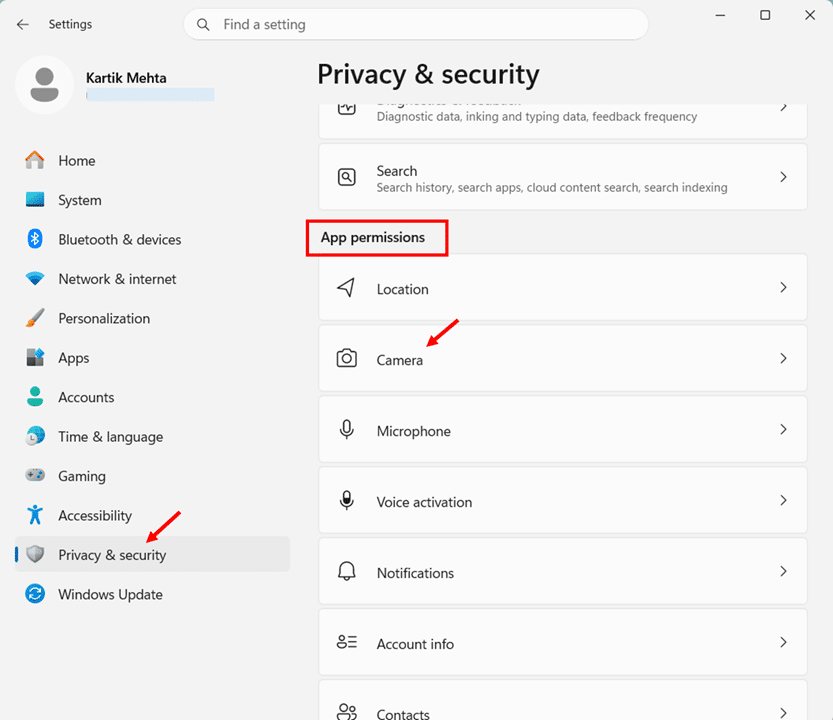
- Press Windows + I to open Settings, select Privacy and Security, then click Camera under App permissions.
- Leave Camera access at the top set to On if you use video calls in Teams, Zoom, or the Camera app. Set it to Off if you never use your webcam.
- Under Let apps access your camera, review the list and toggle off individual apps you do not trust. Games, in particular, rarely need webcam access.
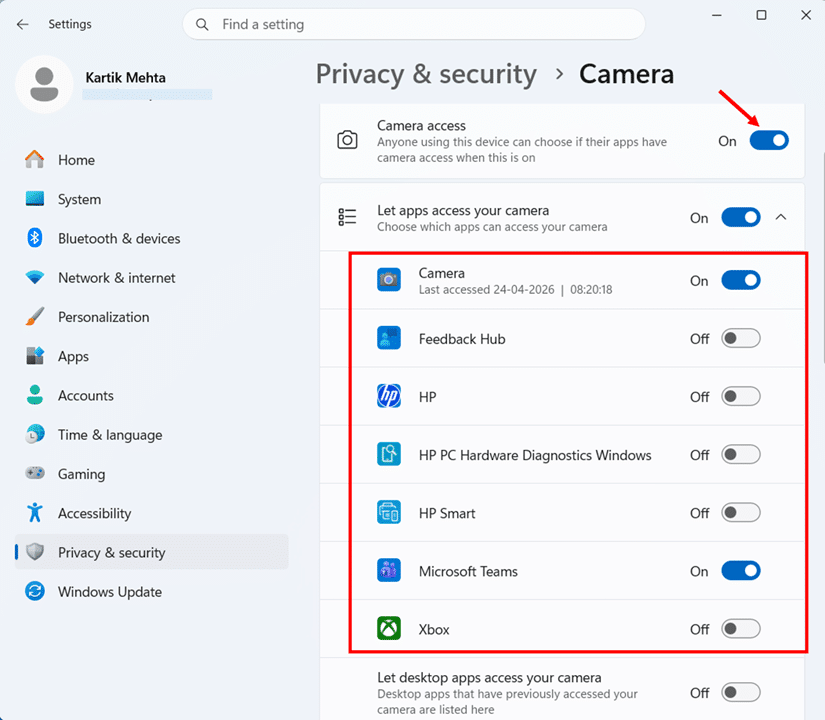
- Scroll to Let desktop apps access your camera and toggle it to Off.
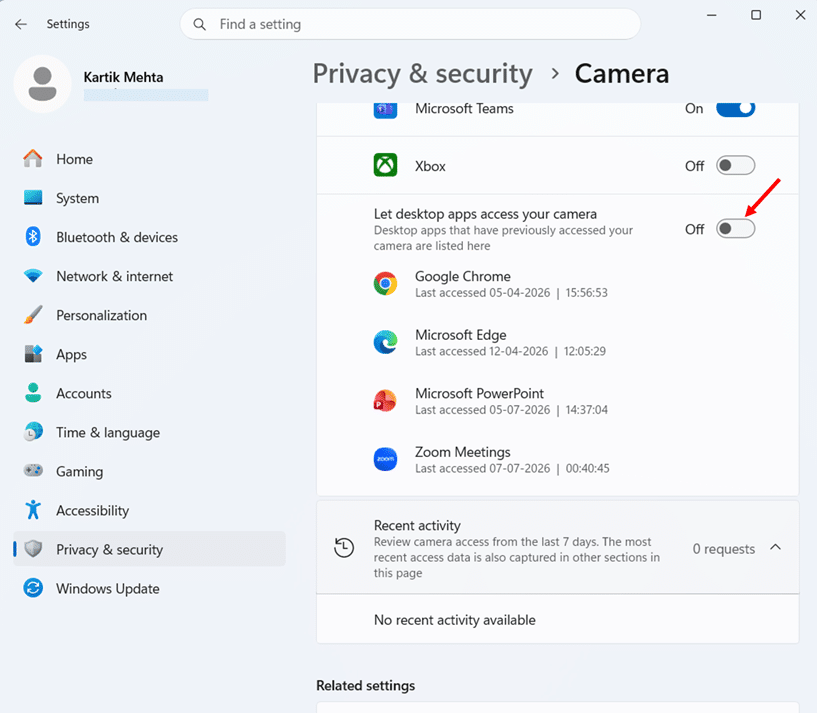
According to Microsoft’s documentation, camera privacy settings for desktop apps cannot be changed at an individual desktop app level. Microsoft also documents that desktop apps might still be able to access your camera even when this setting is turned off.
For extra peace of mind, use a physical camera shutter (built into many modern laptops) or stick a small piece of tape over the lens. A physical block is the only protection that no software app can override.
Setting 7: Restrict Microphone Access
The microphone is easier to miss than the camera. There is no indicator light next to the webcam to warn you, just a small taskbar icon, and no audible cue when Windows is listening.
- Return to Privacy and security and click Microphone.
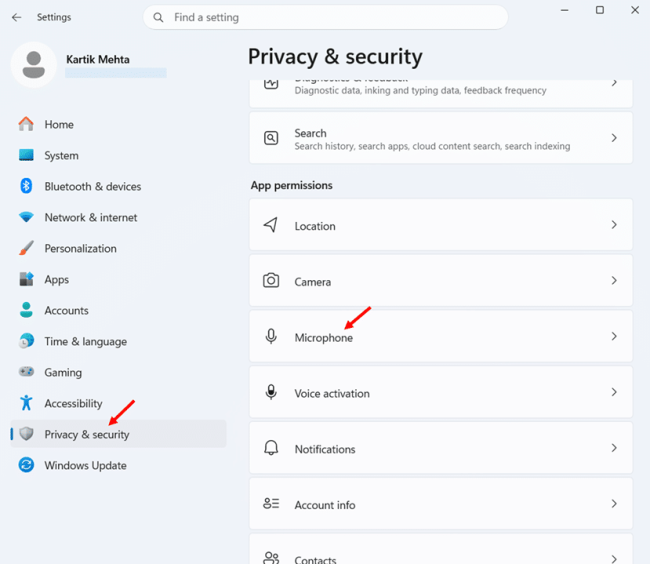
- Set Microphone access at the top to your preference. Turn it off if you never use voice input. Voice input includes dictation, video calls, voice search in the Start menu, and voice typing in Word.
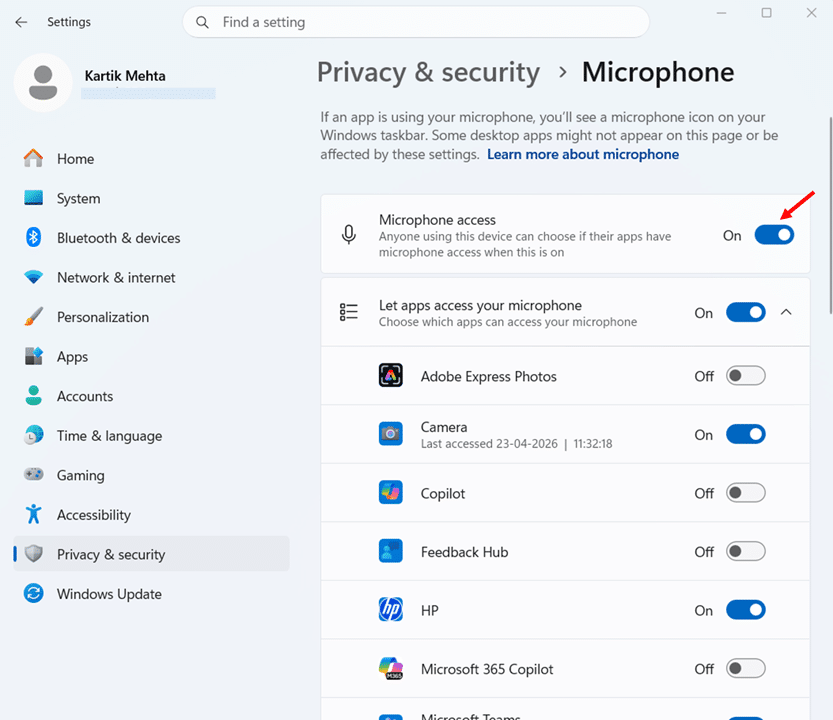
Note: Disabling the microphone globally breaks every app that uses audio input on your PC. This includes video calling apps (Teams, Zoom, Google Meet, Skype, Discord), Windows accessibility features (Voice access), dictation features (Voice typing in Windows, voice typing in Word), browser-based video calls, and the Voice Recorder app. Only switch it off if you never use any of these features.
- Under Let apps access your microphone, review the list carefully. Communication apps (Teams, Zoom, Discord, Skype) need it. Web browsers may need it for video calls. Games, most productivity apps, and random Store apps do not.
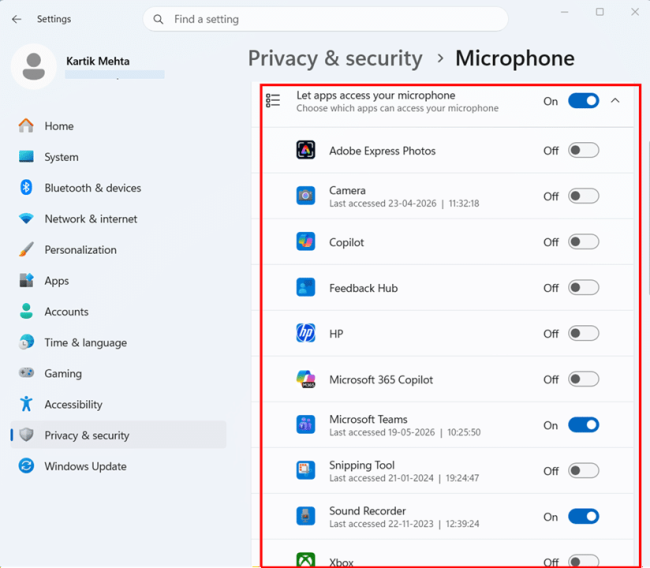
- Scroll to Let desktop apps access your microphone and toggle it to Off.
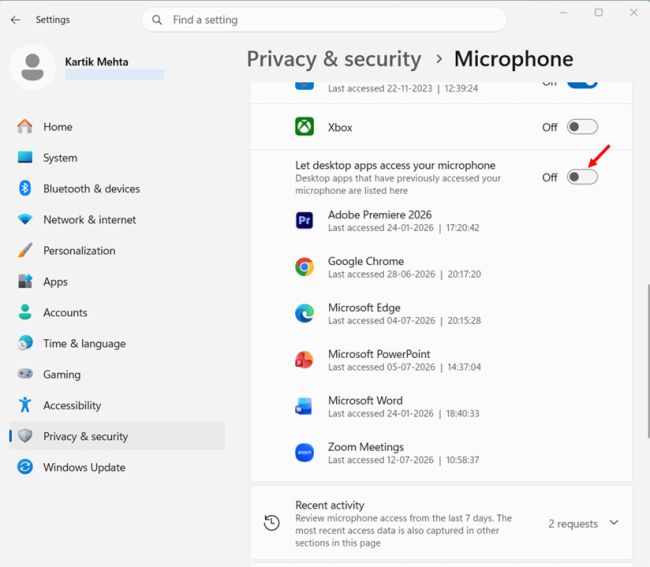
According to Microsoft’s documentation, microphone privacy settings for desktop apps cannot be changed at an individual desktop app level. Microsoft also documents that desktop apps might still be able to access your microphone even when this setting is turned off.
If your laptop has a hardware mute key (many Lenovo, HP, and Dell business laptops do), use it whenever you are not in a call. A hardware mute is the only kind that no app on your PC can silently override.
Setting 8: Configure Location Services
Location has more layers than any other permission on this page.
- From Privacy and Security, click Location under App permissions.
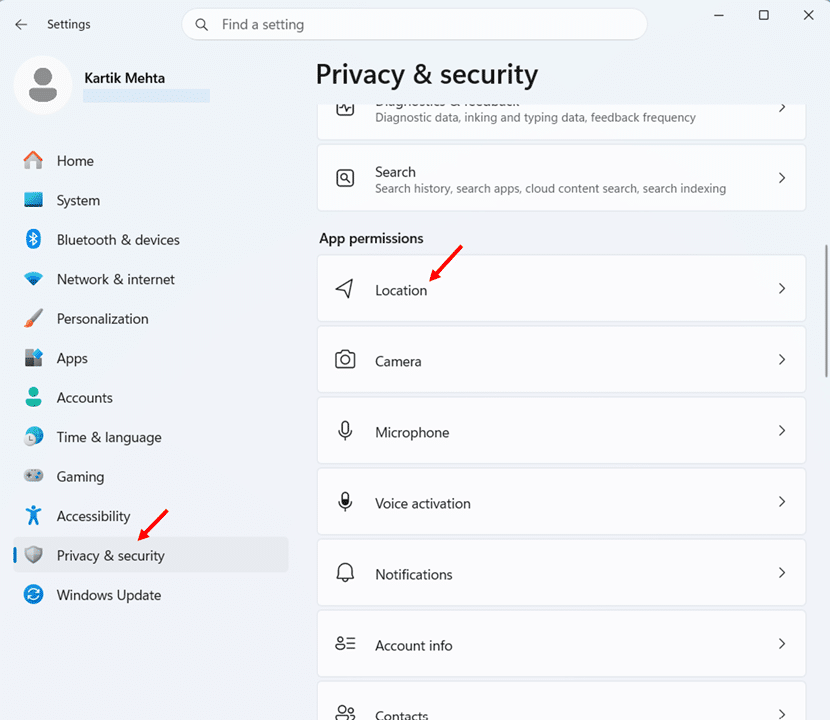
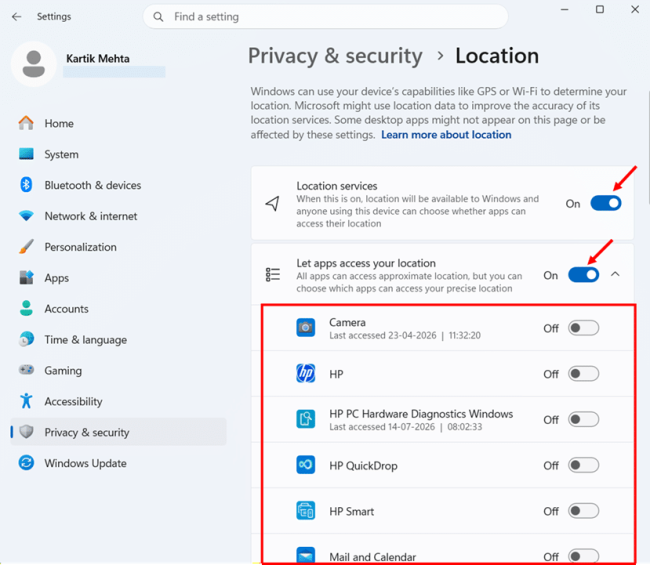
- For most home users, leave Location services at the top set to On so Find My Device continues to work.
- Toggle off Let apps access your location for a hard block. Alternatively, leave it on and disable location per app for anything that does not need it. Weather, Maps, and navigation apps are usually the only ones that need it.
- Scroll to Location history and click Clear to delete recent location data on your device.
- Set a rough Default location. When an app asks for your location and the precise location is unavailable, Windows sends this default value instead of falling back to your public IP address.
Setting 9: Restrict Contacts Access
Your address book is one of the most overlooked permissions in Windows 11. Very few apps need to see who you know, but many apps request access during installation. Most people click allow without thinking twice.
- From Privacy and Security, click Contacts under App permissions.
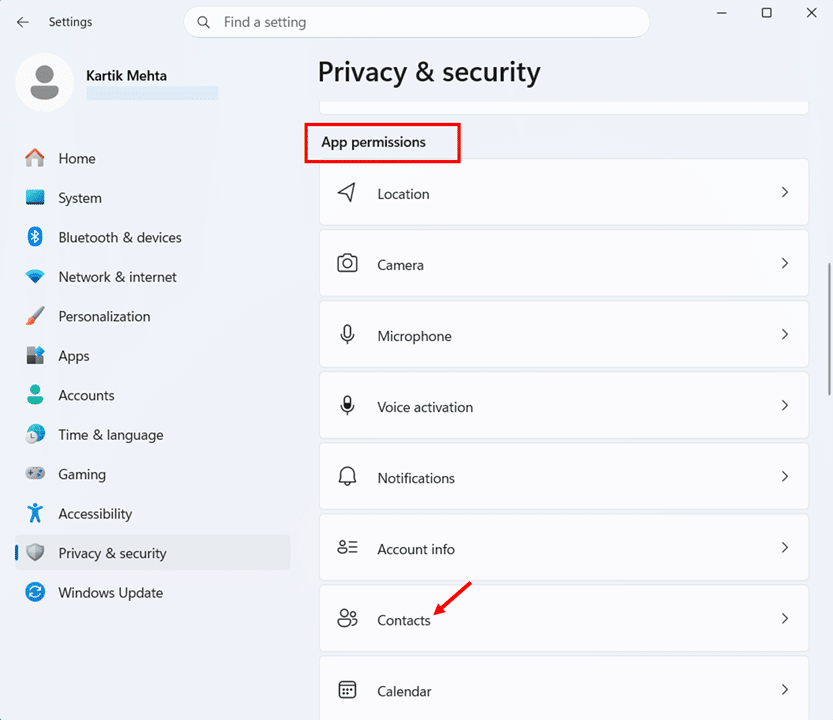
- Set Contacts access at the top to your preference. Set it to Off if you never use apps that need access to your contacts. Set it to On if you use the People app, Mail, or a Microsoft Store contacts sync app.
- If you leave Contacts access on, review the list under Let apps access your contacts and toggle off individual apps that do not need access.
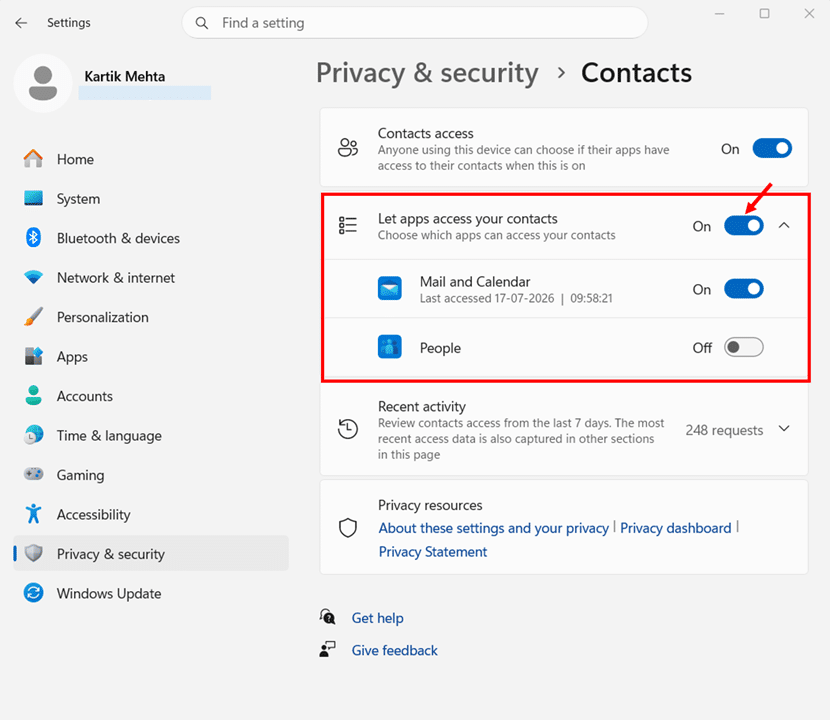
Once you are done with Contacts, go back to Privacy and security and check three related permissions from the App permissions list: Calendar, Phone calls, and Email. The same principle applies to all three: the fewer apps with access, the less personal data at risk.
Disable Copilot and Cloud Search (Settings 10 to 11)
Windows Copilot is one of the biggest changes to Windows 11 in the last two years. Microsoft’s ambition is clear: bring conversational AI into the operating system itself, alongside cloud-connected features like Bing search integration in the Start menu. Some users love it. Others prefer to keep AI out of their daily workflow. This section covers two AI-related privacy configurations in Windows 11: uninstalling the Copilot app and disabling Cloud content search in the Start menu.
Setting 10: Uninstall the Standalone Microsoft Copilot App
Windows 11 ships with two separate Copilot apps: Microsoft Copilot (the consumer version tied to your personal Microsoft account) and Microsoft 365 Copilot (which handles work, school, and personal accounts). Both run in the background, consume memory, and can send your prompts to Microsoft’s cloud services. If you do not actively use them, uninstall them.
- Press Windows + I to open Settings, then select Apps and click Installed apps.
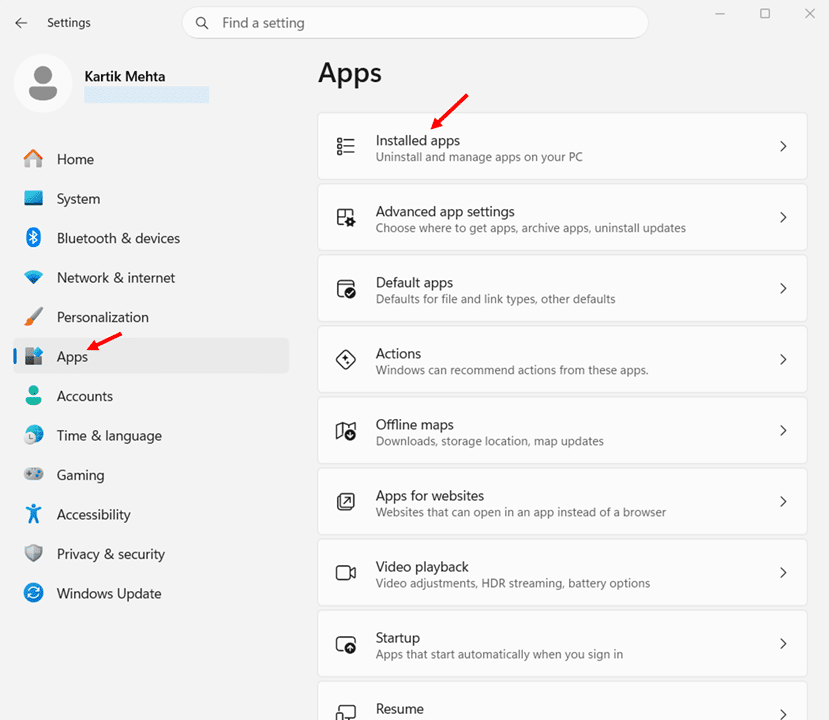
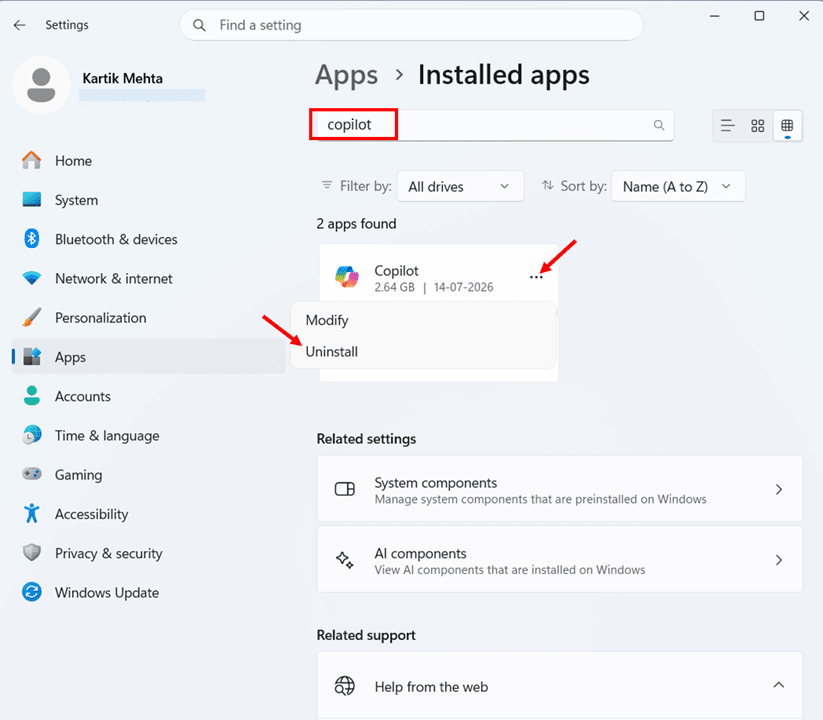
- In the search box, type Copilot to filter the list.
- Click the three-dot icon next to Copilot and choose Uninstall.
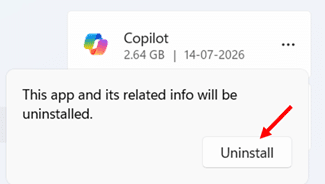
- A confirmation prompt appears stating “This app and its related info will be uninstalled.” Click Uninstall to confirm.
- Repeat for Microsoft 365 Copilot if you do not need it for Office access on this PC.
If your keyboard has a dedicated Copilot key, uninstalling the app makes the key useless. To remap it, go to Settings > Personalization > Text input > Customize Copilot key on keyboard, then pick Search or a custom app.
Note: Feature updates and Windows Update can silently reinstall Copilot. If your PC runs Windows 11 Pro, Enterprise, or Education, Group Policy provides a policy-enforced block that survives feature updates. The full step-by-step is in my Windows 11 Security Hardening PDF.
Setting 11: Disable Cloud Content Search
When you search from the Start menu, Windows 11 sends your query to Bing to fetch cloud-based results (such as news, Microsoft account files, and work documents). This happens even when you are only searching for a local app or file. Turn it off to keep your Start menu searches local and private.
- Press Windows + I to open Settings, then select Privacy and security and click Search
- Click Search my accounts to expand the section (previously called Cloud content search in older builds).
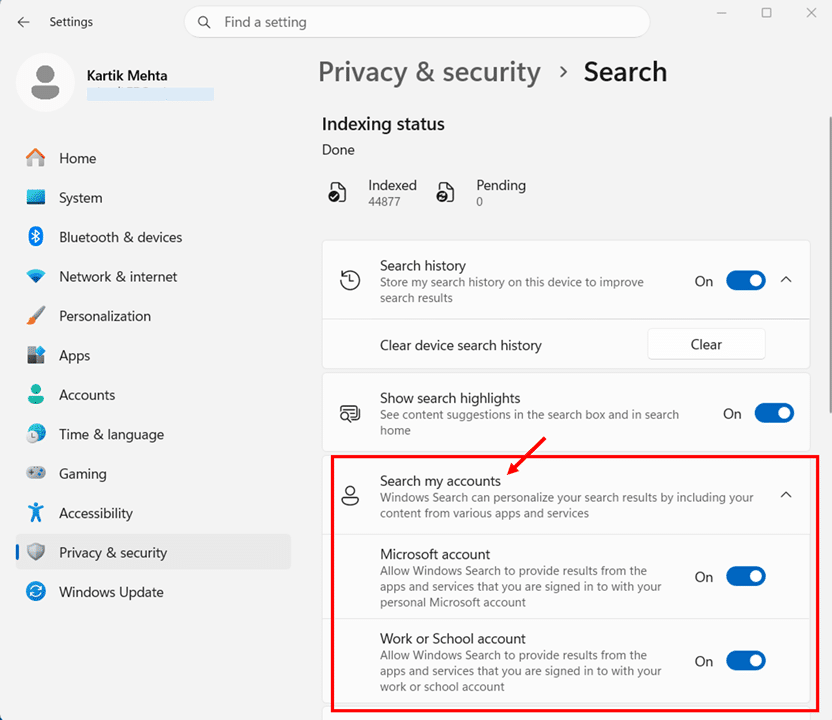
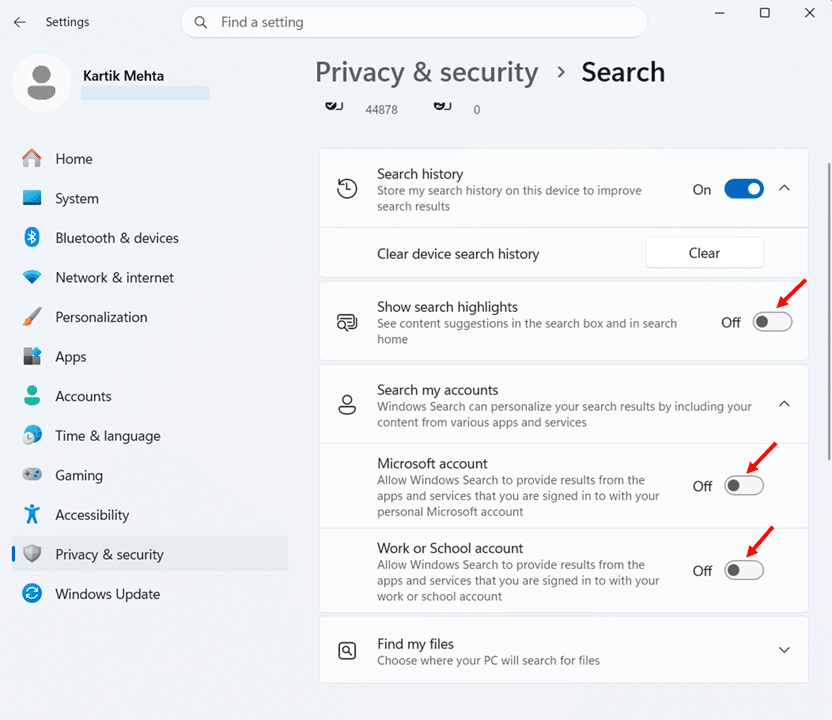
- Toggle off Microsoft account to stop Windows Search from including results from apps and services signed in with your personal Microsoft account.
- Toggle off Work or School account to stop Windows Search from including results from your work or school account.
- Toggle off Show search highlights at the top of the page to remove the Bing-powered content suggestions in the search box and search home.
Disable Windows Recall on Copilot+ PCs (Setting 12)
Windows Recall is one of the most discussed features on Copilot+ PCs in 2026. It periodically captures snapshots of your screen, runs OCR and semantic indexing locally, and lets you search your past activity using natural language (for example, show me the invoice I looked at last Tuesday). For some users, this is a productive tool. For others, the idea of a searchable database of everything they have seen on screen feels like a step too far. Both positions are reasonable. Microsoft has made Recall optional.
One important note before we start: Recall only runs on Copilot+ PCs. According to Microsoft’s official documentation, that means a Neural Processing Unit (NPU) capable of at least 40 TOPS (typically found in Qualcomm Snapdragon X series, AMD Ryzen AI 300 series, or Intel Core Ultra 200V series processors). If your PC does not qualify, Recall is not installed, and you can skip this section entirely.
How to check if Recall is on your PC
Open Settings > Privacy and Security. If you see an entry called Recall and snapshots in the list, your PC qualifies for Recall. If you do not see it, your hardware does not meet the Copilot+ requirements, and Recall is not available on your device.
Setting 12: Turn off Recall Snapshots
By default, Recall is opt-in and switched off. However, if you (or the person who set up your PC) enabled it during setup, it may already be actively capturing snapshots. Here is how to switch it off completely.
- Press Windows + I to open Settings, then select Privacy and Security and click Recall and Snapshots.
- Toggle Save snapshots to Off.
Recall stops capturing new snapshots immediately. If you share the PC with other users, each account must switch it off separately because Recall is a per-user setting.
For a more permanent solution, you can uninstall Recall entirely.
- Type Turn Windows features on or off in the Start menu search box and open the dialog.
- Scroll to Recall in the list, uncheck it, and click OK.
- Restart your PC when prompted.
Note for Windows 11 Pro, Enterprise, and Education users: The Group Policy for managing Recall, under Computer Configuration > Administrative Templates > Windows Components > Windows AI > Turn off saving snapshots for Recall, provides a policy-enforced block that survives feature updates. The full step-by-step is in my Windows 11 Security Hardening PDF.
What Recall's privacy architecture protects
Because there is so much conflicting information online, it is worth being clear about what Recall does and does not do. Microsoft’s official documentation confirms the following:
- Recall processes all snapshots locally on your device. Snapshots are never sent to Microsoft’s servers.
- Snapshots are encrypted using the Trusted Platform Module (TPM) and are tied to your Windows Hello identity through Enhanced Sign-in Security (ESS).
- A Virtualisation-based Security (VBS) Enclave protects the encryption keys.
- The Sensitive information filter is on by default, which reduces (but does not fully eliminate) captures of passwords and credit card numbers.
- Enterprise-managed PCs have Recall removed by default unless IT administrators explicitly enable it.
Whether that architecture meets your privacy standards is a personal decision. If it is, you can leave Recall running with confidence. If it is not, the steps above give you full control to switch it off.
Configure Microsoft Edge Privacy Settings (Settings 13 to 14)
Microsoft Edge is the default browser on every Windows 11 install. Unless you actively use Firefox, Brave, or Chrome, it is likely still the browser your Start menu searches, Copilot chats, and PDF viewers use in the background. That makes its privacy settings just as important as anything else in this guide. Let us walk through the two Edge settings that shape everything the browser shares.
Setting 13: Set Tracking Prevention to Strict
Edge blocks known trackers by default at the Balanced level, which is a reasonable middle ground. However, Strict blocks nearly all trackers across sites and gives you the strongest browser-level privacy Edge offers. Microsoft’s documentation warns that Strict may break some site functionality (video playback or sign-ins occasionally), but you can whitelist any site that misbehaves.
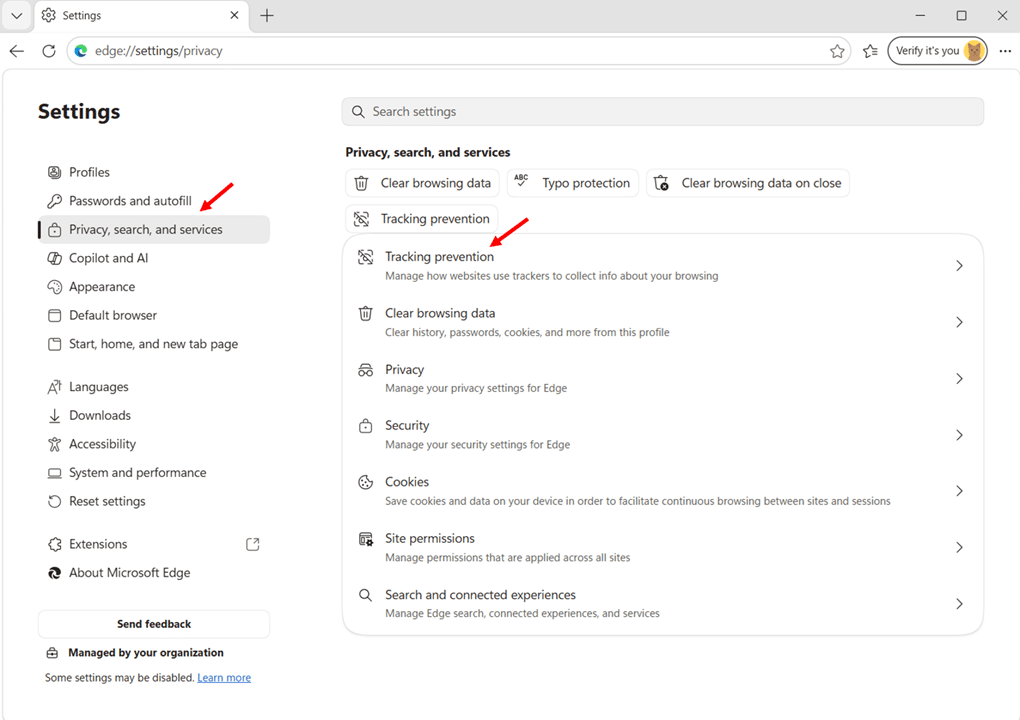
- Open Microsoft Edge and click the three-dot menu at the top-right, then select Settings.
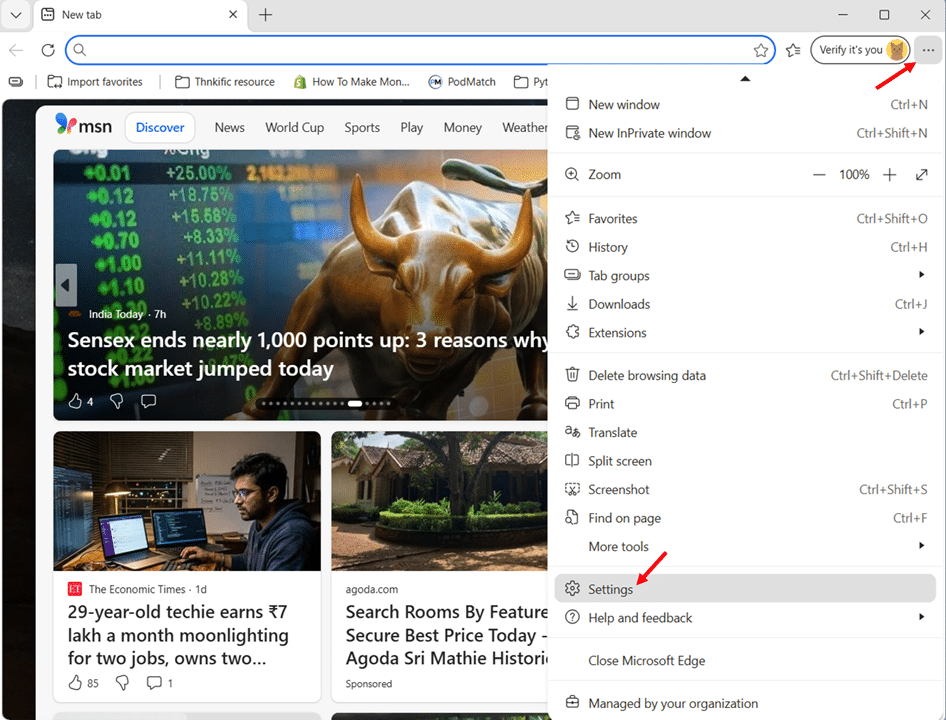
- Click Privacy, search, and services in the left sidebar.
- Click Tracking prevention to open the Tracking prevention page.
- Ensure Enable tracking prevention at the top is toggled On.
- Select Strict as your tracking prevention level.
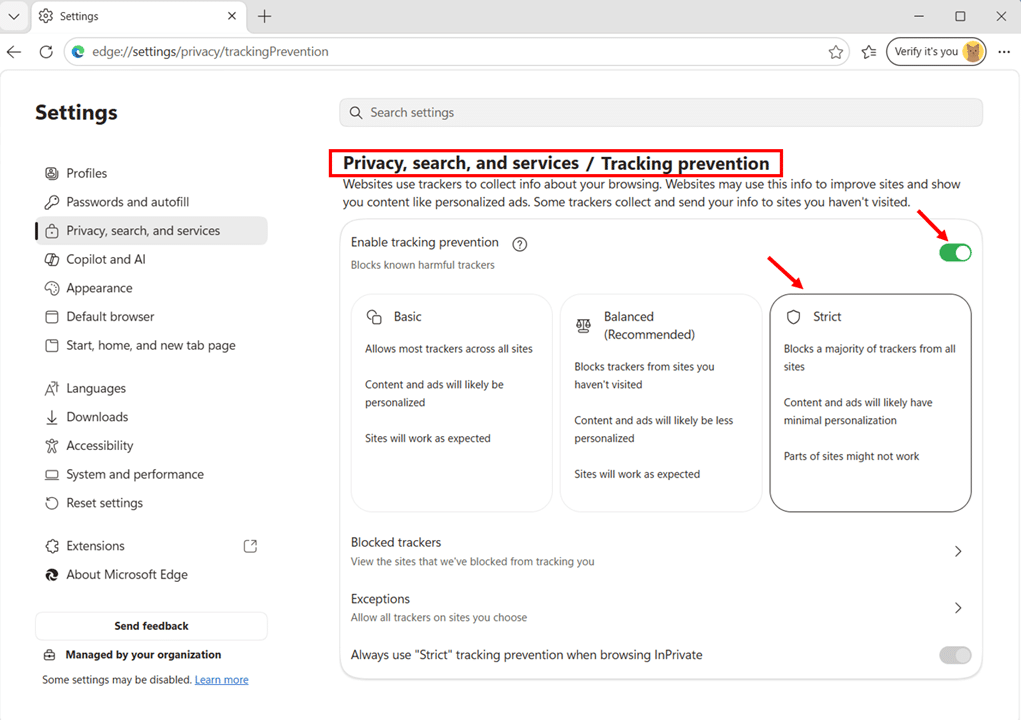
- Scroll to the bottom of the page. If you selected Strict in Step 5, the Always use ‘Strict’ tracking prevention when browsing InPrivate toggle will be greyed out because Strict already applies to InPrivate windows. This is expected behavior. If you selected Basic or Balanced in Step 5, toggle Always use ‘Strict’ tracking prevention when browsing InPrivate to On if you use InPrivate windows. windows.
Setting 14: Disable the Edge Copilot Sidebar
Copilot in Edge (accessed through the sidebar) can read the current webpage, your open tabs, and your browsing history to summarise pages, generate content, and compare information across tabs. If you use ChatGPT, Claude, or another AI tool of choice, or prefer to keep your browsing context from being read by Microsoft’s Copilot, disable Copilot access to browser content.
- In Microsoft Edge, click Settings and more (three dots) and select Settings.
- Click Copilot and AI in the left sidebar. This opens the Copilot in Edge page with all Copilot toggles.
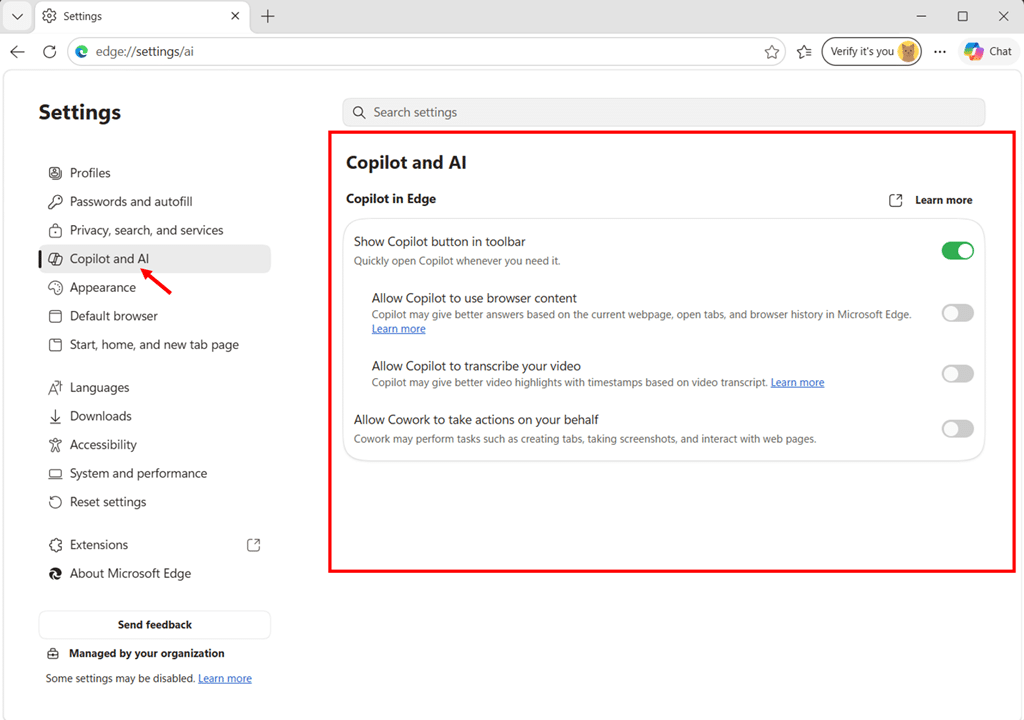
Part A: Hide the Copilot Sidebar Shortcut
What this does: Removes the Copilot button from the Edge toolbar so it does not appear next to your address bar. This prevents accidental clicks and keeps your browser cleaner. Copilot in Edge is not uninstalled by this step. It can still be opened through keyboard shortcuts, the browser menu, or by typing edge://copilot in the address bar.
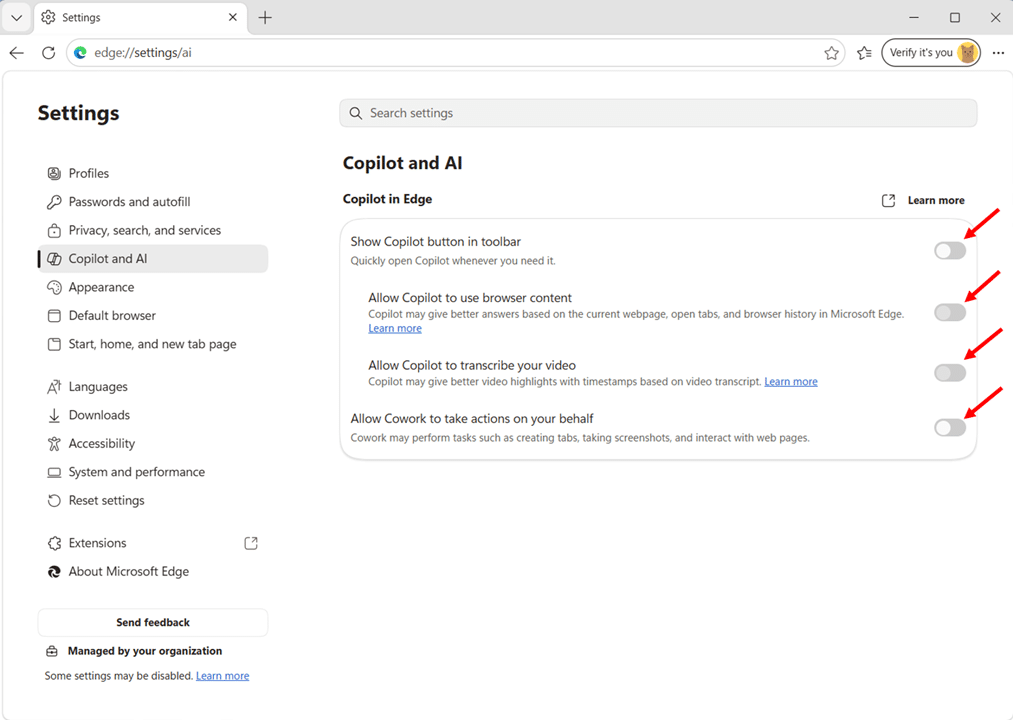
- Toggle Show Copilot button in toolbar to Off.
Part B: Prevent Copilot from Reading Your Browsing Content
What this does: Stops Copilot in Edge from reading your current webpage, open tabs, and browsing history when responding to prompts. This is the more important privacy step because it protects your data even if you or someone else opens Copilot through other means. Without this toggle off, Copilot has full context of what you are browsing.
- Toggle Allow Copilot to use browser content to Off.
Part C: Prevent Copilot from Transcribing Videos
What this does: Stops Copilot from processing video transcripts on webpages. Without this toggle off, Copilot may generate video highlights and summaries based on transcribed audio content.
- Toggle Allow Copilot to transcribe your video to Off.
Part D: Prevent Cowork from Taking Autonomous Actions
What this does: Stops Cowork (Microsoft’s autonomous browser agent) from performing actions on your behalf in Edge, such as creating tabs, taking screenshots, and interacting with web pages.
- Toggle Allow Cowork to take actions on your behalf to Off.
Turn off Recent Items Tracking, Start Menu Suggestions, and Lock Screen Ads (Setting 15)
This is one of the most important privacy settings in Windows 11 25H2 because a single toggle in Personalisation controls four things: the Start menu recommendations feed, File Explorer Recent files, taskbar Jump Lists, and the underlying activity tracking database (which used to be called Activity History and was previously in Privacy and security). Microsoft consolidated these into one toggle with the KB5067036 update in late 2025.
Setting 15: Turn off Start Menu and Lock Screen Suggestions
This is a two-part configuration because Start menu tracking and Lock screen suggestions live on different Settings pages, both under Personalisation
Part A: Turn off Recent Items Tracking and Start Menu Recommendations
- Press Windows + I to open Settings, then select Personalization from the left sidebar. Then click Start
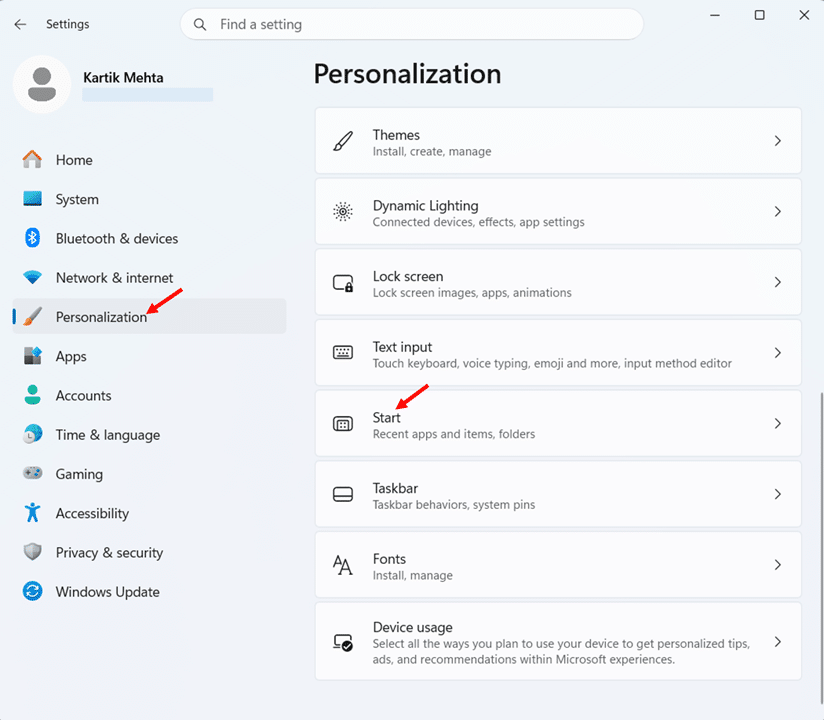
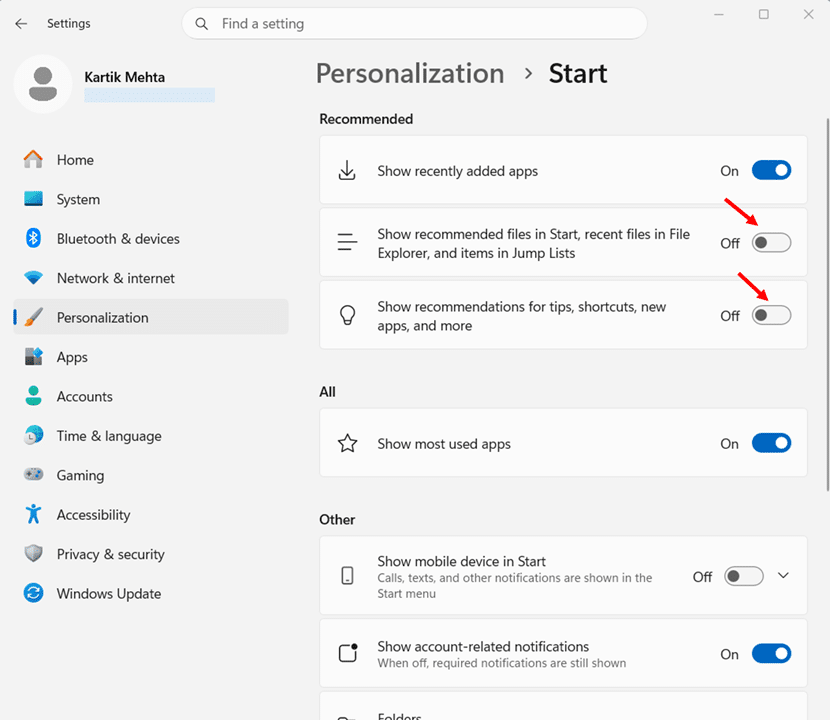
- Toggle off Show recommended files in Start, recent files in File Explorer, and items in Jump Lists.
- Toggle off Show recommendations for tips, shortcuts, new apps, and more to remove the Start menu recommendations feed.
Part B: Turn off Lock screen Ads and tips
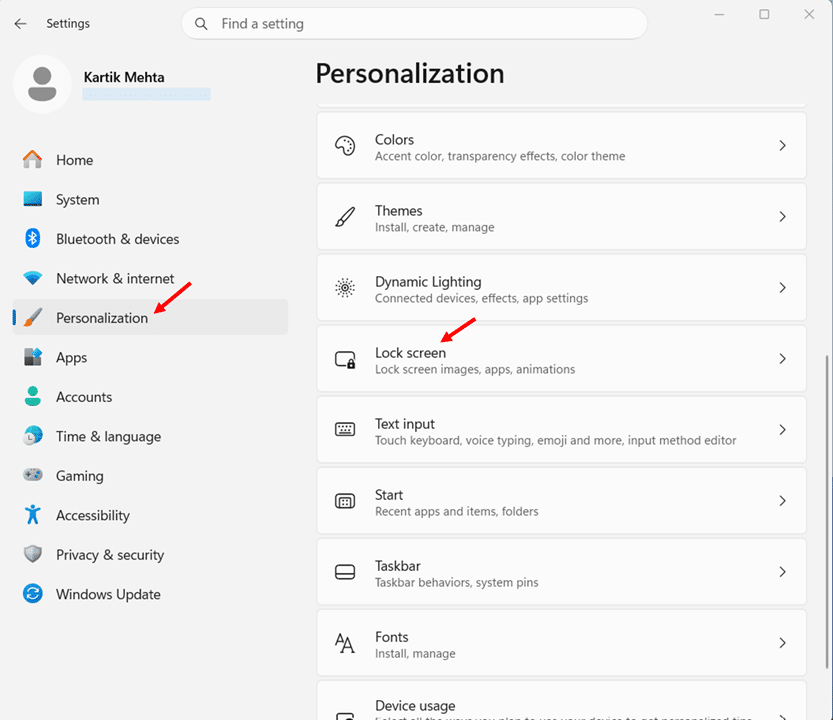
- Stay in Settings > Personalization and select Lock screen.
- Under Personalize your lock screen, if the dropdown is set to Windows Spotlight, change it to Picture or Slideshow to stop the rotating promotional content.
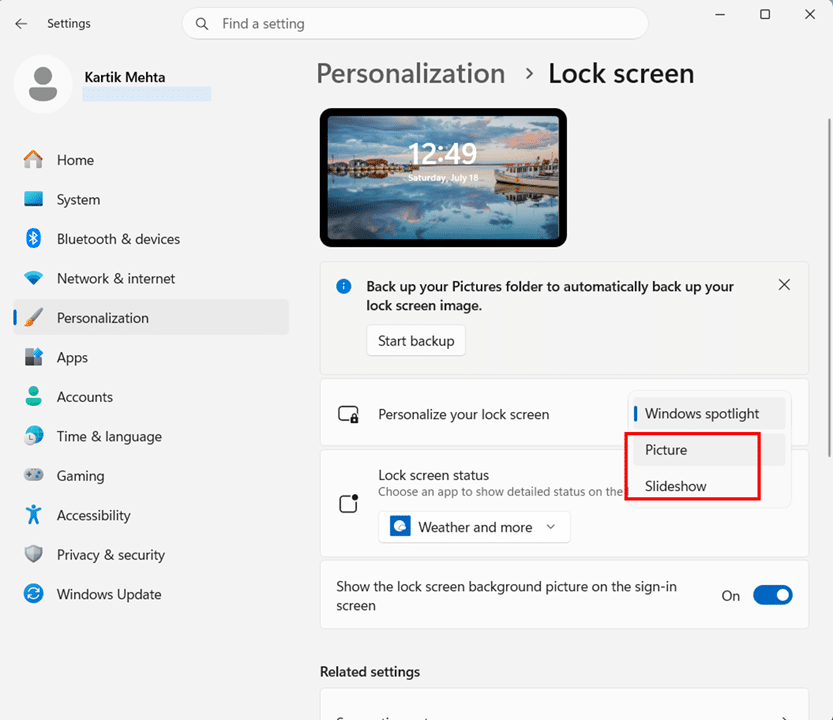
- After changing to Picture or Slideshow, uncheck Get fun facts, tips, tricks, and more on your lock screen (this checkbox only appears when Picture or Slideshow is selected).
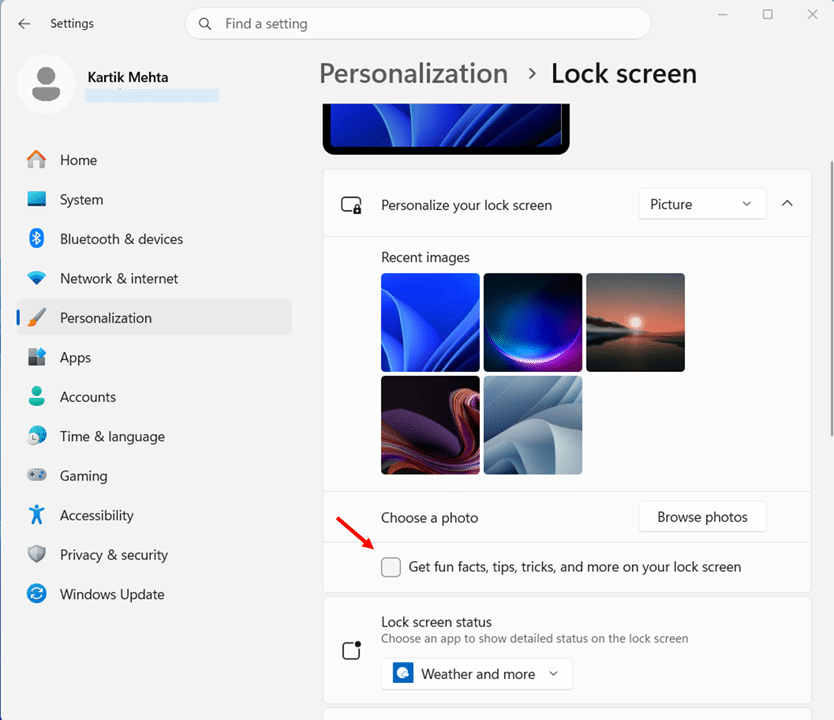
- Toggle off Show the lock screen background picture on the sign-in screen if you want a clean sign-in without promotional imagery. After changing to Picture or Slideshow, uncheck Get fun facts, tips, tricks, and more on your lock screen
(This toggle is available in all Picture, Slide Show and Windows spotlight modes.)
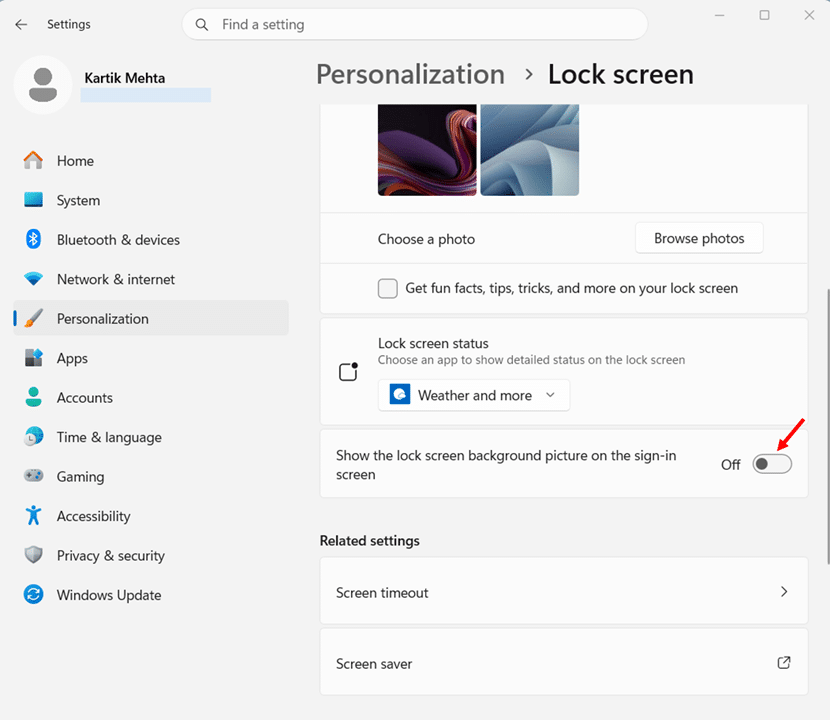
Both the Start menu and Lock screen now stop displaying suggested apps, promotional content, and Windows Spotlight ads. Your PC becomes noticeably cleaner every time you unlock it.
For a complete guide on all Lock screen options including images, slideshow settings, and status app selection, see my guide on how to change Lock screen on Windows 11.
Conclusion
You just walked through 15 privacy toggles Windows 11 offers in 2026. Settings across the Advertising ID, telemetry, voice and speech privacy, app permissions, Copilot, Recall, Microsoft Edge, and recent items tracking. If you worked through all of them, your PC now shares less data with Microsoft and third-party apps than it did when you started reading.
Windows 11 keeps evolving. Microsoft ships feature updates once or twice a year, and each one may reset toggles you already changed or introduce new privacy controls you have not seen. Set a calendar reminder to run through this guide again after every 25H2, 26H1, or 26H2 rollout.
Bookmark this article and share it with anyone setting up a new Windows 11 PC. Drop a comment below if you spot a toggle I missed or have a question I did not answer.

