

Over 1.5 billion people worldwide live with some degree of hearing loss (World Health Organization). Windows 11 includes a built-in feature that helps with this, and it helps a great many people who have no hearing loss at all. Live Captions turns any audio playing on your PC into on-screen text in real time, and all processing happens on your own device, so your audio, voice data, and captions never leave your PC and are not shared with Microsoft.
Live Captions is available in Windows 11 version 22H2 and later. Microsoft has expanded the feature since its launch. On Copilot+ PCs running version 24H2 or later, Live Captions also translates speech from over 40 languages into English captions in real time, and from 27 languages into Chinese (Simplified) (Microsoft Support).
In this guide, I show you every method to turn on Live captions, walk you through the first-time setup, and explain each setting inside the caption window, including position, caption style, microphone audio, and languages. I tested every step in this article on my own Windows 11 Pro 25H2 machine.
Whether you rely on captions every day or just want to catch what a video said while your speakers are muted, you are in the right place. Let us get started.
Table of Contents
What are Live Captions and Which Windows 11 Versions Support Them
Live Captions is a system-wide accessibility feature in Windows 11 that listens to the audio passing through your PC and displays it as text in a caption window on your screen. Microsoft describes it as automatic transcription that helps everyone, including people who are deaf or hard of hearing, understand audio better
Think of it as a subtitle track for your whole computer. A YouTube video without subtitles, a recorded webinar, a Zoom call, and a podcast in a browser tab all pass through the same audio pipeline, and Live Captions transcribes each one without any setup in the individual app. If you turn on the microphone option, it captions the people speaking near your PC as well. I cover the full list of supported audio and video sources later in this guide.
There is one boundary you should understand from the start. Live Captions transcribe speech only. Applause, music, and sound effects are not detected, and sung lyrics are not reliably captioned. It captions people talking, not soundtracks.
Supported Windows 11 versions
Live captions are available in Windows 11 version 22H2 and later. If your PC still runs Windows 11 version 21H2 or Windows 10, the feature is not present. To check your version, press Windows logo key + R, type winver, and press Enter. Any 22H2, 23H2, 24H2 or 25H2 build qualifies.
On-device processing and privacy
All audio processing and caption generation happen on your device. Audio, voice data, and captions never leave your PC and are not shared with Microsoft, and generated captions are not stored on the device or in the cloud (Microsoft Support). This is why Live Captions keeps working when you are disconnected from the internet once the language files have been downloaded (Microsoft Support). This matters if you work with confidential meeting recordings. Nothing is uploaded, and nothing is kept.
Differences on Copilot+ PCs
On a Copilot+ PC, Live captions gain real-time translation. Copilot+ PCs are a class of Windows 11 PCs with a neural processing unit (NPU) capable of more than 40 trillion operations per second (Microsoft).
On these devices running Windows 11 version 24H2 or later, Live Captions translates speech from over 40 languages into English captions and from 27 languages into Chinese (Simplified).
On a standard PC without a qualifying NPU, you still get full transcription in the supported caption languages, but no translation. I explain how to add languages and use translation later in this guide.
How to Complete the First-Time Setup for Live Captions
The first time you turn on Live captions by any of the four methods covered in the next section, Windows asks for your consent to process voice data on your device and prompts you to download a language file for on-device speech recognition. Once the language file is on your PC, every later launch skips straight to captioning, and the feature works without an internet connection. You need to be online for this first download only.
Steps to complete the setup
- Press Windows logo key + Ctrl + L or use any of the turn-on methods from the next section.
- Select Yes, continue when the caption bar asks Do you want to continue and set up live captions?, and read the Welcome to live captions panel beside it, which explains that your voice data is processed on your device and not shared to the cloud, and that network data is used to download language files. Select No, thanks instead to close the bar without setting up.
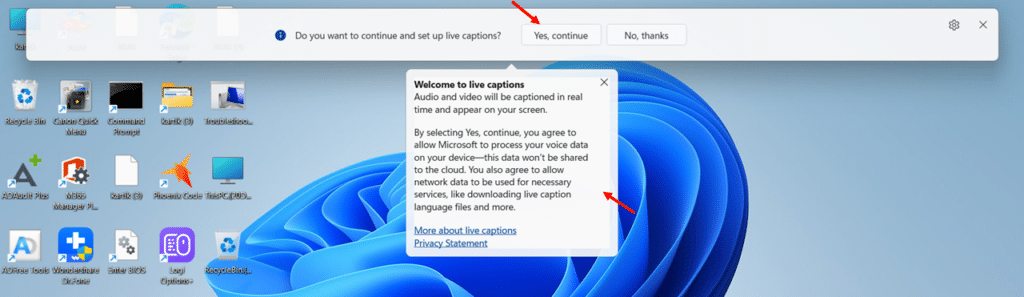
- Choose your caption language from the dropdown when the bar changes to Getting ready to show live captions in, and select Continue.
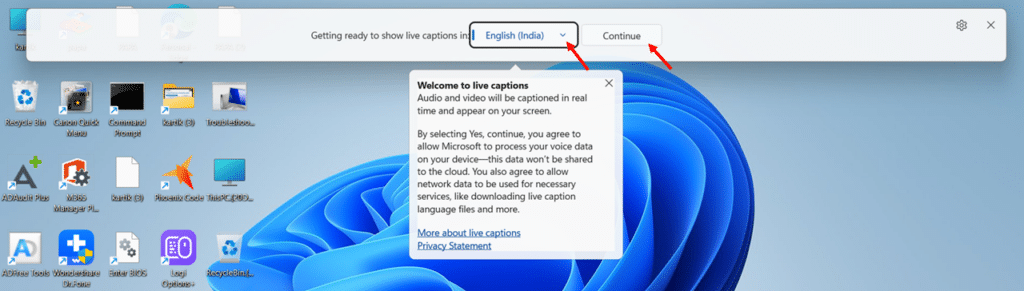
- Select Download if Windows prompts for the language file, which appears only when the chosen language is not already on your PC.

- Read the caption bar, which reports Ready to show live captions in followed by your chosen language, and start playing audio.

How to Turn On Live Captions in Windows 11
Microsoft provides four ways to turn on Live captions (Microsoft Support). Each one opens the same caption bar, so pick whichever suits you. Turning the captions on simply starts a session. The one-time setup from the previous section runs only on your very first launch, and never again after that.
How to Turn On Live Captions Using the Keyboard Shortcut
- Press Windows logo key + Ctrl + L on your keyboard.

This is the fastest method, and it works anywhere in Windows, no matter which app is open. If nothing happens, your PC is running a version earlier than 22H2.
The very first launch shows the one-time setup instead, covered in the previous section.
How to Turn On Live Captions Using Quick Settings
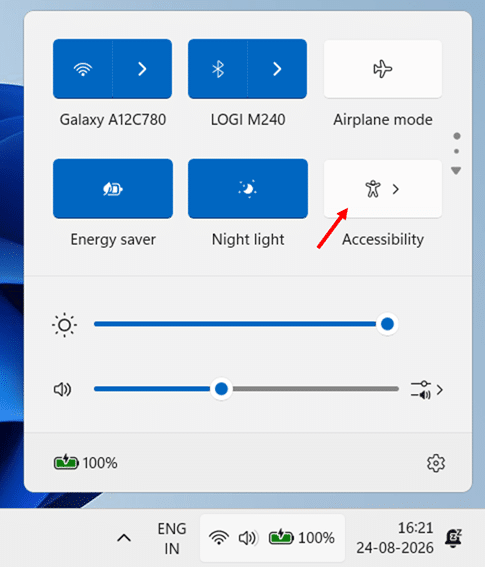
- Select the network, volume, or battery icon on the right side of the taskbar to open Quick Settings, or press Windows logo key + A.
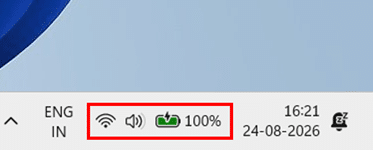
- Select Accessibility in the Quick Settings panel to open the Accessibility flyout.
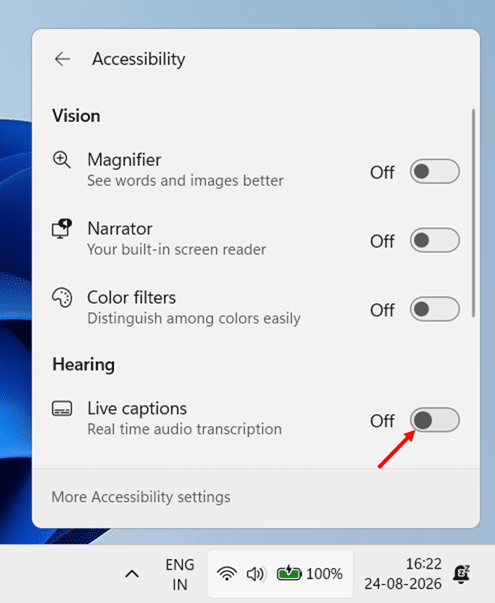
- Turn on the Live captions toggle.
How to Turn On Live Captions Using the Start Menu
- Select Start and scroll down past your pinned apps to the All section, where apps are grouped into categories.
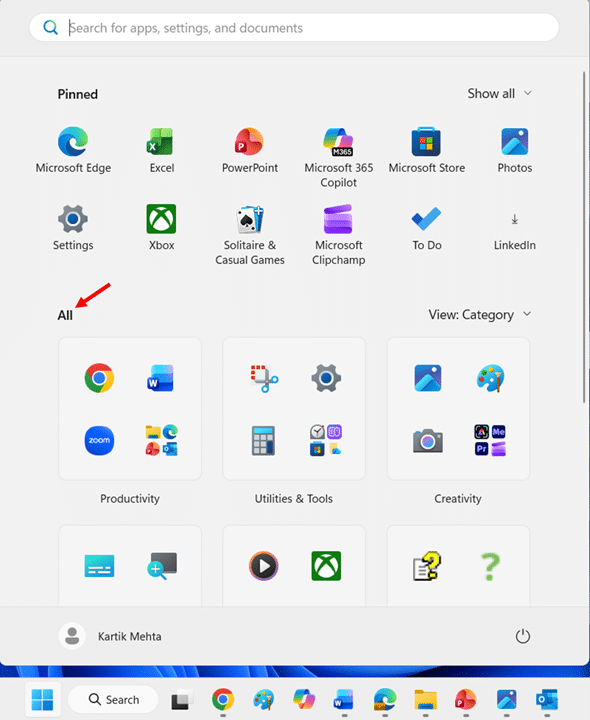
- Select the Accessibility category to expand it. If the View menu beside All is set to a layout other than Category, select Live captions directly from the app list instead.
The category layout is part of the redesigned Start menu that ships with 25H2, and I explain every part of it in my Windows 11 25H2 Start menu guide.

- Select Live Captions.
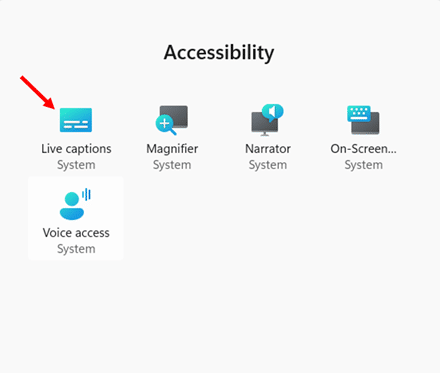
Selecting Live captions from the Start menu opens the caption window. To disable it, select the Close (X) button on the caption window.
This method is useful when you want to pin Live captions to Start or the taskbar for one-click access later. Right-click Live Captions in the list to see the pin options.
How to Turn On Live Captions Using the Settings App
- Press Windows logo key + I to open Settings.
- Select Accessibility in the left pane.
- Under the Hearing heading, select Captions.

- Turn on the Live captions toggle.
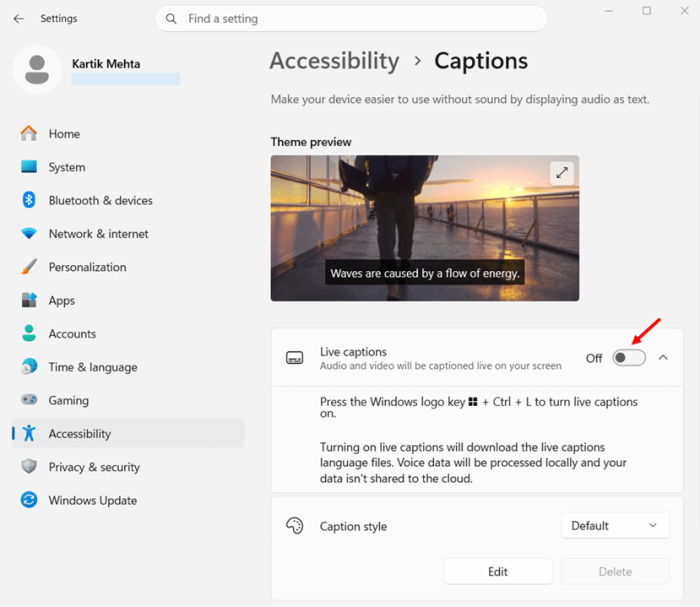
To disable Live captions from here, return to the same Captions page and turn off the Live captions toggle.
The same page holds the caption style settings, so you can turn the feature on and adjust how captions look in one visit.
Important: Starting and stopping the captions works from any route. The Live captions toggle in Quick Settings, the toggle on the Captions page in the Settings app, the Windows logo key + Ctrl + L shortcut and the Close (X) button on the caption bar all control the same session and stay in sync.
What you see when Live captions turns on
Once the feature is on, a caption window appears at the top of your screen, docked above your open apps so it does not cover them. A Ready to caption message or the first line of transcribed speech appears as soon as audio plays. If nothing appears after a few seconds, play any audio with speech, because the window stays quiet until it detects a voice.
How to Enable Live Captions for Audio and Video
There is no per-app switch for Live Captions. Once the feature is on, it captions any audio that passes through your PC and works across Windows 11 while you use other apps. The one rule you need to understand is where it listens. Live Captions follows the default sound output device configured in Settings > System > Sound. Whatever plays through that device gets captioned. Whatever plays through a different device does not.
Steps to caption any audio or video source
- Press Windows logo key + Ctrl + L to turn on Live captions.

- Play the video, call, recording, or stream in the app of your choice, and read the transcription as it appears in the caption window.
- Open Settings > System > Sound and select the device you are listening through under Output if captions do not appear, because Live Captions transcribes only the default output device.

How to Change the Live Captions Window Position
The caption window does not have to sit at the top of your screen. Windows 11 gives you three placements, and the right one depends on what you are doing. Microsoft suggests docking to the top while sharing video in a meeting and docking to the bottom while watching videos. All three options are in the Settings menu inside the caption window itself, not in the Settings app, which trips most people up.
Steps to change the caption window position
- Press Windows logo key + Ctrl + L to open Live Captions if it is not already on screen.

- Select the Settings (gear) button in the caption window.
- Select Position.

- Choose Above screen, Below screen, or Overlaid on screen.

The window moves immediately.
Above screen and Below screen
These two options dock the caption window to the top or bottom edge of your display in reserved space. Microsoft says other apps aren’t blocked by the docked window (Microsoft Support). In practice, your open windows shift up or down to make room, the same way the taskbar reserves its own strip. Nothing is hidden behind the captions. I keep mine at Above screen during Teams calls so the captions sit near the camera and my eyes stay close to the lens, and I switch to Below screen for videos so the text sits where subtitles normally appear.
Overlaid on screen
This option turns the caption window into a floating overlay that sits on top of your apps and that you can drag anywhere (Microsoft Support). Use it when you want captions close to a specific area, such as beside a video player that occupies only part of the screen, or when you do not want your app windows to resize. The trade is that the overlay can cover content, so you position it yourself. Drag it by its title area to move it.
Showing more lines of text
By default, the window shows a small number of lines. To show more, increase the window size using the mouse, touch, or keyboard. With the mouse, drag the edge of the docked window or the corner of the floating window. A taller window is useful when you are reading a fast speaker, because earlier lines stay visible for longer before they scroll away.
How to Change the Caption Style and Text Appearance
Caption style controls how the text looks, not where the window sits. Windows 11 ships four built-in styles plus a Default style, and lets you build your own from a set of text, background, and window options (Microsoft). You can reach the style page from the caption window or straight from the Settings app, and the same page controls captions in Windows media apps that support the system caption style, so one change carries across.
Steps to change the caption style
- Select the Settings (gear) button in the caption window.
- Select Preferences, then select Caption style, which opens the Captions page under Accessibility in the Settings app.

- Under Caption style, open the dropdown and select Default, White on black, Small caps, Large text, or Yellow on blue, and check the preview that appears above the dropdown.
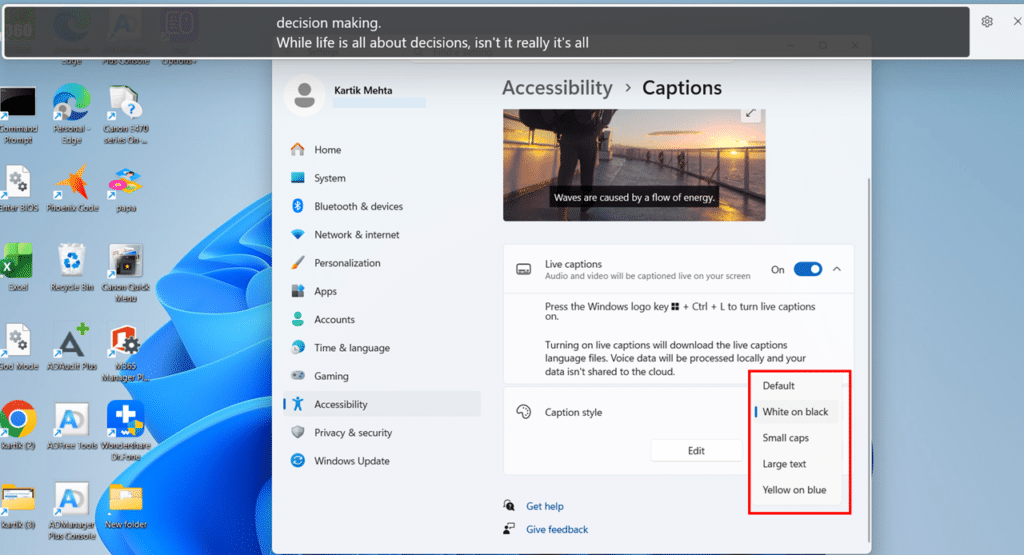
Steps to create a custom caption style
- Select the built-in style closest to what you want from the Caption style dropdown.
- Select the Edit button below the preview to open the custom style options.
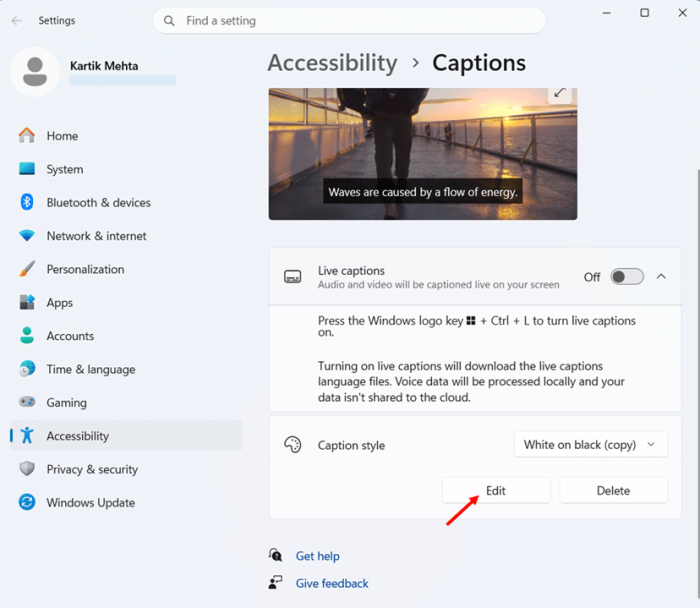
- Type a name for the style in the Name box, replacing the automatic name Windows assigns as a copy of the selected style.
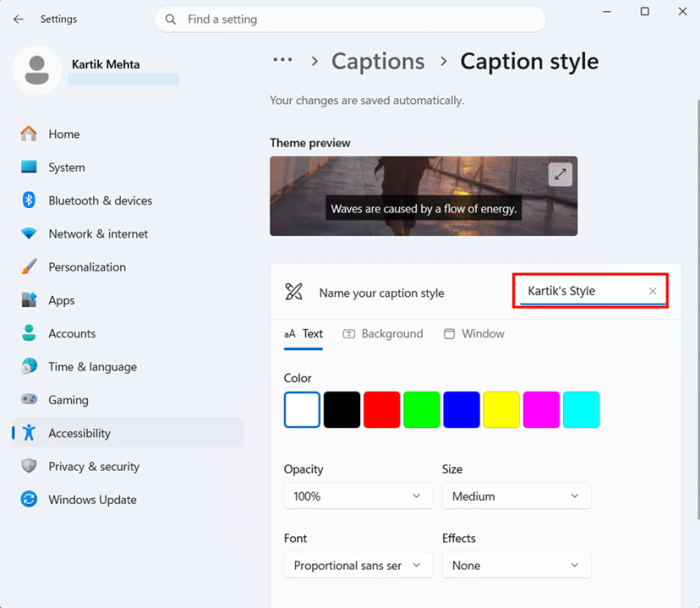
- Adjust the options under Text, Background, and Window, and watch the preview update as you change each one.

- Close the Settings app when the preview looks right, because the changes save as you make them.
Where the caption style applies
The style you set on this page applies to Live captions and to any Windows media app that reads the system caption style setting. That is why the Captions page shows a sample video preview rather than a plain-text sample. Change it once and every supported caption source picks it up.
How to Include Microphone Audio and Filter Profanity
Two options in the caption window change what Live Captions listens to and what it prints. Include microphone audio adds the people speaking near your PC to the captions, and Filter profanity masks offensive words in the output. Both live under Preferences in the caption window’s Settings menu. Both are switches you flip in a second, and both have behaviors worth understanding before you rely on them.
Steps to include microphone audio
- Press Windows logo key + Ctrl + L to open Live captions.
- Select the Settings (gear) button in the caption window.
- Select Preferences, then select Include microphone audio.

- Speak, or ask the person next to you to speak, and read the transcription as it appears in the caption window.
Microphone audio behaviors to expect
Three facts govern how this option behaves. First, Include microphone audio is turned off each time Live captions starts, so you enable it per session. Second, when microphone audio and system audio overlap, the system audio takes priority. This means that on a Teams call with your microphone option on, your own words may be dropped while the other party speaks. Third, the caption window does not label who is speaking, so in a multi-person conversation you read a single running transcript
A practical tip. If you want to caption an in-person meeting on a laptop, mute the system audio in any open apps first, so nothing competes with the microphone stream. Position the laptop so its microphone faces the main speaker.
Steps to filter profanity
- Select the Settings (gear) button in the caption window.
- Select Preferences, then select Filter profanity.

With the filter on, offensive words are masked in the caption text.
How to Add Caption Languages and Use Live Translation
Live captions started as an English (United States) feature and has grown into a multilingual one. As of Microsoft’s July 2026 documentation, it recognizes speech in 21 languages and regional variants, and on a Copilot+ PC it translates from over 40 languages into English and from 27 languages into Chinese (Simplified). The two capabilities have different hardware requirements, so I cover them separately.
Supported caption languages
Live captions supports speech recognition in Chinese (Simplified, China), Chinese (Traditional, Hong Kong SAR), Chinese (Traditional, Taiwan), Danish, English (Australia), English (Canada), English (India), English (Ireland), English (New Zealand), English (United Kingdom), English (United States), French (Canada), French (France), German (Germany), Italian (Italy), Japanese, Korean, Portuguese (Brazil), Portuguese (Portugal), Spanish (Mexico) and Spanish (Spain). English (India) is on that list.
Steps to add and switch a caption language
- Press Windows logo key + Ctrl + L to open Live captions.
- Select the Settings (gear) button in the caption window.
- Select Change language, select the language you want from the dropdown, and select Continue.

- Select Download if Windows asks you to download the language file, and wait for the caption window to report that it is ready to caption in the new language.
Languages already installed on your PC appear in bold in the dropdown, so you can tell at a glance which ones will switch instantly and which need a download. Every downloaded language installs as a separate Speech Pack and can be removed later from Settings > Apps > Installed apps.
Transcription always stays in the language of the audio, so French speech captioned with the French pack produces French text, never English text. Switch the caption language to match the audio whenever it changes, because a standard PC transcribes in the selected language only and never translates (Microsoft Learn).
Conclusion
Live Captions is one of the most practical accessibility features Microsoft has shipped in Windows 11, and it helps far more people than its target audience. It works offline, it captions every app on the system without any per-app setup, and on a Copilot+ PC it translates from over 40 languages into English in real time. Nothing you play is uploaded, and nothing is stored, which is rare to say about a speech feature in 2026.
You now know every route to turn it on, how to get through the first-time language download, how to dock or float the caption window, how to change the caption style, how to add microphone audio and mask profanity, and how to switch caption languages. You also know where it sits next to Voice typing, Voice access, and Narrator, so you reach for the right tool without guessing.
Press Windows logo key + Ctrl + L right now and try it on whatever is playing! It takes two seconds to see whether it earns a place in your daily workflow
Frequently Asked Questions (FAQs)
Yes. All speech recognition runs on your device, so captions work without an internet connection once the language file is downloaded. You only need to be online for that first download.
Windows 11 version 22H2 and later. Press Windows logo key + R, type winver, and press Enter to check your version.
No. Audio, voice data, and captions are processed on your device, never leave your PC, and are not stored anywhere.
Only on a Copilot+ PC running version 24H2 or later, which automatically translates over 40 languages into English. On a standard PC, the caption language must match the spoken language, and no translation happens.
Check that the audio is playing through your default output device under Settings > System > Sound, because captions follow that device only. Then confirm the caption language matches the spoken language.

