Have you ever felt that crucial moment when you realize you’ve sent an email with a typo, wrong attachment, or worse – to the wrong person? I’ve been there, and I know exactly how you feel. Whether it’s a missing attachment you mentioned in your message or an email that wasn’t quite ready to be sent, these situations can be stressful, but they’re not hopeless.
In my years of working with Microsoft Exchange and Outlook, I’ve learned every trick to recall messages and prevent email mishaps. The good news? You have options, and I’m here to walk you through them. Whether working with the Outlook desktop application or accessing your email through a web browser, each platform provides specific tools and techniques for managing sent emails.
So, without further ado, let’s explore.
Table of Contents
Understanding Email Recall in Outlook:
What is Email Recall?
Email recall in Outlook is a built-in feature that attempts to retrieve or replace an email after it has been sent. While many users think of it as a simple “undo send” function, the mechanism behind it is quite complex and depends on various factors within your email environment.
How Email Recall Functions
The recall process operates through Microsoft Exchange Server or Microsoft 365’s Exchange online. When you initiate a recall, the server:
- Identifies all instances of your original message across recipient mailboxes
- Checks the status of each message copy (read/unread)
- Attempts to execute the recall based on recipient settings
- Generates status reports for the sender
Core Technical Requirements
For Outlook email recall to function properly, your environment must meet specific technical conditions. The most crucial requirements include:
- Both sender and recipient must use Microsoft Exchange Server or Microsoft 365 Exchange Online
- Both accounts must belong to the same organization
- The original message must remain unread by the recipient (Not require for Microsoft 365 Exchange Online)
- Messages must not be moved from the original inbox location (Not require for Microsoft 365 Exchange Online)
Understanding Recall Limitations
Environmental Restrictions:
- Personal accounts cannot use recall functionality (outlook.com, hotmail.com, live.com)
- Non-Microsoft email systems are not supported (Gmail, Yahoo, etc.)
Technical Constraints
Several technical factors can prevent successful recall:
- Outlook running in offline mode
- Cached Exchange Mode synchronization delays
- Automatic rule processing on recipient side
- Network latency between server and clients
- Message queue processing delays
- Server-side rules and policies
- Exchange Server load and performance
How to Recall an Email in Outlook Classic (Office 365) Using Classic Ribbon
Accessing the Outlook Recall Feature
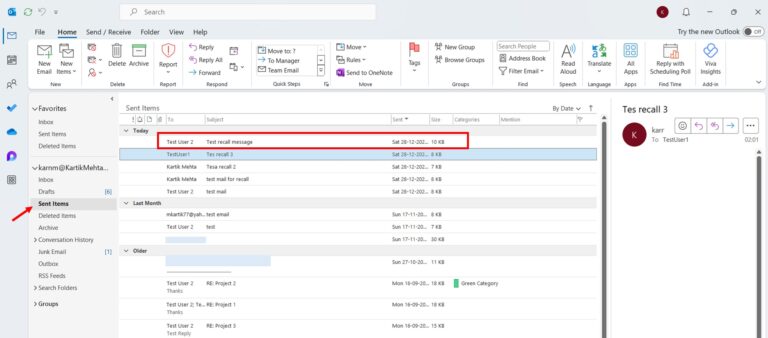
- Locate and open your “Sent Items” folder from the folder pane on the left side of Outlook
- Double-click to open the sent message you want to recall (do not use the reading pane view)
- In the open message window, click the “File” tab located at the top-left corner of the ribbon

- Select Info from the left sidebar if not already selected
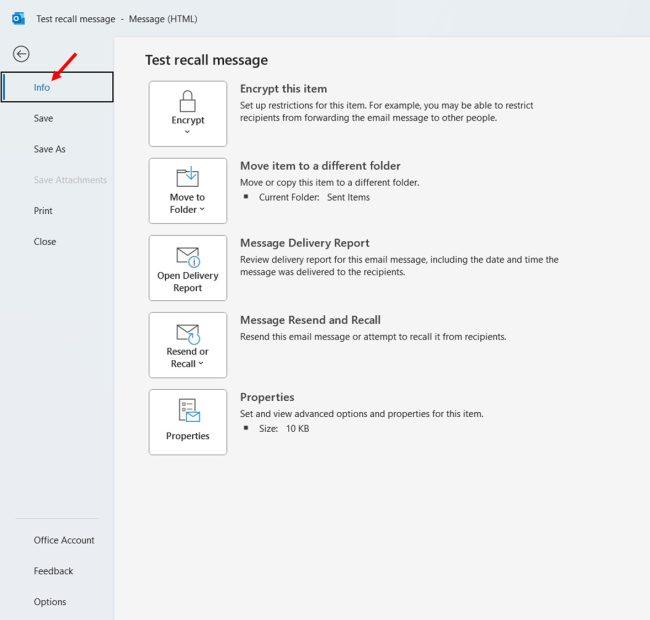
- Under “Message Resend and Recall”, click “Recall This Message”
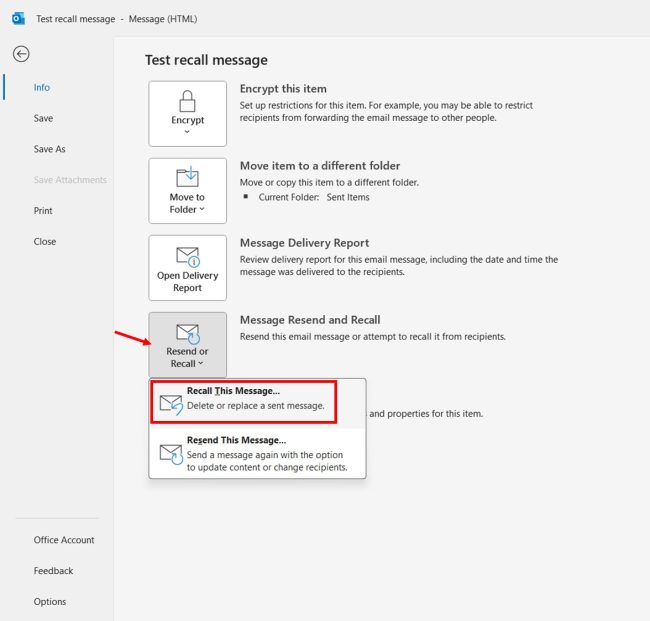
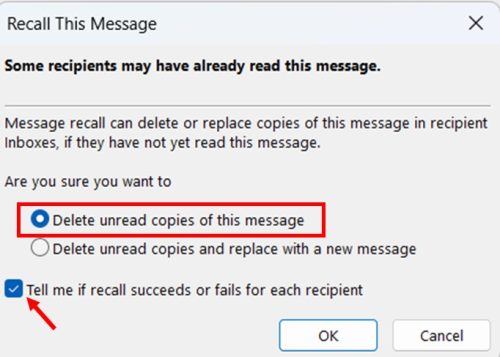
- Recall this Message window will open in it select “Delete unread copy of this message” and select “Tell me if recall succeeds or fails for each recipient”
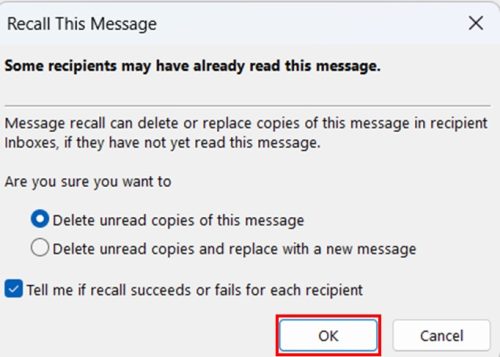
- Click OK to initiate the recall process
Verifying Recall Status
After initiating the recall:
- Watch for confirmation messages in your inbox
- Check for messages with the subject line beginning “Recall:”
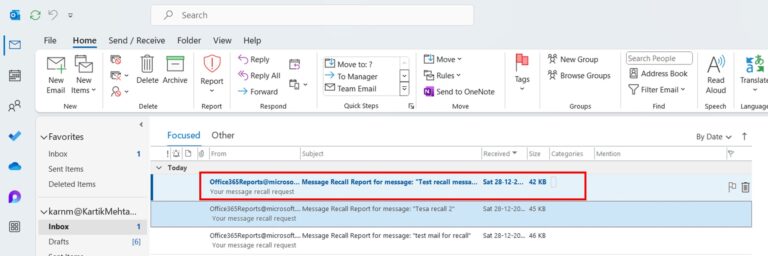
- Open this email and click on “View Message Recall Report”
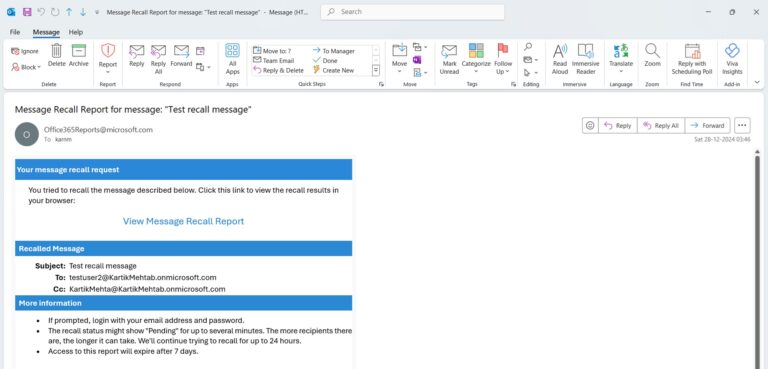
A new window will be open in browser where you can check the status of your recall
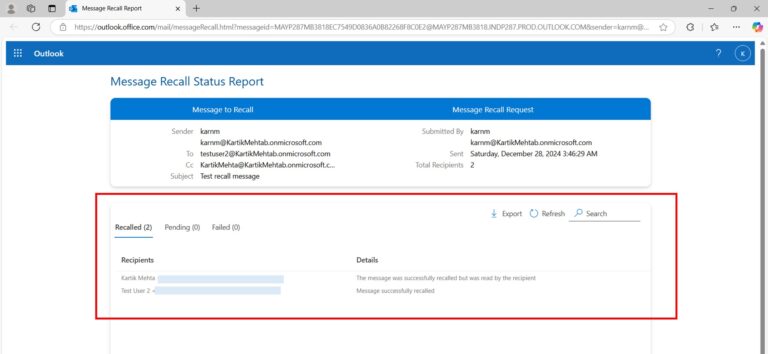
Note:
- If the mailbox of sender and recipient are in Office 365 though the recall this message prompt gives you the option of only Delete unread copy of this message. The recall will also delete read message.
- This prompt will come if we use Office 365 Outlook classic
Alternate Method to Recall an Email in Outlook Classic (Office 365) Using Classic Ribbon
You can also access the Outlook recall feature through these steps:
- Open the sent message you want to recall
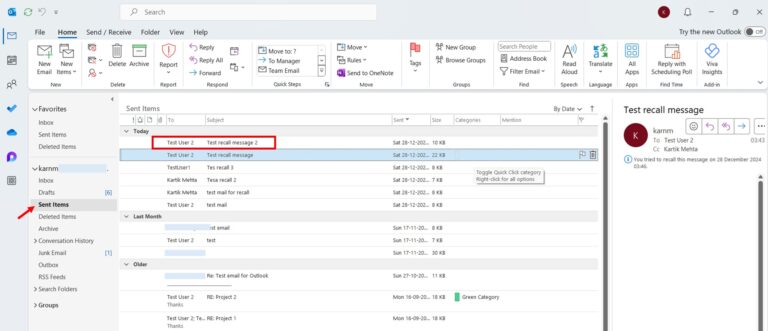
- Click the Message tab in the ribbon
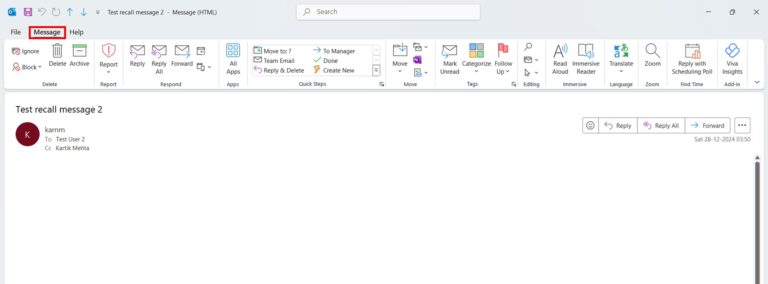
- Click Edit Message drop down menu
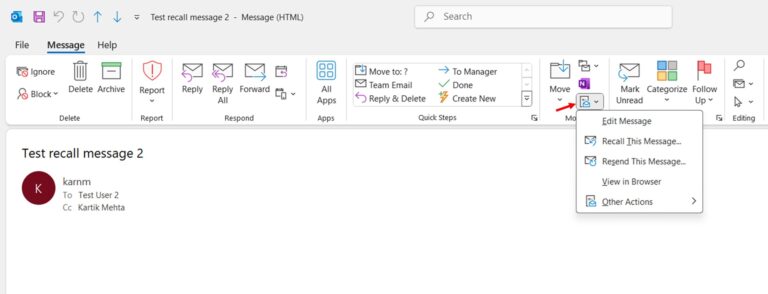
- Click Recall This Message from the dropdown menu
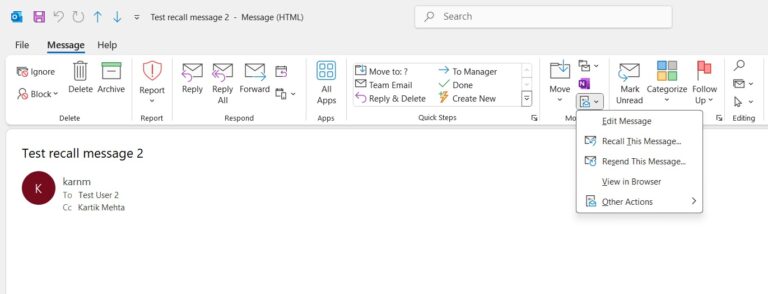
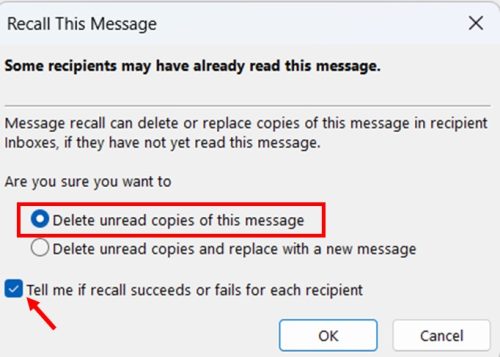
- Recall this Message window will open in it select “Delete unread copy of this message” and select “Tell me if recall succeeds or fails for each recipient”
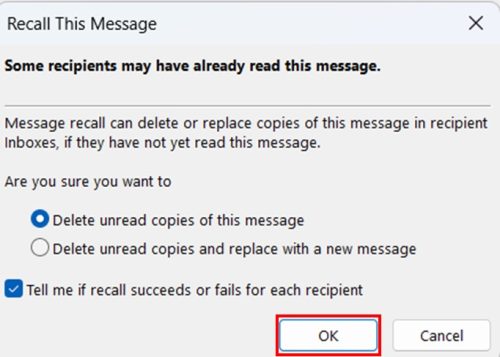
- Click OK to initiate the recall process
How to Recall an Email in Outlook Classic (Office 365) Using Simplified Ribbon
- Locate and open your “Sent Items” folder from the folder pane on the left side of Outlook
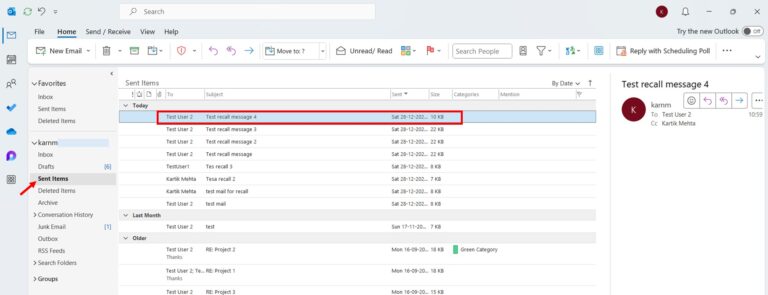
- Double-click to open the sent message you want to recall (do not use the reading pane view)
- In the opened message window, locate the More commands button (three dots) in the top-right corner of the message ribbon
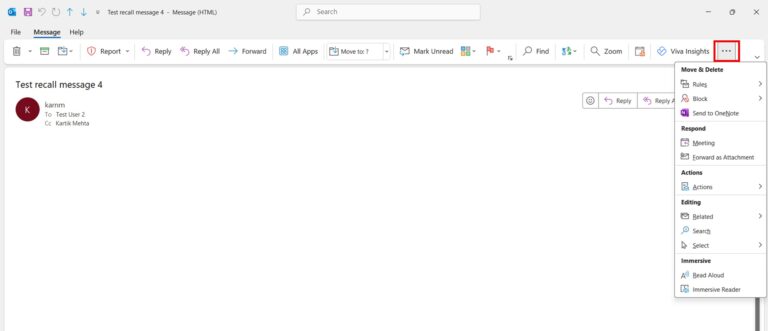
- Click Action and Click Recall This Message from the dropdown menu
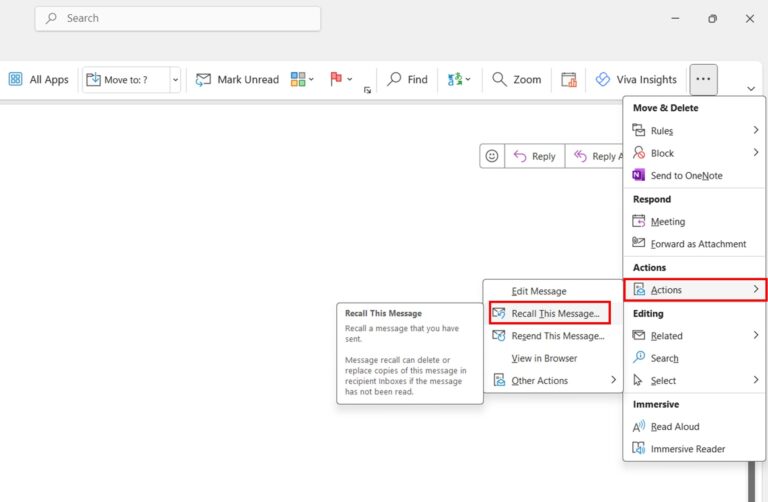
How to Recall an Email in New Outlook (Office 365) Using Simplified Ribbon
Accessing the Outlook Recall Feature
- Open your Sent Items folder from the left navigation pane in Outlook
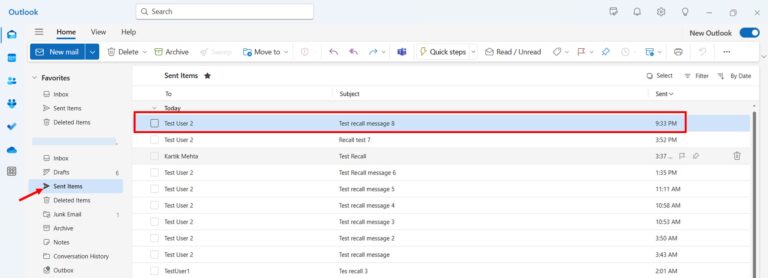
- Double-click the message you want to recall to open it in a new window (important: do not use the reading pane)
- In the opened message window, locate the More commands button (three dots) in the top-right corner of the message ribbon

- Click on More commands to open the dropdown menu
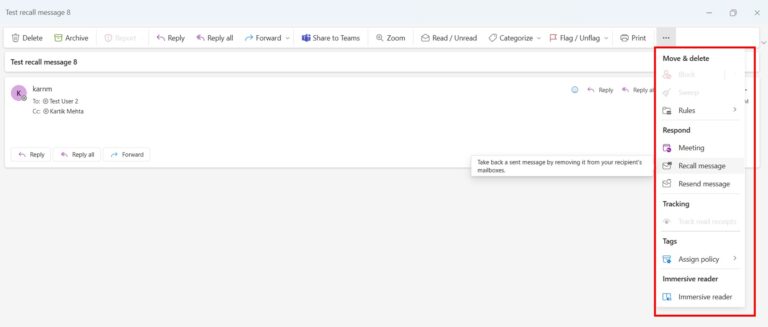
- Click Recall message from the dropdown options
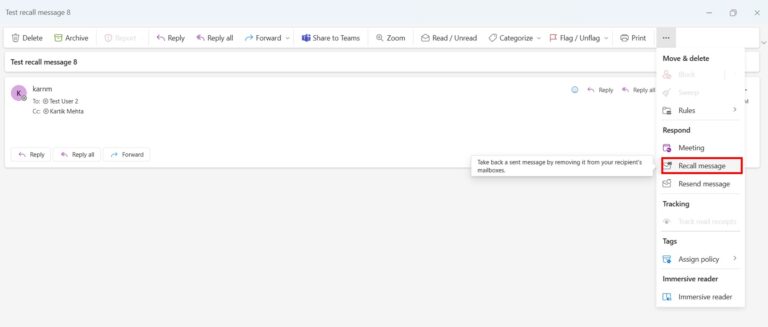
- Recall message window opens stating “Recalling this message will delete it from the mailboxes of all recipients. Do you want to proceed?” click OK to start the recall process
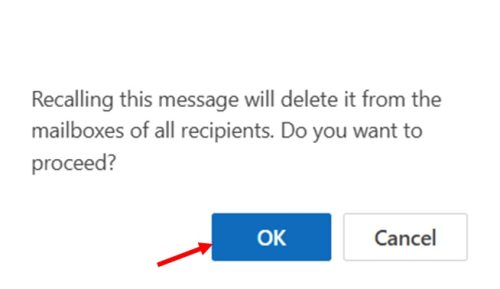
How to Recall an Email in Outlook (Outlook 2021) and Replace It, if required?
Recalling an email is simple in Outlook 2021. If you have a question – about how to recall an email in Outlook 2021, here is the answer.
1. In Outlook, open the Sent Items folder to locate previously transmitted messages. This stores copies of all emails you have sent from your account.
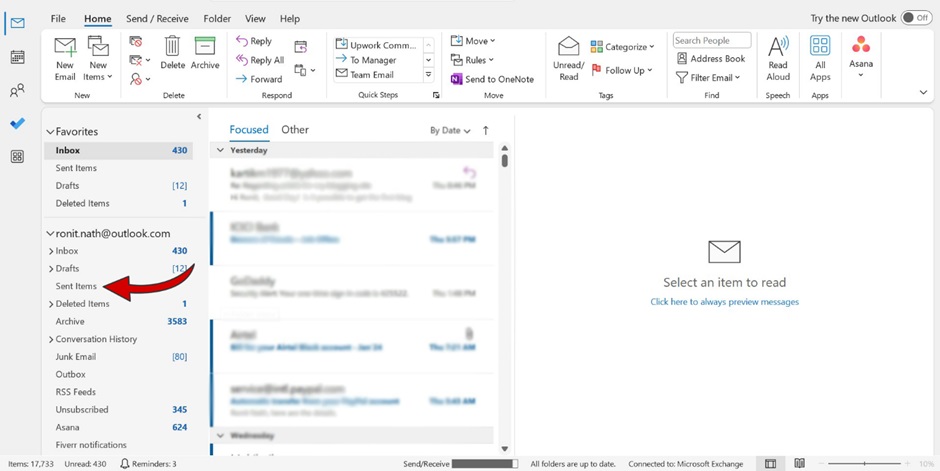
2. Double-click the email you wish to recall. This opens the message in its window.
3. Select “More Move Actions” from the top toolbar menu. This drop-down menu contains functionality like Edit Message, View in Browser, Resend This Message, and Recall.
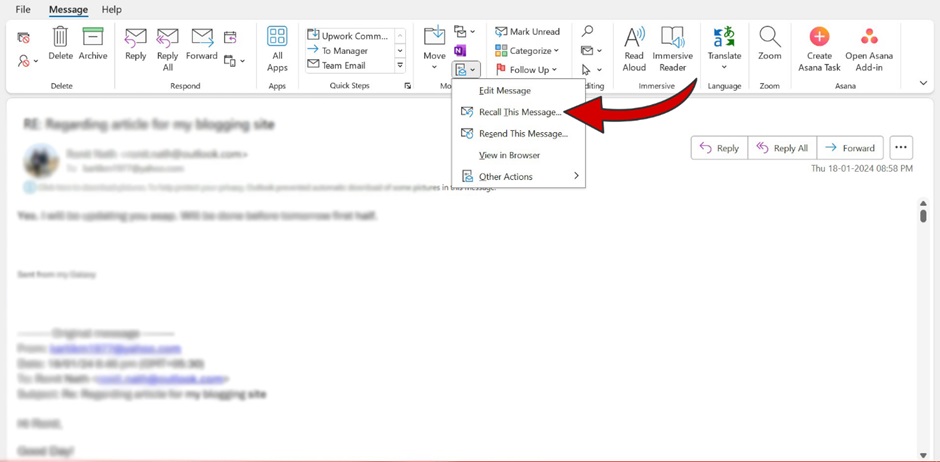
4. Choose “Recall This Message” from the drop-down options. This initiates the recall process.
5. A prompt gives two choices:
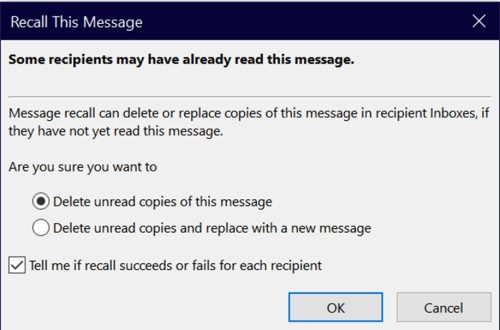
6. Select the appropriate recall option for your purpose. If you need to resend the message, choose option 1. But if you want to resend a modified communication, select option 2.
7. If you replace the message, a new email form opens with the previous pre-populated content. Make any edits to the subject, body, or attachments required. You can overhaul the entire content or tweak parts as needed.
8. Click “Send” when ready to deliver the replacement message. The new email will be transmitted to all the original recipients.
How to Delay Your Emails in Outlook?
Accidentally hitting “send” too soon is one common reason people recall emails in Outlook. However, there’s an even better way to avoid such misfires – scheduling your messages!
Outlook includes a Delay Delivery option that queues up emails to be sent at specific times in the future. Just set the ideal date and time while composing the message, and Outlook handles the rest automatically.
Here’s how to schedule emails in Outlook
1. In the New Email window, craft your message as usual.
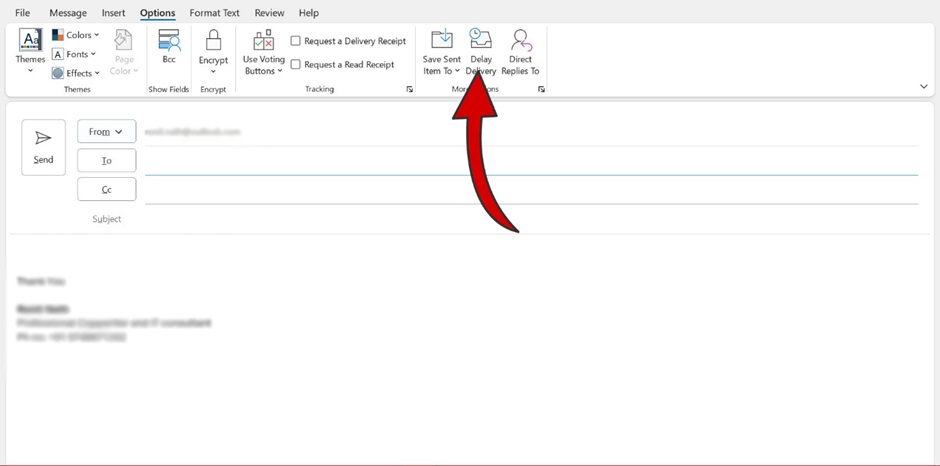
2. Click the “Delay Delivery” tab under the “Options” menu.
3. Check the box next to “Do not deliver before.”
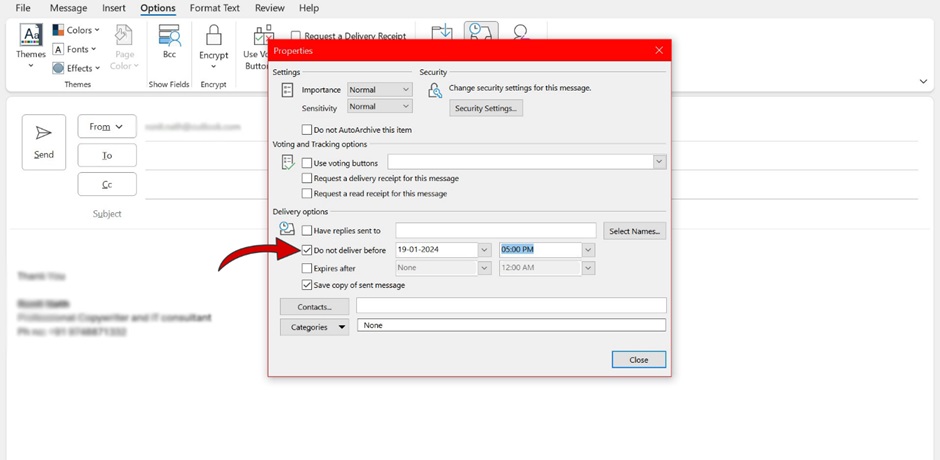
4. Select the date and time to email using the adjacent calendar and clock icons.
5. Finish composing your message, then hit “Send.”
The email is stored in your Outbox folder until the specified delivery time. Pretty neat!
For detail guide on scheduling the email in outlook you can refer How to Schedule an Email in Outlook
So next time you find yourself hastily drafting emails, take advantage of Delay Delivery. You avoid embarrassing recalls later and present a more thoughtful, professional tone.
How to Recall an Email in Outlook on Web (Microsoft 365)
- Navigate to your Sent Items folder in Outlook Web
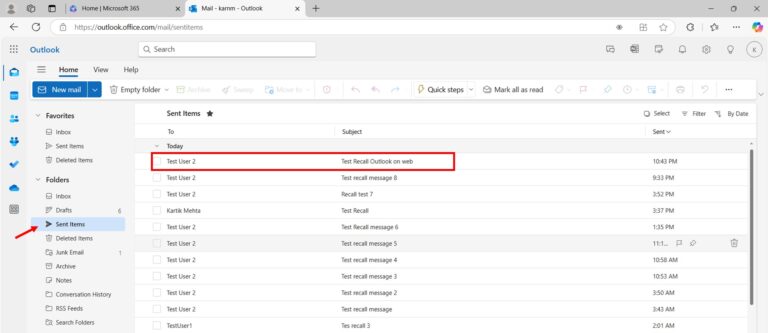
- Open the message you want to recall by double-clicking it
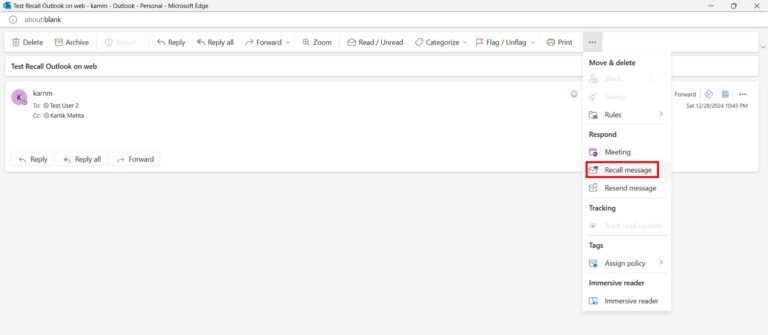
- Click the More actions (three dots) at the top of the message

- Select Recall this message if available in your configuration
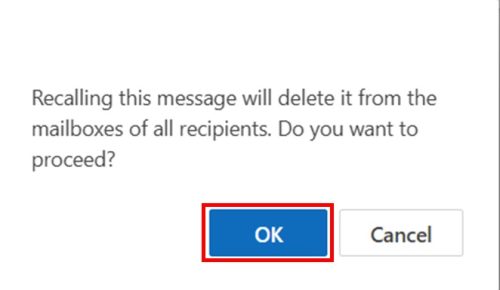
- Recall message window opens stating “Recalling this message will delete it from the mailboxes of all recipients. Do you want to proceed?” click OK to start the recall process
Recalling an Email on Exchange Online (M365) vs Exchange On-Premise
The classic email recall feature in Exchange On-Premises had several limitations that reduced its effectiveness.
- First, it relied on the Outlook client being open on the recipient’s machine to process the recall. This meant other email clients could not have messages recalled from them.
- It could only recall unread messages from the Inbox folder. Read messages, and those in other folders could not be recalled.
- Senders received individual notification emails for each recall attempt, sometimes amounting to hundreds of emails.
The upgraded feature in Exchange online and its benefits:
- The new Exchange Online message recall feature addresses these pain points. As it functions directly in the cloud mailbox, messages can now be recalled regardless of the email client used by the recipient. Whether the recipient uses Outlook, OWA, or any other client that connects to Exchange Online, any message in the mailbox is eligible for recall.
- Additionally, the recall now works on read messages and those in any mailbox folder or sub-folder, except Drafts and Sent Items. This expands the scope of recall to post messages in the mailbox. It is no longer limited to only unread messages in the inbox.
- Finally, the multiple recall notification emails have been replaced by a single status report email. This report contains a link to view the aggregate status of the recall attempt for all recipients. The status is quickly updated, providing senders timely feedback on their recall effort. For large recalls, it may take up to 30 minutes to retrieve full status across tens of thousands of recipients.
- By moving recall handling into Exchange Online itself, Microsoft has addressed key limitations in effectiveness and usability. Any client can connect to the mailbox, most messages are eligible thanks to expanded scope, and a centralized report provides clear status without spamming the sender. The new message recall capability is a major upgrade over the previous client-based feature.
Conclusion
And that’s a wrap, folks! This riveting tutorial covered everything from properly recalling emails in Outlook to proactively delaying deliveries and troubleshooting pesky issues when your magic recall powers fail. Feel free to resend any early drafts we may have accidentally sent while making this delightful guide! Just kidding—unsend isn’t an option when finalizing publish-ready content. But hopefully, all these tips and tricks help you avoid unpleasant emailing snafus in the future and gracefully clean things up if you ever need to retract messages
Frequently Asked Questions (FAQs)
Microsoft has significantly improved the message recall feature for Microsoft 365 users. The enhanced recall now works across multiple platforms and devices, including mobile phones. The key improvements include:
- Recalls work even if the recipient has opened the message
- Messages can be recalled from mobile devices
- Recalls function across different Outlook clients (desktop, web, mobile)
- Recipients cannot access recalled messages after a successful recall
To use the enhanced recall capabilities, the following conditions must be met:
- Both sender and recipient must be using Microsoft 365
- Organizations must be using Exchange Online
- Users need appropriate Microsoft 365 licensing
- The feature must be enabled at the tenant level
- Both parties must be within the same organization or Microsoft 365 tenan
When you recall a message sent to both internal and external recipients, the system will attempt a partial recall. The recall will proceed for internal recipients who meet the requirements, while external recipients will retain access to the original message. You’ll receive separate status notifications for each internal recipient, but no recall attempt will be made for external recipients.
The enhanced recall feature works with delegated access and shared mailboxes, but with specific considerations. When using delegate access, the delegate can initiate recalls on behalf of the primary mailbox owner. For shared mailboxes, users with appropriate permissions can recall messages sent from the shared mailbox.
The enhanced recall system handles attachments more comprehensively than the traditional system. When a message is recalled, access to attachments is immediately blocked along with the message content. However, it’s important to understand that any attachments downloaded before the recall was initiated will remain on recipients’ devices, as the system cannot retroactively remove downloaded files.
