
You start a large file download, step away for a coffee break, and return to find your Windows 11 PC asleep with the download halted! Frustrating, right?
Sleep mode is useful. It saves power, protects your hardware, and extends laptop battery life. But there are plenty of situations where you need your machine awake. Long downloads, video rendering, remote desktop sessions, server workloads, presentations, or simply watching a movie without your screen dimming every few minutes.
In my 24 years working with enterprise IT and Windows endpoints, I have seen this exact issue trip up everyone from home users to seasoned IT admins. The good news? Windows 11 offers multiple ways to control sleep behavior, from a quick toggle in Settings to advanced PowerShell commands and Group Policy settings.
In this guide how to stop Windows 11 from sleeping, I will walk you through every reliable method I have personally tested on Windows 11 Pro 25H2. You will learn the simple Settings app approach for everyday use, the more granular Control Panel options, PowerShell automation for IT pros, Group Policy for managed environments, Registry edits for advanced scenarios, and third-party utilities for one-click control. By the end, you will know exactly which method best fits your situation.
Table of Contents
Why Does Windows 11 Go to Sleep Automatically?
Sleep mode is not a bug. It is a deliberate Microsoft design choice with several layers working together to trigger it.
The first layer is the power plan. Windows 11 ships with the Balanced plan active by default, which decides *when* your PC should sleep. On a typical laptop running version 24H2 or later, the screen turns off after 5 minutes plugged in and 3 minutes on battery, and the device sleeps after 15 minutes plugged in and 5 minutes on battery.
The second layer is the sleep state, which decides *what kind* of sleep your PC enters. Older desktops use the classic S3 state, which puts the system into a deep low power mode where almost everything is off. Newer laptops and tablets use Modern Standby (also called S0 Low Power Idle), which keeps the system lightly active so it can sync email and wake almost instantly. You cannot choose between S0 and S3 directly because your hardware decides for you. Check which one your PC uses by running powercfg /a in an elevated terminal.
OEM utilities from Dell, HP, Lenovo, and ASUS often add their own power profiles that override Windows’ default settings. If you have ever set your screen timeout to 30 minutes only to find it reset to 5 minutes a week later, an OEM utility is likely the culprit. And on corporate devices, Group Policy or Microsoft Intune can enforce sleep settings that you cannot change locally. If you see “Some settings are managed by your organization” in your Power & battery page, that is your sign.
Sleep is helpful when you step away for short breaks, want to extend battery life between charges, or have security policies requiring automatic locking. It gets in your way during long downloads, video rendering, code compilation, remote desktop sessions, scheduled tasks, presentations, or home media server scenarios. Once you know which side of that line you fall on, picking the right method becomes much simpler.
Method 1: Stop Windows 11 from Sleeping Using the Settings App
If you only try one method from this guide, make it this one. The Settings app is the quickest, most beginner-friendly way to stop Windows 11 from sleeping, and it works on every device, including newer Modern Standby laptops.
- Press Windows key + I to open the Settings app instantly.
- Click System in the left sidebar.
- Select Power & battery from the right pane.

- Click Screen, sleep, & hibernate timeouts under the Power section to expand the controls.

- Locate Make my device sleep after under the Plugged in column and select Never from the dropdown.

- Repeat under On battery if you are on a laptop and want to disable battery sleep too.

The section contains three independent controls: Turn my screen off after (display only), Make my device sleep after (the whole system), and Make my device hibernate after (full power down with session saved). You can keep the screen from turning off after 10 minutes while preventing sleep entirely. This saves display power while letting your PC keep working through long tasks.
If you are using a laptop, Windows 11 keeps separate timeout values for Plugged in and On battery modes. I recommend setting Never under Plugged in for uninterrupted long tasks, but keeping a reasonable 15 to 30 minute timeout under On battery to protect battery life.
If the dropdown is grayed out, your IT department has locked the setting via Group Policy or Intune. If the setting reverts after a restart, an OEM utility is likely overriding it. If you do not see the hibernate option, it is not enabled by default on every device. Open Terminal as administrator and run powercfg /hibernate on to enable it, then reopen Settings.
This method is what I reach for in most everyday situations. Downloading a large game or ISO file overnight, running Windows Update without your PC dozing off mid-install, hosting a video call or webinar, letting a backup utility finish, or following a long tutorial. For temporary needs, just remember to set the timeout to something reasonable afterward.
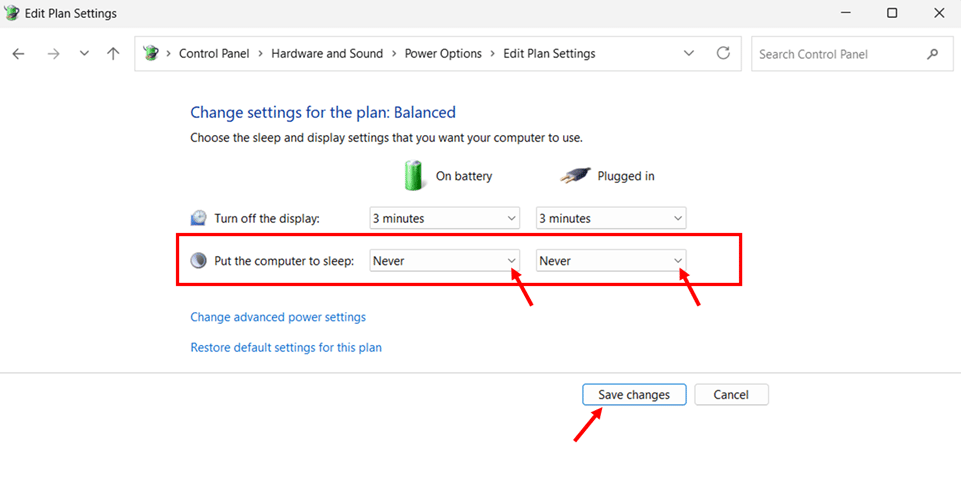
Method 2: Stop Windows 11 from Sleeping Using Control Panel Power Options
When you need finer control than the Settings app offers, the classic Control Panel Power Options still shines. Wake timers, hybrid sleep, USB selective suspend, PCI Express link state, processor power management, and hard disk timeout settings are all configurable here and nowhere else in the standard graphical interface.
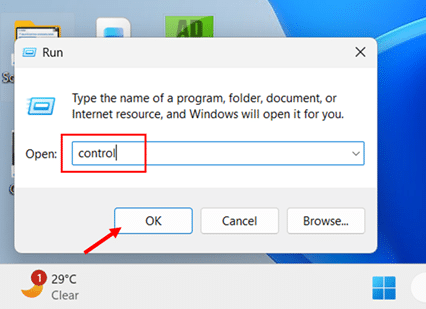
- Press Windows key + R to open the Run dialog box.
- Type control and press Enter to launch the Control Panel.
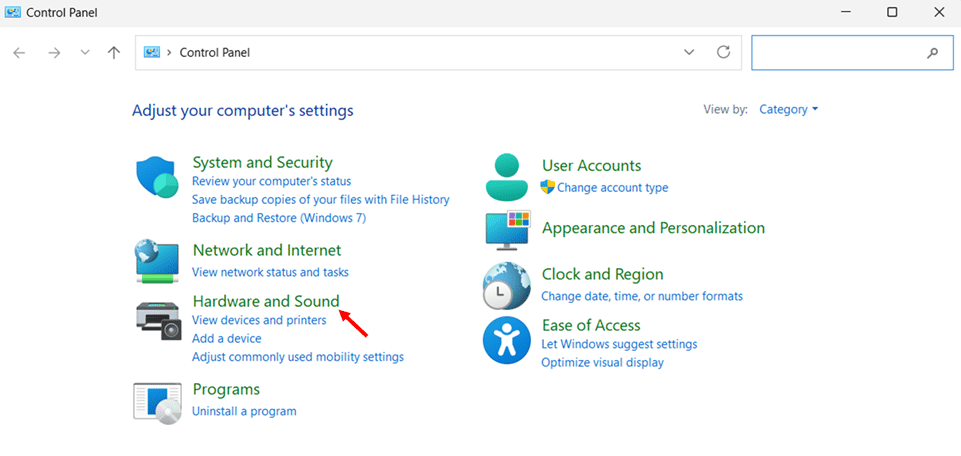
- Click Hardware and Sound
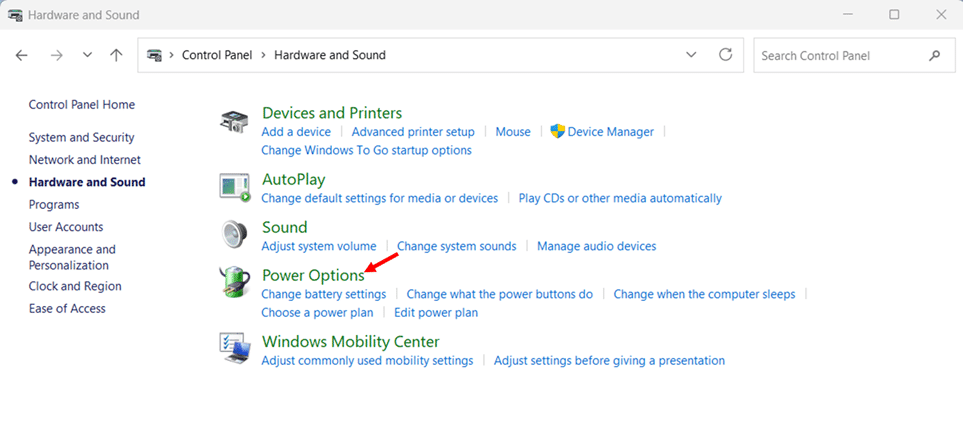
- Click Power Options.
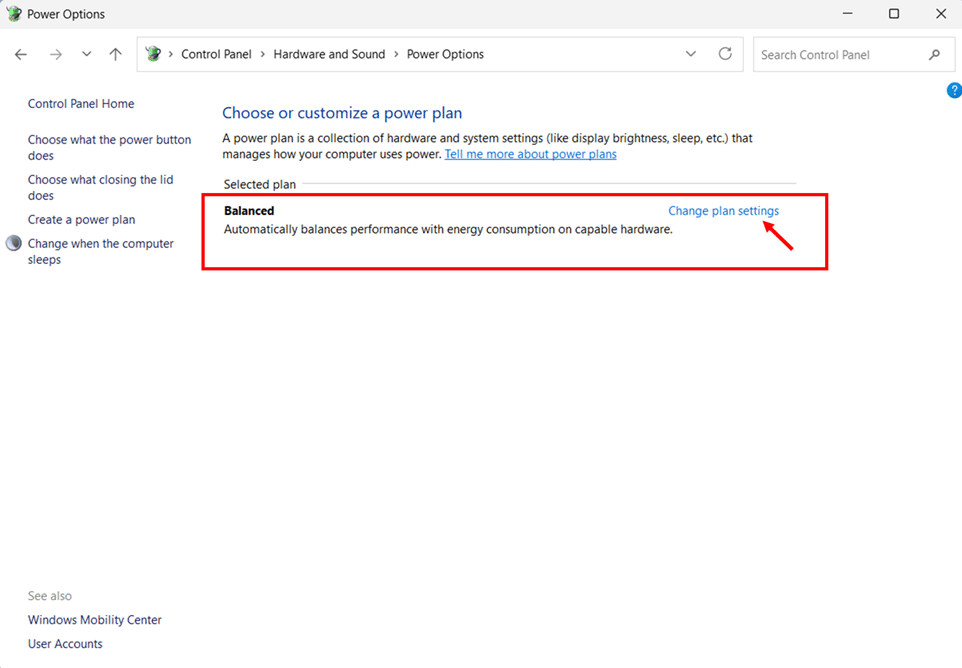
- Click Change plan settings next to your active plan (usually Balanced).
- Open the dropdown next to Put the computer to sleep under both On battery and Plugged in columns and select Never.
- Click Save changes to apply.
For deeper control, click Change advanced power settings to access the Advanced Power Options dialog. Expand the Sleep section to configure Allow hybrid sleep, Hibernate after, and Allow wake timers.
I usually recommend setting Allow wake timers to Disable or Important Wake Timers Only to prevent scheduled tasks from waking your PC unnecessarily.
For workstation grade tasks, Windows 11 Pro and Enterprise include a hidden Ultimate Performance plan. Open Terminal as administrator and run powercfg -duplicatescheme e9a42b02-d5df-448d-aa00-03f14749eb61 to add it. It is ideal for always-on workstations and render boxes where every millisecond matters.
One quirk to know. If you only see a single Balanced plan with no option to add others, your device uses Modern Standby (S0). This is by design, not a bug. Fall back to the Settings app or the powercfg command line method.
Method 3: Prevent Windows 11 from Sleeping Using PowerShell Commands
For anything beyond a one-off change, PowerShell cmdlet is the only sensible option. You can script it, push it through Intune or Group Policy, run it remotely, and verify it instantly.
You can also use Command Prompt in Windows 11 interchangeably with PowerShell for all the powercfg commands in this section.
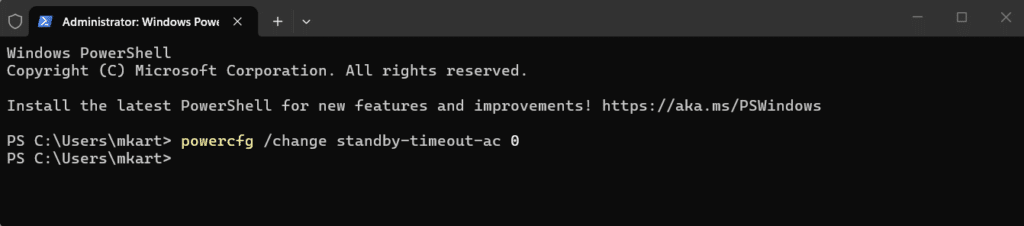
Right click the Start button, then select Terminal (Admin) to open an elevated session. Then run these commands:
powercfg /change standby-timeout-ac 0
powercfg /change standby-timeout-dc 0
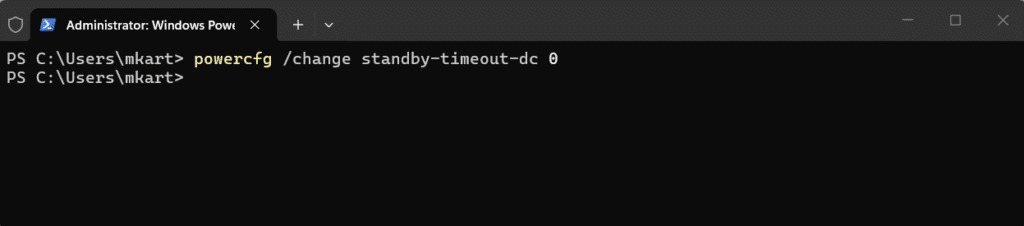
A quick note on terminology. In the powercfg utility, “standby” is the technical name for what Windows displays as “Sleep” in the Settings app. They refer to the same thing. The first command controls sleep when plugged into AC power, and the second controls sleep on DC battery power.
The value 0 is the powercfg equivalent of Never. Any other number specifies the sleep timeout in minutes. For example, powercfg /change standby-timeout-ac 60 sets the sleep timer to 60 minutes when plugged in. These changes apply to your currently active power plan and take effect immediately with no restart required.
Other Useful powercfg Commands for Sleep Management
Beyond the two core commands above, powercfg includes several related commands that complement your sleep configuration. Some control adjacent power behaviors like hibernate and screen timeouts. Others help you inspect, verify, and troubleshoot sleep settings when something does not behave as expected.
Type “powercfg /hibernate off” in the PowerShell window and press “Enter”.
This command disables hibernate completely and reclaims several gigabytes of disk space by removing the hiberfil.sys file, which can be 4 to 16 GB depending on your RAM. Note that this also disables Fast Startup in Windows 11, which relies on a partial hibernation file. To turn hibernate back on later, run “powercfg /hibernate on”.
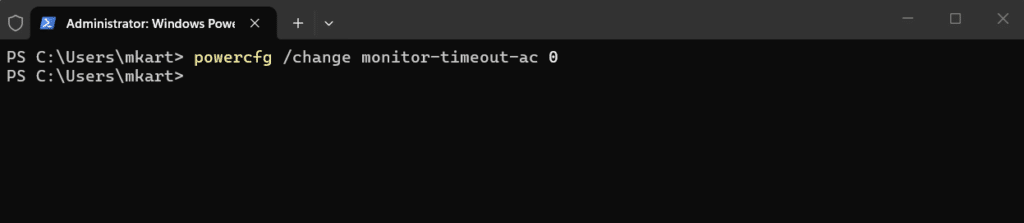
Execute “powercfg /change monitor-timeout-ac 0” to stop your screen from turning off automatically when your PC is plugged into AC power.
The value 0 here means the screen will never turn off. Any other number specifies the screen timeout in minutes. This is useful when you want your display to stay active during long tasks like video rendering, downloads, or remote sessions.
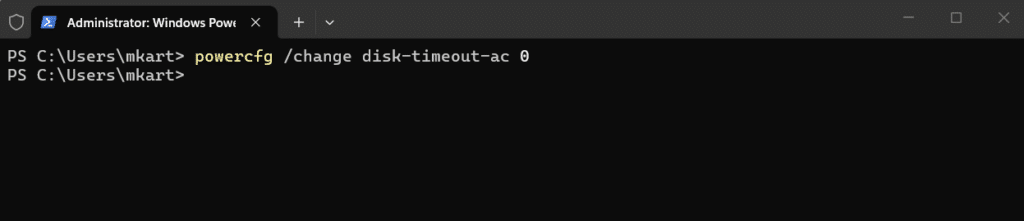
Run “powercfg /change disk-timeout-ac 0” to stop your hard disk from spinning down automatically when your PC is plugged into AC power.
The value 0 means the disk will never spin down. This command keeps your PC fully responsive without waiting for the disk to wake.
Type “powercfg /query” in the PowerShell window and press “Enter”.
This command dumps the full configuration of your currently active power plan, showing every setting with its AC and DC values. It is the fastest way to confirm your sleep timeout is set to 0 (Never) without opening any GUI.

Execute “powercfg /getactivescheme” to view the name and GUID of your currently active power plan.
This is useful when sleep is misbehaving and you suspect Windows might have silently switched to a different plan after a system update or OEM utility intervention.

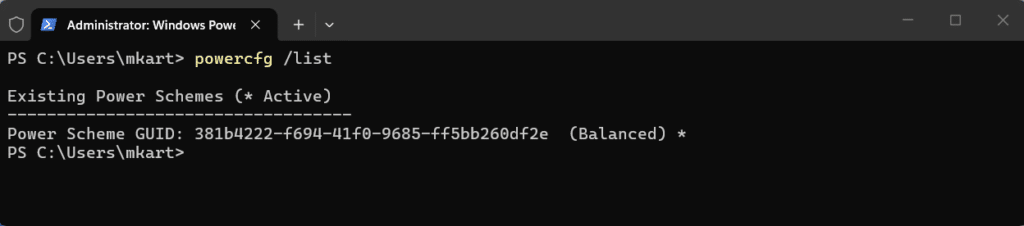
Run “powercfg /list” to display all power plans available on your system, including defaults like Balanced along with any custom plans.
Each plan shows its unique GUID, which you can use when you want to switch between plans to test different sleep configurations.
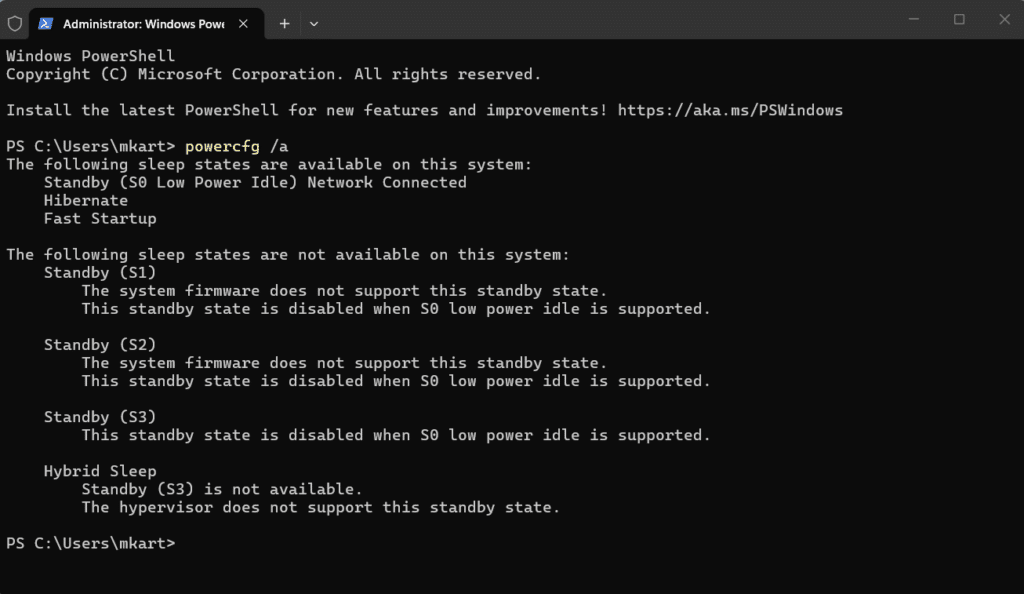
Type “powercfg /a” in the PowerShell window and press “Enter”.
This is the most important inspection command for sleep troubleshooting. It shows which sleep states your hardware supports, such as “Standby (S0 Low Power Idle)” for Modern Standby or “Standby (S3) is available” for classic sleep. The output also explains why certain states are unavailable.
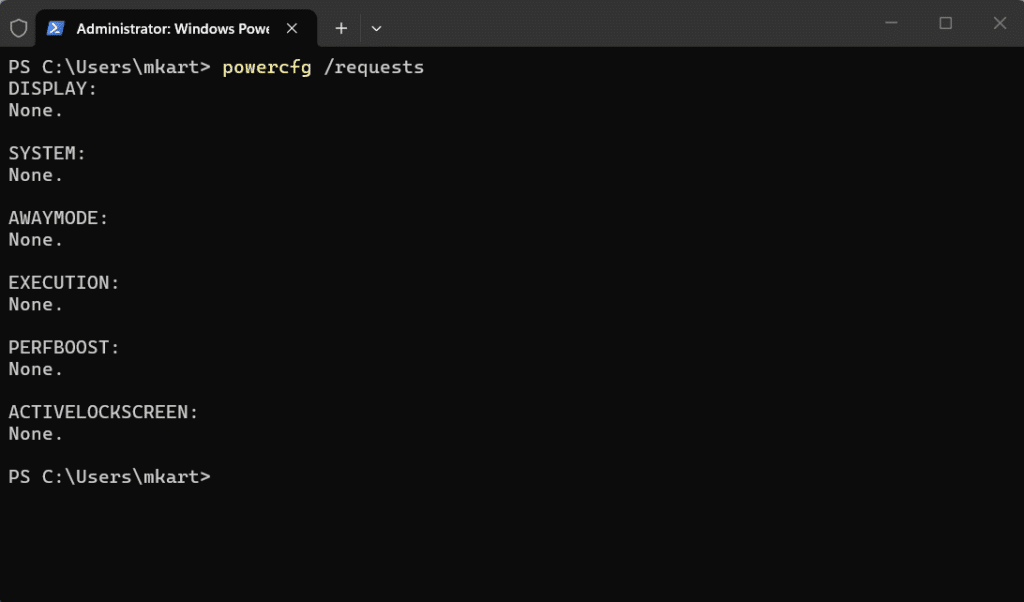
Execute “powercfg /requests” to view all active power requests from drivers and applications currently keeping your PC awake.
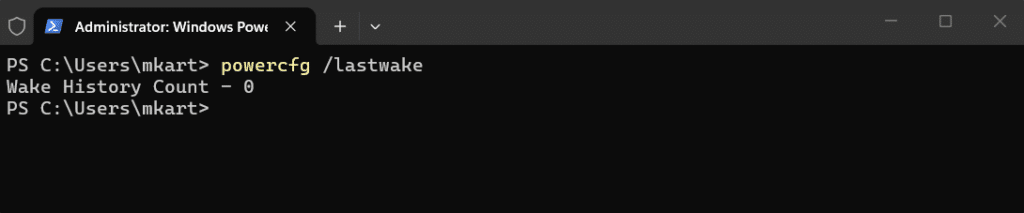
Run “powercfg /lastwake” to identify what woke your PC from the most recent sleep cycle.
This is essential when your PC keeps waking unexpectedly overnight, as the output points you directly at the device, driver, or scheduled task responsible.
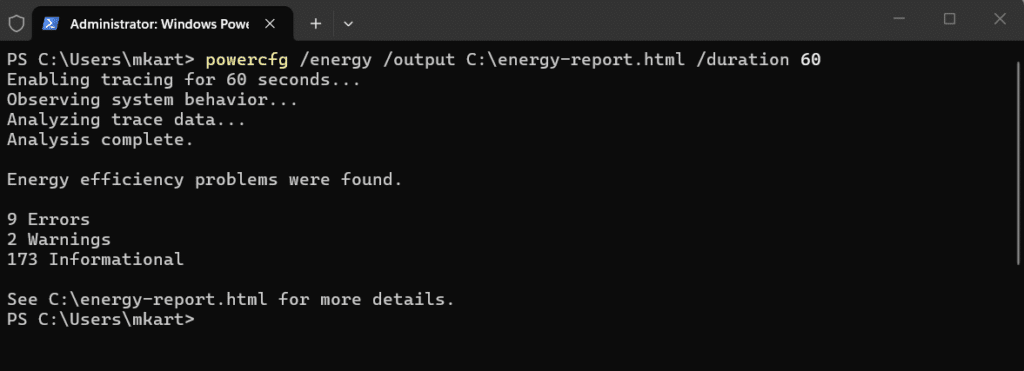
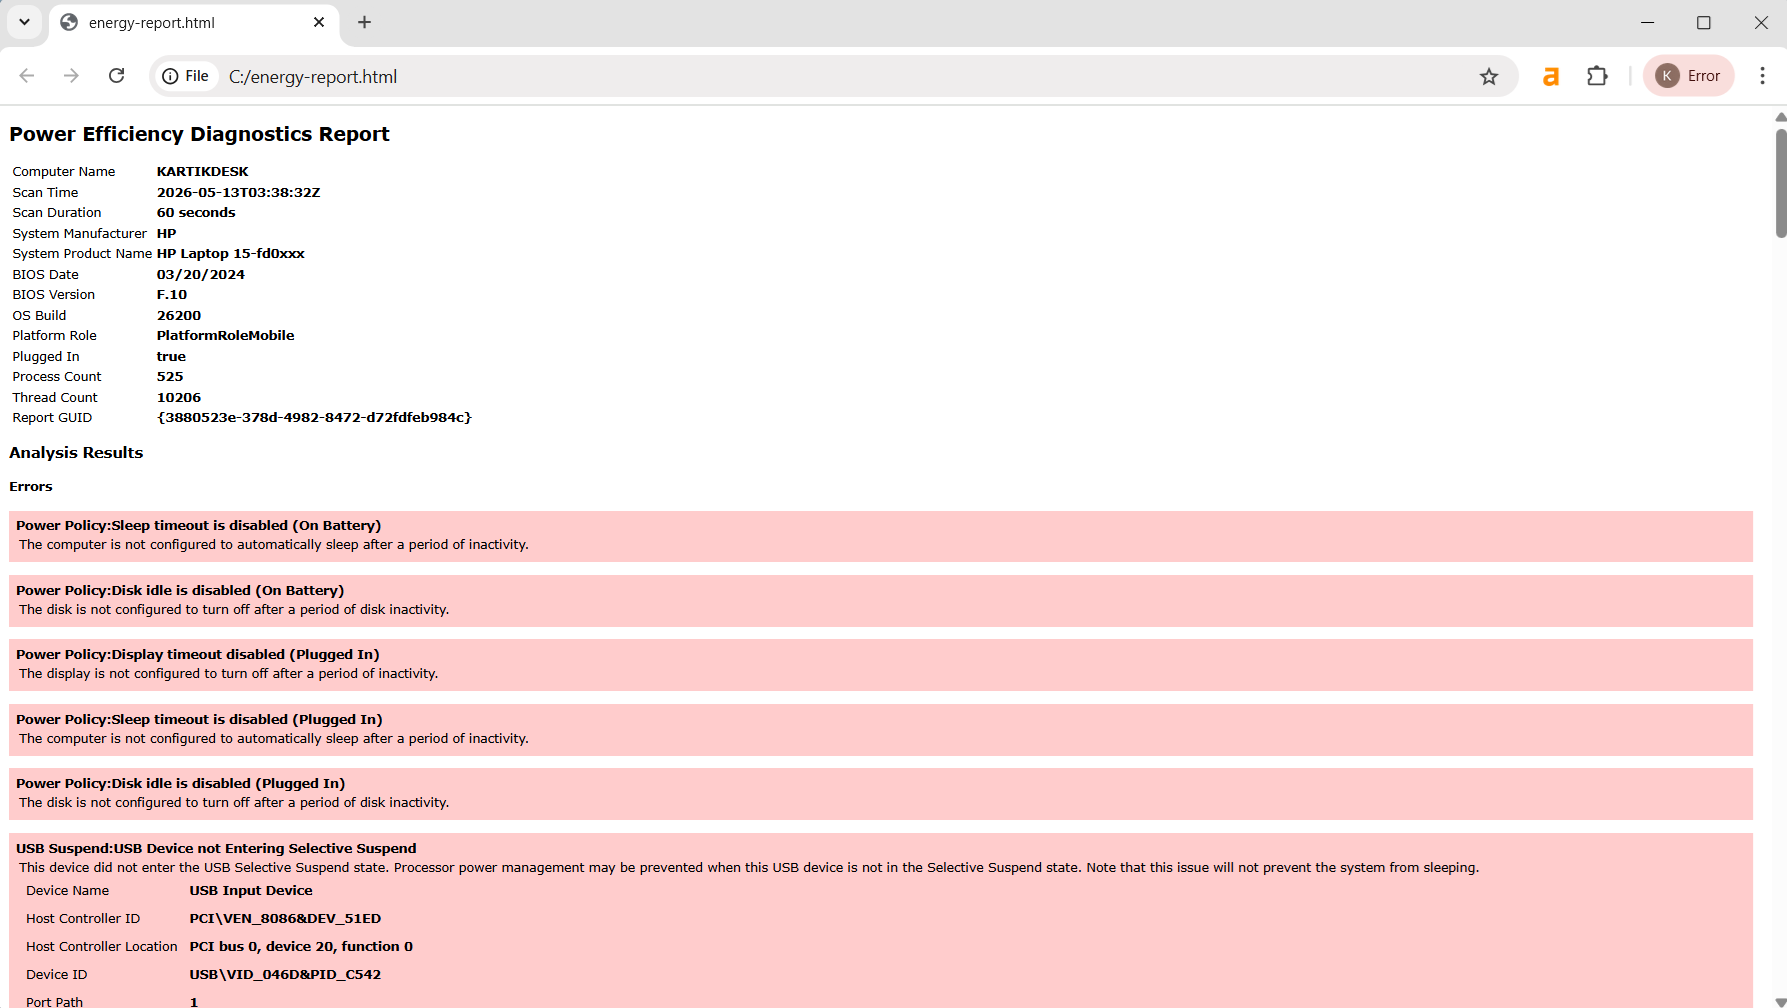
Type “powercfg /energy /output C:\energy-report.html /duration 60” in the PowerShell window and press “Enter”.
This command monitors your system for 60 seconds and generates a detailed HTML report flagging power configuration errors, driver issues, and policy conflicts. The /duration value 60 specifies how many seconds to monitor, and the /output parameter sets the file path where the report will be saved. When the simpler commands do not reveal the problem, this is the deep diagnostic that often catches it.
Execute “powercfg /restoredefaultschemes” to wipe all custom power plans and restore the Balanced, Power Saver, and High Performance plans to factory defaults.
This is useful when your power settings have become so tangled from experimentation that starting fresh is faster than untangling them.
Note:You can use Command Prompt in Windows 11 interchangeably with PowerShell for all the powercfg commands in this section.
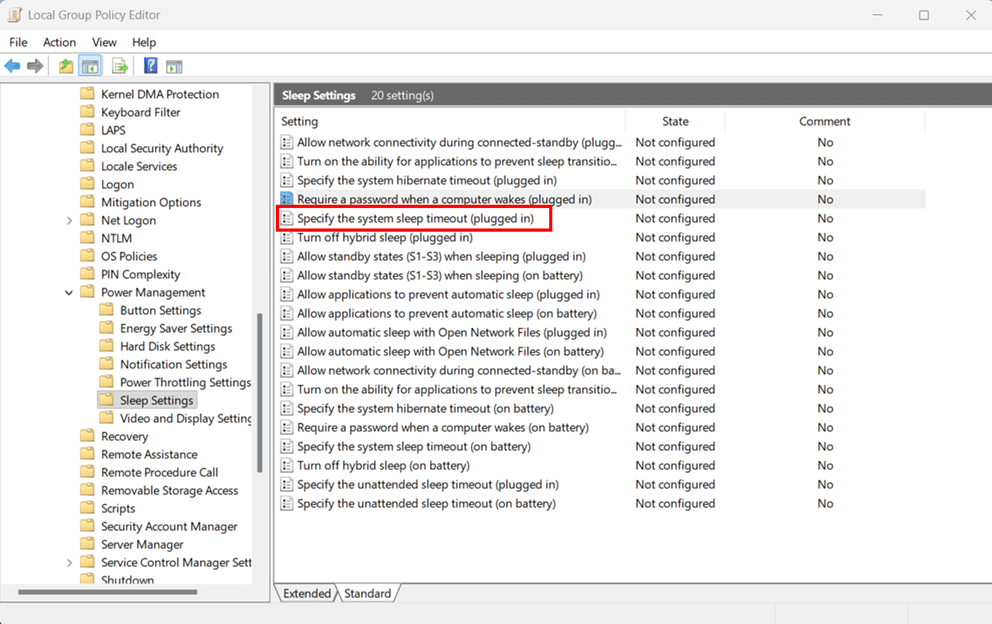
Method 4: Stop Windows 11 from Sleeping Using the Group Policy (Pro and Enterprise)
When you need to enforce sleep settings across multiple machines or want changes that no one (including OEM utilities) can override, Group Policy is the most reliable tool.
The Local Group Policy Editor (gpedit.msc) is only available in Windows 11 Pro, Enterprise, and Education. Windows 11 Home users should use the Registry method instead.
- Press Windows key + R, type gpedit.msc, and press Enter to launch the Local Group Policy Editor.

- Navigate to Computer Configuration → Administrative Templates → System → Power Management → Sleep Settings.
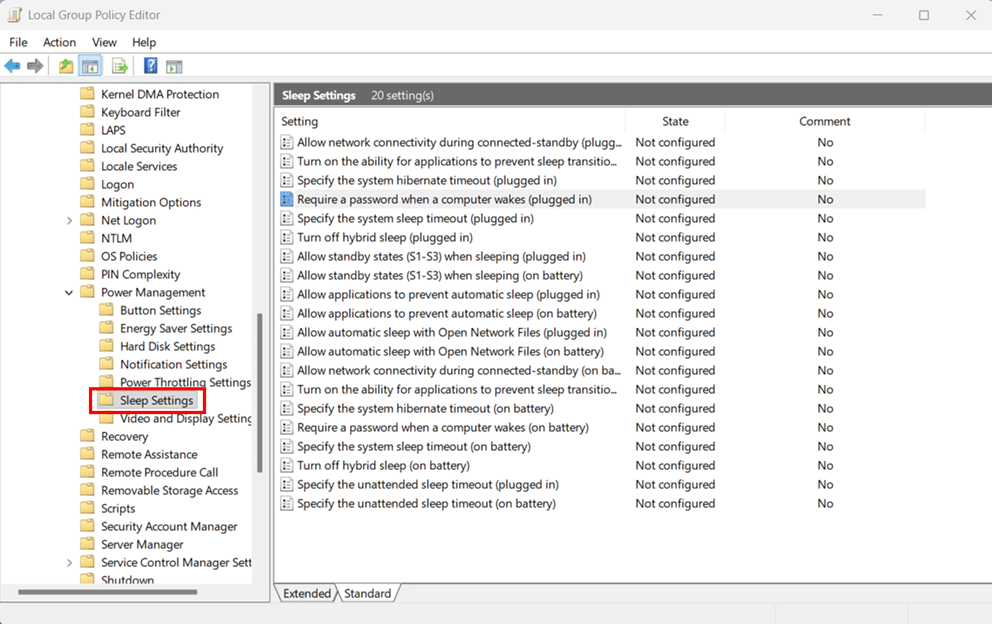
- Double click Specify the system sleep timeout (plugged in) in the right pane.
- Select Enabled and set System Sleep Timeout (seconds) to 0 to disable sleep. Click Apply and Ok
- Click Apply and OK, then repeat for Specify the system sleep timeout (on battery).
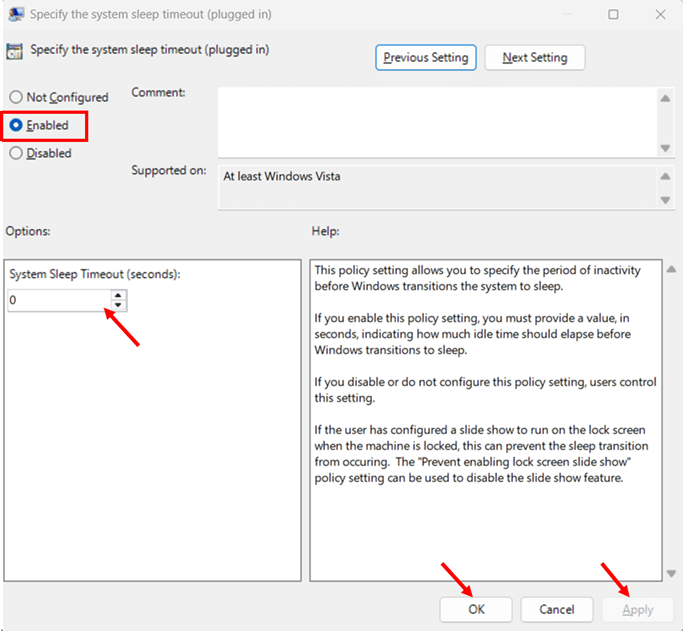

- Open an elevated Terminal and run gpupdate /force to apply immediately.
For a configuration that survives reboots and updates, also enable “Specify the unattended sleep timeout (plugged in)” and “Specify the unattended sleep timeout (on battery)” with values of 0. The unattended timeout often catches IT admins by surprise. Even if you disable the main sleep timeout, the unattended timeout can still trigger sleep after a separate idle period.
For domain environments, configure the same policies in the Group Policy Management Console (gpmc.msc) on a domain controller. For cloud managed devices, push them through Microsoft Intune Settings Catalog by searching for Power Management and adding the equivalent settings. Both behave identically and lock out user changes with the familiar “Some settings are managed by your organization” message.
Method 5: Stop Windows 11 from Sleeping Using the Registry Editor (Advanced Users)
The Registry Editor is the lowest level interface for changing Windows behavior. Everything you configure through the Settings app, Control Panel, powercfg, and Group Policy ultimately writes to the Windows Registry. So if you know exactly which keys to modify, you can bypass all the higher level tools and go straight to the source.
But here is the honest truth. The Registry method is rarely the best choice for stopping Windows 11 from sleeping. The Settings app, powercfg, and Group Policy are easier, safer, and accomplish the same thing. The Registry comes into play in three specific scenarios:
- You are on Windows 11 Home and need Group Policy style enforcement without msc access
- You need to surface hidden power settings that the GUI does not expose
- Your GUI tools are unresponsive, locked by malware, or otherwise broken
Modify Power Policy Keys
The most direct approach is to modify the standby timeout keys that govern your active power scheme. Here is the path:
- Open Registry Editor as described above.
- Navigate to HKEY_LOCAL_MACHINE\SYSTEM\CurrentControlSet\Control\Power\PowerSettings\238C9FA8-0AAD-41ED-83F4-97BE242C8F20\29F6C1DB-86DA-48C5-9FDB-F2B67B1F44DA in the address bar.
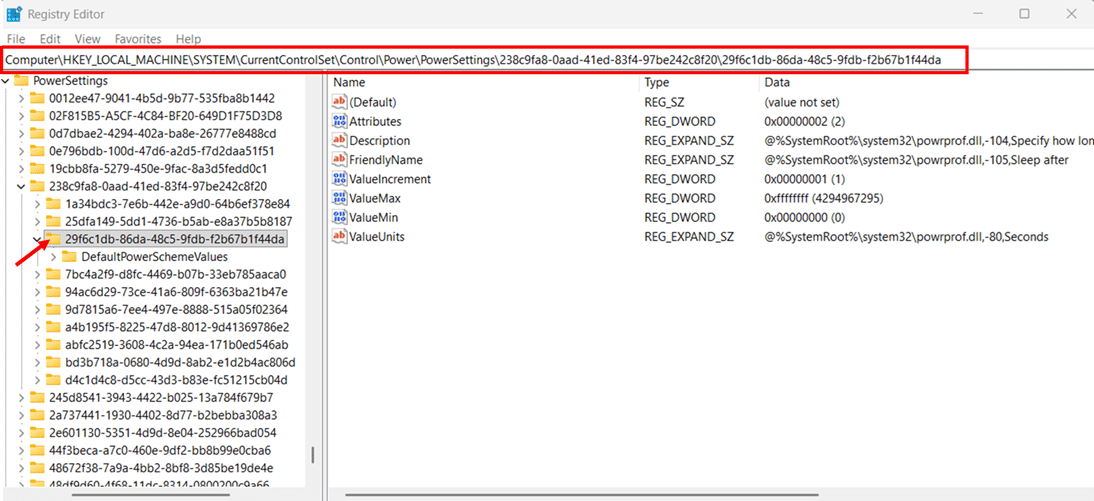
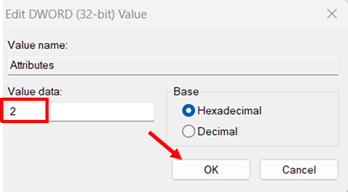
- Locate the Attributes DWORD value in the right pane and double click to edit it.
- If the value is not already 2, change the Value data to 2 and click OK to make this setting visible in Advanced Power Options.
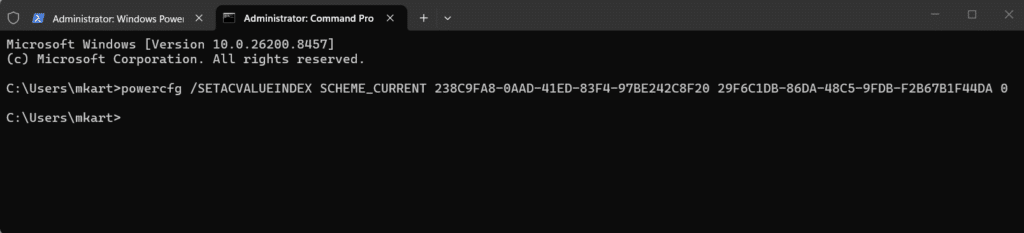
- Open Terminal (Admin) and run powercfg /SETACVALUEINDEX SCHEME_CURRENT 238C9FA8-0AAD-41ED-83F4-97BE242C8F20 29F6C1DB-86DA-48C5-9FDB-F2B67B1F44DA 0 to set the AC sleep timeout to zero.
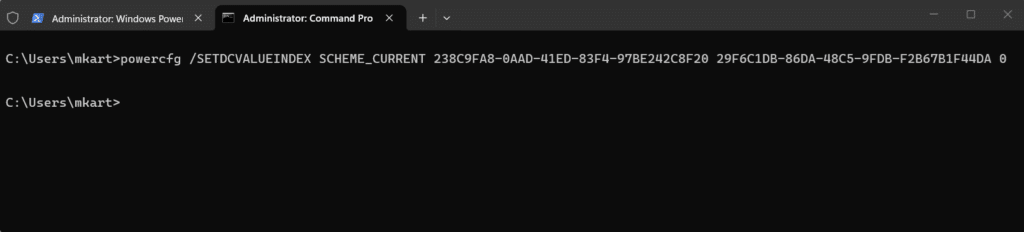
- Run powercfg /SETDCVALUEINDEX SCHEME_CURRENT 238C9FA8-0AAD-41ED-83F4-97BE242C8F20 29F6C1DB-86DA-48C5-9FDB-F2B67B1F44DA 0 to do the same for battery power.
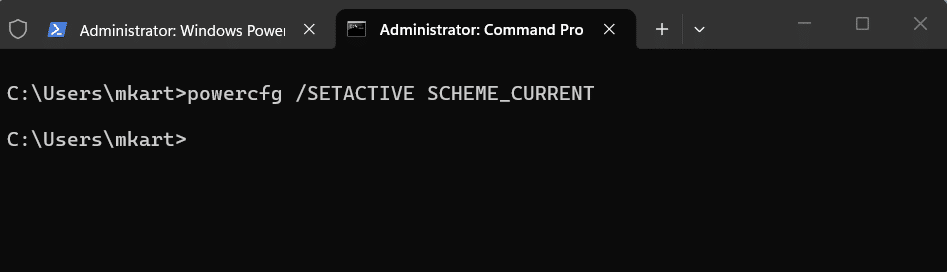
- Run powercfg /SETACTIVE SCHEME_CURRENT to apply the changes immediately.
The GUID 238C9FA8-0AAD-41ED-83F4-97BE242C8F20 represents the Sleep subgroup, and 29F6C1DB-86DA-48C5-9FDB-F2B67B1F44DA is the Sleep after setting within it. These GUIDs are constant across all Windows 11 installations.
Method 6: Use a Third Party App to Keep Windows 11 Awake
Sometimes you do not want to change your system settings permanently. You just need your Windows 11 PC to stay awake for a single task. A long download, a webinar, an overnight backup, or a video rendering job that finishes by lunchtime.
This is where third party “keep awake” utilities come into their own. They give you a simple toggle, often right from the system tray, that overrides Windows sleep behavior temporarily without touching your power plan, Registry, or Group Policy. When the task is done, you just turn the app off, and Windows returns to its normal sleep behavior.
In my experience, this is the most underrated category of Windows utilities. Many users do not even know these tools exist, and they spend years digging through Settings menus when a one click solution is sitting right there in the Microsoft Store or GitHub.
Microsoft PowerToys Awake: The Best Choice for Most Users
If you only install one keep awake tool, make it PowerToys Awake. It is developed by Microsoft, open source, and free, and ships as part of the Microsoft PowerToys suite, which millions of Windows users already have installed for other utilities like FancyZones and PowerRename.
PowerToys Awake works by spawning background threads that inform Windows that the system needs to remain in a specific power state. It does not modify your power plan settings. Once you turn it off, the threads terminate, and your normal power plan resumes immediately. This is exactly the behavior you want for temporary use cases.
How PowerToys Awake Works
The technical approach is elegant. PowerToys Awake uses the same Windows API that legitimate apps like video players, video conferencing tools, and download managers use to keep the system awake during their operations. It is not a hack or workaround. It is the officially sanctioned way to request that Windows stay awake for a specific purpose.
Three important limitations to know upfront:
- PowerToys Awake does not function when the lock screen is displayed because the lock screen operates in a separate security context
- The default behavior keeps the system awake but lets the display turn off, unless you enable the Keep screen on option
- It does not prevent user initiated actions like manually clicking Sleep from the Start menu
These limitations are deliberate design choices, not bugs. For most use cases, they are exactly what you want.
Microsoft PowerToys Awake Installation and Stoping Sleep Configuration
- Open the Microsoft Store from the Start menu or taskbar.

- Search for Microsoft PowerToys and click Install on the official Microsoft listing.

- Launch PowerToys from the Start menu after installation completes.

- Click Awake in the left sidebar of the PowerToys settings window.

- Toggle Enable Awake to the on position to activate the utility.

- Select a Mode from the dropdown, such as Keep awake indefinitely, Keep awake temporarily, or Keep awake until expiration.

- Enable Keep screen on if you also want the display to stay active and not just the system.

That is it. The PowerToys Awake icon will now appear in your system tray, and you can change modes by right clicking it without opening the full settings window.
The Four PowerToys Awake Modes Explained
PowerToys Awake supports four different operating modes, each suited to a specific scenario:
Keep using the selected power plan in the disabled state, where PowerToys Awake does nothing and your normal power plan applies. Use this when you want sleep to behave normally.
Keep awake indefinitely keeps your PC awake until you manually disable PowerToys Awake or put the system to sleep yourself. Ideal for overnight downloads, long backups, or always on workstation use.
Keep awake for a time interval, which lets you specify hours and minutes, after which the system returns to its normal power plan. Perfect for a two hour webinar, a three hour video render, or a 30 minute software installation.
Keep awake until expiration keeps the system awake until a specific date and time you set. Useful when you need the PC to stay awake for a scheduled task, like a 4 AM cron job or a 5 PM end of business backup.
Conclusion
Stopping Windows 11 from sleeping automatically is not a one size fits all task. The right method depends on your scenario! A home user might just toggle a setting in Power & battery, while an IT admin managing hundreds of endpoints will lean on PowerShell scripts or Group Policy.
Start simple. Try the Settings app method first since it covers most use cases. If you need more granular control, use Control Panel or the powercfg commands. For managed environments, Group Policy or Intune is your best friend. And for temporary keep awake needs like long downloads or overnight renders, PowerToys Awake is the cleanest tool. It is free, official, and does not require permanent changes.
Remember, disabling sleep has trade offs. Higher power consumption, faster battery drain on laptops, and slightly more wear on hardware over time. Apply these changes thoughtfully based on what you actually need rather than disabling sleep everywhere.
Have you tried any of these methods on your Windows 11 PC? Let me know in the comments which one worked best for your setup! And if you found this guide helpful, share it with anyone struggling with the same issue.
Frequently Asked Questions (FAQs)
Sleep keeps your session in RAM with a quick wake but uses some power. Hibernate saves your session to disk, uses zero power, but takes longer to resume. Shut Down closes everything and starts fresh on the next boot.
Group Policy, Microsoft Intune, or a Registry policy is enforcing the setting. On corporate devices, contact your IT team. On personal devices, remove the policy through Registry Editor under HKEY_LOCAL_MACHINE\SOFTWARE\Policies\Microsoft\Power\PowerSettings.
No direct damage, but expect higher electricity bills, faster laptop battery wear, and more heat over time. Lithium ion batteries degrade faster when kept at high charge for extended periods. For temporary needs, use Microsoft PowerToys Awake instead of permanently disabling sleep.
Random wake events are usually caused by one of these sources:
- Network adapters with Wake on LAN enabled (especially on docking stations)
- USB mouse or keyboards with high sensitivity, allowing minor movements to wake the PC
- Bluetooth devices reconnecting (especially earbuds and game controllers)
- Scheduled tasks under Task Scheduler with “Wake the computer to run this task” enabled
- Windows Update scheduled scans (MoUsoCoreWorker.exe is a notorious offender)
- Antivirus or backup software performing scheduled jobs
Run “powercfg /lastwake” in an elevated Terminal to see what woke your PC most recently. Run “powercfg /devicequery wake_armed” to see all devices currently allowed to wake the system. Then disable the wake permission for the specific offender in Device Manager.
Functionally, yes, but there are practical differences:
- Laptops typically use Modern Standby (S0 Low Power Idle), which keeps the system lightly active
- Desktops typically use the older S3 sleep state, which is a deeper power down
- Laptops have separate sleep timeouts for AC (plugged in) and DC (battery) power
- Desktops only have one timeout since they are always on AC power
- Laptops have a lid close action setting; desktops do not
- Battery preservation considerations apply only to laptops
Every method in this guide works on the Home except the Group Policy. The Settings app, Control Panel, PowerShell powercfg, Registry Editor, and PowerToys Awake are all fully supported. For locked sleep settings, users cannot change; use the Registry method.
