

Let me show you how ten hidden Windows 11 features work and why they matter for your daily productivity, security, and PC maintenance. Every tool in this guide is already installed on your PC. There is nothing to download and nothing to buy, yet after 24 years in enterprise IT, these are the features I still watch experienced users miss.
Whether you’re looking to work faster, protect your system, or keep your machine running clean, you’ll find everything you need in this guide. I’ll walk you through productivity tools like Clipboard history and Focus Sessions, security features like Windows Sandbox and Dynamic lock, and maintenance essentials like Storage Sense and the brand new Point-in-time restore that arrived in the July 2026 update.
Each feature comes with exact steps, the Windows 11 version it requires, and hands on verification on Windows 11 Pro 25H2. Pick any section below and you can be using that feature in under two minutes.

Table of Contents
Clipboard History: Stop Losing What You Copied
Copy one item, then copy another, and the first one vanishes. That is how the Windows clipboard worked for decades, and it is how most people still use it today. Windows 11 ships with a far more capable system called Clipboard history, and it sits behind a single keyboard shortcut that many users have never pressed.
Press Win + V and a panel opens showing everything you have copied recently. Text, links, and images all appear in a scrollable list, ready to paste wherever you need them.
How to enable Clipboard history
The feature is off by default. The fastest way to switch it on takes two steps.
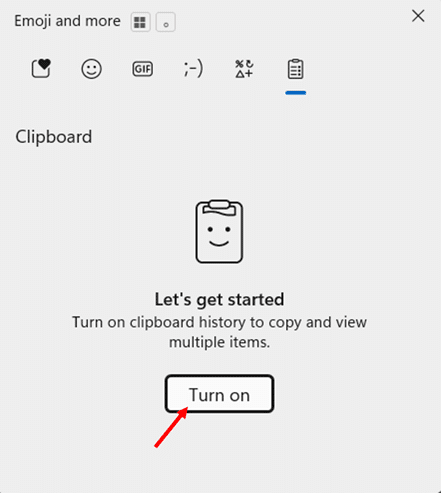
- Press Win + V to open the clipboard panel.
- Select Turn on to activate the feature. The panel now records every item you copy.
You can also enable it through the Settings app.
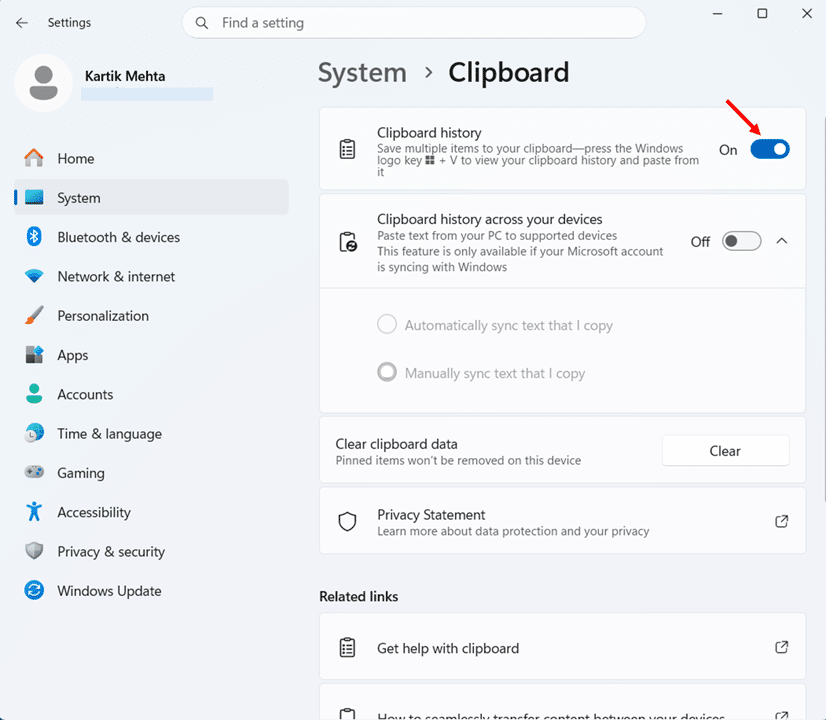
- Press Win + I to open Settings, select System, then select Clipboard.
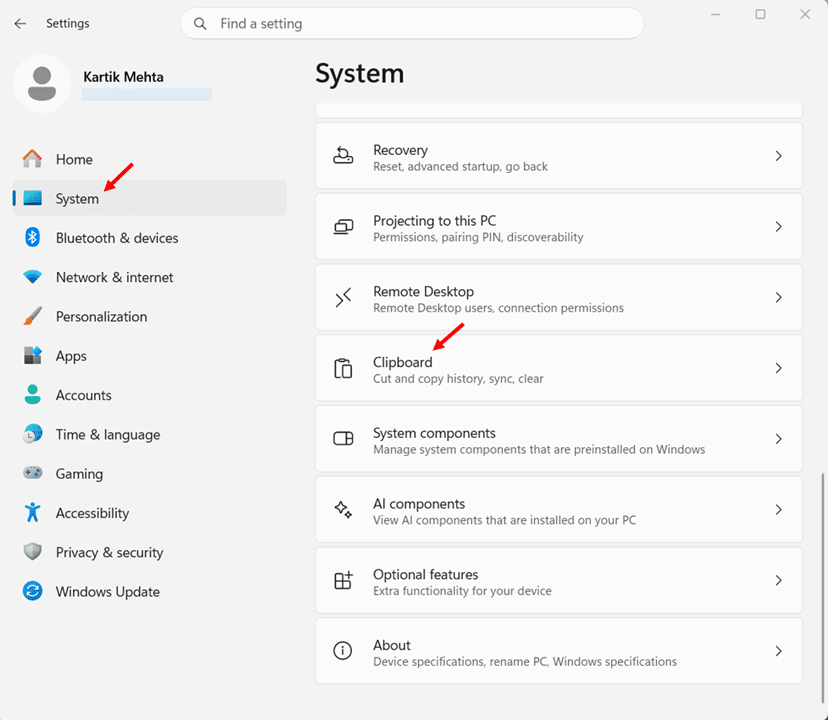
- Turn on the Clipboard history toggle. Copied items now appear whenever you press Win + V.
Pin the items you reuse constantly.
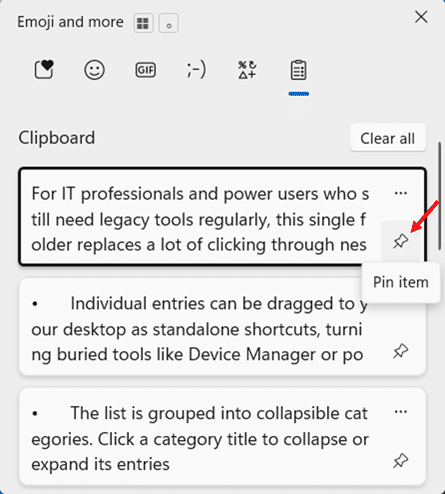
Everything in your history clears when you restart your PC, with one exception. Pinned items stay. If you paste the same content repeatedly, such as your address, a standard email reply, or a recurring link, pinning saves you from copying it again after every reboot.
- Press Win + V to open your clipboard history.
- Hover over the item you want to keep and click the Pin item icon. The item now survives restarts and the Clear all button, which removes every unpinned entry in one click.
Sync your clipboard across devices.
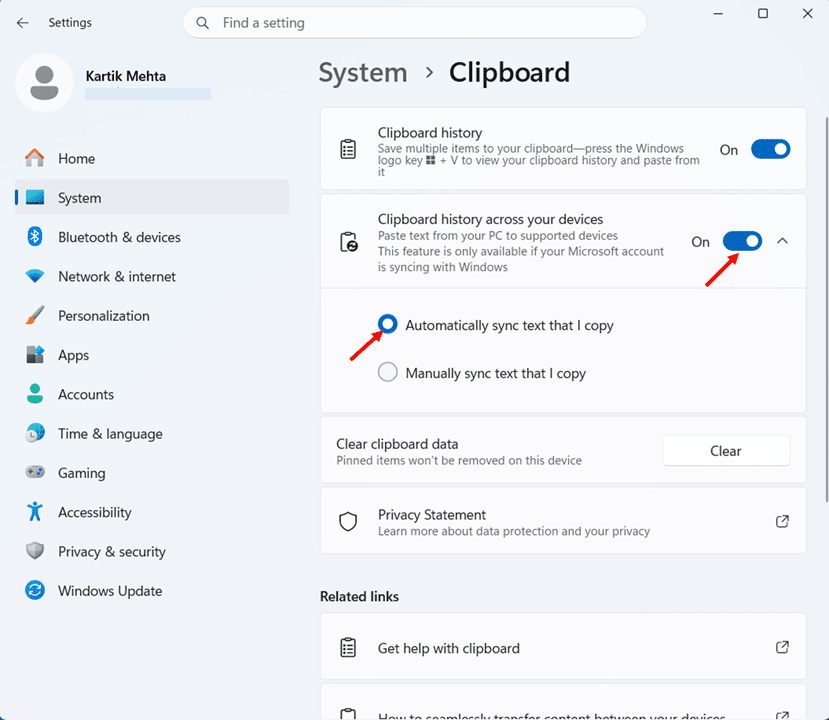
Clipboard history can follow you between PCs. Sign in with the same Microsoft account or work account on each device, then switch on sync.
- Press Win + I to open Settings, select System, then select Clipboard.
- Turn on Clipboard history across your devices and select the automatic sync option. The text you copy now appears on every device signed in with the same account.
Important point worth knowing
- The history holds 25 entries. Older unpinned items drop off as new ones arrive.
- Each item is capped at 4 MB, so large images may not save.
- Only text syncs across devices. Copied images stay in the local history on the PC where you copied them.
- On managed work PCs, IT can disable the feature through group policy. If the toggle in Settings is greyed out, that is why.
This section covers the essentials, and there is more to the feature than fits here. Our complete guide on how to use Clipboard History in Windows 11 walks through pasting as plain text, keyboard only navigation, deleting items, the emoji and GIF tabs inside the same panel, and fixing sync when it stops working.
Voice Typing: Dictate Anywhere Text Goes
Most people speak faster than they type, often by a wide margin. Windows 11 includes a built-in speech to text feature called voice typing. It works in any text field on your PC, from a Word document or an email to a browser search box or a chat window. Anywhere you can place a cursor, you can dictate instead of typing.
Voice typing uses Microsoft’s online speech services to convert your words into text, so you need a working microphone and an active internet connection for it to work. There is nothing to download or install.
How to start voice typing
- Click inside the text field where you want your words to appear.
- Press Win + H to open the voice typing menu. A small window with a microphone icon appears.
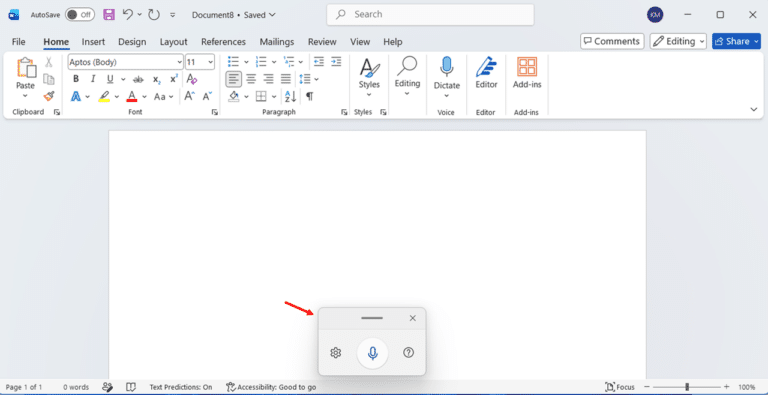
- Wait for the Listening alert, then start speaking. Your words appear as text almost instantly.
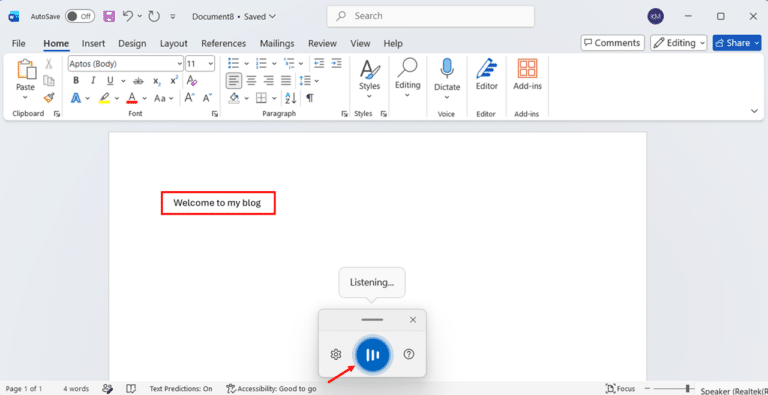
- Say “Stop listening” or select the microphone button when you finish. Dictation stops immediately.
On a tablet or touchscreen, tap the microphone button on the touch keyboard to start and stop dictation instead.
Turn on auto punctuation.
By default, voice typing does not punctuate for you. Enable auto punctuation once, and Windows adds full stops, commas, and capitalization as you speak.
- Press Win + H to open the voice typing menu.
- Select the Settings icon and toggle on Automatic punctuation. Your dictated text now arrives punctuated.
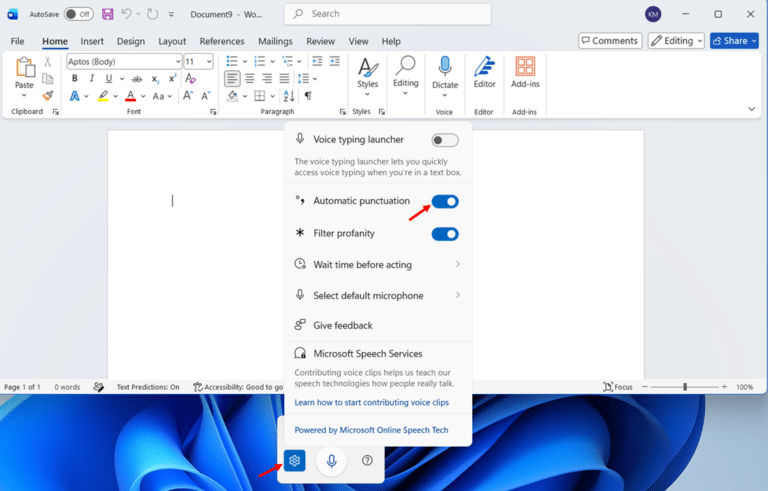
If you prefer manual control, leave the toggle off and speak your punctuation instead. Saying “comma”, “question mark”, or “new line” inserts the corresponding punctuation mark or line break. Microsoft’s documentation lists the full set of punctuation commands for each supported language.
Impoertant points worth knowing
- An internet connection is required, since speech processing happens through Microsoft’s online services.
- Accuracy depends on your microphone quality and background noise. A basic headset beats a laptop’s built-in microphone.
- Dictation language follows your Windows input language. To dictate in another language, add it under Settings > Time & language > Language & region, then switch input languages.
- Voice typing types text. It does not control your PC. For full hands-free control of Windows, Microsoft offers a separate feature called voice access.
Try one dictated email today. The accuracy of modern speech recognition surprises most people who last tried it years ago, and the habit builds quickly once the first attempt goes well.
Snap Layouts and Snap Groups: Window Management Most Users Ignore
A typical workday means fifteen browser tabs, a spreadsheet, Teams in the corner, and a PDF you keep referencing, all managed by cycling through Alt + Tab. Manual window juggling drains time every single day, and Windows 11 shipped the fix on day one. Both features are built into every edition and require no installation.
They divide the work between them. Snap Layouts handles the arrangement, giving you prebuilt templates that place windows into clean halves, thirds, or quadrants. Snap Groups handles the memory, saving your snapped windows as a set you can bring back with one click.
Snap your first layout.
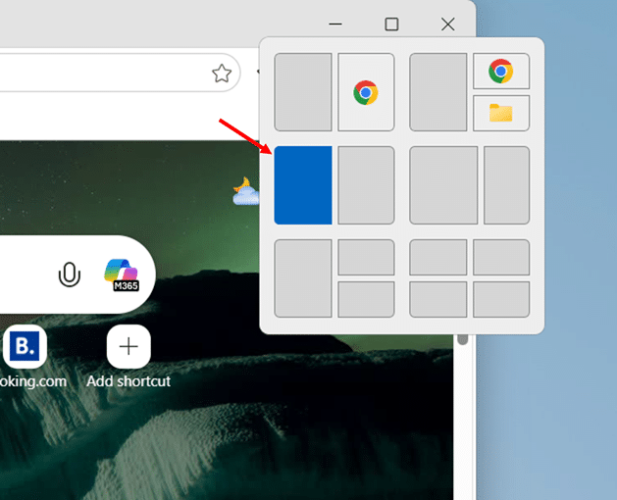
- Hover over the Maximize button of any open window, or press Win + Z. The Snap Flyout appears showing your available layouts.
- Click the zone where you want the current window, or press the numbered keys if you used Win + Z. The window snaps into position.
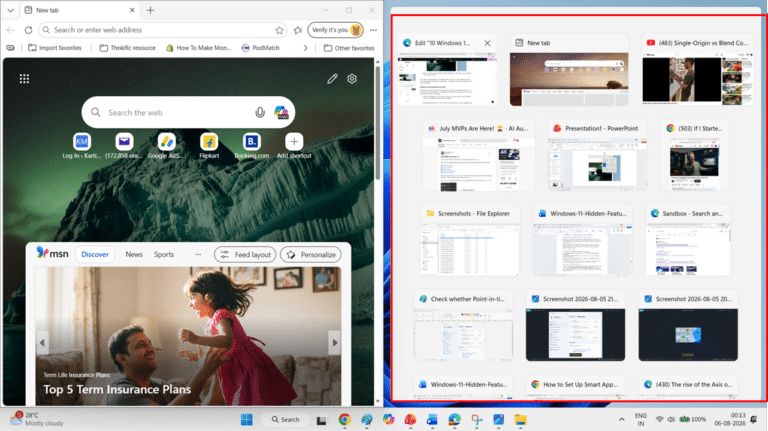
- Select an app from the Snap Assist thumbnails that appear in each empty zone, and repeat until the layout is filled.
The number of layouts depends on your display width. Screens narrower than 1920px show four layouts, while screens at 1920px and wider show six, including three column arrangements built for ultrawide monitors.
Restore a Snap Group in one click.
The moment you snap two or more windows together, Windows 11 automatically saves them as a Snap Group, with no save button and no extra steps. When another task pulls you away, the whole arrangement comes back in two steps.
- Hover over the taskbar icon of any app in the group. Two previews appear, one for the app alone and one showing the grouped windows together.
- Click the group preview. Every window returns to the foreground in its exact snapped position.
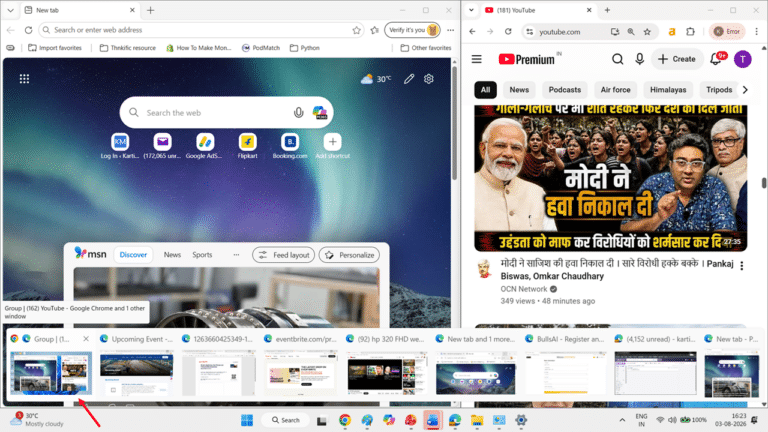
Snap Groups also appear in Task View (Win + Tab) and in the Alt + Tab switcher. There is one limit to know. Groups persist only while every app in them stays open, and they do not survive a restart.
Keyboard shortcuts to snap your windows
- Win + Z opens the Snap Flyout with numbered layout options.
- Win + Left Arrow or Win + Right Arrow snaps the active window to either half of the screen.
- Win + Up Arrow or Win + Down Arrow moves a snapped window between top and bottom quadrants.
- Win + Shift + Left Arrow or Win + Shift + Right Arrow moves the active window to your next monitor.
Snapping goes considerably deeper than this. Our complete guide on how to use Snap Layouts and Snap Groups in Windows 11 covers all three methods, including drag to snap, every settings toggle under Settings > System > Multitasking, fixes for the flyout not appearing, and a comparison with PowerToys FancyZones for users who want custom zones.
Windows Sandbox: Run Untrusted Content Safely
You downloaded an installer from a site you are not entirely sure about. Running it on your main system is a gamble. Windows Sandbox removes the gamble by giving you a disposable copy of Windows that runs in an isolated window on your desktop.
The sandbox uses hardware based virtualization for kernel isolation, which means software running inside it stays completely separated from your host machine. Every launch gives you a pristine, brand new installation of Windows. Close the window and everything inside it, all software, files, and changes, is permanently deleted.
Check the requirements first.
- Windows Sandbox is included in the Pro, Enterprise, and Education editions of Windows 11. Home edition does not support it.
- Virtualization must be enabled. On a physical machine, this is a BIOS setting, and most modern PCs ship with it already on.
- Microsoft lists at least 4 GB of RAM, 1 GB of free disk space, and two CPU cores as the minimum, with 8 GB of RAM and four cores recommended.
How to enable Windows Sandbox
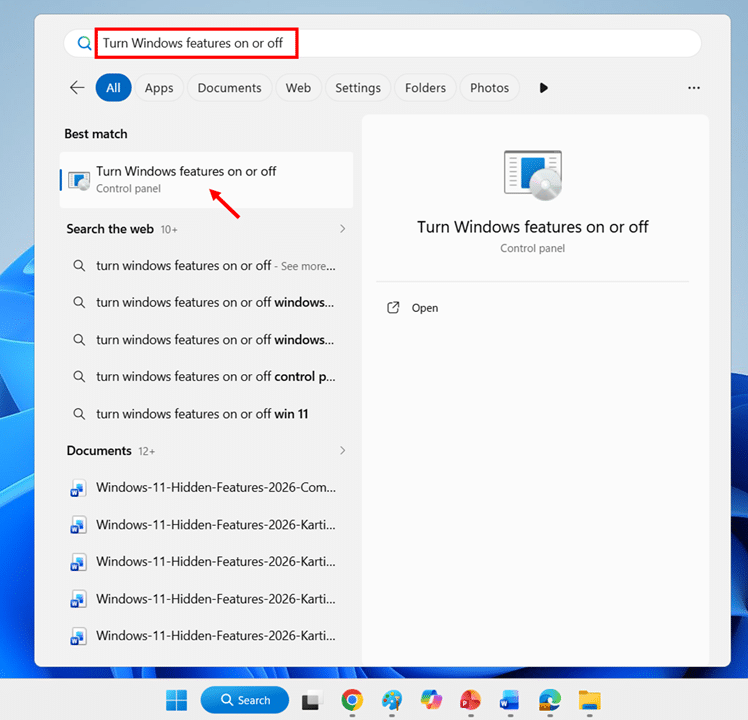
- Select Search from the taskbar, type Windows features, and select Turn Windows features on or off from the results.
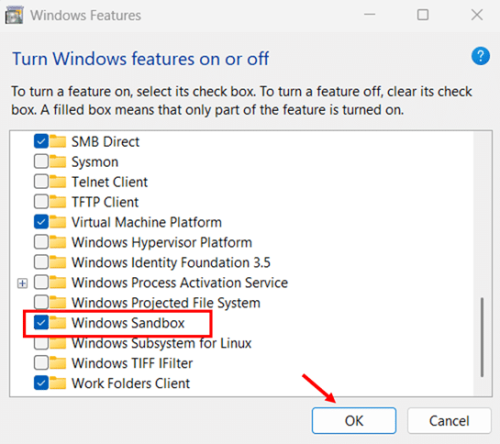
- Tick the Windows Sandbox checkbox, select OK, and restart your PC when prompted. Windows installs the feature during the restart.
How to use Windows Sandbox
- Select Start, type Windows Sandbox, and select the app. A fresh Windows desktop opens inside a window after a short load.
- Copy the file you want to test on your host PC and paste it inside the sandbox window. Clipboard redirection is enabled by default, so files move across with a standard copy and paste.
- Run the installer, open the file, or browse the questionable site inside the sandbox. Anything harmful stays contained.
Inportant points worth knowing
- Software installed on your host PC does not appear inside the sandbox. Anything you need there must be installed there
- Only one sandbox instance can run at a time.
- Since version 22H2, data survives restarts you initiate inside the sandbox, which helps when testing software that requires a reboot. Closing the window still deletes everything.
- Beginning in version 24H2, inbox Store apps such as Calculator, Photos, Notepad, and Terminal are not available inside the sandbox.
- Version 24H2 also introduced a Store-updated Windows Sandbox app with runtime controls for clipboard redirection, audio and video input, and folder sharing, accessed through the … icon in the top right corner.
For anyone who tests software regularly, downloads tools from smaller vendors, or wants to open email attachments with an extra layer of protection, this is the single most underused security feature in Windows 11.
Dynamic Lock: Your PC Locks Itself When You Walk Away
Locking your PC every time you step away is one of those habits everyone knows, and plenty of people skip. An unlocked screen in an office, a cafe, or even a shared home is an open door. Dynamic lock closes that door for you.
The feature uses Bluetooth to pair your PC with your phone. When the Bluetooth signal drops below a certain level, indicating you are no longer near your device, Windows locks the PC automatically, within a minute of your phone going out of range. Your phone already travels with you when you leave your desk. Dynamic lock simply turns that fact into a security layer.
Pair your phone with PC first
Dynamic lock needs an active Bluetooth pairing before it appears usable, so start here if your phone is not already paired.
- Turn on Bluetooth on your phone and make it discoverable.
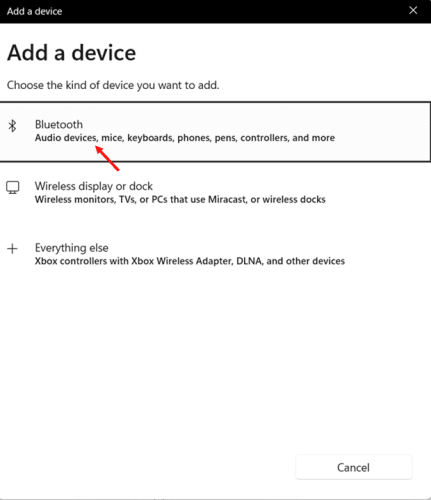
- Press Win + I to open Settings, select Bluetooth & devices, then select Add device.
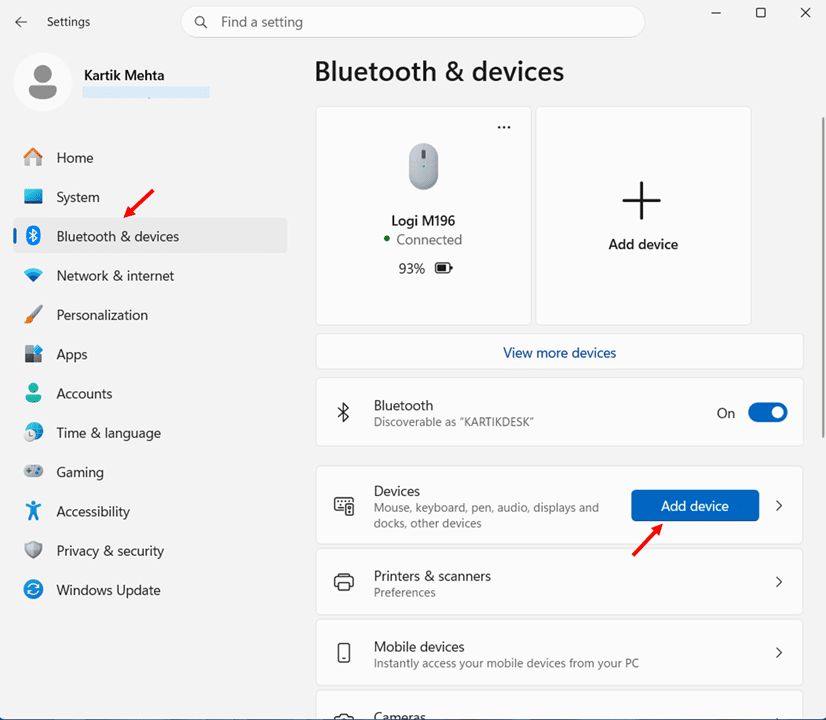
- In the Add a device dialog, select Bluetooth.
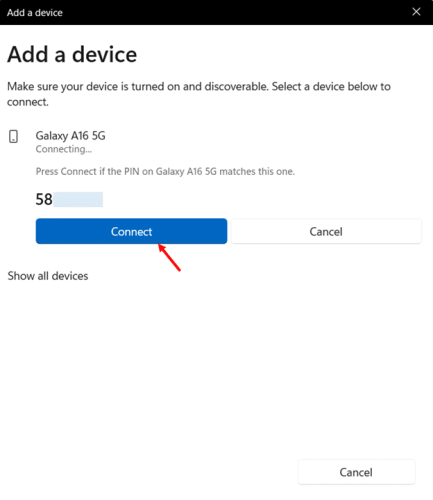
- Choose your phone from the list and confirm the pairing code on both screens. Your phone now appears under your paired devices.
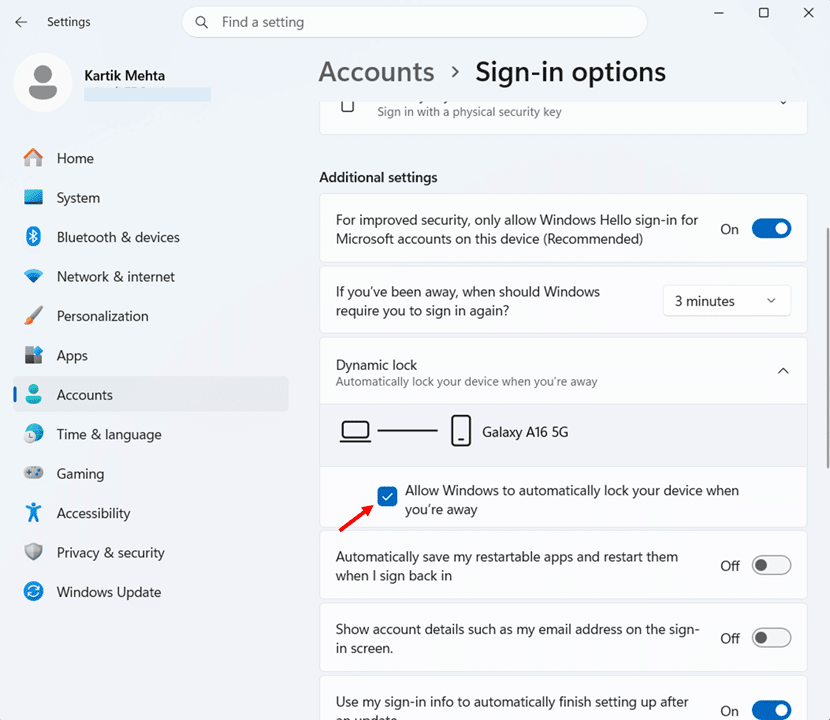
Turn on Dynamic lock.
- Press Win + I to open Settings, select Accounts, then select Sign-in options.
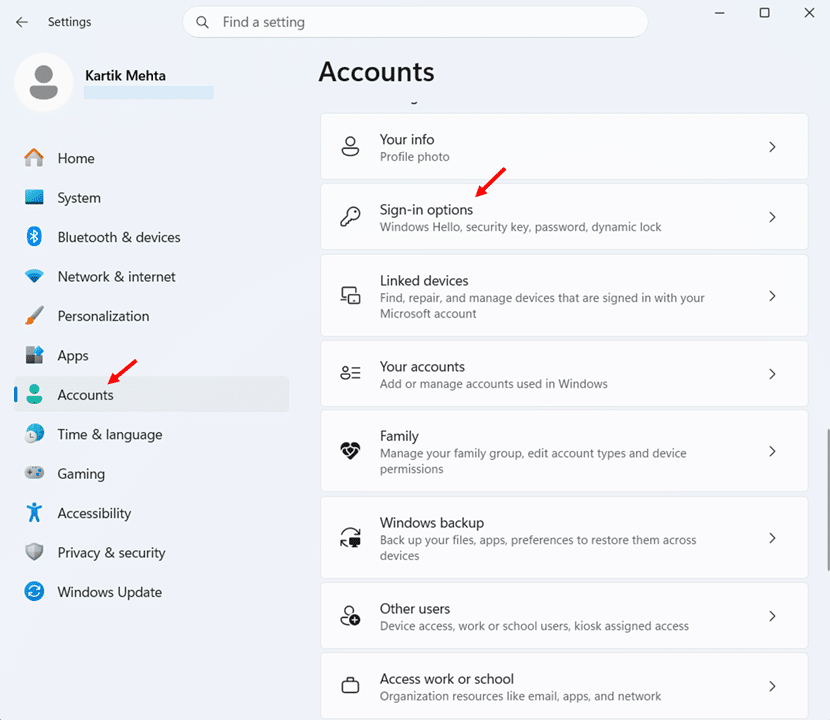
- Select Dynamic lock to expand it.
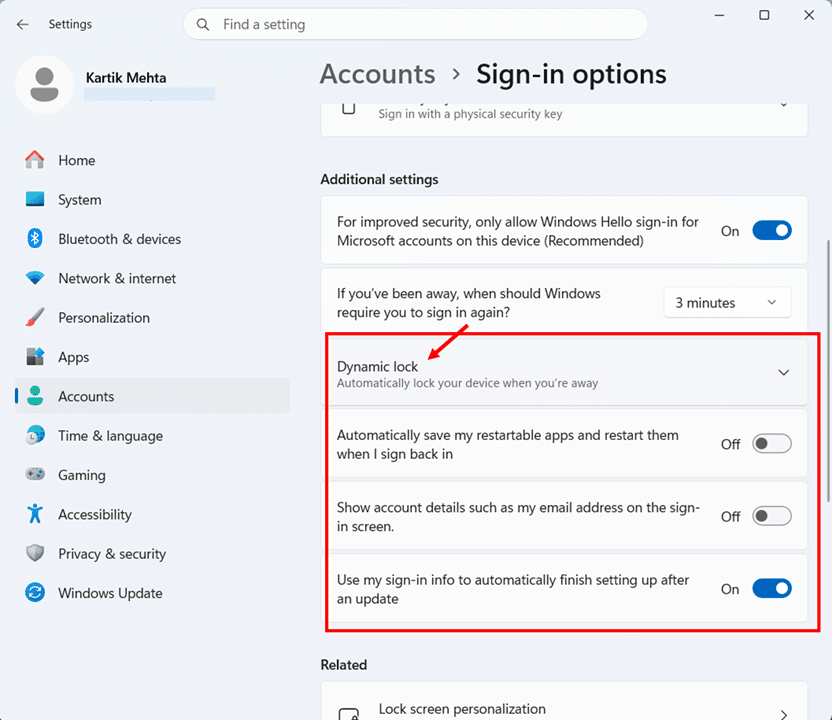
- Tick the Allow Windows to automatically lock your device when you’re away checkbox.
Windows now monitors your phone’s Bluetooth signal in the background.
Test it before you rely on it
- Take your phone and walk out of Bluetooth range, leaving your PC unlocked.
- Wait a minute or so, then return. Your PC should be sitting at the lock screen.
Security limitations to be aware of
- The lock requires two conditions together. The Bluetooth signal must fall below a set level, and the system must be idle. If someone is actively using your unlocked PC, it does not lock even after your phone goes out of range. Microsoft describes the feature as an additional barrier that does not replace locking manually, so Win + L remains the right habit when you consciously step away.
- Dynamic lock only locks. It does not unlock your PC when you return. You sign back in with Windows Hello or your PIN as usual.
- The feature depends on Bluetooth staying enabled on both devices and on your phone having battery. A dead phone means no automatic lock.
Important: The dropdown labelled If you’ve been away, when should Windows require you to sign in again on the same page is a separate setting. It controls when Windows asks you to sign in again after you have been away, and it does not set the Dynamic lock delay.
Treat Dynamic lock as a safety net for the times you forget, not a replacement for locking deliberately. As a free, built in second line of defence, it takes two minutes to set up and then never needs thinking about again.
Focus Sessions: Built In Deep Work Timer
Notifications, badges, and flashing taskbar icons all compete for your attention while you work. The answer Windows 11 ships is called Focus Sessions, a feature built into the Clock app.
Focus Sessions combines a Pomodoro style timer with automatic notification silencing. Start a session, and Windows turns on Do Not Disturb, hides taskbar badges, and stops apps flashing for attention, all at once. It works on every Windows 11 edition from version 22H2 onward, and no Microsoft account is needed for the core timer.
The fastest way to start Focus session
- Press Win + N to open the Notification Center, or click the date and time area in the bottom right corner of the taskbar.
- Locate the Focus section below the calendar pane and set your session length using the + and – buttons.
- Click Focus to start. The panel closes, and a focus timer appears in the top right corner of your desktop.
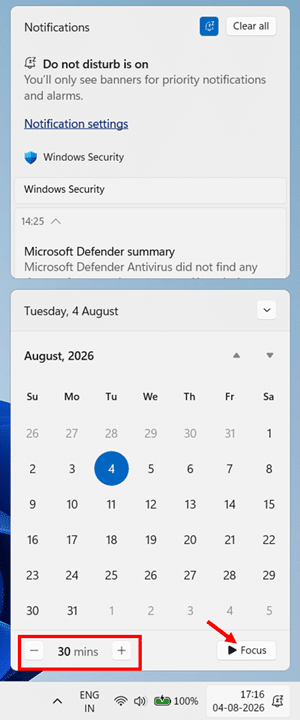
The whole flow takes you from keyboard shortcut to active session in under five seconds, which makes this the method to reach for between meetings.
Use Clock App for full configuration of Focus Session
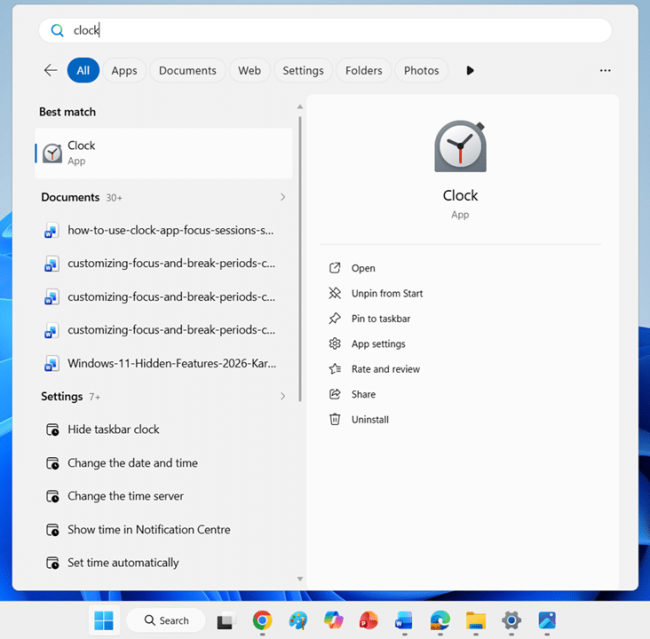
- Select Search from the taskbar, type Clock, and press Enter.
- Click the Focus sessions tab in the left sidebar. The screen shows your timer, daily progress, tasks, and an optional Spotify tile.
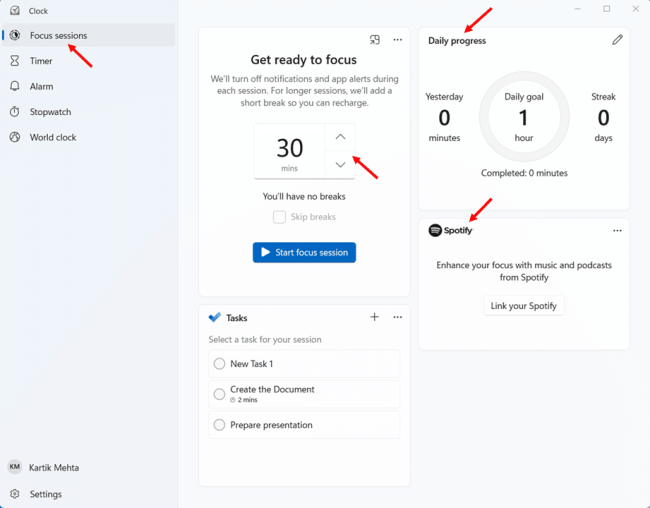
- Set a duration between 5 and 240 minutes, tick Skip breaks if you want one continuous block, and click Start focus session.
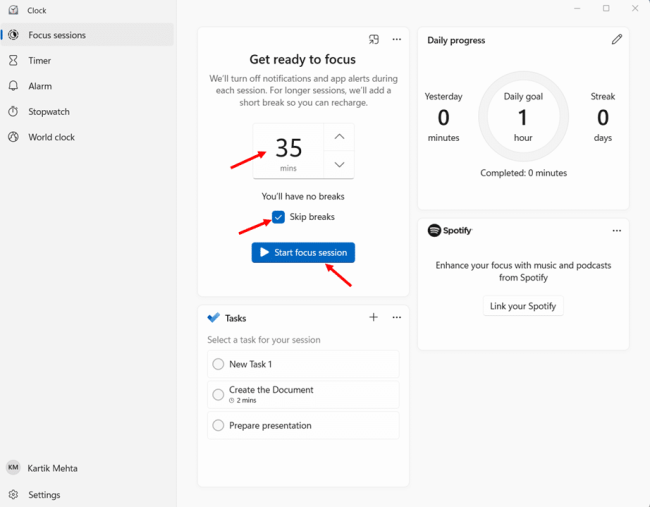
Leave breaks enabled, and Windows schedules them for you. A 45 minute session, for example, runs as two 20 minute focus blocks with a 5 minute break between them, while sessions of 30 minutes or less run straight through.
There is considerably more depth here than one section can hold. Our complete guide on how to use Focus Sessions in Windows 11 walks through all four launch methods, the Microsoft To Do integration, priority notifications for urgent messages, focus and break period customization, and fixes for the most common problems, including notifications that break through mid session.
Snipping Tool Text Extraction: Copy Text From Any Image
An error message arrives in a screenshot from a colleague, or a phone number sits in a photo. Text trapped inside images used to mean retyping it by hand or installing third party OCR software. The Snipping Tool now handles this natively, and most Windows 11 users have no idea it exists.
All text recognition processes run locally on your device. Nothing is uploaded anywhere, which matters when the image contains sensitive content. The feature appears in two places with two different names. It appears as Text extractor in the capture bar and as Scan text inside the Snipping Tool editor.
Extract a section of text from anything on screen.
This is the fastest route, and it copies only the text you select without creating a screenshot.
- Bring the text onto your screen. A webpage, an app window, or an opened image all work.
- Press Win + Shift + T to jump straight to the text extractor. Alternatively, press Win + Shift + S and select the Text extractor icon from the capture bar.
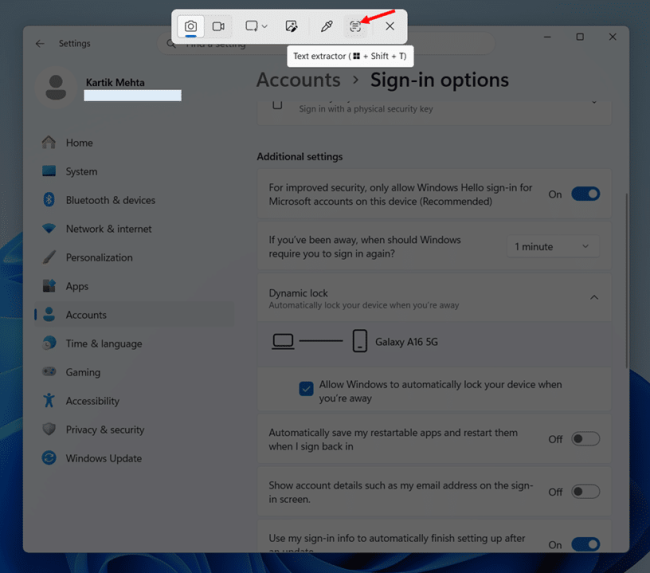
- Drag across the section containing the text you need. The tool recognizes the text in that region only.
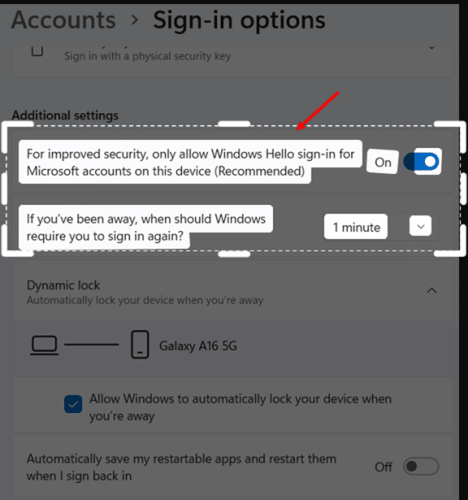
- Copy the recognized text and paste it anywhere text goes.
Scan a full capture inside the editor
For a snip already open in the Snipping Tool, or a saved image, the editor runs recognition across the whole capture.
- Select Start, type Snipping Tool, and open the app.
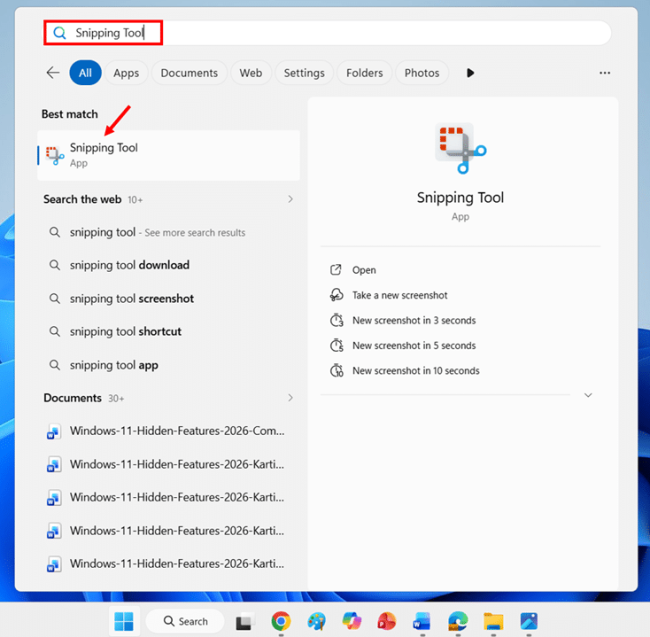
- Select the See more menu (the three dots in the top right corner of the app window), then select Open file and choose your image.
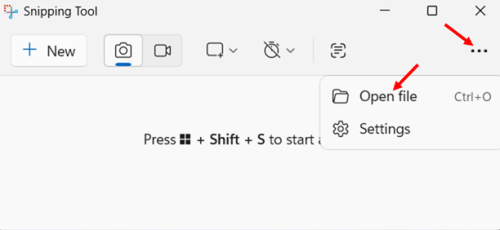
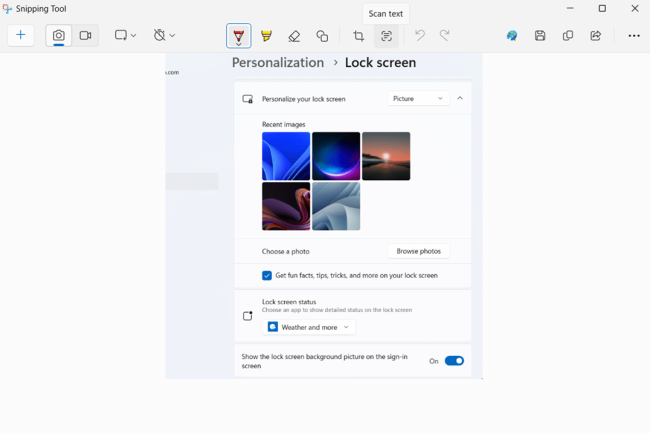
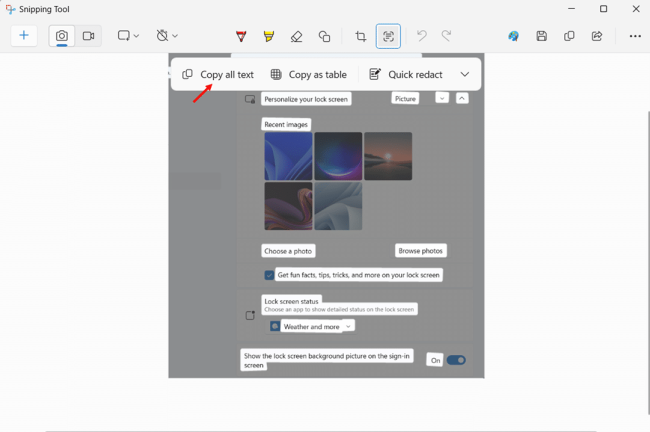
- Select the Scan text button. Every piece of recognized text in the capture is highlighted.
- Select Copy all text, paste the result into your document or Notepad, and keep the part you need.
Redact sensitive details before sharing
The editor’s recognition view includes a privacy tool built for anyone who shares screenshots at work.
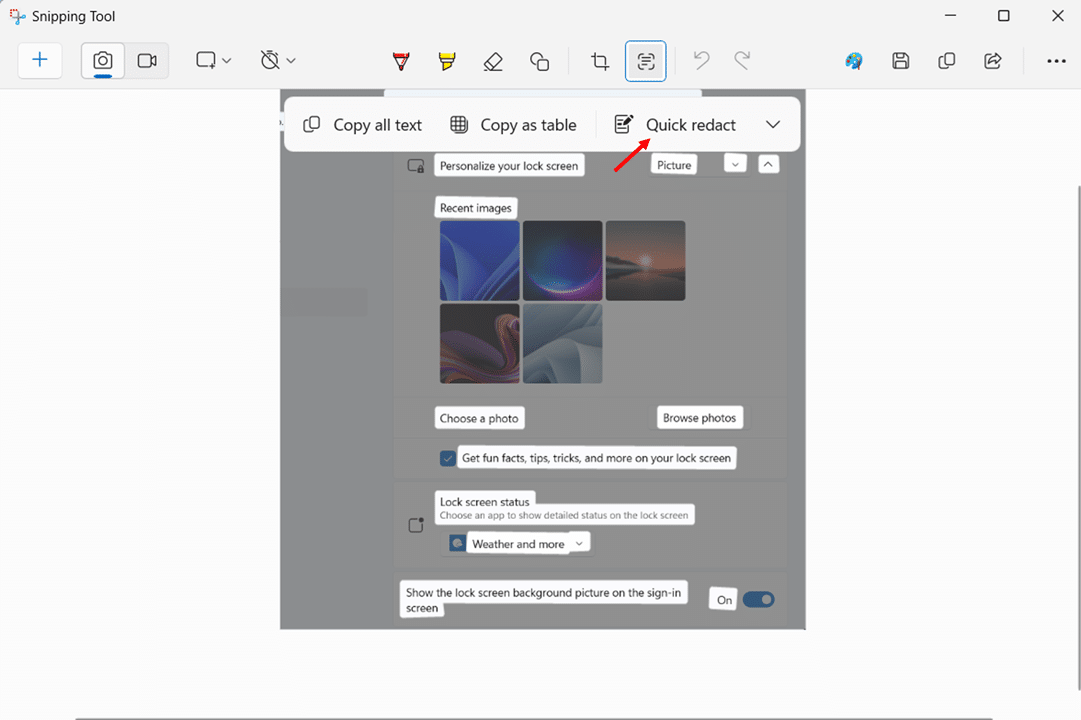
- Select Scan text on your captured snip.
- Select Quick redact. The tool automatically hides email addresses and phone numbers detected in the image, ready for safe sharing.
Snipping Tool Text Extraction Use Cases
- Error messages and system dialogs that block text selection go straight into a support ticket.
- Details from receipts, invoices, and scanned documents come across without retyping.
- Text from slides and shared screens can be captured during video calls.
- Anything visible in a paused video, a game, or an app interface that blocks copying becomes selectable text.
Text extraction is a Snipping Tool feature, and the Snipping Tool is one of the methods by which Windows 11 captures your screen. Our complete guide on how to take screenshot in Windows 11 covers all six capture methods, including the PrtScn key behaviour, the Snipping Tool’s delay timer, Xbox Game Bar captures, and automatic saving of your screenshots to OneDrive.
Storage Sense: Automatic Disk Cleanup You Configure Once
Temporary files, update leftovers, and a Recycle Bin nobody empties all build up over time. Disk space disappears quietly until an update fails or performance drops. Storage Sense is the Windows 11 feature that handles this maintenance for you. It is off by default, which is exactly why most PCs never benefit from it.
Turned on with default settings, Storage Sense runs when your device is low on disk space and cleans up unnecessary temporary files, and the Recycle Bin content is deleted after a set time. Your Downloads folder and OneDrive files are not touched unless you configure that yourself, so the defaults are safe.
Turn Storage Sense on and set the schedule
- Press Win + I to open Settings, select System, then select Storage.
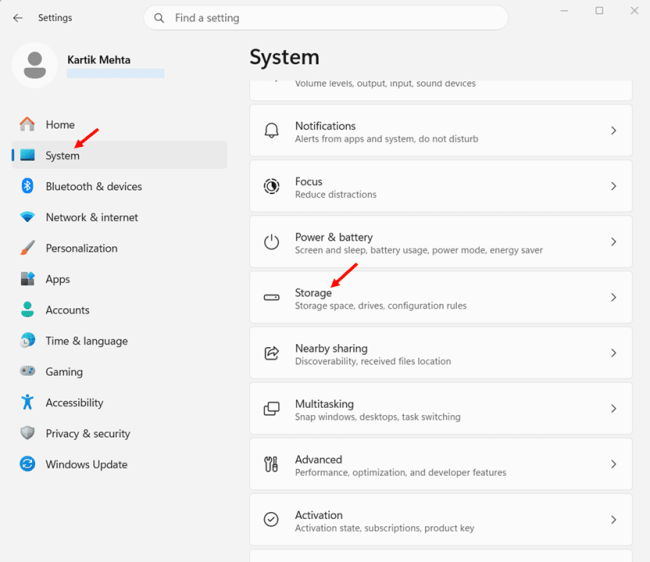
- Select Storage Sense under Storage management and turn on the Automatic User content cleanup toggle.
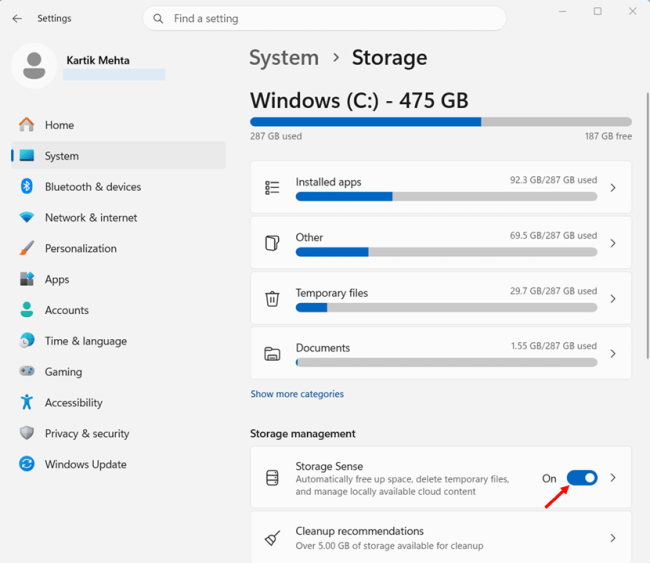
- Under Run Storage Sense, choose how often it runs: Every day, every week, every month, or during low free disk space.
- Set the Recycle Bin and Downloads timers to your preference. Each can delete files after they sit unused for a chosen period, or be set to never.
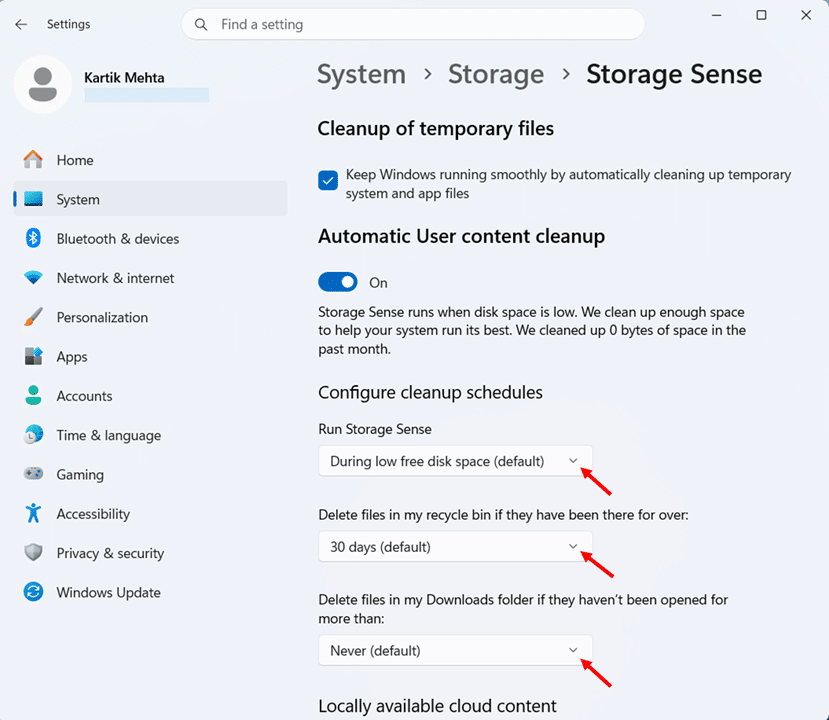
A monthly schedule with the Recycle Bin timer at 30 days suits most users. Leave the Downloads timer on never if that folder holds files you actually keep, since deleted means deleted.
Convert unopened OneDrive files to online-only copies
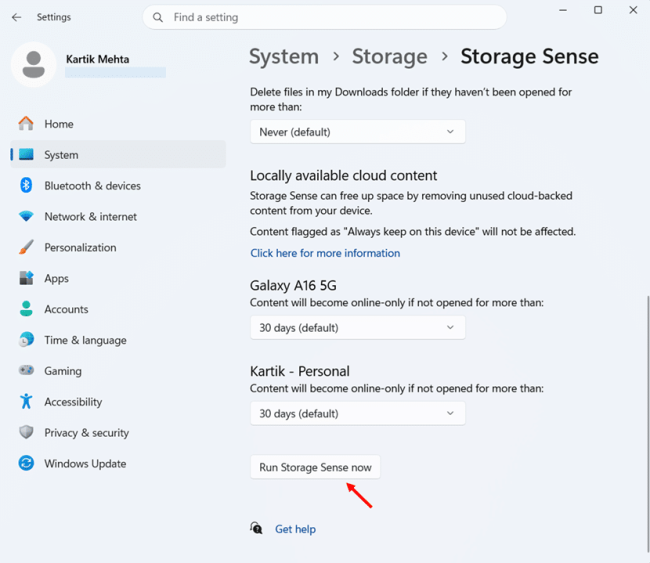
If you sign in with a cloud account, Storage Sense adds one more option worth knowing. Look for the setting labeled Content will become online-only if not opened for more than, which ends in a dropdown for your chosen period. Any OneDrive file that stays unopened for that long is converted to an online only copy. From Windows 11 version 22H2, the default for OneDrive cloud files is online only after 30 days unopened.
The copy stored on your local drive is removed, which is what frees the space, but the file itself is not deleted. It stays in OneDrive, remains visible in File Explorer with a cloud status icon, and downloads again the moment you open it. Anything marked Always keep on this device is exempt and never managed by Storage Sense.
Run a Storage Sense cleanup right now
- Open the Storage Sense page in Settings.
- Select Run Storage Sense now at the bottom of the page. Windows performs the cleanup with your configured rules and reports the space freed.
Important point worth knowing
- Storage Sense works only on your system drive, the drive where Windows is installed. For other drives, use View storage usage on other drives under More storage settings.
- If your PC hits low disk space and you have never interacted with Storage Sense, Windows may turn it on automatically to manage select temporary files, then notify you.
- For a one off manual review instead, Cleanup recommendations on the same Storage page lists temporary files, large or unused files, files synced to the cloud, and unused apps you can remove selectively.
- The legacy Disk Cleanup utility still exists, but Storage Sense covers the same ground automatically and adds the cloud content handling Disk Cleanup never had.
Reclaiming disk space is one part of keeping a machine responsive. Our complete guide on how to speed up Windows 11 covers the rest, from startup program management to visual effects tuning and the other built in performance tools.
God Mode Folder: Every Control Panel Setting in One Place
Windows 11 settings live in three different worlds. These are the modern Settings app, the legacy Control Panel, and a scattering of management consoles. Finding one specific option often means guessing which world it lives in. God Mode collapses all of it into a single folder.
The name comes from the community, not Microsoft. Technically, this is the Windows Master Control Panel shortcut, an All Tasks view that aggregates Control Panel applets, administrative tools, and settings into one browsable list. Creating it takes under a minute.
How to create the God Mode folder
- Right click an empty area of your desktop, select New, then select Folder.
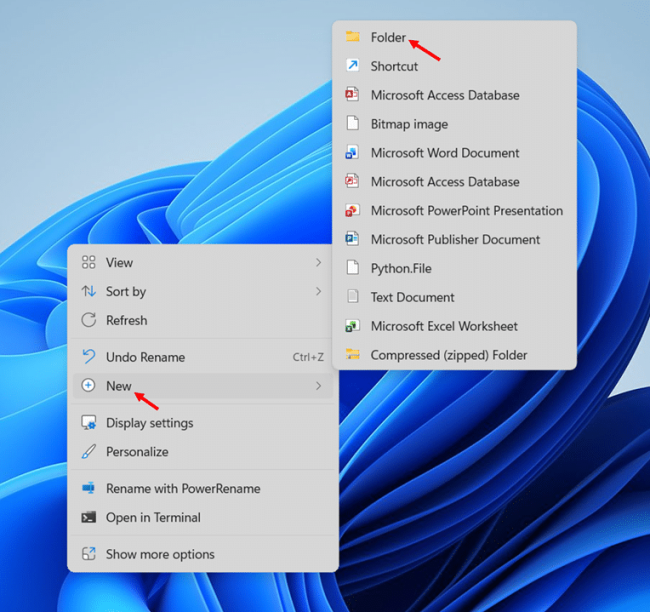
- Rename the folder to the following, exactly as written, including the full stop and curly brackets. Copying and pasting the string avoids typing errors.
GodMode.{ED7BA470-8E54-465E-825C-99712043E01C}
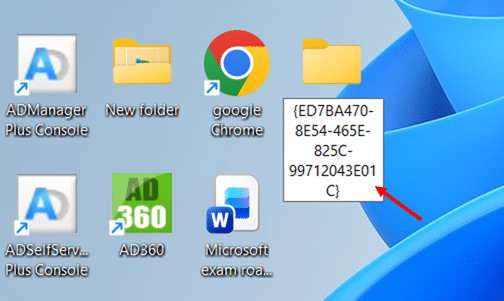
- Press Enter. The folder name disappears, and the icon changes to a Control Panel style icon. Double-click it to open the full settings list.
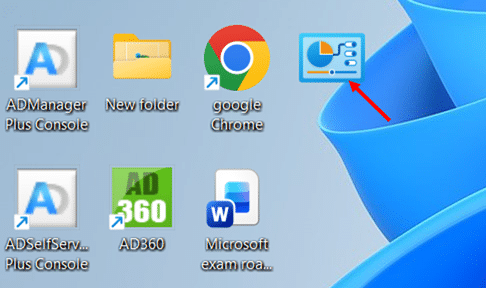
The word GodMode is not special. Any name before the full stop works, so AdminCenter or Toolbox produce the same result. The code in the curly brackets is what triggers the behavior.
How to use God Mode folder
- The list is grouped into collapsible categories. Click a category title to collapse or expand its entries.
- The File Explorer search box works inside the folder, so typing a keyword such as power or display instantly filters the list.
- Double-clicking any entry opens that settings page or utility directly.
- Individual entries can be dragged to your desktop as standalone shortcuts, turning buried tools like Device Manager or power plan options into one-click icons.
Important points worth knowing
- The list contains over 200 entries. XDA Developers counted 207 on their test PC and notes the total varies by Windows version and device.
- God Mode does not unlock anything hidden or bypass security. Every entry opens the same tool with the same permissions as its normal route, and UAC prompts still appear where required.
- Removing it is as simple as deleting the folder. Creating or deleting it only adds or removes the view, and nothing about your system changes.
For IT professionals and power users who still need legacy tools regularly, this single folder replaces a lot of clicking through nested menus. Create it once, pin the shortcuts you actually use, and delete it if it ever stops earning its desk space.
Point-in-time Restore: The 2026 Recovery Feature Nobody Knows Yet
A Windows update breaks a driver. An application install corrupts something. Yesterday everything worked, and today it does not. Point-in-time restore is Microsoft’s answer to exactly that situation, and it reached general availability for Windows 11 in June 2026, rolling out broadly with the July 2026 security update. Your PC may already be creating restore points without you knowing.
According to Microsoft’s announcement, Point-in-time Restore creates a local restore point automatically every 24 hours and keeps the most recent three points. Each restore point can include the Windows operating system, installed applications, system and app configurations, settings, and local user files. The inclusion of local user files is the key difference from the legacy System Restore, which does not include your personal files. Microsoft’s stated goal is recovery in minutes instead of hours.
Check whether Point-in-time Restore is already on
Microsoft enables the feature by default on Windows 11 Home devices and on Pro devices that are not domain joined or enterprise managed, provided the OS volume is 200 GB or larger. On smaller drives, it is off by default but can be turned on manually. It is available on version 24H2 and later across Home, Pro, and Enterprise editions.
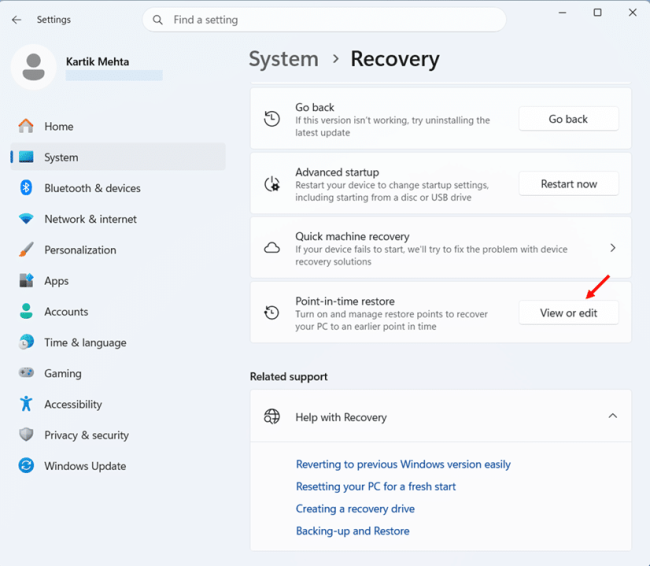
- Press Win + I to open Settings, select System, then select Recovery.
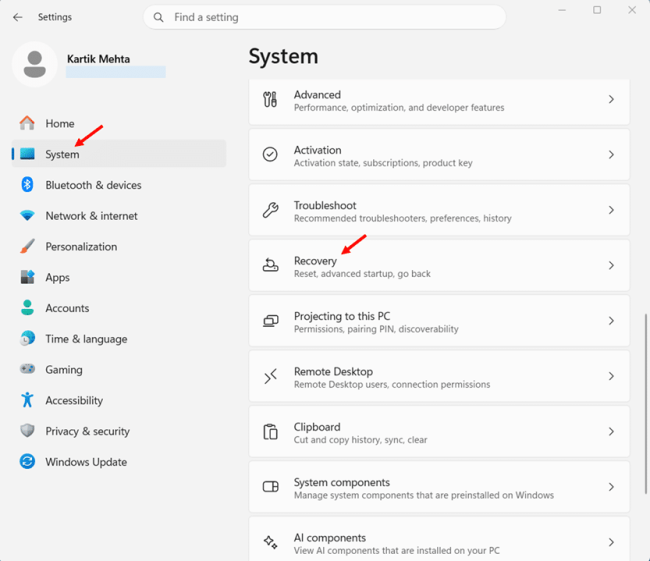
- Select View or edit next to Point-in-time restore.
How to restore when something breaks using Point-in-time Restore
Restores run from the Windows Recovery Environment rather than from inside Settings, which means the feature works even when Windows cannot boot normally.
- Boot into the Windows Recovery Environment. From a working desktop, go to Settings > System > Recovery and select Restart now under Advanced startup. An unbootable PC typically enters it automatically after failed startup attempts.
- Select Troubleshoot, then select Point-in-time restore.
- Enter your BitLocker recovery key if prompted, choose a restore point, and confirm. The PC rolls back to that captured state.
Important points worth knowing
- Anything created after the chosen restore point is lost in the rollback. Files, installed apps, and settings changes since that snapshot do not survive, so pick the most recent healthy point.
- Restore points reach back a maximum of 72 hours with the default three point, 24 hour cycle, and the schedule and retention are not user adjustable.
- Disk usage defaults to 2% of the drive, allocated dynamically rather than reserved up front. It can reach up to 50 GB on large drives.
- The legacy System Restore still exists alongside it, and Reset this PC remains the full reinstall option. Point-in-time restore sits between them, a complete state rollback without a rebuild.
Conclusion
This guide covered ten features with zero downloads and nothing to buy. Everything in it was already sitting on your Windows 11 PC before you started reading.
The productivity set alone changes daily work. Clipboard history ends lost copies, voice typing turns speech into first drafts, Snap Layouts organizes your screen, and Focus Sessions protects your attention. The security pair, Windows Sandbox and Dynamic Lock, adds real protection that most third-party tools cannot match at any price. Storage Sense keeps your disk clean without being asked. Text extraction pulls words out of any image, the God Mode folder puts two hundred settings in one place, and Point-in-time restore quietly guards your whole system every 24 hours.
Do not try to adopt all ten this week. Pick the one that solves a problem you actually have, set it up today, and let it become invisible. Then come back for the next one. That is how these features stop being hidden and start being habits.
Which hidden feature surprised you most? Tell me in the comments, and if you know one I missed, I want to hear about that too.
Frequently Asked Questions (FAQs)
Nine of the ten work on every Windows 11 edition. Windows Sandbox is the exception. It is included in the Pro, Enterprise, and Education editions and is not available on Home.
No. Only text syncs across devices. Copied images stay in the local history on the PC where you copied them, and each clipboard item is capped at 4 MB.
Point-in-time restore can include your local user files in each restore point, along with the operating system, installed applications, and settings. System Restore does not include your personal files. Both tools exist side by side in Windows 11.
No. Dynamic lock only locks. You sign back in with Windows Hello or your PIN as usual. The lock also requires two conditions to be met. The Bluetooth signal must fall below a set level, and the system must be idle.
No. Files that stay unopened beyond your chosen period become online-only copies. The copy on your local drive is removed to free space, but the file stays in OneDrive and downloads again the moment you open it.
No. Voice typing uses Microsoft’s online speech services, so an active internet connection and a working microphone are required. There is nothing to download or install.