
Is your Windows 11 computer running slower than usual? You’re not alone! Did you know that accumulated cache files can consume gigabytes of storage space and significantly impact your system’s performance? As someone who’s spent years helping users optimize their Windows systems, I can tell you that understanding cache management is one of the most effective ways to restore your computer’s performance and free up valuable storage space.
Cache files are temporary data stored by your operating system, browsers, and applications to enhance performance and speed up processes. However, over time, these files can accumulate and slow down your computer, rather than helping it. Don’t worry – clearing cache on Windows 11 is easier than you might think!
Whether you’re looking to speed up your computer’s performance, reclaim gigabytes of storage space, or fix stubborn application issues, you’ll find everything you need in this comprehensive guide. I’ll walk you through the fundamentals of Windows 11 cache systems, step-by-step instructions for clearing different types of cache using built-in tools, and advanced troubleshooting techniques for when things go wrong. You’ll also discover safe third-party alternatives and learn how to automate cache maintenance, ensuring your system stays clean without requiring constant manual intervention.
This isn’t about becoming a Windows expert – it’s about learning simple, effective techniques that keep your computer running smoothly. I’ve designed every section to be actionable, with clear step-by-step instructions that work whether you’re a beginner or an experienced user. By the time you finish this guide, you’ll have a reliable system for managing cache that takes just minutes per month, delivering noticeable improvements in speed and stability
For laptop users concerned about battery performance, explore my comprehensive guide on how to check battery health in Windows 11
Table of Contents
Understanding Cache Files in Windows 11
Think of cache files as your computer’s memory helpers – they’re like having a really efficient personal assistant who remembers everything you do frequently and keeps those things handy for quick access later. But just like any assistant, they sometimes need a good cleanup to stay organized and effective.
Every time you use your Windows 11 computer, whether you’re browsing the web, opening applications, or navigating through your files, your system constantly creates and stores temporary files called cache. These files are essentially snapshots of data that your computer thinks you might need again soon. Hence, it keeps them in easily accessible storage locations to speed up your next interaction.
What Are Cache Files and Why Do They Exist?
Cache files are temporary storage containers that hold copies of frequently accessed data to make your computer run faster and more efficiently. Cache files are temporary files created by the operating system and applications to store data that is frequently accessed. The primary purpose of cache files is to reduce the time it takes to retrieve data, thereby improving system performance.
Cache files are temporary storage containers that hold copies of frequently accessed data to make your computer run faster. Your Windows 11 system creates cache files to:
- Reduce loading times for applications and websites you visit frequently
- Minimize hard drive workload by keeping commonly used data readily available
- Preserve bandwidth by reducing repeated downloads from the internet
- Improve user experience by making familiar tasks feel instantaneous
The Different Types of Cache in Windows 11
Understanding the various types of cache files helps you make informed decisions about which ones to clear and when. Windows 11 maintains several distinct categories of cache, each serving specific purposes.
System Cache represents the backbone of your operating system’s efficiency. By default, Windows caches file data that is read from disks and written to disks. This implies that read operations read file data from an area in system memory, known as the system file cache, rather than from the physical disk. This system file cache acts as a buffer between your applications and your storage drives, keeping frequently accessed files readily available in memory for lightning-fast retrieval.
The browser cache stores elements from websites you visit – including images, scripts, stylesheets, and other web content. When you return to a website, your browser can load these cached elements locally instead of downloading them again from the internet. This is why familiar websites often load much faster on subsequent visits.
Application Cache consists of temporary files created by individual programs installed on your system. These might include recent document thumbnails, application preferences, or temporary working files that help programs launch faster and remember your settings.
DNS Cache maintains a local directory of domain name to IP address translations. When browsing the web or using an app that relies on an internet connection, the Windows 11 networking stack saves a copy of each domain name to IP address translation from the DNS feature in the local resolver cache, making subsequent connections faster. This prevents your computer from repeatedly looking up the same website addresses.
Location Cache stores information about your geographic location and location-based services. This enables apps that utilize location data to respond more quickly, providing a better user experience for navigation and location-aware applications.
How Cache Files Impact System Performance
When functioning correctly, cache files significantly boost performance. However, problems arise when cache files accumulate excessively or become corrupted. Over time, accumulated cache can consume gigabytes of storage space and slow down your system.
Warning signs of cache problems include:
- Websites displaying incorrectly or showing outdated content
- Applications crashing during startup or normal operation
- Slow system performance despite no other changes
Corrupted cache files can cause system instability, application conflicts, and unpredictable behavior. When websites update their content but your browser shows old cached versions, or when applications use outdated cached information, you experience the downside of cache accumulation.
The Benefits of Regular Cache Maintenance
Maintaining your cache files through regular cleanup provides multiple benefits for your Windows 11 system. The benefits of clearing your cache include: freeing up disk space, boosting overall system speed, minimizing the chance of running into file conflicts or errors, and improving application performance.
Regular cache maintenance helps ensure that your system continues to perform optimally over time. By removing outdated and unnecessary cache files, you prevent the accumulation of digital clutter that can slow down your computer’s performance. This proactive approach to system maintenance can extend the effective lifespan of your hardware and improve your overall computing experience.
How to Clear System Cache Using Built-in Windows Tools
Windows 11 comes equipped with several powerful built-in tools that make clearing system cache straightforward and safe. These native utilities are designed to work seamlessly with your operating system, ensuring that you can clean up your system without worrying about accidentally deleting important files or causing system instability.
Using the Windows Settings for Cache Cleanup in Windows 11
Windows 11’s Settings app includes a user-friendly interface for managing temporary files and cache. This modern approach provides clear visual feedback about what you’re deleting and how much space you’ll recover.
- Open the Settings app by pressing the Windows key + I on your keyboard simultaneously. This keyboard shortcut provides the fastest access to Windows Settings.
- Click on System in the left sidebar of the Settings window. You’ll see this option prominently displayed as the first item in the navigation menu.
- Select Storage from the right panel under the System settings. This section provides a visual breakdown of how your storage space is utilized across various categories.

- Click on Temporary files in the storage breakdown. Windows will automatically scan your system to identify temporary files that can be safely removed. This scan may take a few moments, depending on the number of temporary files that have accumulated.
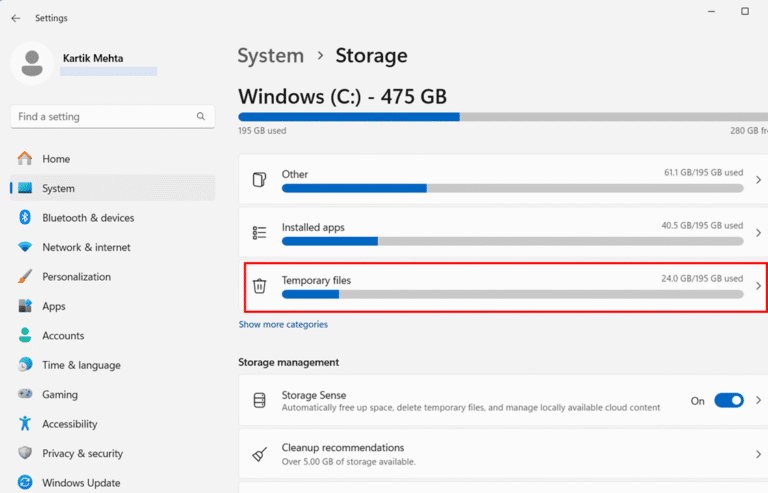
- Review the list of temporary file categories that appears after the scan completes. You’ll see options such as Temporary Files, Delivery Optimization Files, Thumbnails, Recycle Bin, and Downloads. Each category shows the amount of space it’s currently occupying.
- Check the boxes next to the file types you want to remove. Exercise caution with the Downloads category, as it may contain important files you’ve downloaded and want to keep. When you select items, the total amount of space to be freed is displayed at the top of the window.

- Click the Remove files button to initiate the cleanup process. Windows will display a confirmation dialog asking if you’re sure you want to delete these files permanently.

- Click Continue in the confirmation dialog to proceed with the deletion. The system will then remove the selected temporary files, and you’ll see a progress indicator showing the cleanup status.

Using Disk Cleanup for Comprehensive Cache Removal in Windows 11
Disk Cleanup is a classic Windows utility that has been refined over many years to provide thorough system cleaning capabilities. This tool offers more granular control over what gets deleted and can access deeper system cache files.
- Press the Windows key + S to open the Windows search function. Type Disk Cleanup in the search box and look for the Disk Cleanup app in the search results.
- Click Run as administrator when the Disk Cleanup option appears in the search results. Running with administrative privileges ensures the tool can access all system cache files, including those that require elevated permissions.

- Select the drive you want to clean from the dropdown menu in the Disk Cleanup dialog box. Typically, this will be your C: drive, where Windows is installed; however, you can clean other drives if needed.
- Click OK to confirm your drive selection. Disk Cleanup will now scan the selected drive to calculate the amount of space that can be freed up. This process may take several minutes on drives with lots of data.
- Review the file categories in the Files to Delete section once the scan completes. You’ll see options like Temporary files, Thumbnails, Temporary Internet Files, System error memory dump files, and Windows Update Cleanup. Each category includes a description explaining what these files are.

- Check the boxes next to the file types you want to remove. Focus on categories such as Temporary Files, Thumbnails, and Temporary Internet Files for the most significant impact on cache cleanup.
- Click OK at the bottom of the Disk Cleanup window to proceed with the selected deletions. The tool will display the total amount of disk space that will be freed.

- Click Delete Files in the confirmation dialog to finalize the cleanup process. Disk Cleanup will then remove the selected files and display a progress bar showing the cleanup status.

System File Cleanup Using Disk Cleanup in Windows 11
Note: If you opened Disk Cleanup without selecting Run as Administrator, follow the steps below to access additional cleanup options:
- Windows upgrade log files
- Downloaded Program Files
- Device driver packages
These options allow you to remove deeper system cache files, including old Windows installation files and system update remnants.
If you opened Disk Cleanup with Run as Administrator, these options will already be available, so you can skip the following steps.
- Launch Disk Cleanup without Run as Administrator
- Select your system drive again when prompted, typically the C: drive.
- Click the Clean up system files button located near the bottom of the Disk Cleanup window. This will relaunch Disk Cleanup with elevated privileges to access system-level cache files.

- Review the expanded list of file categories that appears after the system scan. You’ll now see additional options, such as Windows upgrade log files, Downloaded Program Files, and Device driver packages.
- Check the boxes for categories you want to clean. Click OK and then Delete Files to remove the selected system cache files. Be aware that deleting previous Windows installations prevents you from rolling back to an earlier version of Windows.

Setting Up Storage Sense for Automatic Cache Management in Windows 11
Storage Sense is Windows 11’s intelligent automatic cleanup feature that can manage cache files without requiring manual intervention. This feature runs in the background and cleans up cache files based on your configured preferences.
- Open Settings by pressing Windows key + I
- Click on System in the left sidebar of the Settings window. Select Storage from the right panel under the System settings.

- Locate the Storage Sense section under Storage management and toggle the switch to On

- Click on Storage Sense to access its configuration options. This opens a detailed settings page where you can customize how Storage Sense operates.

- Configure the Run Storage Sense dropdown menu to specify when automatic cleanup should occur. You can choose Every day, Every week, Every month, or During low free disk space based on your preferences.

- Set preferences for Delete files in my recycle bin if they have been there for over a certain period by selecting a timeframe like 1 day, 14 days, 30 days, or 60 days. This automatically empties your Recycle Bin after the specified period.

- Configure the Delete files in my Downloads folder setting if you want Storage Sense to automatically remove downloaded files that haven’t been opened recently. Use caution with this setting as it may delete important downloads.

- Check the box for Keep Windows running smoothly by automatically cleaning up temporary system and app files under the Cleanup of temporary files section. This ensures Storage Sense removes cache files during its regular maintenance routines.

- Click Run Storage Sense now if you want to immediately test your configuration and perform a cleanup with your new settings.

Windows 11’s built-in cache clearing tools provide comprehensive options for maintaining your system’s performance and storage efficiency. By regularly using these tools, either manually or through automated Storage Sense configuration, you can ensure your computer continues to run smoothly while maximizing available storage space. These native Windows tools offer the safest and most reliable approach to cache management, as they’re specifically designed to work with your operating system’s architecture and requirements.
Clearing Browser Cache in Windows 11
Clearing the browser cache is one of the most essential maintenance tasks for keeping your web browsing experience smooth and up-to-date. When websites act strangely, load slowly, or display outdated content, the culprit is often cached data that has become stale or corrupted. Windows 11 users have access to several popular browsers, each with its cache clearing process.
Understanding how to clear the cache in different browsers empowers you to troubleshoot web-related issues effectively and maintain optimal browsing performance.
Universal Keyboard Shortcut for Quick Cache Clearing in all Browsers
Before diving into browser-specific methods, there’s a universal keyboard shortcut that works across most major browsers in Windows 11. This shortcut provides the fastest way to access cache clearing options regardless of which browser you’re using.
- Press Ctrl + Shift + Delete simultaneously while your browser is open. This keyboard combination opens the browsing data deletion dialog in Chrome, Edge, Firefox, and most other browsers.
- Select the time range from the dropdown menu that appears. You can choose Last Hour, Last 24 Hours, Last 7 Days, or All Time, depending on how much cached data you want to remove.

- Check the box next to Cached images and files or Cached data, depending on your browser. This ensures you’re targeting the browser cache specifically.
- Click Clear Now or Delete Data to remove the selected cached content. The exact button text varies by browser, but the function remains the same.

Clearing Cache in Google Chrome
Google Chrome is the most popular browser worldwide, and it offers multiple ways to clear cached data. Chrome’s cache clearing interface is particularly user-friendly and provides excellent control over what gets deleted.
- Open Google Chrome by clicking its icon in your taskbar or searching for it in the Start menu.

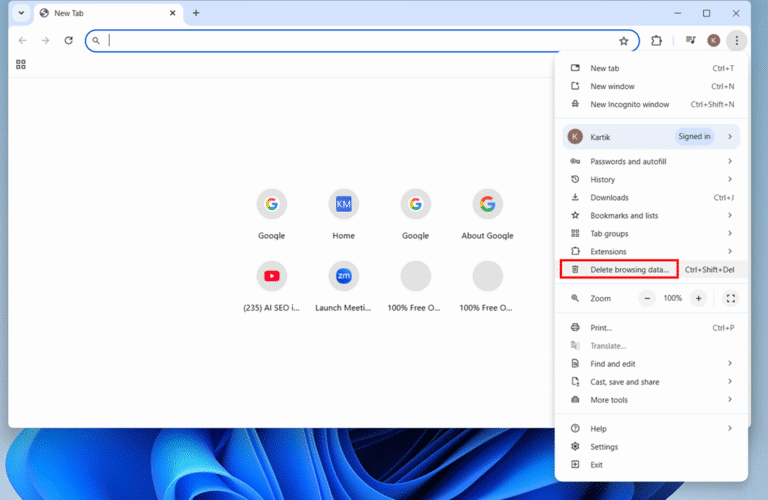
- Click the three-dot menu icon in the top-right corner of the Chrome window.
- Click the Delete browsing data from the menu. This opens Chrome’s dedicated cache and data clearing interface in a new tab.
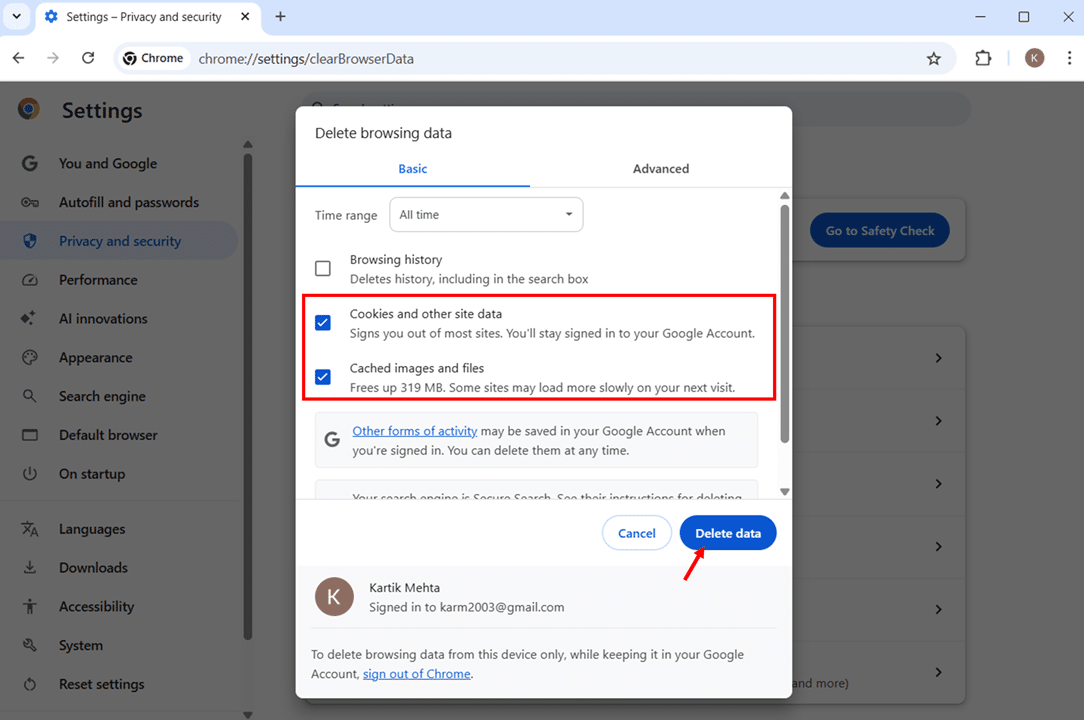
- Select the Basic tab if it’s not already selected. This tab shows the most commonly cleared data types and is sufficient for most cache clearing needs.
- Choose your preferred time range from the dropdown menu at the top. All time is recommended if you want to completely clear all cached data for maximum effect.
- Check the box next to Cached images and files. You can also select Cookies and other site data if you want to clear login sessions and stored website preferences.
- Click the Delete data button to initiate the cache clearing process. Chrome will display a brief progress indicator while removing the selected data.
- Wait for the process to complete, which typically takes a few seconds. Chrome will automatically refresh any open tabs to ensure they load with fresh data.
Clearing Cache in Microsoft Edge
Microsoft Edge is the default browser in Windows 11 and offers robust cache management features. Edge’s cache clearing process is designed to be intuitive while providing comprehensive control over browser data.
- Launch Microsoft Edge from your taskbar, desktop, or Start menu. Edge may be your default browser if you haven’t changed it after installing Windows 11.

- Click the three-dot menu button in the upper-right corner of the Edge window. This button is labeled “Settings and more” when you hover over it.

- Select Settings from the dropdown menu. This opens Edge’s comprehensive settings page, where you can manage all browser preferences and data.

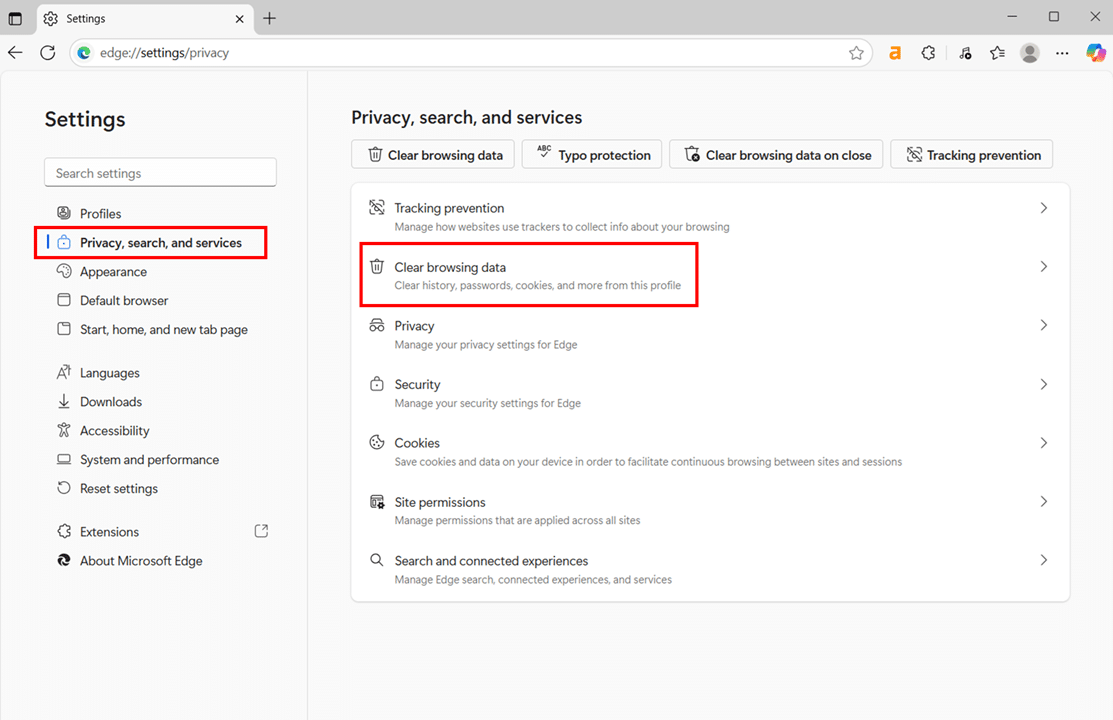
- Click Privacy, search, and services in the left sidebar of the Settings page. This section contains all privacy-related options, including cache management.
- Scroll down and locate Clear browsing data and click it
- Click Choose what to clear under the Clear browsing data section. This opens the Data Selection dialog, where you can specify exactly what to remove.
- Select your desired time range from the dropdown menu. All time provides the most thorough cleaning, while shorter periods preserve more recent data.

- Check the box next to Cached images and files. This is the primary cache data that affects website loading and display.
- Optionally select Cookies and other site data if you want to clear login sessions and website preferences along with the cache.
- Click Clear now to begin the cache clearing process. Edge will remove the selected data and may refresh open tabs to ensure they display current content.

Setting Up Automatic Cache Clearing in Browser
Microsoft Edge allow you to configure automatic cache clearing to maintain optimal performance without manual intervention.
Edge Automatic Clearing
- Open Edge and go to Settings > Privacy, search, and services.
- Click on Clear browsing data on close.

- Click Choose what to clear every time you close the browser.
- Select Cached images and files and any other data you want automatically cleared.
- Close and reopen Edge to test the automatic clearing functionality.
How to Clear App Cache and Microsoft Store Cache in Windows 11
Application cache and Microsoft Store cache can accumulate over time, causing apps to behave unpredictably, launch slowly, or fail to update properly. Unlike browser cache, app cache is stored in specific locations for each application and requires different approaches to clear effectively. Windows 11 provides several methods to manage both individual app cache and the Microsoft Store’s cache system.
Clearing Microsoft Store Cache Using WSReset
The Microsoft Store has a cache system that can become corrupted, resulting in issues with app downloads, updates, and overall Store functionality. Windows provides a built-in utility called WSReset, specifically designed to safely clear the Microsoft Store cache.
- Press Windows key + R to open the Run dialog box. This keyboard shortcut provides the fastest way to access the Run command interface.
- Type WSReset.exe in the Run dialog text field. This is the official Microsoft utility for clearing the Microsoft Store cache without affecting your installed apps or personal data.
- Click OK or press Enter to execute the command. You don’t need to run this as an administrator since it’s designed to work with standard user permissions.

- Wait for a blank Command Prompt window to appear. This window indicates that the cache clearing process is running in the background.
- Allow the Command Prompt window to close automatically. When the process completes, the window will disappear, and the Microsoft Store will open automatically.
- Check if the Microsoft Store opens properly and functions normally. You should be able to browse, search, and download apps without the previous issues you were experiencing.
Clearing Microsoft Store Cache Through Windows Settings
If you prefer using the graphical interface, you can also clear Microsoft Store cache through Windows Settings, which provides additional options for repairing or resetting the Store app.
- Press Windows key + I to open the Settings app. This opens the modern Windows Settings interface, where you can manage all system and app configurations.
- Click System in the left sidebar of the Settings window.
- Select System components from the right panel. This displays a comprehensive list of all core Windows system components

- Scroll down to find Microsoft Store in the list of installed apps. You can also use the search box at the top to quickly locate the Microsoft Store app.
- Click the three dots button next to Microsoft Store. This opens a context menu with additional options for managing the app.
- Select Advanced options from the dropdown menu. This opens the detailed management page for the Microsoft Store app.

- Click Terminate to stop any running Microsoft Store processes. This ensures that the app isn’t running when you attempt to clear its cache.
- Click Reset to clear all Microsoft Store cache and data. This option removes all cached data, login information, and app preferences.

- Click Reset again in the confirmation dialog to confirm the action. The Microsoft Store will be restored to its default state with all cache cleared.

Clearing Individual App Cache Through Windows Settings
Windows 11 allows you to clear the cache for individual Universal Windows Platform (UWP) apps through the Settings interface. This method works for apps downloaded from the Microsoft Store and some built-in Windows apps.
- Open the Settings app by pressing Windows key + I or clicking the Settings icon in the Start menu.
- Navigate to Apps in the left sidebar and select Installed apps from the right panel. This shows all applications currently installed on your system.

- Locate the app whose cache you want to clear. You can scroll through the list or use the search functionality to find specific apps quickly.
- Click the three dots button next to the app you want to manage. This reveals additional options for the selected application.
- Select Advanced options from the dropdown menu. Note that this option is only available for UWP apps and some Microsoft Store apps.

- Click Terminate to stop the app if it’s currently running. This ensures that the app isn’t active when you clear its cache.
- Click Reset in the Reset section to clear the app’s cache and data. This will remove all cached files, user preferences, and stored data for the application.

- Click Reset again in the confirmation dialog to confirm the action. The app will be restored to its default state as if it were newly installed.

Clearing App Cache Through Start Menu in Windows 11
For apps that don’t show advanced options in the Settings interface, you can access cache clearing options directly through the Start menu context menu.
- Click the Start button or press the Windows key to open the Start menu.
- Click All apps to view the complete list of installed applications on your system.

- Locate the app whose cache you want to clear in the alphabetical list of applications.
- Right-click on the app you want to manage. This opens a context menu with various options for the selected application.
- Select More from the context menu to reveal additional options. This expands the menu to show more management functions.
- Click App settings from the expanded menu. This opens the same advanced options page you can access through Settings.

- Follow the same steps as outlined in the previous method to terminate and reset the app’s cache.
Using PowerShell to Clear App Cache in Windows 11
PowerShell provides advanced users with command-line options for clearing the app cache, which can be useful for bulk operations or when the graphical interface is not functioning properly.
- Right-click the Start button and select Windows Terminal (Admin) from the context menu. This opens the Windows Terminal with administrator privileges.

- Select Windows PowerShell from the terminal tabs if it’s not already active. PowerShell provides the necessary cmdlets for app management.
- Type Get-AppxPackage | Select Name and press Enter to display all installed UWP apps. This command lists all UWP applications with their formal names.

- Locate the formal name of the app you want to reset from the list. Note the exact name as it appears in the output, as this will be needed for the reset command.
- Type Get-AppxPackage AppName | Reset-AppxPackage and press Enter. Replace “AppName” with the actual name of the app you want to reset.

- Wait for the command to complete. PowerShell will display progress information and confirm when the app has been successfully reset.
- Close the PowerShell window when finished. The app’s cache and data will be cleared, and you can launch the app to verify it’s working properly.
Third-Party Tools for Cache Management
While Windows 11 provides excellent built-in cache management tools, some users prefer third-party applications that offer additional features, more granular control, or automated maintenance capabilities. These tools can provide deeper cleaning options and often include features that go beyond simple cache clearing, such as registry optimization, startup management, and privacy protection.
However, it’s crucial to understand that third-party cache management tools should be used with caution. Always research any tool thoroughly, download only from official sources, and create system backups before using aggressive cleaning options.
CCleaner: The Most Popular Choice
CCleaner is arguably the most well-known third-party cache cleaning tool, offering both free and premium versions. While it has faced some security concerns in the past, it remains popular due to its comprehensive features and user-friendly interface.
Downloading and Installing CCleaner
- Open your web browser and navigate to the official CCleaner website at ccleaner.com. Always download from the official source to ensure you get a legitimate, unmodified version.
- Click the Free Download button for the free version, or select Professional if you prefer the premium features. The free version provides all basic cache cleaning functionality.
- Wait for the ccsetup.exe file to download to your Downloads folder. The installer is typically small, around 85 MB in size.
- Locate the downloaded ccsetup.exe file in your Downloads folder and double-click it to begin installation. Windows may display a security warning, which is normal for downloaded executables.
- Click Yes when prompted by User Account Control to allow the installer to make changes to your system. This permission is required for proper installation.
- Click Install to begin the installation process. The installer will extract files and configure CCleaner on your system.

- Wait for the installation to complete, then click Run CCleaner to launch the application. You can also access it later through the Start menu or by using a desktop shortcut.

Using CCleaner for Cache Management
- Alternatively, you can launch CCleaner from your desktop shortcut or Start menu.

- Click the Custom Clean tab for more detailed control over what gets cleaned. This option allows you to select specific cache types and cleaning options.
- Review the Applications section to select which program caches to clear. You can choose browser caches, media player caches, and other application-specific temporary files.

- Check the Windows section options to select system cache and temporary files. Common safe options include Temporary files, Thumbnails, and Memory Dumps.

- Click Analyze to scan your system and see what can be cleaned without actually removing anything. This preview helps you understand what will be deleted.
- Review the analysis results to ensure you’re comfortable with what will be removed. Pay special attention to items such as saved passwords or form data that you may want to retain.

- Click Run Cleaner to execute the cleaning process. CCleaner will remove the selected cache files and display a summary of freed space.

Conclusion
Your Windows 11 cache management skills are now solid. You’ve learned everything from basic temporary file cleanup to advanced troubleshooting techniques that solve stubborn cache corruption issues. The methods I’ve shown you – from Storage Sense automation to manual browser cache clearing – will keep your system performing at its best. Don’t overcomplicate this: Windows 11 handles most cache management automatically, and your job is simply to assist when needed.
Focus on prevention rather than cure. Set up Storage Sense to run automatically, clear your browser cache when websites misbehave, and use Disk Cleanup monthly to catch what automated tools miss. If you encounter problems, work through the troubleshooting steps systematically rather than jumping to drastic measures. Most cache issues can be resolved with basic steps, such as restarting applications or running them as an administrator.
You don’t need to become a cache management expert or use every tool I’ve mentioned. Pick the methods that match your comfort level and stick with them consistently. Whether that’s relying entirely on Windows’ built-in tools or adding a trusted third-party cleaner to your routine, consistency beats complexity every time. Your computer will reward regular, simple maintenance with better performance and fewer headaches than sporadic, aggressive cleaning sessions ever could.
Having trouble changing file formats in Windows 11? Check out my detailed guide on How to Change File Type in Windows 11 with multiple methods, complete with screenshots and step-by-step instructions.
Frequently Asked Questions (FAQs)
Clear browser cache weekly if you’re a heavy internet user, monthly for casual browsing. Run Disk Cleanup monthly and let Storage Sense handle automatic daily cleanup.
Cache files are locked by running applications. Close all programs or restart your computer before clearing the cache.
Files may be locked by hidden processes, have corrupted permissions, or be protected by antivirus software. Try clearing the cache in Safe Mode and disabling antivirus temporarily before clearing the cache.
This is normal. Applications recreate cache files as you use them. The goal is regular maintenance, not permanent elimination.
