
Have you ever needed to quickly capture what’s on your Windows 11 screen, whether it’s an error message, an important conversation, or something you want to save for later? Do not worry, in this comprehensive guide, I will show how to screenshot on Windows 11 using six different methods. From convenient keyboard shortcuts to utilizing built-in tools, we will cover every viable approach that transform how you capture your screen.
With the latest Windows 11 update, capturing your screen has become simpler and more efficient, boasting several enhancements and new features compared to its predecessor, Windows 10.
Whether you’re helping IT support to diagnose a problem, documenting a process for your team, or just wanting to save something interesting you found online, this guide will ensure you know exactly which screenshot method to use
Table of Contents
How to Take Screenshot on Windows 11 Using PrtScn Key or Win+Shift+S Shortcut
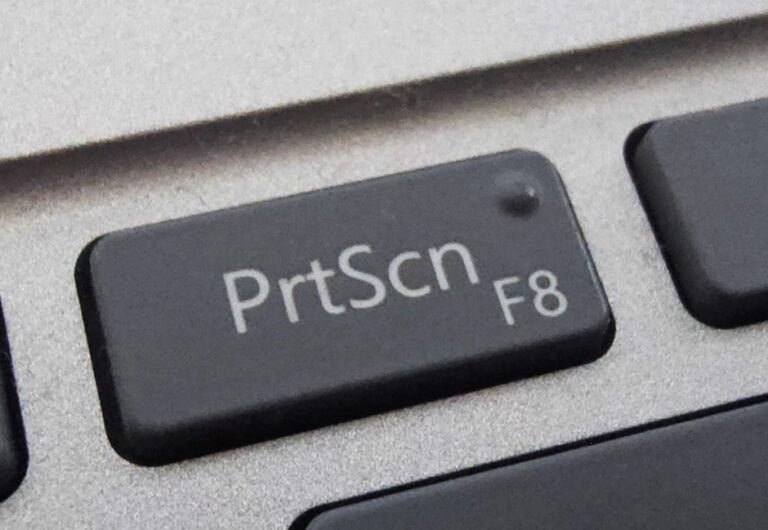
The PrintScreen key (PrtScn) is like your digital camera button, capturing everything on your screen. It’s the simplest way to take a screenshot in Windows 11. In the past, pressing PrtScn would quietly save your screen image. But with the recent KB5025310 update, this key now opens the Snip pop up, giving you more snipping power.
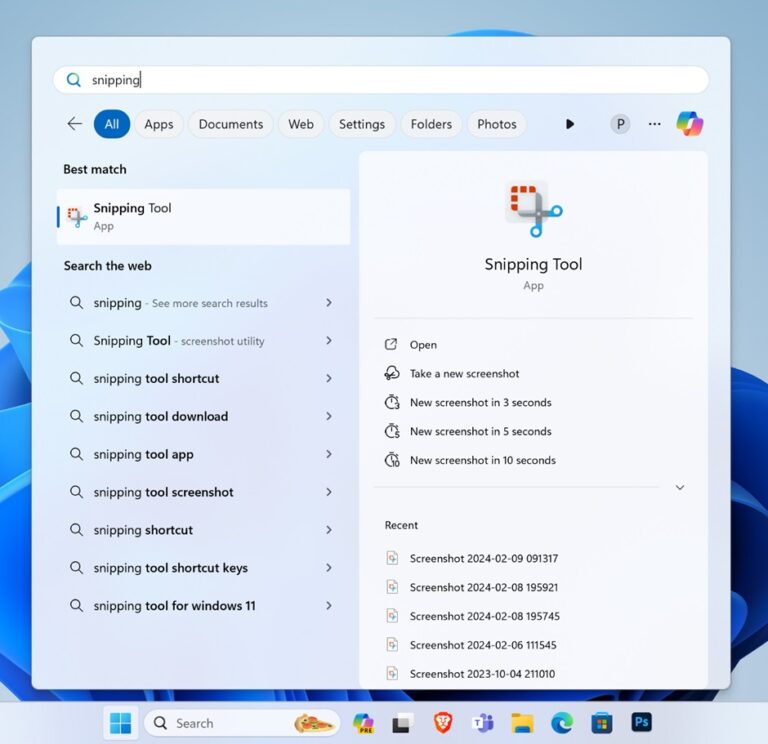
To capture your screen, find the PrtScn key on your keyboard and press it. If it doesn’t work, you can also use the Win + Shift + S shortcut to open the Snipping Tool modes window.
If the popup doesn’t appear by pressing the PrtScn key, you must check if you have enabled the option. For this:
- Open Windows 11 Settings by pressing the Windows Key + I shortcut on your keyboard.
- Go to “Accessibility” from the left pane and select the “Keyboard” option from the right afterward.
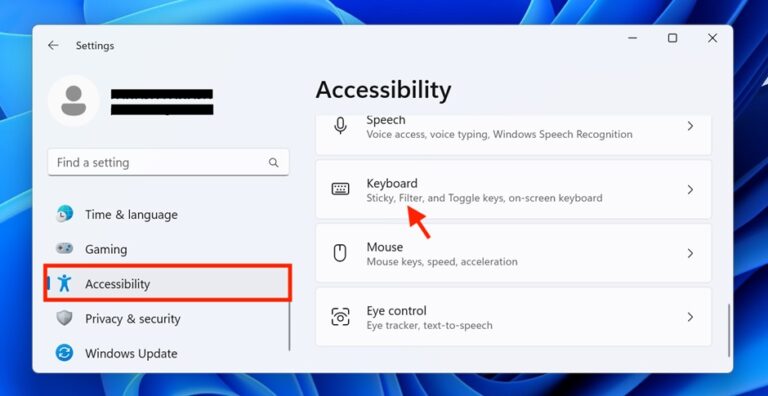
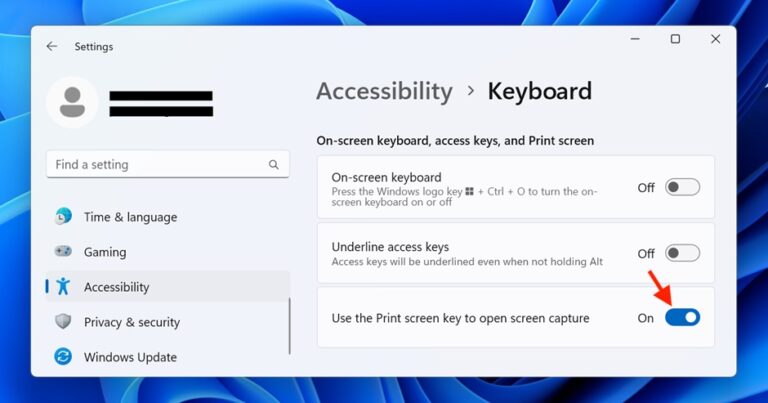
- Finally, look for the option saying “Use the Print Screen button to open screen snipping” or “Use the Print Screen button to open Snipping Tool” and toggle its switch to “On.“
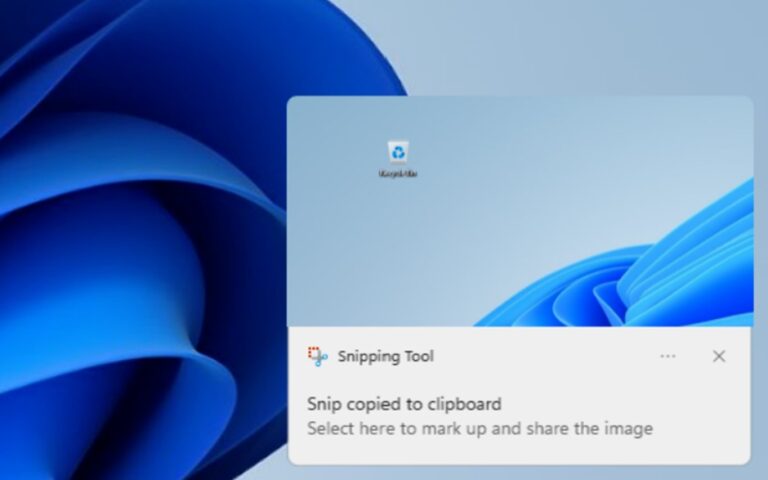
Now, press the PrtScn key, and the popup should appear. Once the popup appears, follow the below steps to capture a screenshot:
- In the Snipping Tool popup, four different types of modes will appear. Select one at your convenience. The Snipping modes are as follows:
- Free-form: This mode lets you take screenshots in whichever freeform snip shape you draw using the mouse. It is a freehand selection tool to take screenshots.
- Rectangular: This lets you capture your desired screen content in a rectangular snip.
- Window: This lets you capture a window that you open.
- Full-screen: This lets you capture the entire screen from one corner to the other.

- Once you’ve chosen the snip type, your screen will fade. Click and drag to select the area you want to capture or select the Window you want to capture (if you have chosen the Window Snip mode).

- Once you have captured the screenshot, a notification will pop up, showing the screenshot you have captured. Click on it to preview it.
- Now, click on the “Save” icon (floppy disk icon) to save your screenshot to a location of your choice on your computer.

- Finally, name the screen, select the location where you want to save the screenshot, and click the “Save” button.

- You can also paste the captured screenshot, as once snipped by the Snipping Tool, it gets automatically copied to the Windows 11 clipboard.
How to Take Screenshot on Windows 11 Using Snipping Tool
The Shipping tool is the built-in power tool for screenshot purposes. Yes, it’s the same snipping tool that we used in the previous PrintScreen method, but there is a difference. The PrtScn key shortcut directly opened the Snip popup and did not greet us with customization options.
Here’s how to open and use the Snipping tool dedicatedly on your Windows 11 PC to take screenshots:
- Press the Window key, search for Snipping Tool, and open it from the search results.
- Next to the “+” icon, make sure the toggle is set to the screenshot icon (the icon on the left) and not to the screen recording icon (the icon on the right), and click on the “New” button to capture the screenshot.
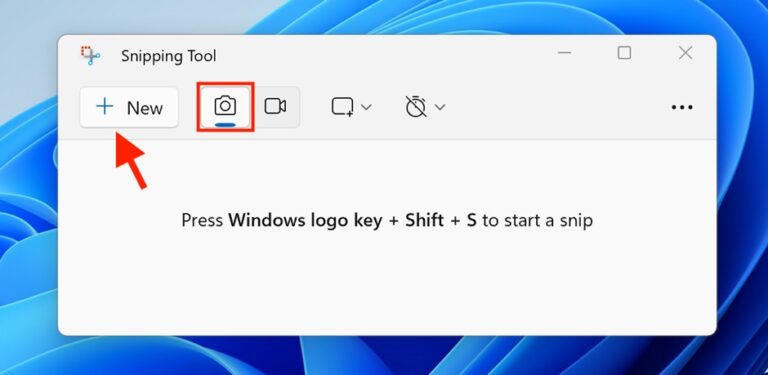
- Doing so will open up the Snipping popup with four different snipping modes that we saw in the previous PrntScrn method. i.e., Free-form mode, Rectangular mode, Window mode, and Full-screen mode.

- After capturing the screenshot, the snipping tool will preview your screenshot. Locate and click on the “Save” icon, represented by a floppy disk, to save your screenshot.
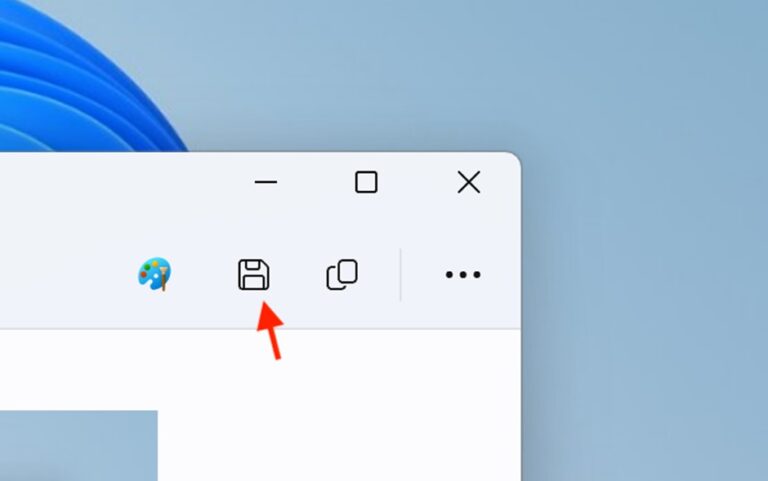
- Upon clicking the “Save” icon, you’ll be prompted to name the screenshot and choose the desired save location. Once done, click the “Save” button to confirm.

Adding Delay Timer in Snipping tool
Adding a delay timer will help you when you need a moment to set up your screen before capturing the screenshot. Here’s how it’s done in the Snipping Tool app:
- Open the Snipping tool app, and after ensuring that the toggle is switched to screenshot and not screen recording, click on the “Delay Snip” clock icon.
- A drop-down menu with several delay options will appear. Click and select the one of your choice.
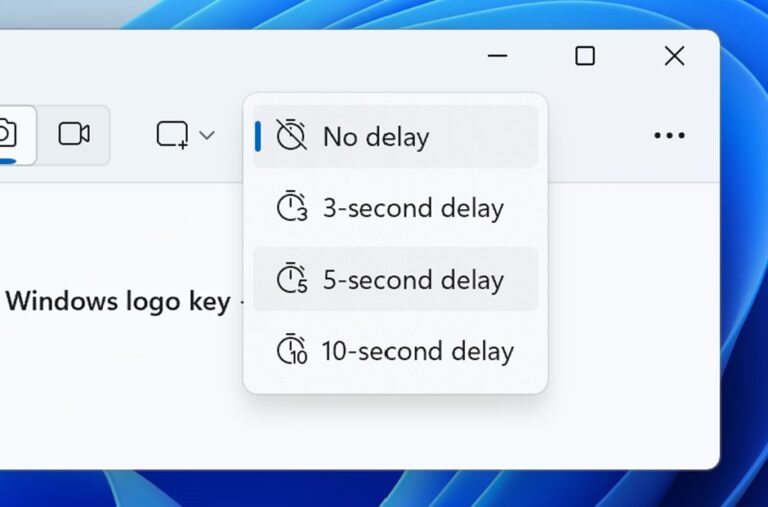
And now, when you click on the “+” icon to capture a screenshot, the set timer will delay the snipping popup.
How to Take Screenshot on Windows 11 Using Xbox Game Bar
The Xbox Game Bar isn’t just for gamers! It’s a handy tool for capturing screenshots on Windows 11. Here’s how to use it:
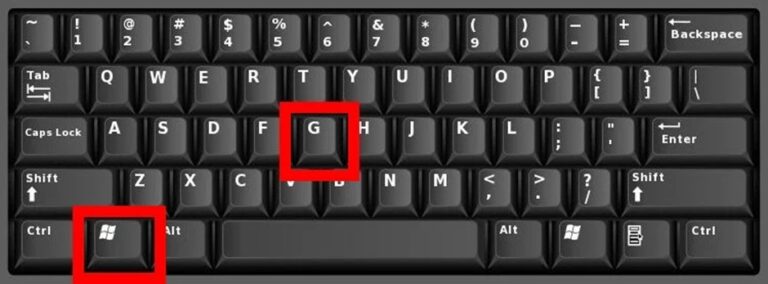
- Open the Xbox Game Bar by pressing your keyboard’s Windows Key + G key combination.
- Once the Game Bar is open, click on the Capture icon (camera icon) or use the keyboard shortcut Win + Alt + PrtScn keyboard shortcut.
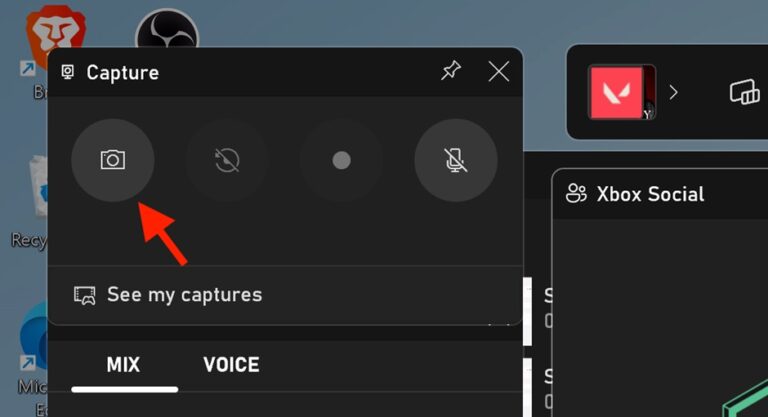
- Your whole screen will flash momentarily, indicating that the screenshot has been captured. You’ll also get a notification saying, “Screenshot saved.” This will capture a full-screen screenshot of your display.

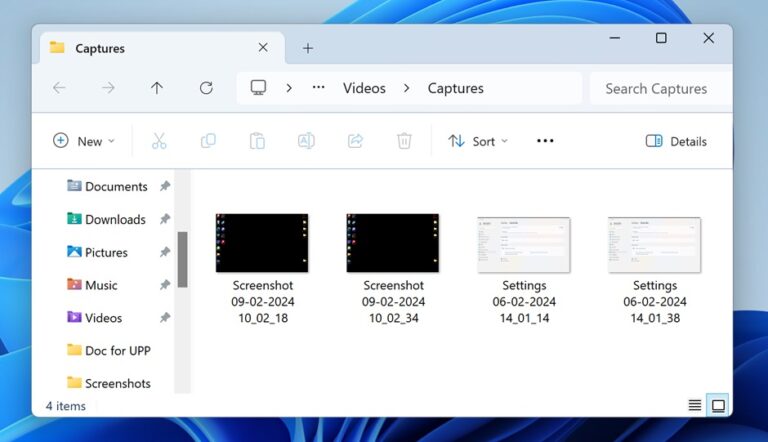
- To access the saved screenshot, open the File Explorer (Win + E) on your PC, go to Videos from the left pane, and then go to the Captures folder. This is where all your screenshots captured with Game Bar are saved.
Following these simple steps, you can quickly and easily capture screenshots using the Xbox Game Bar on your Windows 11 PC.
How to Take Screenshot on Windows 11 Using Win + PrtSrn Shortcut
Capturing your screen with the Windows key and PrtScn shortcut is as easy as pie. This shortcut is handy if you are looking for a quick way to capture a screenshot of your whole screen at once by pressing just a set of two keyboard keys.
Follow these simple steps to take a screenshot effortlessly:
- Simultaneously press the Windows key and the PrtScn key on your keyboard.
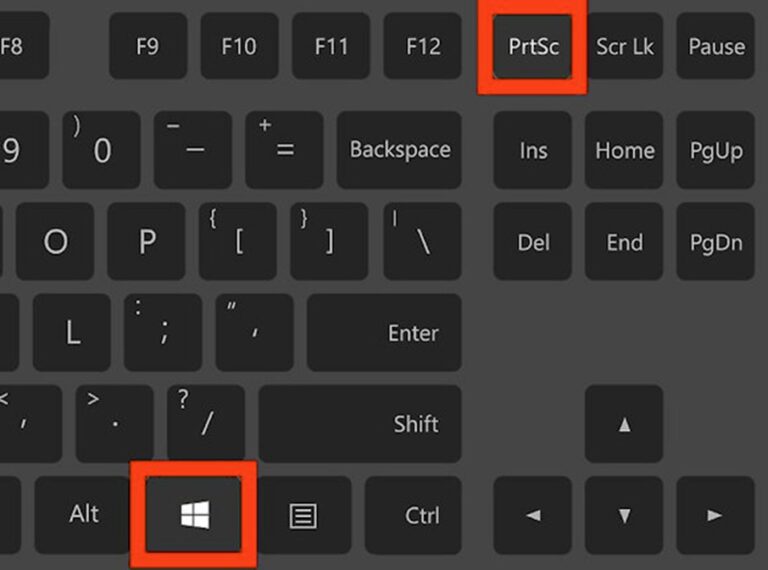
- You’ll notice your screen briefly dimming. This indicates that your screenshot has been successfully taken.
- Now, open the File Explorer and navigate to the Pictures folder on your PC. Inside, you’ll find the Screenshots folder. Your screenshot will be waiting for you there, ready to be viewed and shared.
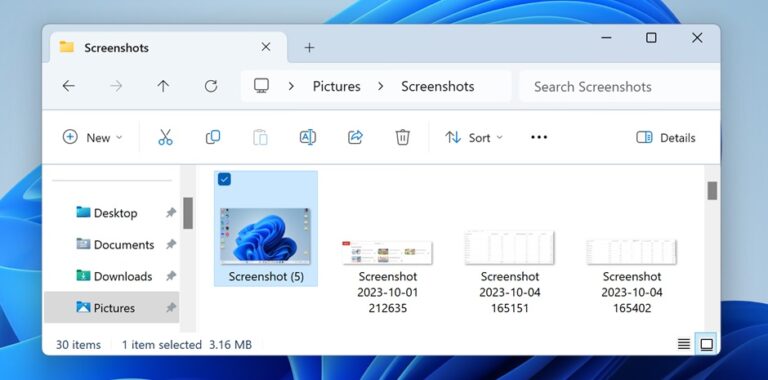
That’s it! You’ve just captured your screen using the Windows key and PrtScn shortcut. It’s quick, simple, and the perfect way to capture memorable moments on your Windows 11 device.
How to Take Screenshot on Windows 11 Using Alt + PrtScn Shortcut
When you’re focused on a particular window and want to capture it quickly, the Alt + PrtScn shortcut comes to your rescue. This method captures only the active Window instead of the entire screen, keeping things neat.
To capture Window using the Alt + PrtScn shortcut:
- Make sure the Window you want to capture is active and visible on your screen. This means it should be the one you’re currently working in or interacting with.
- With the desired Window in focus, press and hold the Alt key on your keyboard. While holding Alt, press the PrtScn (Print Screen) key. You’ll hear a faint sound or notice a brief screen flicker, indicating that the screenshot has been captured.
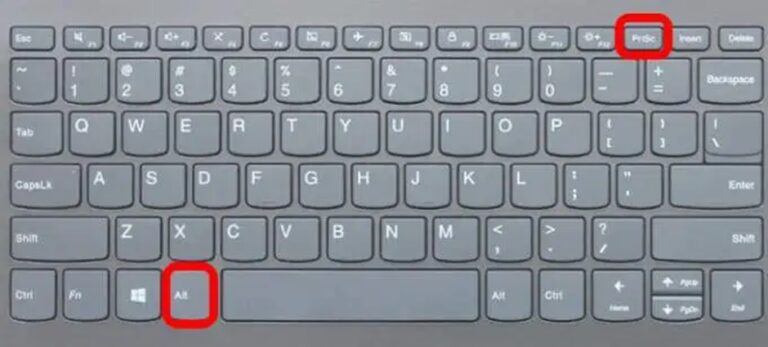
- Next, launch File Explorer and go to the Pictures folder located on your computer. Within this folder, you’ll spot the Screenshots folder. This is where you’ll see your captured screenshots.

And there you have it! You’ve successfully captured your active Window using the Alt key and PrtScn shortcut. It’s fast, straightforward, and ideal for preserving noteworthy moments on your Windows 11 device.
How to Take Screenshot on Windows 11 Using PrtScn key with OneDrive
OneDrive offers a convenient way to save your screenshots as image files in the cloud automatically. By enabling a simple setting, you can streamline the process and have your screenshots readily accessible from any device with internet access.
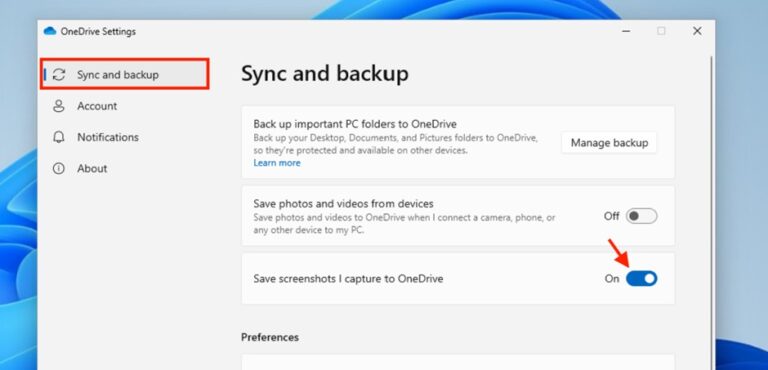
- Click or right-click on the OneDrive cloud icon on the right side of your taskbar and go to “Settings.“

- Switch to the “Sync & Backup” tab and toggle on the switch for the “Save Screenshots I capture to OneDrive” option. This setting transforms the way the PrtScn key works, eliminating the need for additional steps like opening an image app or pasting from the clipboard.
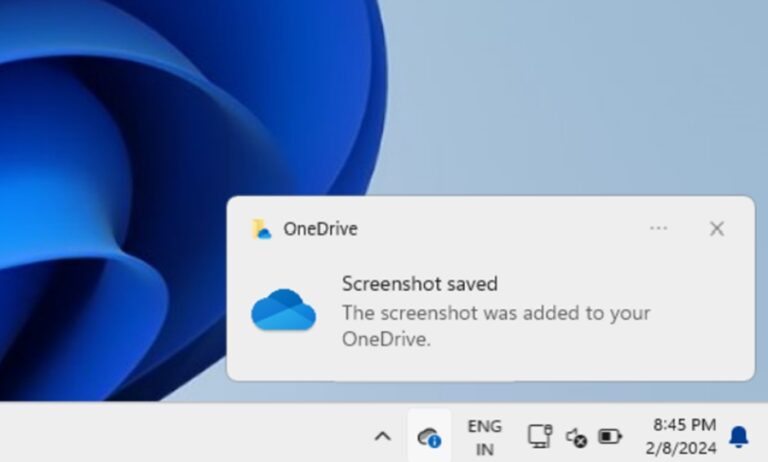
- Once you’ve enabled the OneDrive backup for screenshots, simply press the PrtScn, Win + PrtScn, or Alt + PrtScn on your keyboard to capture a screenshot.
- After capturing the screenshot, a notification will appear for the same. You can click on the notification to go to the location containing the screenshot directly.
Alternatively, you can also navigate to the following location, where your screenshots are automatically saved the image file as a PNG file:
- OneDrive/username/Pictures/Screenshots
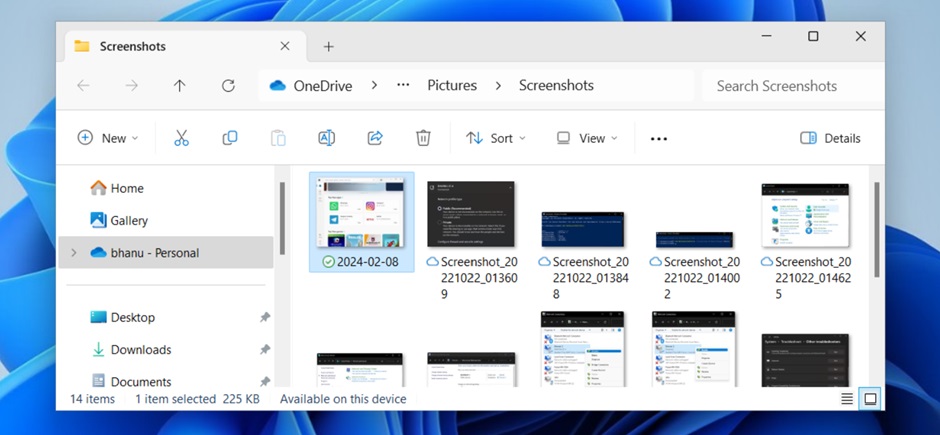
The benefit of this method is that you can access this file from any device with OneDrive installed, including desktop clients for major platforms and the web version.
Some Power Tips for Taking Screenshot on Windows 11
Here are some power tips to enhance your screenshot-taking experience on Windows 11:
- Utilize Time Delay Capture: Take advantage of features like delayed capture available in the Snipping Tool. This allows you to set a timer before the screenshot is taken, giving you time to prepare the screen as needed.
- Experiment with Editing Tools: After capturing a screenshot, don’t hesitate to explore the built-in Snipping Tool editing option. These editing options enable you to annotate, crop, and highlight areas of your screenshot, adding clarity and emphasis.
- Utilize Clipboard History: Take advantage of the clipboard history feature in Windows 11 to manage and access your screenshots easily. Once you’ve captured a screenshot, it’s automatically saved to your clipboard, allowing you to paste it into various applications or documents without the need to save it as a file immediately.
- Explore One Drive Integration: Leverage the cloud integration capabilities of Windows 11, such as OneDrive or other cloud storage services, to seamlessly sync your screenshots across devices. By saving your screenshots to the cloud, you can access them from anywhere, ensuring you never lose an important capture and facilitating effortless sharing with others.
Conclusion
Capturing screenshots on Windows 11 is a straightforward process with several options to choose from. Whether you prefer using the traditional Print Screen key, the Snipping Tool, or the more advanced features of Snip & Sketch and Game Bar, Windows 11 caters to various preferences.
Knowing these methods ensures you can do so quickly and effectively. So, next time you need to capture something on your screen, remember these handy tips and tricks to streamline the process and make it more convenient for yourself.
Frequently Asked Questions (FAQs)
Q1: How do you frame a screenshot in Windows 11?
Framing a screenshot on Windows 11 is simple. You can use the Snip & Sketch tool to select the area you want to capture or press Win + Shift + S to use the built-in snipping feature. Alternatively, use the Print Screen key (PrtScn) to capture the entire screen instantly.
Q2: What are the three most convenient ways to take a screenshot in Windows 11?
The three most convenient ways to take a screenshot in Windows 11 are using the keyboard shortcuts, such as Win + Shift + S for snipping, Win + PrtScn for full-screen capture, or Alt + PrtScn to capture the active Window. Additionally, you can use the Snip & Sketch tool for more advanced capturing options.
Q3: How do I access my PrtScn screenshots in Windows 11?
To access PrtScn screenshots, navigate to the Pictures folder on your PC using File Explorer. Now, locate the “Screenshots” subfolder where your PrtScn screenshots are automatically saved. You can view, edit, or share your screenshots from this folder.
Q4: How can I take a screenshot of a specific window in Windows 11?
To capture a screenshot of a desired window in Windows 11, make sure the Window you want to capture is active. Then, press Alt + Print Screen on your keyboard. This will capture only the active Window and copy it to the clipboard. Alternatively, you can summon the Snipping popup by pressing Ctrl + Shift + S or PrntScn key and selecting the Windows mode to take a screen of a selected window.
Q5: How do I take a screenshot on a Microsoft Surface device running Windows 11?
To take screenshots on Microsoft Surface tablets running Windows 11, press and hold the Windows Logo touch button located at the bottom of the screen, then press the physical volume-down button on the side of the tablet simultaneously. The screenshot will be automatically saved to the Pictures > Screenshots folder.
