
Are you tired of Windows 11 updates interrupting your workflow or causing unexpected issues on your system? If so, you’re not alone. Many users seek ways to gain more control over the update process in Windows 11. Whether you’re looking to temporarily put the updates on halt, prevent them permanently, or customize your update preferences, this guide will provide step-by-step instructions and valuable insights on how to stop Windows 11 update effectively.
By exploring various methods and understanding the implications of each approach, you’ll be empowered to manage Windows 11 updates according to your preferences and needs. Let’s dive into the details and take control of your update experience in Windows 11.
Table of Contents
How to Stop Windows 11 Update
Taking control of Windows 11 updates is crucial for many users, whether to avoid interruptions during important tasks or to manage system updates more effectively. From turning off Windows Update services to utilizing advanced tools like the Group Policy Editor, there are various methods to achieve this.
Method 1. Turn off Windows Update Service to Stop Windows 11 Update
Control Windows updates by disabling the Update service. Follow these steps to prevent automatic updates and regain control over your system’s update schedule.
- Click on the Start menu button or press the Windows key on your keyboard. Type “Services” into the search bar and press Enter. This will open the Windows Services application.

- In the Services window, look for “Windows Update” in the list of services. You can either scroll down manually or use the search box at the top to find it quickly.
Once you’ve located Windows Update, right-click on it and select “Properties.” This will open the Properties window for the Windows Update service.

- In the Properties window, you’ll see a drop-down menu next to “Startup type.” Click on this drop-down menu.
From the drop-down menu, select “Disabled.” This will prevent the service from starting automatically.

- After selecting “Disabled,” click the “OK” button at the bottom right corner of the Properties window to save the changes.

Finally, close the Services window and restart your Windows 11 computer for the changes to take effect.
If you ever want to re-enable the Update services, you can follow the same steps but choose “Automatic” or “Automatic (Delayed Start)” from the Startup type drop-down menu in Step 3.
Method 2. Stop Windows 11 Updates with Registry Editor
Use the Registry Editor to customize your Update settings and halt automatic updates. This method provides advanced control over update behaviors with a careful manipulation of registry entries.
- Press the Windows key + R key combination on your keyboard. This will open up the Run window.
In the Run Window, type “regedit” (without the quotes) and hit Enter to open Registry Editor.

- Here, you’ll see a tree-like structure on the left side. Navigate through the folders in the following order:
Computer\HKEY_LOCAL_MACHINE\SOFTWARE\Microsoft\Windows\WindowsUpdate
You can copy and paste the above address into the address bar of the window to reach the WindowsUpdate Registry entry directly.

- Tip: If you don’t see the WindowsUpdate folder in the tree structure, right-click on the Windows folder on the right, go to “New,” and choose “Key.”
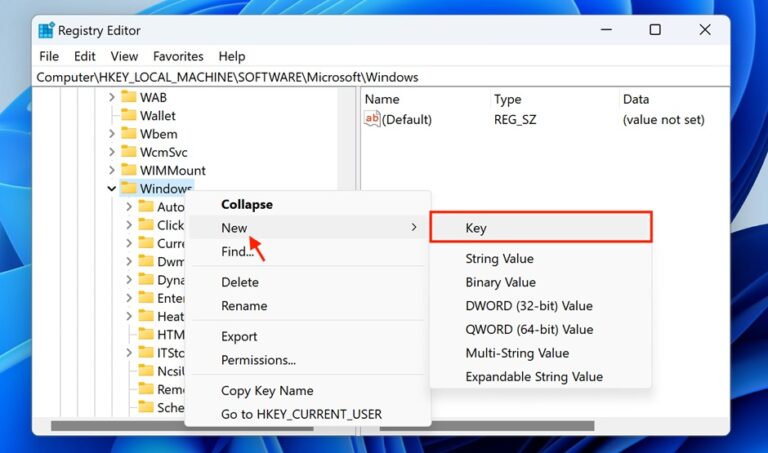
- You’ll see a new key under the Windows folder tree; name the newly created key “WindowsUpdate.”

- Once you’ve reached the “WindowsUpdate” folder, right-click anywhere in the empty space on the right side of the window. From the context menu, hover over “New” and then click on “DWORD (32-bit) Value.”
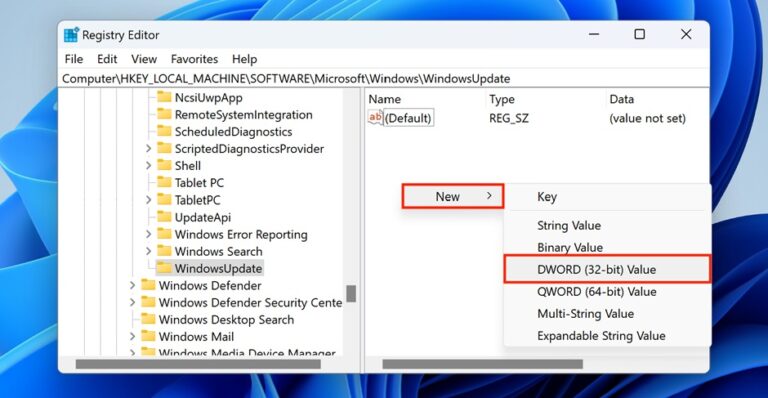
- A new dword 32 bit value will appear in the right pane. Give it the name “NoAutoUpdate” (without the quotes) and press Enter.
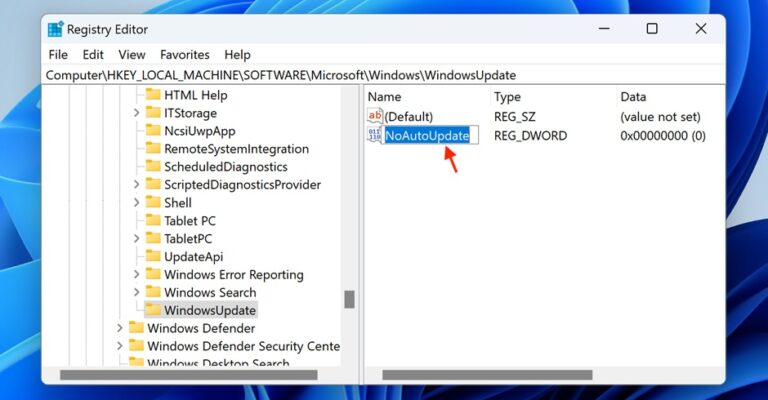
- Double-click on the “NoAutoUpdate” entry to modify its value. In the dialog box that opens, under “Value data,” enter “2” (without the quotes) and click OK. This value tells Windows to notify you about updates but not to download or install them automatically.

- To apply the changes you’ve made in the Registry Editor, restart your computer.
After completing these steps, your Windows 11 system will be configured to stop automatic updates.
If you ever want to revert to the changes, you can simply delete the “NoAutoUpdate” value you created and change its value data back to “0” or just delete it.
Note: Remember that modifying the Registry can affect system behavior, so proceed cautiously and follow the instructions closely.
Method 3. Stop Windows 11 Update with Command Prompt
Using the Windows Registry Editor is quite a hasslesome experience for you, so you can use the Windows Command Prompt instead. Just execute a line of command, and it will make the required changes in your Registry to stop the updates completely. Here’s how it is done:
- Look for the key on your keyboard with the Windows logo (usually located between the Ctrl and Alt keys). Press it once.
After pressing the Windows key, you’ll see a search bar appear. Type “cmd” into that search bar. This will open “Command Prompt,” a tool we’ll use. Open it by clicking the “Run as Administrator” on the right pane of the main search result.

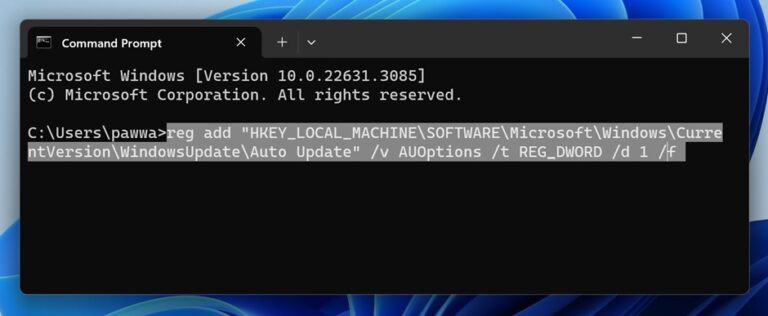
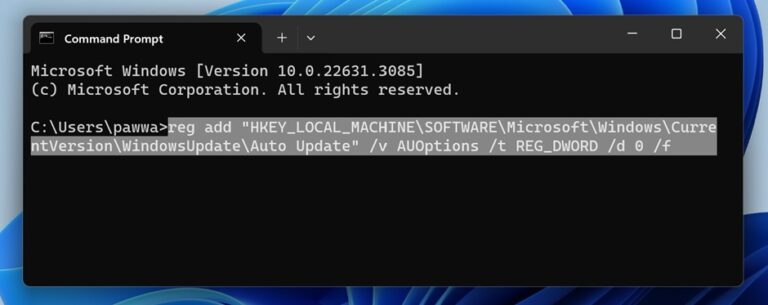
- In the Command Prompt window that opens. Type the following command exactly as shown and hit the Enter key to execute the command:
reg add “HKEY_LOCAL_MACHINE\SOFTWARE\Microsoft\Windows\CurrentVersion\WindowsUpdate\Auto Update” /v AUOptions /t REG_DWORD /d 1 /f
Executing the above command will stop the Automatic Updates on your Windows computer.
- If you want to re-enable the automatic updates, type the following command and press Enter:
reg add “HKEY_LOCAL_MACHINE\SOFTWARE\Microsoft\Windows\CurrentVersion\WindowsUpdate\Auto Update” /v AUOptions /t REG_DWORD /d 0 /f
This will set the update behavior to “0,” enabling the updates.
And that’s it! You’ve successfully used the Command Prompt to manage Windows Updates settings.
Method 4. Stop Windows 11 Updates for Every Week
One of the simplest ways to temporarily stop Windows 11 updates is by using the built-in pause feature. This method allows you to stop updates for a set period of one week, giving you control over when your system installs new updates. Here’s how it’s done:
- Begin by clicking on the Start menu icon at the bottom left corner of your screen. From the Start menu, click the gear icon labeled “Settings.” This will open the Windows 11 Settings app.
Alternatively, press the Windows Key + I keyboard shortcut to launch Windows 11 Settings.
- Within the Settings app, locate and click on the “Windows Update” option from the left pane.
- Here, under the More Options section, locate the “Pause updates” tile and click on the “Pause for one week” button.
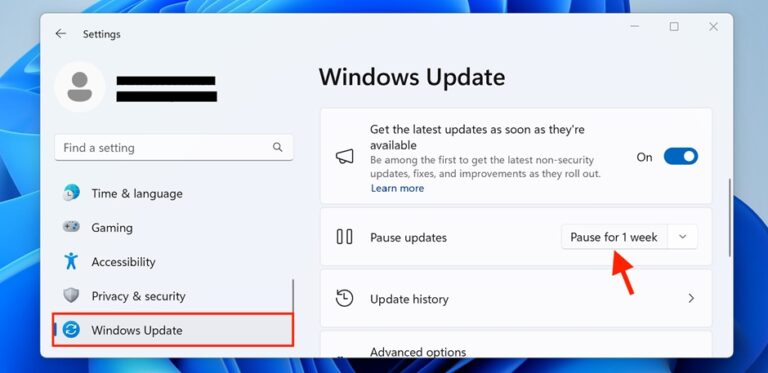
- Once done, close the Settings app. Your changes will be automatically saved, and Windows Update will be paused for seven days.
While you’ve paused updates, staying informed about any critical updates or security patches released by Microsoft is essential. Make sure to check for updates manually after the pause period ends.
Following these simple steps, you can easily pause Windows 11 updates for a week, giving you more control over when your system installs new updates. This feature is handy when you want to avoid interruptions during crucial tasks or ensure updates are installed at a more convenient time.
Method 5. Stop Windows 11 Update with Group Policy Editor
The Group Policy Editor, found on your computer, is a potent tool for making advanced adjustments to your Windows system settings. With this tool, you can effectively prevent Windows 11 updates. Here’s how to use it:
- Press the Windows key + R on your keyboard and open the Run window.
- Type gpedit.msc into the text field, press Enter, or click OK. This action will launch the Windows Group Policy Editor.

- In the Group Policy Editor window, navigate to the following location from the navigation in the left pane:
Computer Configuration\Administrative Templates\Windows Components\Windows Update
- On the right-hand side of the window, you’ll see various settings related to Windows Update. Look for the “Manage end user experience” setting and double-click on it. This will open a new window.
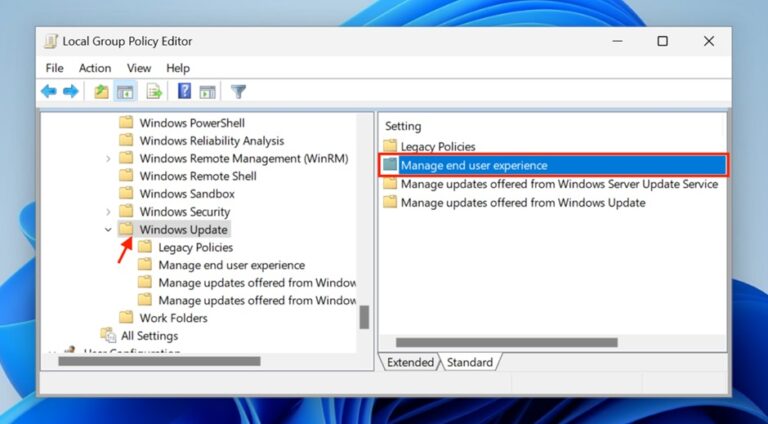
- In the Manage end user experience window, look for the “Configure Automatic Updates” Group Policy and double-click on it to configure it.

- You’ll find several options, such as Not Configured, Enabled, and Disabled. Select the Disabled option to block Windows 11 update and click OK to save your changes.

- Now, just reboot your PC to save the changes you made using the Group Policy Editor to block Windows 11 updates effectively.
Note: It’s important to note that this method is intended for advanced users and should be used with caution. Blocking updates may leave your system vulnerable to security threats, so weigh the risks before proceeding.
Method 6. Stop Windows 11 Update Using Metered Connection
In Windows 11, updates won’t be downloaded automatically when using metered connections. You have the option to establish a metered connection, which restricts automatic updates. Follow the steps below to configure this setting.
- Open the Windows Settings by pressing Win + I or searching for the same in the Windows Start Menu.
- In the Settings window, locate and click on the “Network & Internet” option from the left panel.
- Now, on the right side of the window, go to the “Properties” option. This will open up the properties of the Wi-Fi or Ethernet network connection
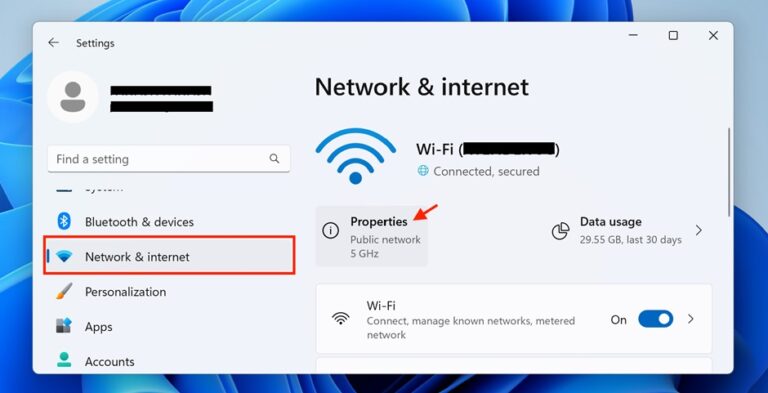
- Now, locate the Metered Connection option and toggle its switch to “off.”
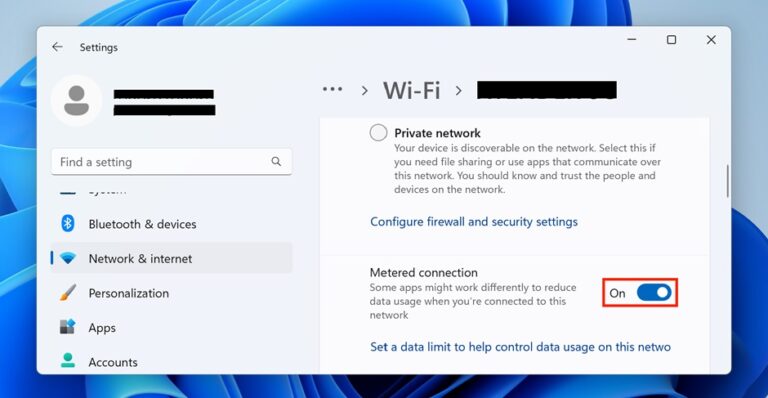
And that’s it. From now onwards, whenever you are connected to the network you have enabled metered connection, your Windows 11 PC will not download and install the available update. However, you can manually navigate the Windows Update option in Settings to look for and download the available update.
Conclusion
And with that said, here comes the end of this how-to guide. By following the step-by-step instructions for each method – turning off Update services, stopping updates with the Registry Editor, pausing updates for a week, and blocking Windows 11 updates with Group Policy Editor – users can tailor their update preferences to suit their needs.
However, it’s essential to proceed cautiously, especially when changing system settings or the Registry. Always ensure you understand the implications of your actions and consider the potential risks before implementing any changes. With careful execution, users can effectively manage Windows 11 updates and maintain control over their system’s functionality.
Frequently Asked Questions (FAQs)
Q1: How do I stop Windows 11 from updating?
To stop Windows 11 from updating, you can utilize various methods depending on your preferences and the level of control you want over the update process.
Some common methods include disabling Windows Update services, using the Registry Editor to modify update settings, pausing updates temporarily, or configuring advanced settings through the Group Policy Editor.
Each method offers different levels of control, allowing you to tailor your approach based on your specific needs.
Q2: Why does Windows 11 update so often?
Windows 11 updates frequently to ensure your system remains secure, stable, and up-to-date with the latest features and improvements. Regular updates help address security vulnerabilities, fix software bugs, and enhance performance, reliability, and compatibility with hardware and software.
Additionally, Microsoft continuously develops and releases new features and enhancements to improve the overall user experience and keep up with evolving technology trends.
Q3: How do I stop Windows 11 update permanently?
Stopping Windows 11 updates permanently is not recommended, as it can leave your system vulnerable to security threats and may result in compatibility issues with software and hardware.
However, if you choose to disable updates indefinitely, you can achieve this by modifying system settings using tools like the Group Policy Editor or the Registry Editor.
Remember that permanently disabling updates is not advisable for most users and should only be done by advanced users who understand the potential risks involved.
Q4: Can I disable Windows 11 updates temporarily?
Yes, you can disable Windows updates temporarily by utilizing built-in features like the “Pause updates” option in the Windows Update settings. This feature allows you to put the updates on hold for a specified period of 7 days, giving you temporary relief from update notifications and installations.
Pausing updates is useful when you need to avoid interruptions during critical tasks or want to schedule updates for a more convenient time.
Q5: What are the risks of stopping Windows 11 updates?
Stopping Windows 11 updates poses several risks, including leaving your system vulnerable to security threats, missing out on important bug fixes and performance enhancements, and encountering compatibility issues with software and hardware.
Additionally, disabling updates may result in reduced system stability and reliability over time, as updates often include essential patches and improvements to ensure optimal performance and security.
