Is your Windows 11 PC feeling a bit sluggish? You’re not alone. Many users find that their once-speedy computer starts to slow down over time. But don’t worry – with a few simple tweaks and tricks; you can breathe new life into your system and get it running like new again.
Windows 11, Microsoft’s latest operating system, brought a fresh look and exciting features to our desktops. However, like any complex software, it can sometimes struggle to meet our demands. Whether you’re a casual user or a power professional, a smooth, responsive system is crucial for productivity and an enjoyable computing experience.
This comprehensive guide will walk you through proven methods to speed up your Windows 11 PC. From quick fixes to more advanced techniques, we’ve got you covered.
By the end of this article, you’ll have a toolkit of strategies to enhance your Windows 11 experience. Stay tuned as we explore each optimization technique in detail. By the time we are done, you will be well-equipped to transform your sluggish PC into a high-performance workhorse. Let’s get started on your journey to a faster, more responsive Windows 11!
For more understanding on Windows 11 you can refer tips and tricks for Windows 11 and What’s new in Windows 11
Key Takeaways
- Update Windows and Drivers: Keeping your system and drivers up-to-date is crucial for optimal performance and security.
- Manage Startup Programs: Controlling what launches at startup can significantly reduce boot times and improve overall system responsiveness.
- Clean Up Your Disk: Regular disk cleanup, including using built-in tools like Disk Cleanup and Storage Sense, helps maintain free space and system efficiency.
- Optimize Visual Effects: Balancing visual appeal with performance by adjusting Windows 11’s visual effects can boost speed, especially on older hardware.
- Defragment and Optimize Drives: Regular drive optimization keeps your file system efficient, though remember that SSDs require different treatment than HDDs.
- Consider Hardware Upgrades: Strategic hardware upgrades, particularly SSD and RAM, can substantially improve performance.
- Utilize Built-in Performance Tools: Windows 11’s native tools like Task Manager, Performance Monitor, and Windows Security are potent allies in maintaining system health.
Table of Contents
Update Windows 11 and Drivers
When it comes to speeding up your Windows 11 PC, one of the most crucial yet often overlooked steps is keeping your system and drivers up to date. It might seem counterintuitive – after all, doesn’t installing updates take time and potentially slow things down? But trust us, this foundational step can make a difference in your system’s performance.
Why Updates Are Crucial for Performance
Microsoft regularly releases updates for Windows 11 that do more than just patch security vulnerabilities. These updates often include performance enhancements, bug fixes, and optimizations that can significantly improve your system’s speed and stability. Similarly, updated drivers ensure that your hardware components – from your graphics card to your network adapter work efficiently.
These updates can resolve issues you might not even realize are slowing your Windows 11 PC down, from memory leaks to inefficient processing algorithms.
How to Check for and Install Windows Updates
Fortunately, Windows 11 makes it easy to stay current:
Step 1: Open the Start menu and click on Settings (the gear icon).

Step 2: Navigate to Windows Update in the left sidebar.
Step 3: Click Check for updates.

Remember, some updates may require a restart, so it’s best to do this when you have a few minutes to spare.
Pro tip: I highly recommend that you do the following. While in the Windows Update, click on Advanced options and toggle on “Receive updates for other Microsoft products when you update Windows”.
To understand different methods to restart your Windows 11 you can refer to “How to Restart Windows 11“
Updating Device Drivers for Optimal Performance
Drivers are the software that allows your operating system to communicate with your hardware. Outdated drivers can lead to slowdowns, crashes, and even security vulnerabilities. Here’s how to keep them up to date:
Step 1: Right-click on the Start button and select Device Manager.

Step 2: For the device whose driver needs to updated, right-click and select Update driver.
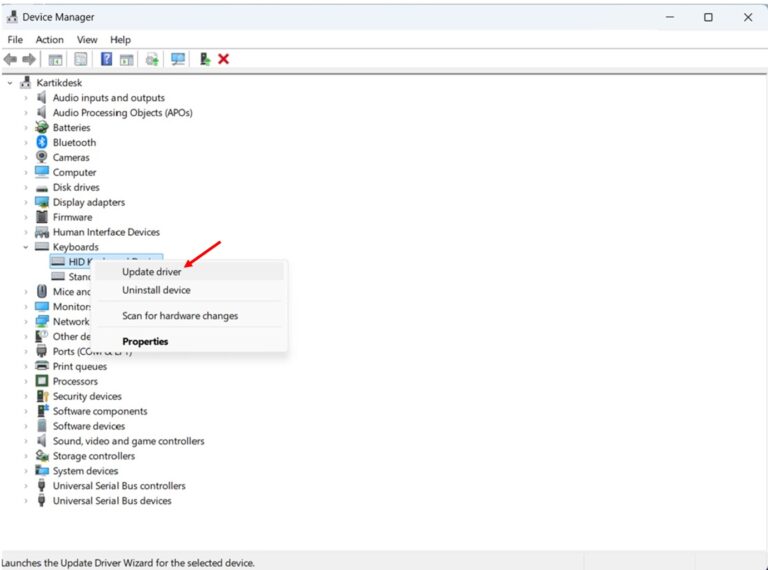
Step 3: In new window that appears click Search automatically for driver.

It’s often better to download drivers directly from the manufacturer’s website for crucial components like graphics cards. Companies like NVIDIA, AMD, and Intel frequently release optimized drivers that can boost performance, especially for gaming and graphic-intensive tasks.
For more detailed guide on updating drivers in Windows 11 you can refer How to Update Drivers in Windows 11
The Impact of Updated Drivers
Updated drivers can breathe new life into your system. For example, a graphics driver update might improve frame rates in games or reduce video rendering times. A network driver update could enhance your internet connection speed. Even something as simple as an updated audio driver can improve sound quality and reduce system resource usage.
Remember, driver updates are not just for fixing problems – they often introduce new features and optimizations that can enhance your overall Windows 11 experience.
A Word of Caution
While updates are generally beneficial, creating a system restore point before applying major updates is always wise. This gives you a safety net in case anything goes wrong during the update process.
Optimize Startup Programs to Quicken Windows 11 Boot Time.
Have you ever wondered why it takes so long for your Windows 11 PC to become usable after you press the power button? The culprit might be hiding in plain sight: your startup programs. These are applications that automatically launch when your computer boots up, and while some are essential, others can unnecessarily bog down your system.
The Impact of Startup Programs on System Speed
Each additional application that launches at startup requires memory and processing power, extending the time it takes for your system to become fully operational.
Some startup programs, such as antivirus software or hardware drivers, are crucial for your system’s functionality and security. However, many others – like that chat app you rarely use or the software updater for a program you uninstalled months ago – are just dead weight.
How to Access and Manage Startup Apps in Windows 11
Fortunately, Windows 11 makes it easy to view and control which programs start with your system:
Step 1: Right-click on the Start button and select Task Manager.

Step 2: Click on the Startup apps.
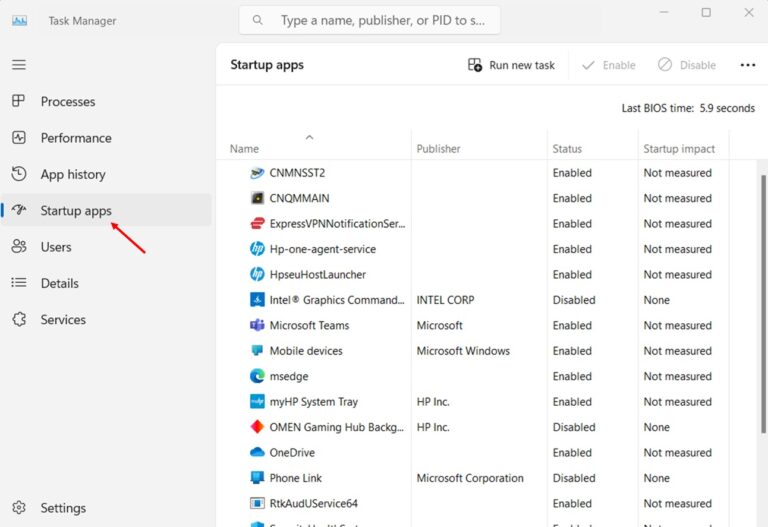
Step 3: You’ll see a list of all programs set to start with Windows and their impact on startup time.
Identifying and Disabling Unnecessary Startup Items
Now comes the crucial part: deciding what to keep and what to disable. Here’s a step-by-step approach:
- Evaluate the impact: Focus first on items labeled “High” or “Medium” impact.
- Identify essential programs: Keep antivirus software, hardware-related applications, and any programs you use daily.
- Research unfamiliar items: If you need clarification on a program, a quick web search can help you determine if it’s necessary.
- Disable non-essential items: Right-click on any program you don’t need at startup and select “Disable”.
Remember, disabling a program here doesn’t uninstall it or prevent you from using it – it simply stops it from launching automatically at startup.
Pro Tips
- Be cautious with system programs: If you’re unsure, leave Microsoft and hardware-related services enabled.
- Stagger your startups: For programs you use often but don’t need immediately, consider using the Task Scheduler to start them a few minutes after boot.
- Regularly review your startup items: New programs often add themselves to startup without asking. Make it a habit to check this list monthly.
- Use ‘Fast Startup’: This Windows feature combines elements of shutdown and hibernation for faster boot times. Enable it in Power Options if it’s not already active.
Remember, the goal isn’t to disable everything in Startup but it’s to find the right balance between convenience and performance. Some startup programs improve your computing experience by ensuring everything’s ready to go when needed.
If you want to understand what is Windows 11 startup folder and how to manage the Windows 11 startup applications you can checkout my Essential guide on Windows 11 Startup Folder
Clean Up Your Disk for a Faster Windows 11 Experience
Just as a cluttered desk can slow down your work, a cluttered hard drive can slow down your computer. Over time, your Windows 11 PC accumulates a surprising amount of digital detritus – temporary files, downloaded program installers, old backups, and more. This digital clutter takes up valuable space and can impact your system’s performance. Let’s dive into how you can clean up your disk and boost your Windows 11 PC performance.
Using the Disk Cleanup Utility
Windows 11 comes with a built-in tool called Disk Cleanup that’s specifically designed to help you reclaim disk space and, in turn, improve performance. Here’s how to use it:
Step 1: Open the Start menu by clicking the Windows icon in the taskbar
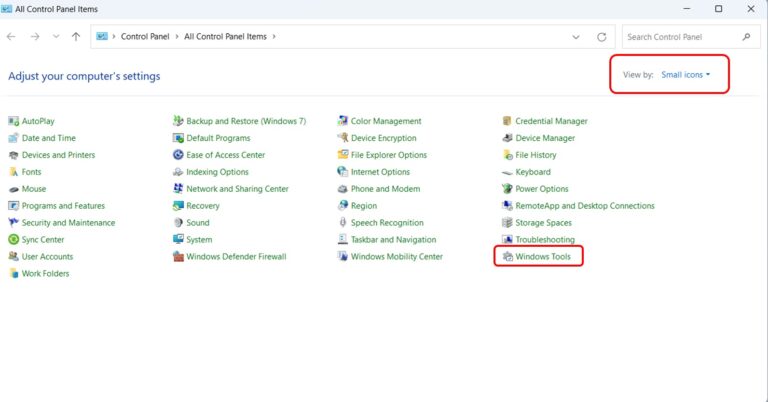
Step 2: Type Control Panel in the search bar and click on the Control Panel app when it appears in the search results.

Step 3: In the Control Panel window, make sure you are in the Small Icon view. If not, click on View by in the top-right corner and select Small Icon.
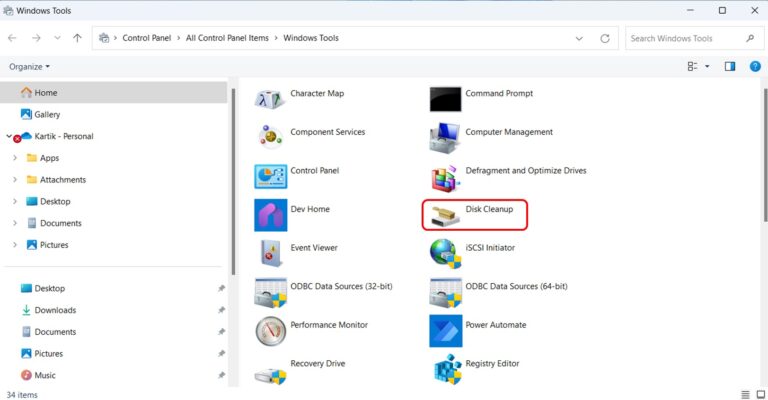
Step 4: Click on Windows Tools.
Step 5: In the Windows Tools window, double click on Disk Cleanup to launch it.
Step 6: Check the boxes next to the file types you want to remove, then click OK.

Step 7: A confirmation dialog will appear. Click Delete Files to proceed with the cleanup.

Disk Cleanup can safely remove:
- Temporary Internet files
- Downloaded Program files
- Recycle Bin
- Temporary files
- Thumbnails
- And more
Uninstalling Unused Programs
Programs you no longer use aren’t just taking up space – they might be running background processes that slow down your system. Here is how to uninstall them
Step 1: Open the Start menu by clicking the Windows icon on the taskbar or pressing the Windows key.
Step 2: Click on the Settings icon (it looks like a gear) or type “Settings” and select it from the search results.

Step 3: In the Settings window, click on Apps in the left sidebar.
Step 4: Select Installed apps from the list of options on the right.

Step 5: You will see a list of all installed programs on your computer. This list can be quite long.
Step 6: To find specific programs more easily, you can:
- Use the search bar at the top of the list to search for a program by name.
- Sort the list by name, size, or install date using the Sort by dropdown menu.
- Filter the list by drive, if you have multiple drives, using the Filter by dropdown menu.

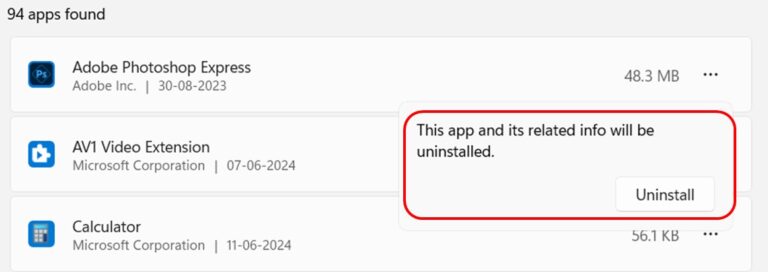
Step 7: Once you’ve found the program you want to uninstall, click on the three dots (…) next to its name.
Step 8: Click Uninstall in the dropdown menu that appears.

Step 9: A confirmation dialog will pop up. Click Uninstall again to confirm.
Step 10: Some programs may have their own uninstallation process. If this is the case, follow the on-screen prompts to complete the uninstallation.
Step 11: Repeat steps 7-10 for each program you want to uninstall.
Step 12: After uninstalling, it’s a good idea to restart your computer to ensure all changes take effect.
Clearing Temporary Files and the Recycle Bin
Temporary files and your Recycle Bin can accumulate a surprising amount of data:
Temporary Files:
- Press Win + R, Run Window will be launched, type %temp% in Run window, and hit Enter.
- Select all files and delete (skip any that are in use).
Recycle Bin:
- Right-click the Recycle Bin on your desktop and select Empty Recycle Bin.
Remember, files in the Recycle Bin still take up space on your drive. Emptying it can free up significant space, especially if you haven’t done so in a while.
Leveraging Storage Sense to Automate Your Cleanup
Windows 11 includes a feature called Storage Sense that can automate much of the cleanup process:
Step 1: Open the Start menu by clicking the Windows icon in the taskbar or pressing the Windows key.
Step 2: Click on the Settings icon (gear symbol) or type “Settings” and select it from the search results.

Step 3: In the Settings window, click on System in the left sidebar.
Step 4: Scroll down the right panel and click on Storage.

Step 5: At the top of the Storage settings page, you’ll see the “Storage Sense” option. If it’s not already on, toggle the switch to turn it on.
Step 6: Click on “Storage Sense” to access more detailed settings.

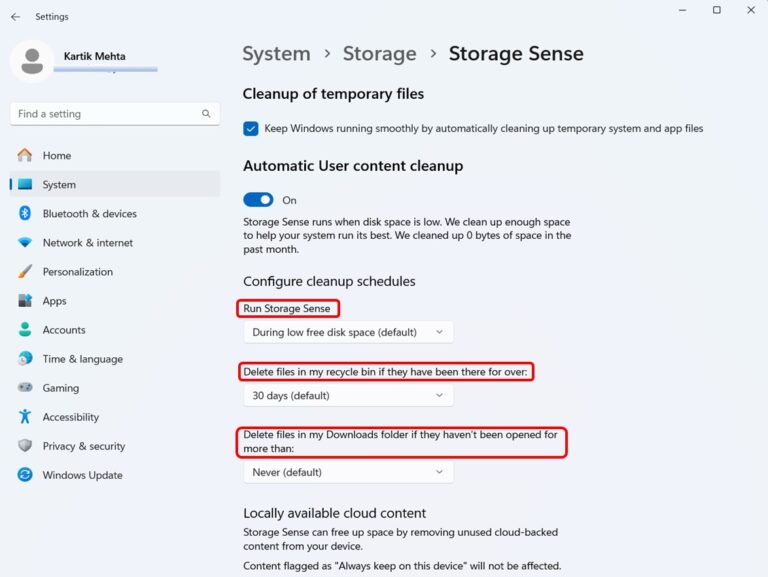
Step 7: Here you will see several options to configure:
a. Run Storage Sense” dropdown: Choose how often you want Storage Sense to run automatically. Options include:
- Every day
- Every week
- Every month
- During low free disk space
b. Delete files in my recycle bin if they have been there for over: Option include
- Never
- 1 day
- 14 days
- 30 days (default)
- 60 days
c. Delete files in my Downloads folder if they have been opened for more than dropdown: Options include
- Never (default)
- 1 day
- 14 days
- 30 days
- 60 days
You can set Storage Sense to automatically free up space by deleting temporary files and emptying the Recycle Bin on a schedule.
The Impact of a Clean Disk on Performance
Cleaning up your disk does more than just free up space:
- Faster file access: With less clutter, Windows can quickly find and open files.
- Improved search functionality: Searches become faster and more accurate.
- Smoother updates: Windows updates often require free space to download and install.
- Better overall system health: A clean system is less prone to errors and crashes.
Pro Tip: Remember, disk cleanup is not a one-time task. Make it a habit to perform these cleanup steps regularly – perhaps monthly or quarterly – to keep your Windows 11 system running at its best.
Adjust Visual Effects for Performance
Windows 11 brought a fresh, sleek look to the Windows operating system. While these visual enhancements contribute to a more pleasing user experience, they can also put a strain on your system’s resources, especially on older or less powerful hardware. The good news? You can fine-tune these visual effects to strike the perfect balance between aesthetics and performance. Let’s dive into how you can adjust these settings to speed up your Windows 11 PC.
Accessing Performance Options in Windows 11
To start tweaking your visual effects:
Step 1: Press Win + R or Right Click on Windows icon in the taskbar and in the menu click on Run to open the Run dialog.
Step 2. Type sysdm.cpl and press Enter.

Step 3: In the System Properties window, go to the Advanced tab.
Step 4: Under Performance click Settings.

This opens the Performance Options window, your control center for visual effects.

Understanding the Impact of Visual Effects
Windows 11’s visual effects, while attractive, can consume significant system resources:
- Transparency effects require constant re-rendering of windows.
- Animations, while smooth, need extra processing power.
- Shadow effects add depth but increase the complexity of what’s being displayed.
On powerful systems, these effects might not noticeably impact performance. However, minimizing these effects on older or budget PCs or when running resource-intensive applications can lead to a snappier Windows experience.
Balancing Appearance and Speed
In the Performance Options window, you’ll see four main choices:
- Let Windows choose what’s best for my computer
- Adjust for the best appearance
- Adjust for best performance
- Custom
For most users, the “Custom” option offers the best balance. It allows you to cherry-pick which visual effects to keep and which to disable.
Recommended Settings for Faster Performance
If you choose “Custom,” consider disabling these effects for a performance boost:
- Animate controls and elements inside windows
- Animate windows when minimizing and maximizing
- Animations in the taskbar
- Fade or slide menus into view
- Fade or slide ToolTips into the view
- Show shadows under windows
However, you might want to keep:
- Show thumbnails instead of icons
- Smooth edges of screen fonts
- Use drop shadows for icon labels on the desktop
These settings often provide useful functionality with minimal performance impact.
The “Best Performance” Option for Maximum Speed
If you’re using an older PC or need every ounce of performance, selecting “Adjust for best performance” will disable all visual effects. This can significantly speed up your system, especially on lower-end hardware. However, be prepared for a much more basic-looking interface.
Pro Tip: Remember, the goal is to find the right balance for your specific setup and needs. If you’re a gamer or video editor, you might prioritize performance over aesthetics. If you use your PC primarily for web browsing and document editing, you might prefer to keep more visual effects enabled.
Measuring the Impact
After making changes:
- Use the built-in Task Manager (Ctrl + Shift + Esc) to monitor CPU and RAM usage.
- Pay attention to how your system feels during regular use. Does it feel more responsive?
- If you’ve gone too far and missed specific effects, you can always re-enable them individually.
Defragment Your Hard Drive for Faster Access in Windows 11
If you’ve been a Windows user for a while, you’ve probably heard of disk defragmentation. But what exactly is it, and why is it still relevant in Windows 11? Let’s explore how to use Windows 11’s built-in defragmentation tool, and understand why this process can give your system a significant speed boost.
Understanding Disk Fragmentation
To grasp the concept of defragmentation, imagine your hard drive as a large library. When you first start storing files (books in our analogy), they’re placed neatly and in order on the shelves. However, the library becomes disorganized as you add and remove books over time. Some books are scattered across multiple shelves, making it more difficult and time-consuming to locate required book.
This essentially happens to your files on a hard disk drive (HDD). As your system writes, deletes, and modifies data, files can become scattered across different areas of the disk. This fragmentation forces your drive to work harder to read files, potentially slowing down your system.
How to Use the Built-in Defragmenter Tool in Windows 11
Windows 11 comes with a built-in tool to help you keep your drives optimized. Here’s how to use it:
- Open File Explorer and right-click on the drive you want to defragment (usually C:) In the menu click Properties
- In Properties window go to the Tools tab.
- In Tools tab under “Optimize and defragment drive” click “Optimize.”
- In the Optimize Drives window, select the drive and click Analyze.
- If the drive is more than 10% fragmented, click Optimize to start defragmentation.
Automating the Process by Scheduling Regular Defragmentation
Windows 11 can automatically optimize your drives on a schedule:
- In the Optimize Drives window, click on Change settings.
- Ensure the box next to Run on a schedule is checked.
- Choose how often you want the process to run (weekly is usually sufficient for most users).
By scheduling regular optimization, you ensure your drives stay in top shape without having to remember to do it manually.
The Impact of Defragmentation on Performance
Defragmenting your hard drive can lead to several performance improvements:
- Faster file access
- Improved application loading times: Programs that rely on reading multiple files can start up faster.
- More efficient use of disk space: Defragmentation can sometimes recover small amounts of usable space.
- Extended hard drive life: By reducing the physical movement needed to read files, defragmentation can potentially extend the life of mechanical hard drives.
SSD Considerations: A Different Approach
If you’re using a Solid State Drive (SSD), the rules are different. SSDs don’t suffer from physical fragmentation as HDDs do. In fact, excessive defragmentation can potentially reduce an SSD’s lifespan due to the limited number of write operations these drives can perform.
Fortunately, Windows 11 is smart enough to know the difference:
- For HDDs, it performs traditional defragmentation.
- For SSDs, it performs a process called TRIM, which helps maintain the drive’s performance without unnecessary write operations.
When you use the Optimize Drives tool on an SSD, Windows 11 automatically uses the appropriate optimization method.
Best Practices for Drive Optimization
To get the most out of drive optimization in Windows 11:
- Let Windows handle it: The automatic scheduling feature is usually sufficient for most users.
- Don’t overdo it: Monthly or even quarterly optimization is often enough for personal computers.
- Combine with other maintenance: Pair defragmentation with disk cleanup for maximum benefit.
- Keep your drives healthy: Use tools like chkdsk periodically to scan for and fix disk errors.
When Defragmentation Isn’t Enough
If you’ve defragmented your drive and are still experiencing slow performance, consider these factors:
- Available disk space: Keep at least 15-20% of your drive free for optimal performance.
- Drive health: Use Windows’ built-in tools or third-party software to check your drive’s health.
- Upgrade considerations: If you’re still using an HDD, consider upgrading to an SSD for a substantial performance boost.
Remember, defragmentation is just one piece of the performance puzzle. Combine it with other optimization techniques we’ve discussed, like cleaning up your disk and managing startup programs, for the best results.
Upgrade Your Hardware to Improve Windows 11 performance
While software optimizations can significantly improve your Windows 11 performance, sometimes, the most effective way to speed up your system is through hardware upgrades. In this section, we’ll explore key hardware components that can give your Windows 11 PC a substantial performance boost. We’ll focus on three main areas: RAM, storage, and processor upgrades.
Adding More RAM
RAM (Random Access Memory) is your computer’s short-term memory. It’s where your system keeps data for quick access while you’re actively using it. More RAM allows your computer to handle more tasks simultaneously without slowing down.
Benefits of Upgrading RAM:
- Smoother multitasking
- Faster application loading times
- Improved system responsiveness
- Better performance in memory-intensive tasks like video editing or running virtual machines
How to Upgrade RAM:
- Check your current RAM: Press Win + I, go to system> About, and look under “Installed RAM.”
- Determine your motherboard’s maximum supported RAM and available slots
- Purchase compatible RAM modules
- Install the new RAM sticks (consult your PC or motherboard manual for specific instructions)
Recommended RAM for Windows 11:
- Minimum: 4GB (hardly sufficient for modern computing)
- Comfortable: 8GB-16GB (suitable for most users)
- Power User: 32GB or more (for heavy multitasking, content creation, or running virtual machines)
Switching to an SSD
If your Windows 11 PC is still running on a traditional Hard Disk Drive (HDD), upgrading to a Solid State Drive (SSD) can provide one of the most noticeable performance improvements.
Benefits of Upgrading to an SSD:
- Dramatically faster boot times
- Near-instant application launches
- Quicker file transfers
- Improved overall system responsiveness
How to Upgrade to an SSD:
- Choose an SSD: Consider capacity and form factor (2.5-inch SATA or M.2 NVMe)
- Clone your existing drive to the new SSD or perform a clean Windows 11 installation
- Install the SSD (refer to your PC manual for specific instructions)
SSD Recommendations:
- SATA SSDs: Good for older systems or budget upgrades
- NVMe SSDs: Offer the fastest speeds for modern systems with M.2 slots
- Capacity: 250GB minimum, 500GB-1TB ideal for most users
Considering a Processor Upgrade
Upgrading your CPU (Central Processing Unit) can significantly improve your system’s performance, especially for tasks like video editing, 3D rendering, or running complex simulations.
Benefits of a CPU Upgrade:
- Faster processing of complex tasks
- Improved multitasking capabilities
- Better performance in CPU-intensive applications and games
- Potential for better energy efficiency with newer models
How to Upgrade Your CPU:
- Check your motherboard’s socket type and compatible CPU list
- Choose a compatible CPU that fits your budget and performance needs
- Consider whether a motherboard upgrade is also necessary
- Install the new CPU (this can be complex; consider professional installation if you’re unsure)
CPU Upgrade Considerations:
- Ensure your power supply can handle the new CPU
- Check if your current cooling solution is sufficient for the new processor
- Consider the overall balance of your system (e.g., pairing a high-end CPU with sufficient RAM and a fast SSD)
Balancing Your Upgrades: Getting the Most Bang for Your Buck
When considering hardware upgrades, it’s important to identify your system’s bottlenecks:
- Run resource-intensive tasks and monitor performance in Task Manager
- If RAM usage is consistently high, prioritize a RAM upgrade
- If disk usage is often at 100%, focus on an SSD upgrade
- If CPU usage is frequently maxed out, a processor upgrade might be beneficial
Remember, a balanced system performs better than one with a single high-end component and other outdated parts.
Other Potential Upgrades:
- Graphics Card: Essential for gaming and graphics-intensive work
- Power Supply: Ensures stable power delivery for high-performance components
- Cooling Solutions: Better cooling can allow your components to perform at their best for longer periods
When to Consider a New PC
Sometimes, especially with older systems, the cost and effort of multiple upgrades might outweigh the benefits. In such cases, investing in a new PC with modern components designed for Windows 11 might be more cost-effective in the long run.
Leverage Windows 11 Built-in Performance Tools
Windows 11 has various built-in tools designed to help you monitor, maintain, and optimize your system’s performance. In this section, we’ll explore some of the most useful built-in performance tools and how you can leverage them to keep your Windows 11 PC running smoothly.
Task Manager
Task Manager is arguably the most versatile and accessible performance tool in Windows 11. It provides real-time information about your system’s resource usage and allows you to manage running processes.
How to Use Task Manager:
- Press Ctrl + Shift + Esc or right-click the taskbar and select Task Manager.
- If you see a simplified view, click “More details” at the bottom
Key Features:
- Processes tab: Shows all running applications and background processes
- Performance tab: Provides detailed graphs of CPU, Memory, Disk, and Network usage
- Startup tab: Allows you to manage programs that launch at startup
- Users tab: Shows resource usage by user account
- Details tab: Offers a more technical view of running processes
Pro Tips:
- Use the Performance tab to identify resource bottlenecks
- Use the “End task” button to close unresponsive programs
You can refer to “How to Open Task Manager in Windows 11” to learn nine different methods to do so
Storage Sense:
Storage Sense is a feature that automatically frees up disk space by deleting unnecessary files.
How to Use Storage Sense:
- Go to Settings > System > Storage
- Toggle on “Storage Sense”
- Click “Storage Sense” or “Run Storage Sense now” to configure the settings
Key Features:
- Automatically deletes temporary files
- Can be set to delete files in your Downloads folder that haven’t been opened for a while
- Removes files from the Recycle Bin after they’ve been there for a set period
Pro Tip:
Configure Storage Sense to run automatically when your disk space gets low for hands-off disk maintenance.
Windows Security
While primarily a security tool, Windows Security (formerly Windows Defender) plays a crucial role in maintaining system performance by protecting against malware that could slow down your PC.
How to Use Windows Security:
- Go to Settings > Privacy & Security > Windows Security
- Click “Open Windows Security”
Key Features:
- Real-time protection against viruses and other threats
- Firewall and network protection
- Device performance and health reports
Pro Tip:
Regularly run a full scan to ensure no performance-degrading malware is lurking on your system.
Reliability Monitor
Reliability Monitor is a lesser-known but powerful tool that tracks system stability and provides a history of software installations, updates, and crashes.
How to Use Reliability Monitor:
- Press Win + R, type “perfmon /rel”, and press Enter
Key Features:
- Provides a stability index score for your system
- Shows a timeline of system and application failures
- Offers “View technical details” for more in-depth information on issues
Pro Tip:
Use Reliability Monitor to identify patterns in system instability, which can help pinpoint problematic software or drivers.
Performance Monitor
For those who want more detailed performance data, Performance Monitor offers in-depth system analytics.
How to Use Performance Monitor:
- Press Win + R, type “perfmon”, and press Enter
Key Features:
- Real-time monitoring of hundreds of system metrics
- Ability to create custom data collector sets
- Option to generate detailed performance reports
Pro Tip:
Use Performance Monitor to create baseline performance measurements, which can be invaluable for tracking system health over time.
Power & Sleep Settings
While not a tool per se, properly configured power settings can significantly impact system performance.
How to Access Power & Sleep Settings:
- Go to Settings > System > Power & battery
Key Features:
- Adjust screen and sleep timers
- Set up power modes (Best power efficiency, Balanced, Best performance)
- Configure advanced power settings for fine-tuned control
Pro Tip:
Choose the “Best Performance” power mode for maximum performance, but be aware this may increase energy consumption.
DirectX Diagnostic Tool
The DirectX Diagnostic Tool (DxDiag) is useful for diagnosing problems related to graphics and sound, which can impact performance in games and multimedia applications.
How to Use DxDiag:
- Press Win + R, type “dxdiag”, and press Enter
Key Features:
- Provides detailed information about your system, including DirectX version
- Shows information about display adapters and sound devices
- Offers diagnostic tools for DirectX functionality
Pro Tip:
Use DxDiag to check if your graphics drivers are up to date, which can be crucial for optimal performance in graphics-intensive applications.
Windows 11’s built-in performance tools offer a powerful suite of options for monitoring, maintaining, and optimizing your system. By regularly using these tools, you can:
- Identify and resolve performance bottlenecks
- Keep your system clean and efficient
- Ensure your PC is protected against performance-degrading security threats
- Troubleshoot issues before they become major problems
Remember, the key to maintaining peak performance is regular system maintenance. Make it a habit to check these tools periodically, and you’ll be well on your way to enjoying a consistently fast and responsive Windows 11 experience.
Conclusion
We hope this guide has empowered you to take control of your Windows 11 experience. From simple tweaks to more advanced optimizations, every step you take contributes to a faster, more efficient system. Remember, the goal isn’t just about raw speed—it’s about creating a computing environment that’s responsive, reliable, and tailored to your needs.
As you implement these optimizations, don’t be afraid to experiment and find what works best for your unique setup and usage patterns. Windows 11 is a powerful, flexible operating system, and with the knowledge you’ve gained, you’re now equipped to make the most of it.