
Is your computer acting strangely or running slower than it should? One helpful trick to fix these issues is learning how to boot Windows 11 into Safe Mode. Safe Mode is a simple way for Windows to start up with just the basics it needs, making it easier to spot and fix problems. If the thought of trying to boot into Safe Mode sounds complicated, don’t worry.
This guide walks you through the process step by step. Booting Windows 11 into Safe Mode is easier than you think and can help get your computer back to running smoothly. So, let’s dive into how you can fix your PC by learning how to boot Windows 11 into Safe Mode.
Key Takeaway
- Safe Mode is a diagnostic startup with minimal drivers for troubleshooting Windows issues
- Three versions of Safe Mode exist: Basic Safe Mode, Safe Mode with Networking, and Safe Mode with Command Prompt
- Safe Mode helps diagnose driver conflicts, software issues, and system crashes
- Start Menu method: Windows key → Power → Hold Shift + click Restart → Troubleshoot → Advanced options → Startup Settings → Restart → Press 4, 5, or 6
- Advanced Startup: Settings → System → Recovery → Advanced startup (Restart Now) → Follow prompts
- Function Key method: Enable with command “bcdedit /set {default} bootmenupolicy legacy” → Restart → Repeatedly press F8 during boot
- System Configuration Utility: Run msconfig → Boot tab → Check “Safe boot” → Select mode → Apply → OK → Restart
- Command Prompt & WinRE: Run as admin → Enter “shutdown.exe /r /o” → Follow troubleshooting prompts
- Exit Safe Mode by restarting normally or unchecking “Safe boot” in msconfig (Windows+R → msconfig)
For a complete guide on multiple ways to get help in Windows 11, check out my detailed article “How to Get Help in Windows 11“
Table of Contents
What is Safe Mode?
Safe Mode is a diagnostic startup mode in Windows operating systems designed to troubleshoot and resolve system issues. It starts the computer with a minimal set of drivers and services to help diagnose problems with your PC. There are three versions of Safe Mode:
- Safe Mode: The most basic form, providing a minimal user interface and disabling network connectivity and non-essential services.
- Safe Mode with Networking: Similar to Safe Mode, it includes network drivers and services to allow internet access.
- Safe Mode with Command Prompt: This is the most advanced level, replacing the standard user interface with the Command Prompt. To use this version effectively, users must have knowledge of command-line tools.
Why Use Safe Mode?
Safe Mode is invaluable for troubleshooting and resolving various computer issues, including but not limited to:
- Driver Conflicts: Safe Mode can help identify and resolve driver-related issues that may cause system instability or the infamous blue screen of death (BSOD).
- Software Issues: It allows the system to bypass potential software conflicts by preventing most third-party software from starting up.
- System Diagnosis: By running the system with minimal drivers and services, Safe Mode can help pinpoint the cause of system crashes, slowdowns, or malfunctions.
5 Ways to Boot Windows 11 into Safe Mode
There are many ways to reach the final target—getting into Safe Mode in Windows 11. Five relatively simple ways are described so you can choose the one that best suits your current situation.
Start Windows 11 in Safe Mode using Start Menu
The simplest is the Start Menu method, which inherently utilizes Windows functions. The whole process is simple, involving only a few clicks while holding down the Shift key, and this will quite well suit users for whom time is of the essence.
- Press the Windows key on your keyboard. This key usually has a Microsoft Windows logo on it. Pressing this will open the Start Menu.

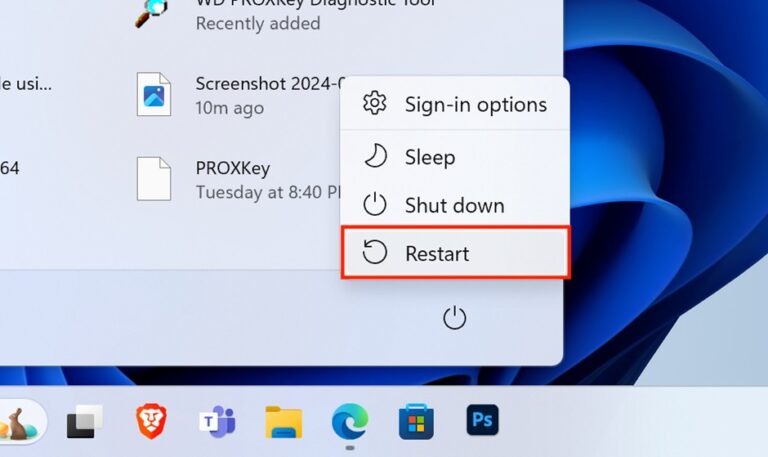
- In the Start Menu, you will see a small power icon at the bottom right of the window. It resembles a circle with a vertical line at the top. Click on this power icon to see options Sleep, Shut down, and Restart.

- While holding the Shift key on your keyboard, click on Restart. Keep holding the Shift key until the PC begins to restart. This special Restart will take you to a blue screen with more options than a regular start-up.
- You’ll see several options on the blue screen. Look for and click on the one that says Troubleshoot.

- After clicking Troubleshoot, you’ll see another option for Advanced Options. Click on that to explore the troubleshooting options further.

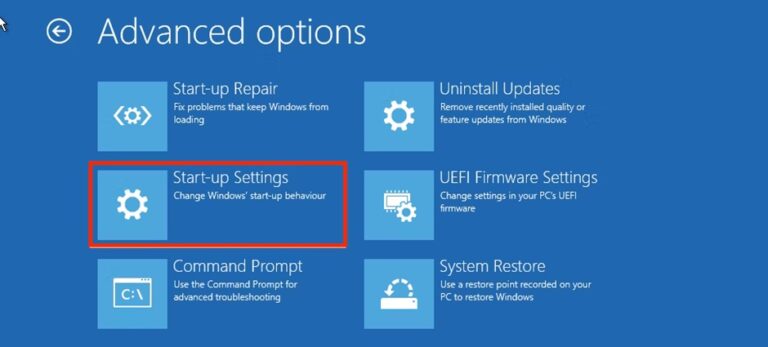
- Within Advanced Options, there will be a choice labeled Start-up Settings. Click on this to see startup options that can help diagnose and fix issues.
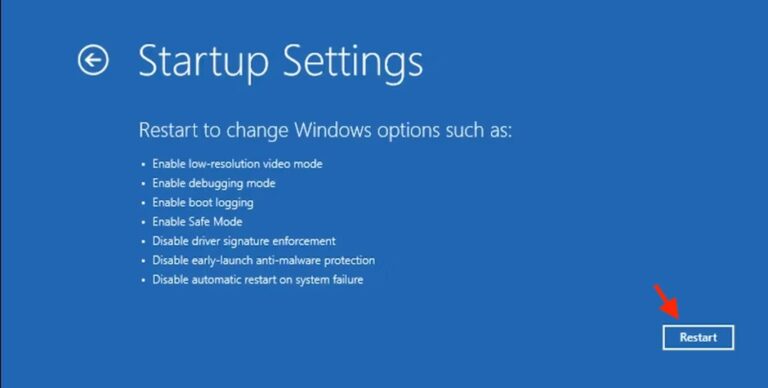
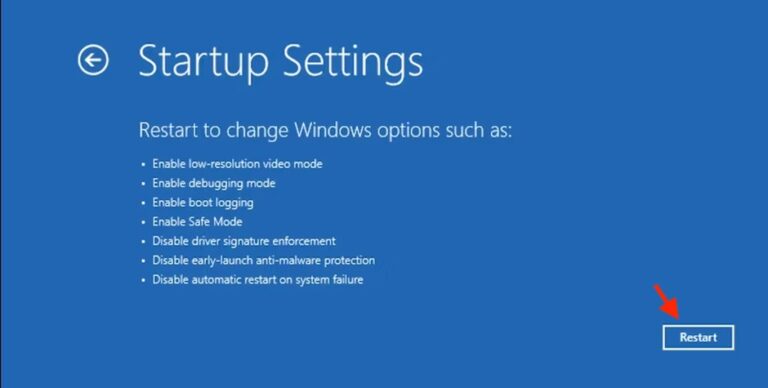
- In the Start-up Settings, you’ll find a button that says Restart. Click on it. This doesn’t restart your PC the usual way; instead, it takes you to a menu where you can choose different ways to start your PC.
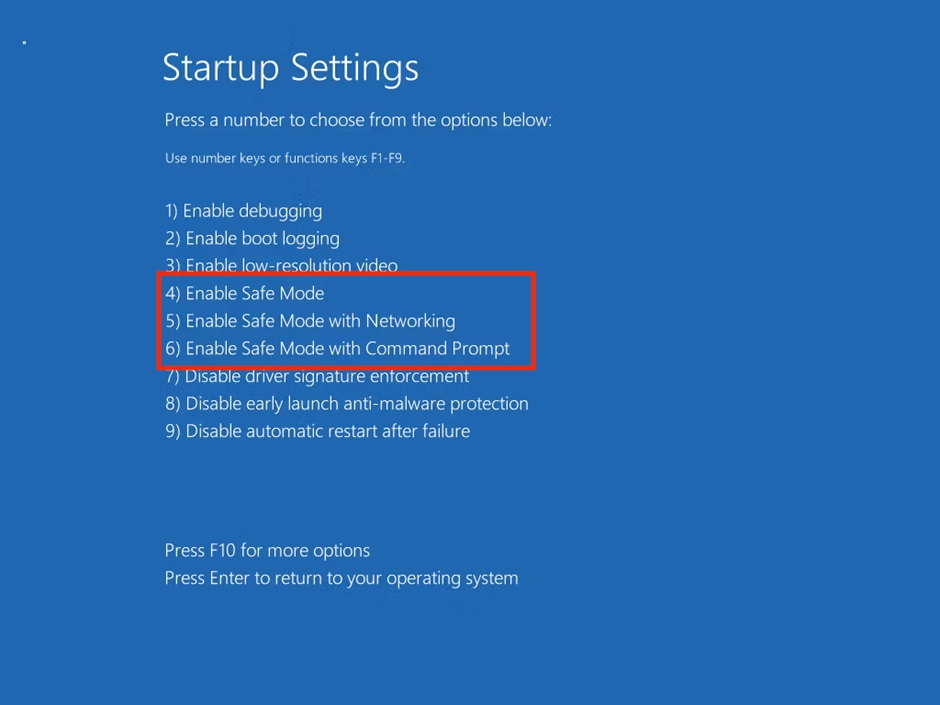
- After the Restart, your PC will show you a list of options. To enter Safe Mode, press the 4 key on your keyboard. If you need internet access in Safe Mode, press 5 for Safe Mode with Networking. For Safe Mode with Command Prompt, a more advanced option, press 6.
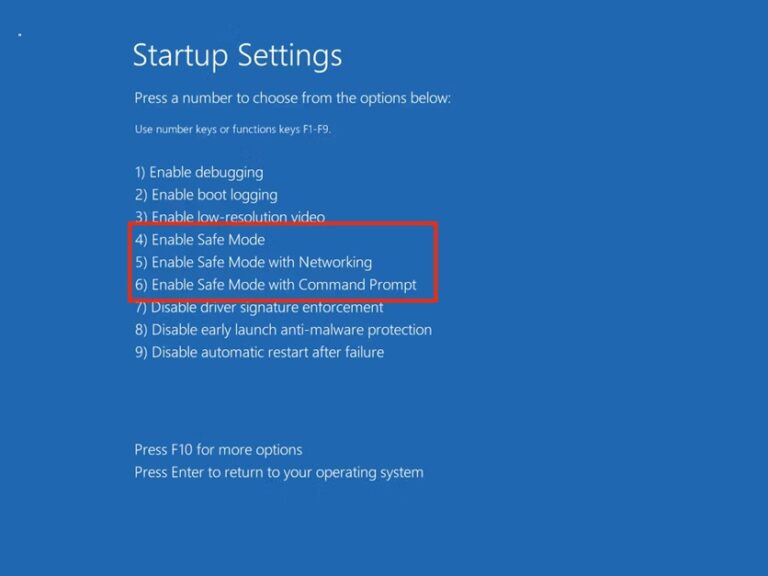
Your PC will then restart in the Safe Mode option you selected. Everything might look a bit different because Windows is running with just the basics, which is exactly what we want for troubleshooting.
Tip: You can replicate the above steps by selecting the Power option on the Windows login screen to boot into Safe Mode.
Start Windows 11 in Safe Mode using Advanced Startup
With Advanced Startup, you can access the system’s Safe Mode directly from the Windows settings without going through all those many intervening steps at boot.
- First, you’ll want to open the Settings app on your computer. You can do this easily by pressing the Windows key (the key with the Windows logo) and the I key on your keyboard simultaneously.
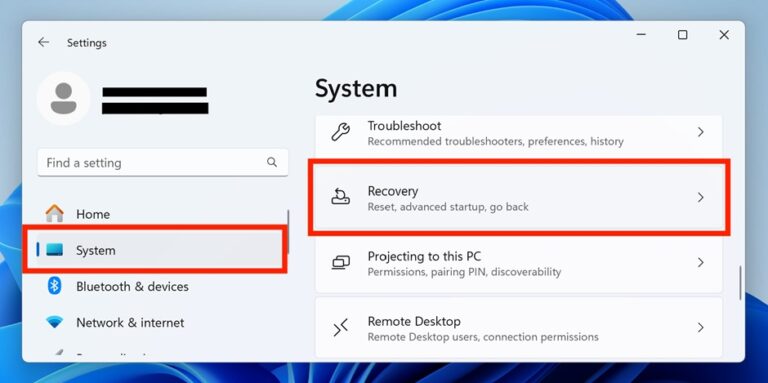
- Once the Settings app is open, look on the left side for an option that says “System.” Click on it.
After clicking on “System,” you’ll see several options in the right pane. Find and click on “Recovery.”
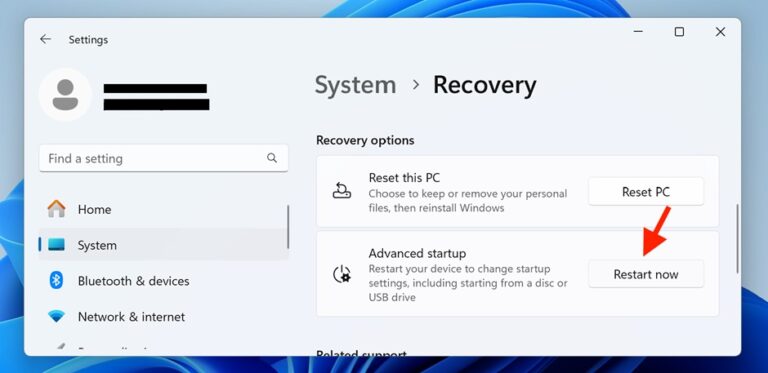
- In the Recovery settings, scroll down a bit and click on the “Restart Now” associated with the Advanced Startup option. You’ll find it under the Recovery Options section.
- Your computer will now restart to a blue screen with several options. This is the Advanced Startup screen. Here, click on “Troubleshoot.”

- You’ll see two options now. Click on “Advanced options” to access the advanced troubleshooting options.

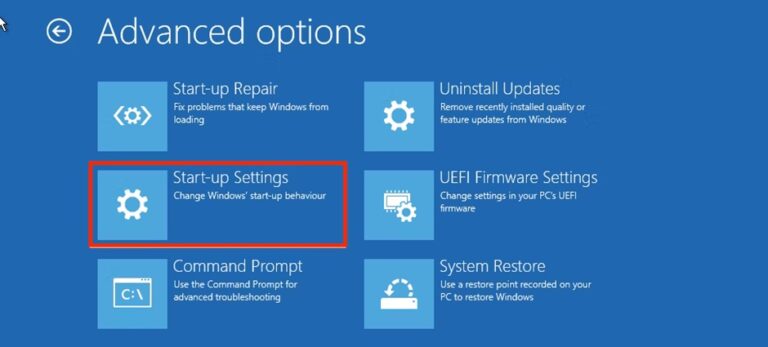
- Within “Advanced options,” look for and click on “Start-up Settings.”
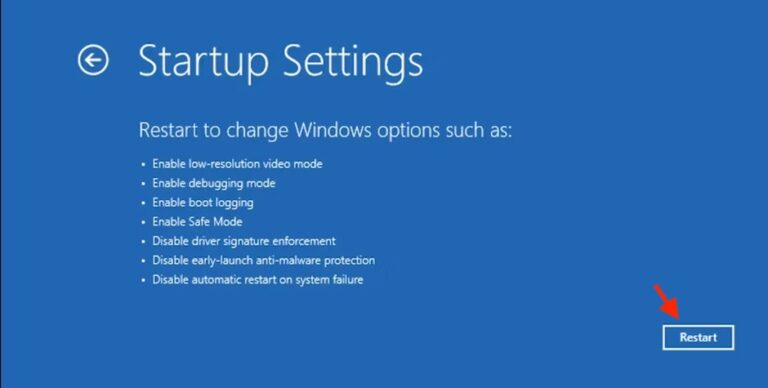
- Your PC will be on the Startup Settings screen, asking you to restart it to access special startup options, including Safe Mode. To restart into Startup settings, click on the “Restart” button at the bottom right of the screen.
- After your computer restarts, you’ll see a list of different startup options, among which three are to boot into three different Safe Modes. These Safe Mode versions are as follows:
Enable Safe Mode: To enter normal Safe Mode i.e. no internet connection or functional command line utility program (Command Prompt) press 4 on your keyboard.
Enable Safe Mode with Networking: If you need internet access in Safe Mode, press 5 on your keyboard.
Enable Safe Mode with Command prompt: For those who feel comfortable with command lines and want an even more stripped-down version of Safe Mode, press 6.
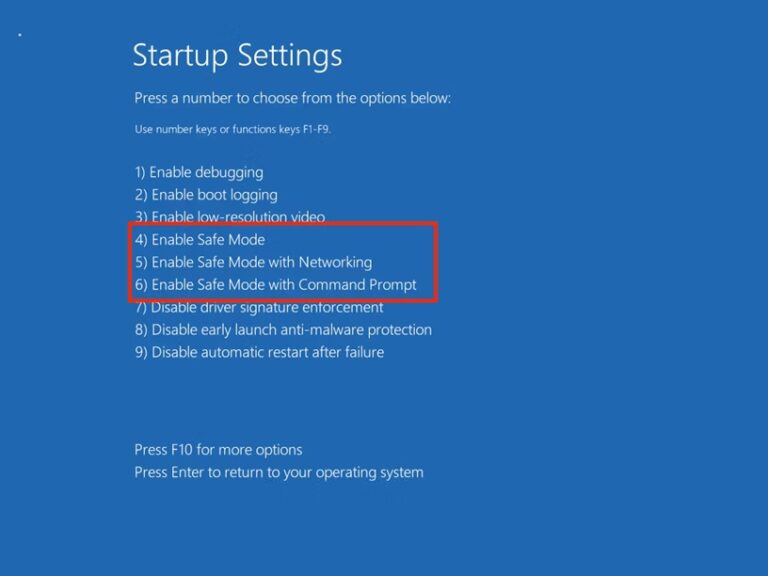
Pressing the number of your choice will start your computer in the version of Safe Mode you selected.
Start Windows 11 in Safe Mode using the Function Key
In previous versions like Windows 7, you could tap the F8 key during startup to Safe Mode boot options. However, this method isn’t available by default due to the quicker boot times in Windows 10 and 11. But don’t worry; there’s a way to bring it back using the Command Prompt with a simple command.
- Press the Windows key to bring up the Start Menu and search for “Command Prompt” in the top search bar.
From the search results, click on the “Run as administrator” option to launch the Windows Command prompt with admin rights.
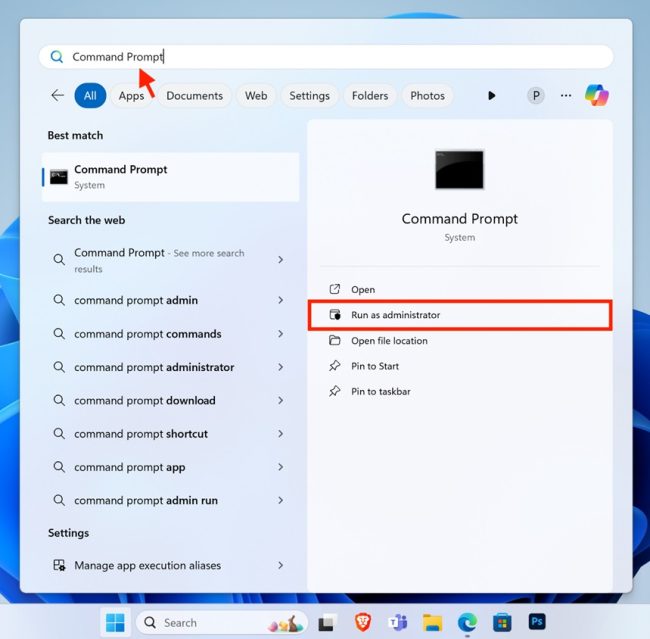
- In the Command Prompt window, carefully type the following command and hit the Enter key to execute it:
bcdedit /set {default} bootmenupolicy legacy
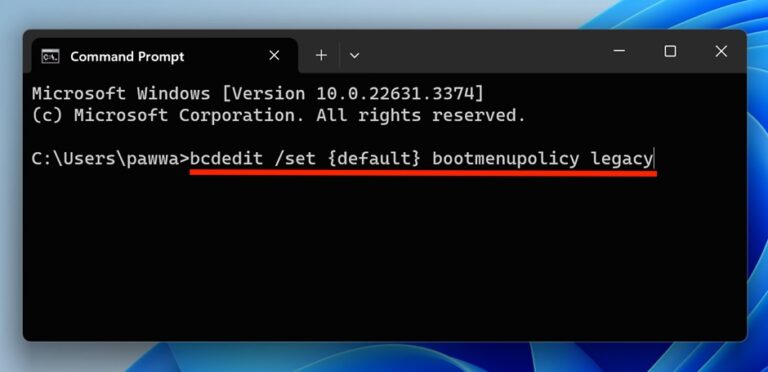
- After executing the command, close the Command Prompt window and restart your computer.
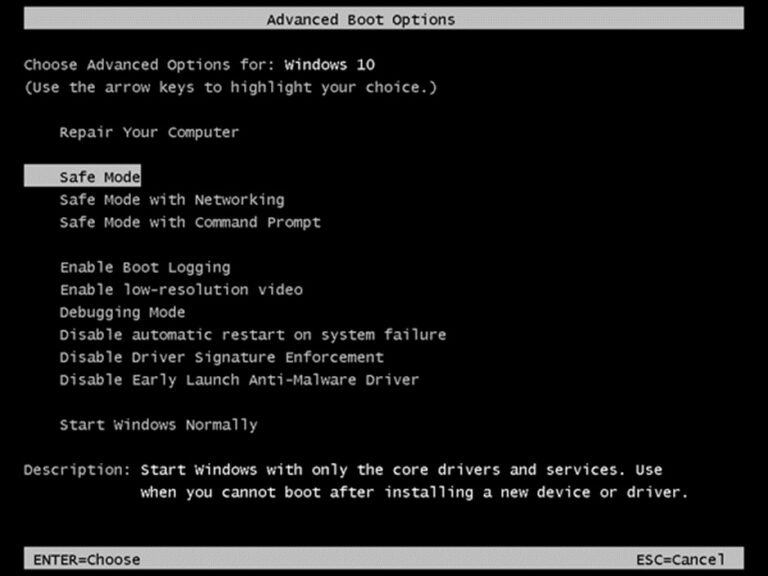
- As your PC is booting up, start tapping the F8 key (or Shift + F8) repeatedly before the Windows logo appears. This action should bring you to the Advanced Boot Options screen.
- On the Advanced Boot Options screen, use the arrow keys to navigate and select your desired startup method (such as Safe Mode, Safe Mode with Networking, or Safe Mode with Command Prompt.
Disabling the F8 Key Function in Windows 11
If you ever decide to revert to the standard boot settings and disable the F8 key functionality:
- Repeat the initial steps to open the Command Prompt with admin rights.
- Type the following command and hit Enter to execute it:
bcdedit /set {default} bootmenupolicy standard
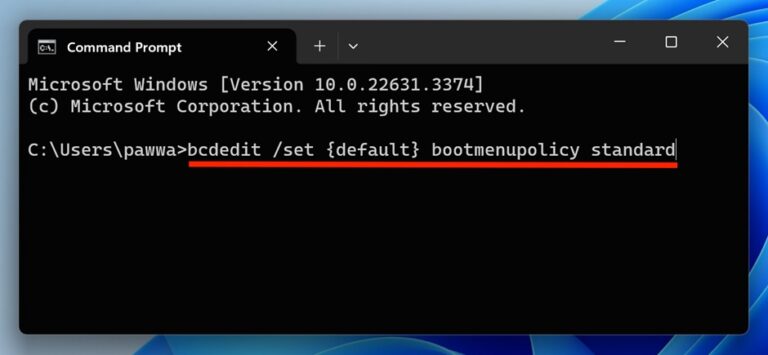
- Close the Command Prompt window and restart your PC to apply the changes.
Start Windows 11 in Safe Mode using Microsoft System Configuration Utility
The System Configuration utility provides a boot into Safe Mode with more detail and options. This suits those who may need greater granular control of the startup process so that they can have the ability to create a more custom environment for troubleshooting.
- Click on the Start Menu button on the Taskbar or press the Windows key on your keyboard, and search for “System Configuration” in the search bar.The System Configuration app will appear in the search results. Click on the “Run as administrator” option.
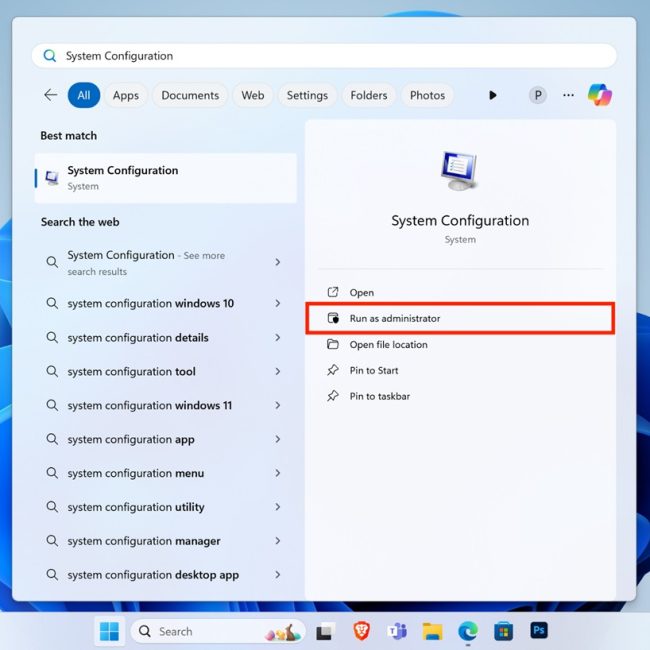
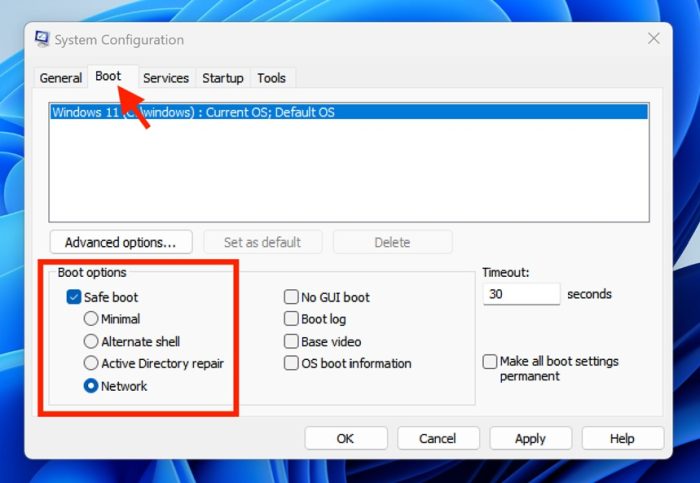
- Once the System Configuration window is open, switch to the “Boot” tab.
In the Boot tab, you’ll find a section called Boot Options. Here, you need to select the Safe Boot option. Make sure there’s a checkmark in the box next to it.
- After clicking Safe Boot, you’ll see a few options underneath. Choose the Safe Boot mode of your choice (here we have selected boot mode with networking support).
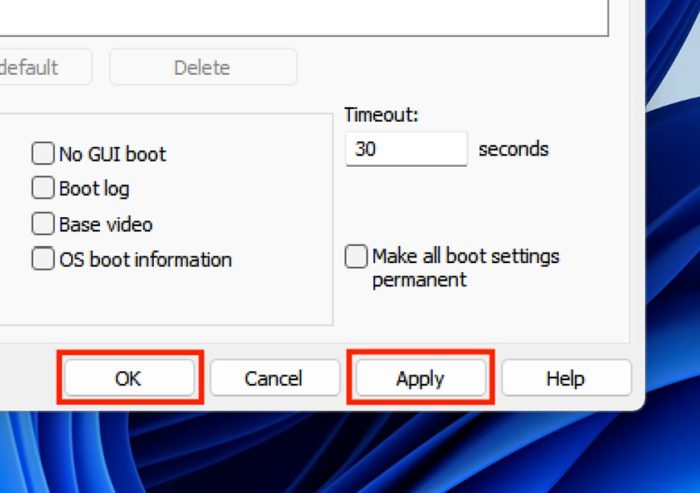
- Click on “Apply” at the bottom right of the window to save your changes, then click “OK.”
- You’ll be prompted to restart your computer. Go ahead and click “Restart” to do so. Your computer will then start in the Safe Mode of your selected choice.

Turning Off Safe Mode
To stop your computer from starting in Safe Mode next time:
- Repeat the steps to open System Configuration through the Start Menu’s search bar.
- Go back to the Boot tab as you did before.
This time, uncheck the Safe Boot option in the Boot Options section to disable it.
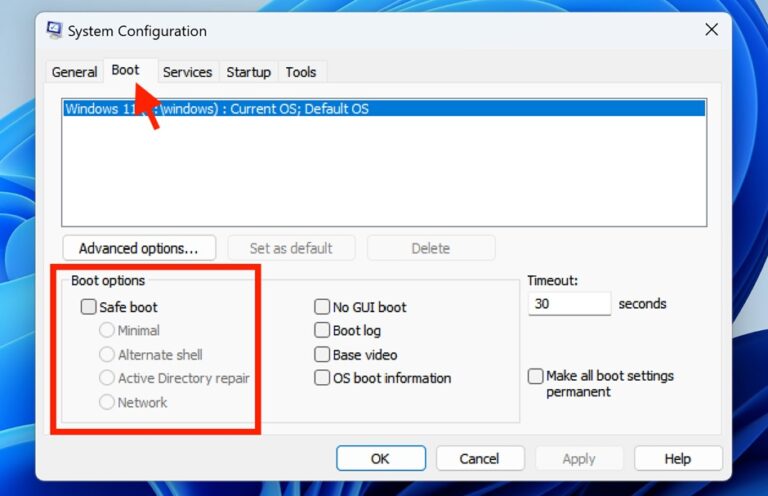
- Click on “Apply” again to save this change, and then click “OK”.
- Restart your computer once more. This time, it will start up normally without going into Safe Mode.
Start Windows 11 in Safe Mode using Command Prompt & WinRE
For pro users, using Command Prompt can also be a way to access the WinRE screen that is used to boot Windows into Safe Mode. Here’s how you can do this:
- Press the Windows key to launch the Start Menu, type cmd in the search bar, and click on the “Run as administrator” option to launch Command Prompt with the special permissions needed to make changes.
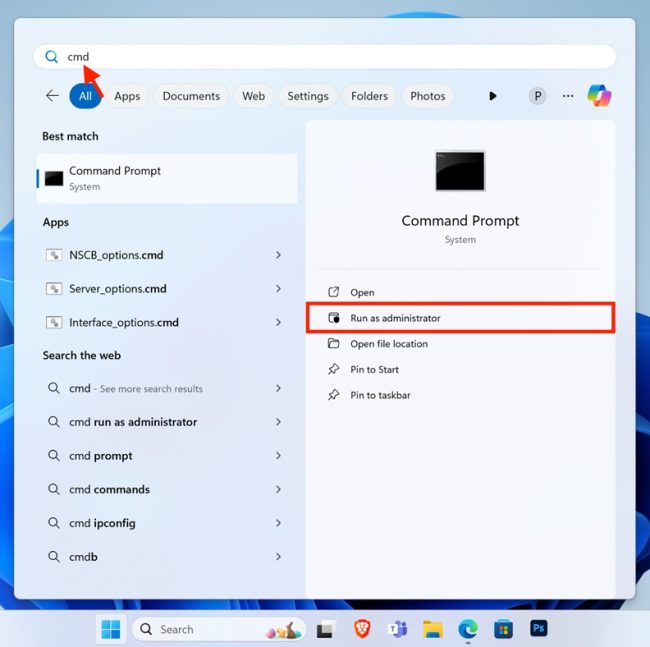
- Once the Command Prompt window opens, type the following command exactly as shown and then press the Enter key:
shutdown.exe /r /o
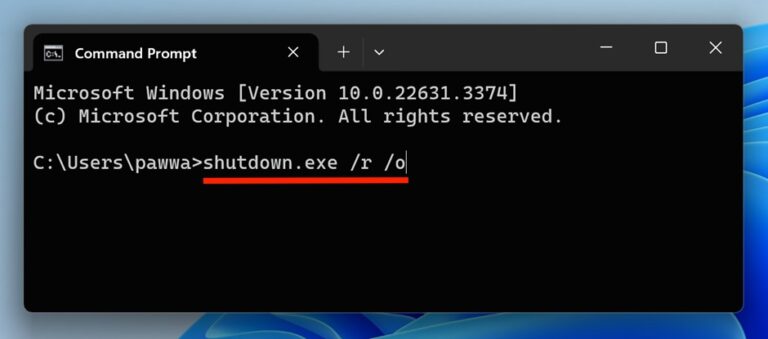
This command tells your computer to restart and shows you some advanced options before it starts up again.
- You don’t have to do anything else here; just wait a little bit (about a minute).
- Your computer will restart and show you a screen called “Choose an option.” Click on “Troubleshoot” to see more options.

- In the “Troubleshoot” menu, click on “Advanced options” to find more ways to fix your PC.

- Look for “Start-up Settings” in the Advanced options and click on it. This shows you settings related to starting up your computer.
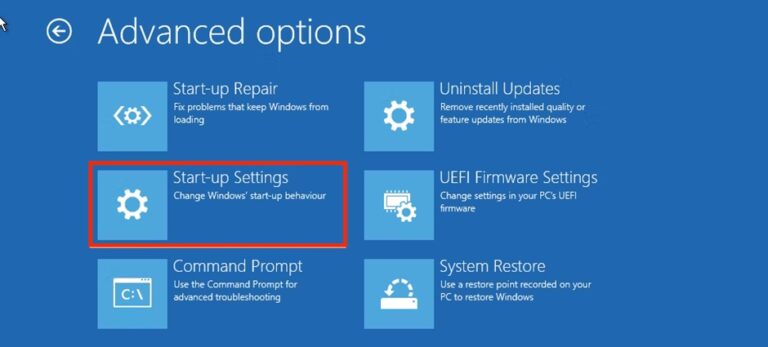
- Now, click the “Restart” button. This doesn’t start Windows right away but brings you to a screen with different ways to start Windows.
- Once your computer has restarted, a variety of startup options will appear. For basic Safe Mode, simply press 4 on your keyboard. Should you require internet connectivity while in Safe Mode, opt for 5 to select “Safe Mode with Networking.” And for those adept with command lines seeking a minimalist Safe Mode experience, 6 will activate “Safe Mode with Command Prompt.”
How to Exit Safe Mode in Windows 11
Even though it is quite simple to exit Safe Mode in Windows 11, sometimes you could find a situation where your computer just keeps booting into Safe Mode every time you turn it on. In such a case, you will have to change it back to normal startup manually; here is how to exit Safe Mode on Windows 11:
- Press the Windows key and R, and a little window will appear at the bottom left of the screen. This is known as the Run dialog box.
In the Run dialog box’s text field, type “msconfig” (without quotes) and hit Enter.
- This will bring up the System Configuration window. Here, switch to the “Boot” tab and then check the “Safe boot” option under Boot options. If it is checked (there’s a checkmark in the box), your PC is supposed to start in Safe Mode.
Click on “Safe boot,” and the tick (checkmark) will disappear.
- After unchecking the Safe boot option, click the “Apply” button, then click “OK” to confirm your changes.
The computer will ask you whether you want to restart; instead, it is the one to click “Restart” so that the changes take effect instantly.
Conclusion
Safe Mode is an important option for troubleshooting in Windows that provides a minimal environment that will help simplify troubleshooting. Every informed computer user, technological enthusiast, or merely a common user needs to keep abreast of how to get in and out of Safe Mode for the smooth running of the system.
If you’re interested in making your Windows 11 run faster, check out my comprehensive guide on “How to Speed Up Windows 11“
Frequently Asked Questions (FAQs)
Q1. What is the Boot Mode Hot Key F8 in Windows 11?
The boot mode hotkey for accessing the Advanced Boot Options menu, including Safe Mode, is F8. However, this, by default, applies to older Windows PCs like Windows 7. With the introduction of faster boot processes in newer operating systems like Windows 11 and changes in firmware from BIOS to UEFI, the F8 key might not always work.
To make it work in the newer Windows OS, you’ll have to manually set the Boot Menu Policy to Legacy by running the following command in Command Prompt:
bcdedit /set {default} bootmenupolicy legacy
Q2. How do I start my computer in Safe Mode when F8 Hot Key doesn’t work?
If the F8 key doesn’t bring up the Advanced Boot Options menu to start your computer in Safe Mode, you can use one of the following methods:
- Through the Start Menu
- Press the Windows key to open the Start menu, click on the Power icon, then hold down the Shift key while clicking on “Restart.”
- Once the system restarts and brings up the options menu, navigate through Troubleshoot > Advanced options > Start-up Settings, and then click “Restart.” When the system restarts again, press the F4 key to enter Safe Mode.
- Press the Windows key to open the Start menu, click on the Power icon, then hold down the Shift key while clicking on “Restart.”
- Using System Configuration
- Press Windows Key + R to open the Run dialog, type msconfig, and press Enter. In the System Configuration window, go to the Boot tab, check the Safe boot option, choose the desired Safe Mode type, click Apply, OK, and then restart your computer.
These methods provide the simplest alternative routes into Safe Mode without relying on the F8 key. There are even more ways to boot into Safe Mode, which you can read in the detailed how-to guide above.
Q3. How do I turn off Safe Mode in Windows 11?
To turn off Safe Mode in Windows 11 and start your computer normally:
- Try Restarting Normally:
- Often, simply restarting your computer will exit Safe Mode. Click on the Start menu, select the Power icon, and then choose “Restart.”
- Often, simply restarting your computer will exit Safe Mode. Click on the Start menu, select the Power icon, and then choose “Restart.”
- If Your PC Continues to Boot into Safe Mode:
- Press Windows Key + R to open the Run dialog box.
- Type msconfig and press Enter to open the System Configuration window.
- Click on the “Boot” tab, find the “Safe boot” option under Boot options, and make sure it is unchecked.
- Click “Apply,” then “OK,” and restart your PC.
- Press Windows Key + R to open the Run dialog box.
Following these steps should revert your PC back to its standard boot mode, exiting Safe Mode.
Q4. How do I know if my PC is in Safe Mode?
Knowing you’re in Safe Mode is straightforward:
- A watermark indicating “Safe Mode” will appear on the desktop, typically above the notification area or near the clock.
- The overall appearance of the Windows interface will be more basic, with a dark background and limited functionality, reflecting the reduced operating Mode.

