As someone who has spent 24 years managing enterprise endpoints and securing devices across large organisations, I can tell you that knowing how to turn off BitLocker in Windows 11 correctly is just as important as knowing how to turn it on. Done wrong, you risk losing access to your data or triggering a recovery key prompt at the worst possible moment.
Microsoft recommends suspending BitLocker before applying firmware updates, TPM firmware updates, or any non-Microsoft software updates that modify boot components, as failing to do so will trigger a recovery key prompt on the next restart.
Whether you are preparing a device for resale, sending a laptop in for hardware repairs, or need to temporarily suspend protection before a firmware update, you will find the right method for your situation in this guide.
I will walk you through four methods: Control Panel, the Settings app, PowerShell, and Command Prompt, so you can pick the one that fits your scenario.
Each method suits a different scenario. Control Panel gives you per-drive control across all drive types. The Settings app toggle is the quickest route for everyday users. PowerShell and Command Prompt are built for automation and enterprise deployments. Pick the one that fits your situation and follow the steps.
If you are looking to enable BitLocker instead, check out How to Turn On BitLocker in Windows 11.
Table of Contents
Disable vs. Suspend BitLocker: Which Do You Actually Need?
Choosing the wrong option is the most common mistake when turning off BitLocker. Here is the difference:
Turn off BitLocker: Fully decrypts the drive. The drive is permanently unencrypted until you re-enable BitLocker. Use this when selling a device, doing a clean Windows reinstall, or permanently removing encryption from a drive.
Suspend BitLocker: Keeps the drive encrypted but stores the encryption key in a readable state temporarily. No decryption occurs, so it takes seconds rather than hours. Use this before BIOS updates, firmware changes, hardware upgrades, or major Windows updates. BitLocker automatically resumes protection after the next restart.
If you are doing any kind of temporary maintenance, especially a BIOS or firmware update, use Suspend, not Disable. Fully decrypting and re-encrypting a drive unnecessarily is a waste of hours.
How to Turn Off BitLocker in Windows 11 via Control Panel
Disabling BitLocker via the Control Panel is the simplest method. It gives you a clear view of every encrypted drive on your system.
The BitLocker Drive Encryption panel in Control Panel lets you turn off BitLocker on each drive individually. It lists all drives connected to your device in three sections: the Operating system drive, Fixed data drives, and Removable data drives.
According to the Windows 11 Security Book on Microsoft Learn, the Device encryption toggle in Settings encrypts the OS drive and all fixed internal drives, but does not cover removable drives.
Control Panel fills that gap and also gives you granular per-drive control, letting you decrypt one drive without affecting others. This method is available only on Windows 11 Pro, Enterprise, and Education editions.
Before you start, there is one important distinction worth understanding: turning BitLocker off fully decrypts your drive, which takes time. Suspending BitLocker, on the other hand, keeps the data encrypted but temporarily removes the protection layer, ideal when you only need a brief maintenance window.
How to Turn Off BitLocker on the OS Drive (C:) via Control Panel
This is the most common scenario, disabling BitLocker on the C: drive where Windows 11 is installed. You must be signed in with an administrator account to complete these steps.
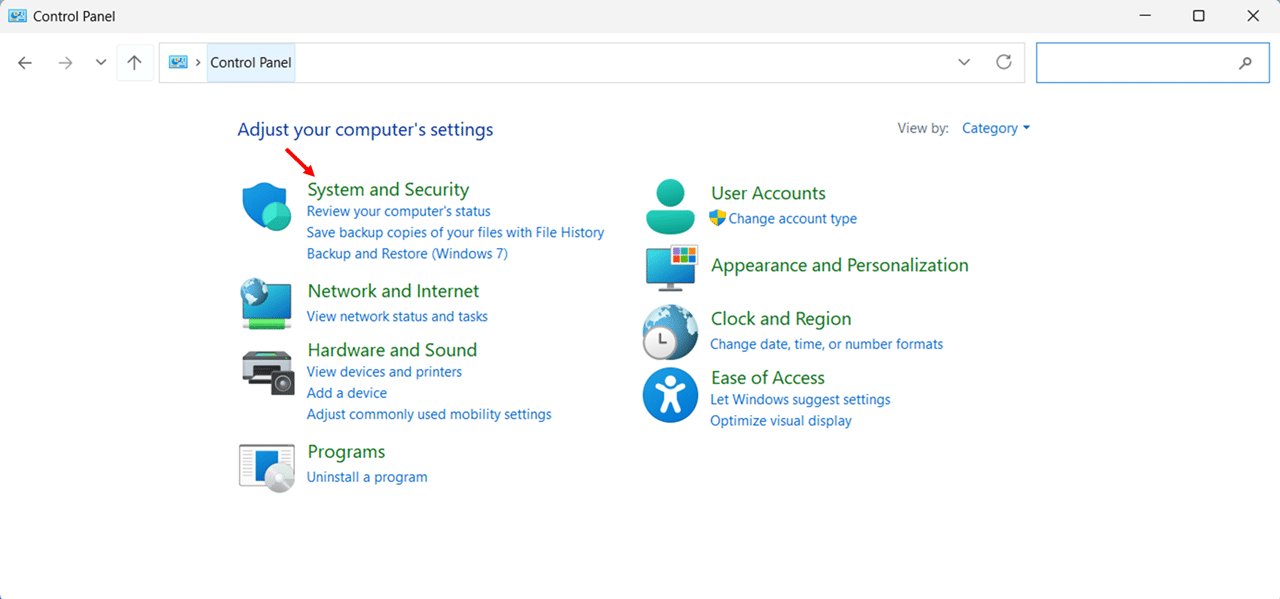
- Press Windows key + R, type control, and press Enter to open Control Panel.

- Click System and Security to expand the category.
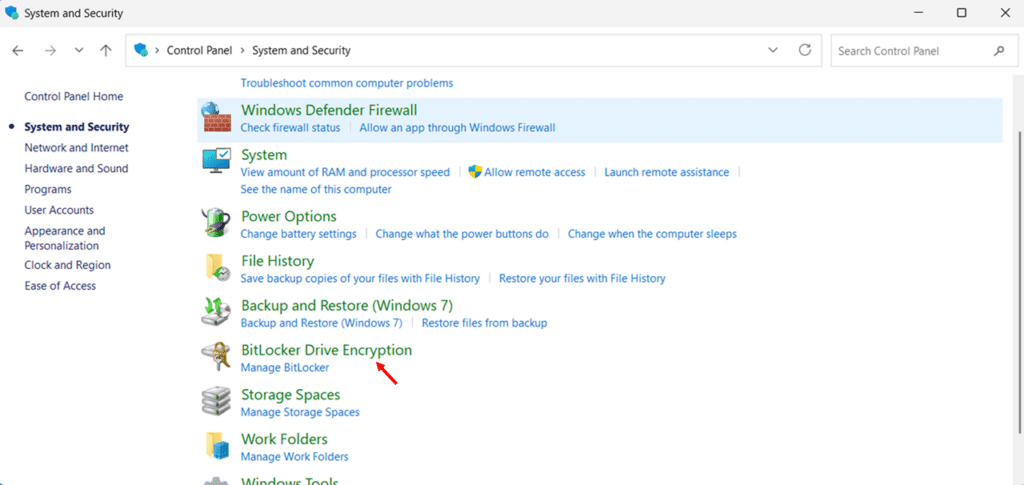
- Click BitLocker Drive Encryption. The BitLocker management page opens, showing the encryption status of all drives on your system.
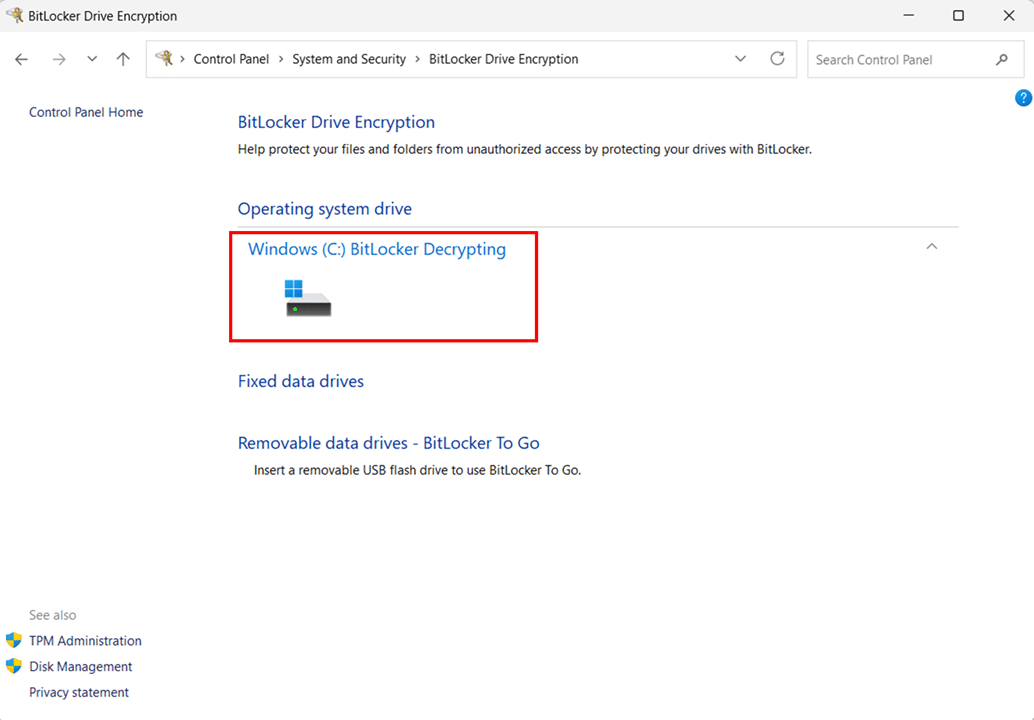
- Locate your C: drive under Operating system drive. It will show BitLocker on with an open padlock icon next to the drive letter, indicating the drive is encrypted and currently accessible.
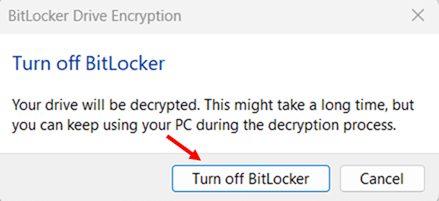
- Click Turn off BitLocker next to the C: drive.
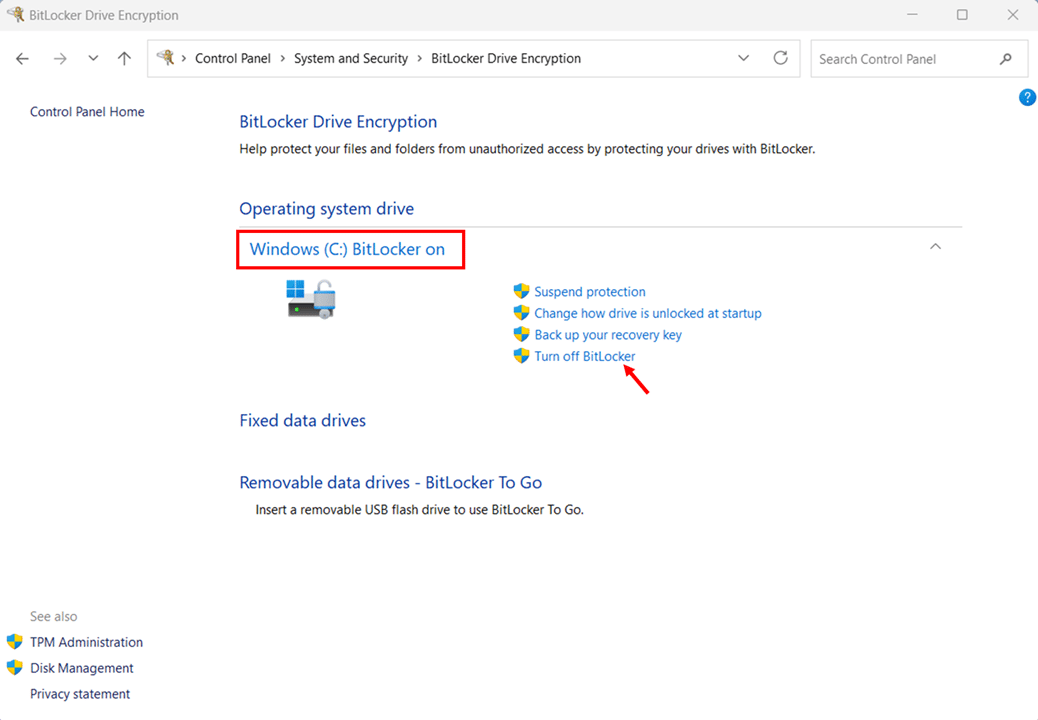
- Click Turn off BitLocker again on the confirmation dialog to confirm the action and start decryption.
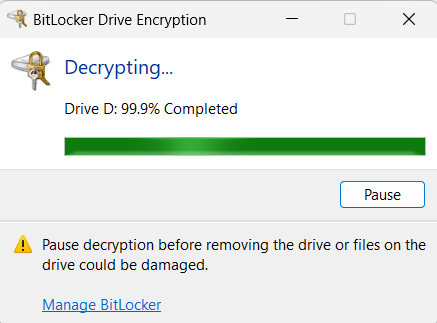
- Decryption runs in the background, you can continue using your PC normally while it completes. The Control Panel page shows “Windows (C:) BitLocker Decrypting” under the drive name during the process
Note: To check the exact decryption progress as a percentage, open an elevated Command Prompt and run manage-bde -status C: look for the Percentage Encrypted field decreasing toward 0%.
How to Turn Off BitLocker on a Secondary Data Drive
The process for disabling BitLocker on a fixed data drive (D:, E:, etc.) or a removable drive is nearly identical, with the drive listed under a different section in the BitLocker management panel.
- Open Control Panel > System and Security > BitLocker Drive Encryption.

- Scroll down to Fixed data drives or Removable data drives and locate the encrypted drive.
- If the drive is locked, click Unlock drive and enter the drive password before proceeding.
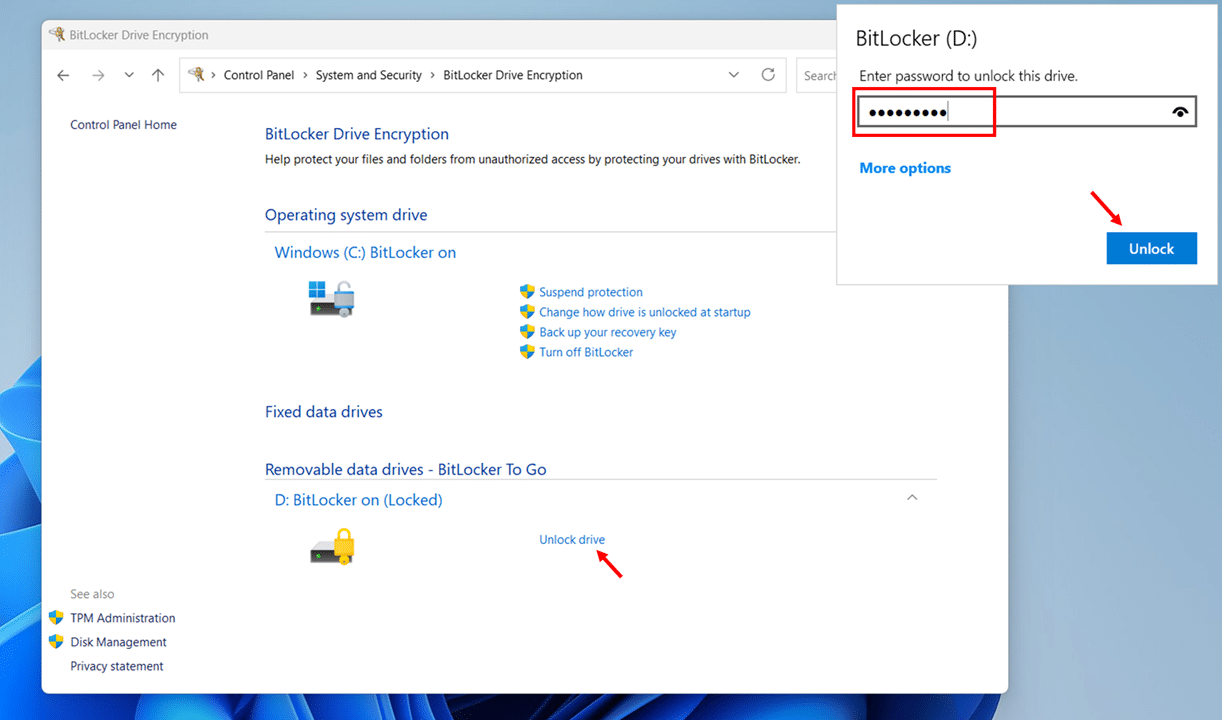
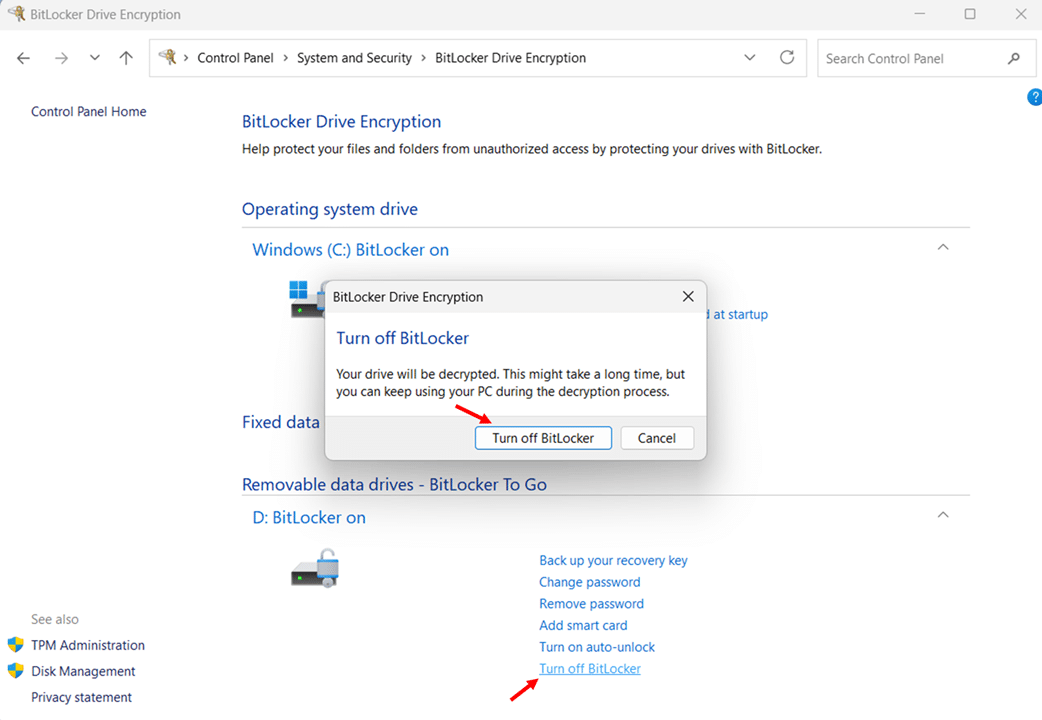
- Click Turn off BitLocker next to the target drive, then click Turn off BitLocker on the confirmation dialog.
- A decryption progress dialog opens automatically, displaying the decryption completion percentage.
How to Suspend BitLocker via Control Panel (For Temporary Maintenance)
Suspend BitLocker during brief maintenance windows, such as before a BIOS update, firmware change, or hardware upgrade, without the time-consuming process of full decryption and re-encryption. Suspending takes seconds, and BitLocker automatically resumes protection after your next restart.
Note: Always suspend BitLocker before updating your BIOS or UEFI firmware. Firmware updates change the system measurements that the TPM uses to verify boot integrity. If BitLocker is active during a BIOS update, the TPM may reject the changed measurements and lock you out of your drive, requiring your recovery key to regain access.
- Open Control Panel > System and Security > BitLocker Drive Encryption.
- Click Suspend protection next to the C: drive.
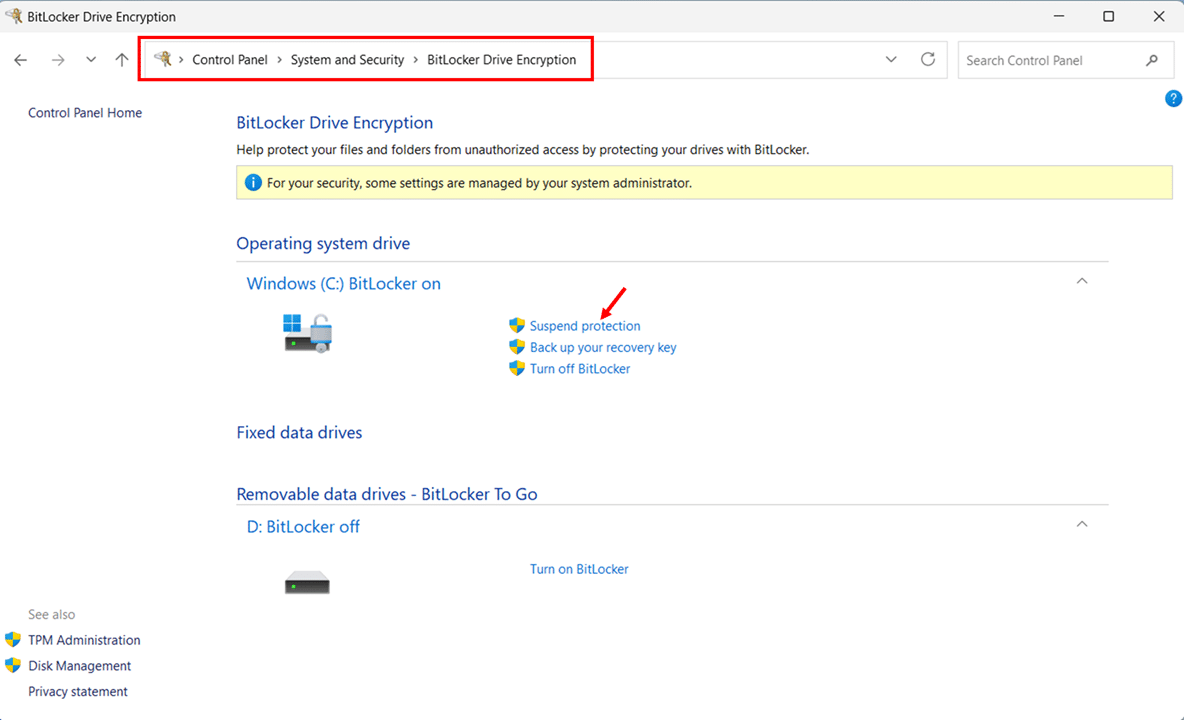
- Click Yes on the confirmation dialog. The drive icon changes to an open padlock with a yellow warning triangle, indicating BitLocker protection is suspended. The drive data remains encrypted, only the protection layer is paused.

- Complete your maintenance task such as BIOS update, hardware swap, or firmware change, then restart your PC. BitLocker protection resumes automatically after the restart.
- If BitLocker does not resume automatically, return to Control Panel > BitLocker Drive Encryption and click Resume protection next to the C: drive.
How to Verify BitLocker Has Been Fully Disabled
Once decryption finishes, confirm that BitLocker is fully off before proceeding with any hardware changes or device handoffs.
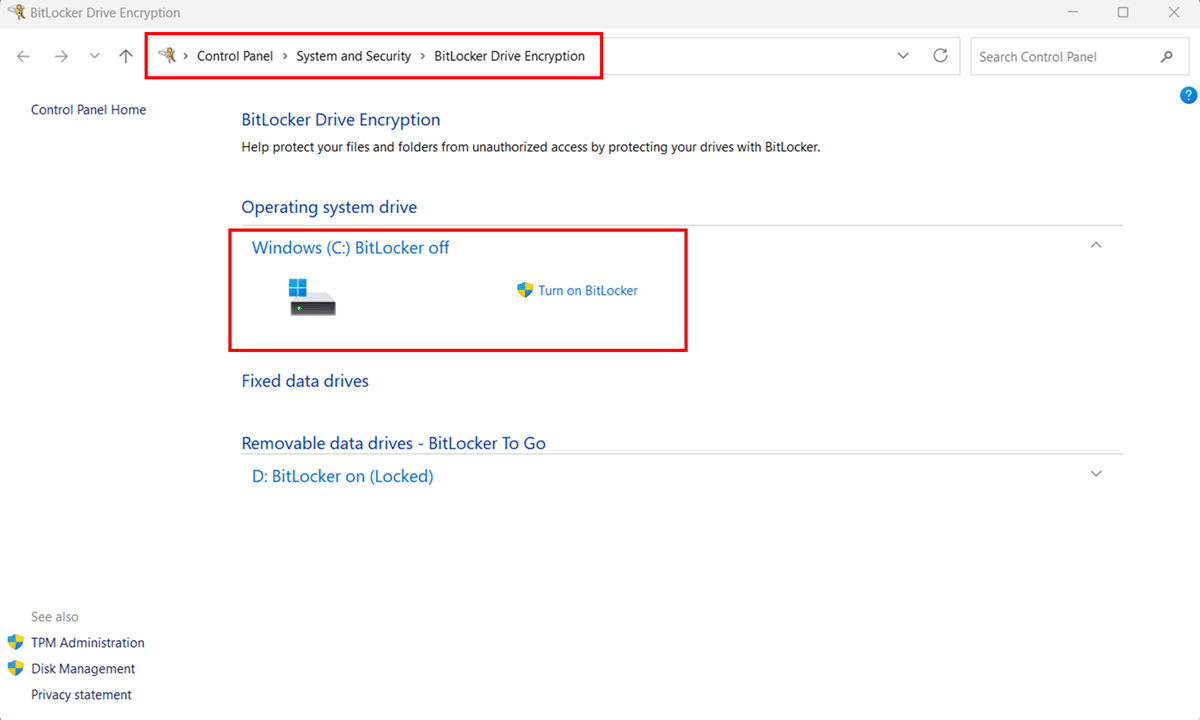
- Open Control Panel > System and Security > BitLocker Drive Encryption.
- Confirm the target drive shows BitLocker off with no padlock icon. When BitLocker is fully off and decryption is complete, the padlock overlay is removed entirely from the drive icon. A Turn on BitLocker option will be visible, confirming the drive is fully unencrypted.
How to Turn Off BitLocker in Windows 11 via the Settings App
The Settings app offers an alternative path to turning off BitLocker on Windows 11. The Device encryption page in Settings shows a simple on/off toggle. Toggling it off starts decryption immediately in the background. You can continue using your PC normally while it completes.
Note: The Device Encryption toggle in Settings was introduced in Windows 11 24H2. In versions before 24H2, clicking Device encryption in Settings does not show a toggle — it opens the BitLocker Drive Encryption management page directly, just as in Control Panel. To check your Windows version, go to Settings > System > About.
How to Turn Off BitLocker via the Settings App (Toggle Switch)
These steps apply to both Windows 11 Pro, Enterprise, Education and Windows 11 Home. the Device encryption page and toggle work the same way on all Windows 11 editions.
- Press Windows key + I to open the Settings app.
- Select Privacy & security from the left-hand navigation panel.
- Click Device encryption under the Security section.
 step 1, 2 and 3")
- Toggle Device encryption to Off.
- Click Turn off on the confirmation dialog.
 step 4 nd 5")
- The page shows “Decryption is in progress” while decryption runs in the background. You can continue using your PC normally.
 step 6")
Turn Off BitLocker via Setting Apps (BitLocker Drive Encryption)
On Windows 11 Pro, Enterprise, and Education editions, the BitLocker drive encryption link under Related on the Device encryption page opens the full BitLocker Drive Encryption management panel in Control Panel.
This gives you granular per-drive control. You can turn off BitLocker on any individual drive, including removable drives that the Settings toggle does not cover. This method is not available on Windows 11 Home. On Home, clicking the BitLocker drive encryption link opens the Microsoft Store showing an upgrade to Windows 11 Pro.
- On the Device encryption page in Settings, click BitLocker drive encryption under the Related section. The BitLocker Drive Encryption management panel opens in Control Panel.
 step 1")
- Click Turn off BitLocker next to the C: drive under Operating system drive.

- Click Turn off BitLocker on the confirmation dialog. Decryption runs in the background, you can continue using your PC normally while it completes.

Turn Off BitLocker on a Secondary Data Drive via Setting Apps (BitLocker Drive Encryption)
According to the Windows 11 Security Book on Microsoft Learn, the Device encryption toggle in Settings encrypts the OS drive and all fixed internal drives but it does not encrypt external or USB drives. This means when you toggle Device encryption off in Settings, it affects the OS drive and fixed internal drives. If you need to turn off BitLocker on a removable drive or want to manage individual drives separately, use the BitLocker drive encryption link under Related on the Device encryption page (available on Windows 11 Pro, Enterprise, and Education editions only) to open the full BitLocker management panel in Control Panel.
- On the Device encryption page, click BitLocker drive encryption under the Related section. This opens the full BitLocker management panel in Control Panel.
 step 1")
- Locate the target drive under Fixed data drives or Removable data drives, click Turn off BitLocker, and confirm on the dialog.
- Monitor decryption progress until the drive shows BitLocker off with an open padlock icon.
How to Confirm Decryption Is Complete
After turning off BitLocker, decryption runs in the background. Here is how to confirm it has fully completed.
Check via Settings
Return to Settings > Privacy & security > Device encryption. When decryption is complete, the toggle sits in the Off position with no progress message visible.
Check via Command Prompt
For a precise status check, open an elevated Command Prompt and run:
manage-bde -status C:
Confirm that the Conversion Status shows Fully Decrypted and the Protection Status shows Protection Off. These two fields together confirm that the drive is completely unencrypted and that BitLocker is no longer active.
How to Turn Off BitLocker in Windows 11 via PowerShell
PowerShell gives you the most precise control over disabling BitLocker, whether you are decrypting a single drive, all volumes on a machine at once, suspending protection temporarily before a firmware update, or scripting decryption across a fleet of devices. The Disable-BitLocker cmdlet handles all of these scenarios cleanly, and the Suspend-BitLocker cmdlet gives you a lightweight alternative when you only need a brief maintenance window.
This section covers four practical scenarios: disabling BitLocker on a single drive, disabling it across all drives at once, suspending and resuming protection, and monitoring decryption progress, all from an elevated PowerShell session.
Best suited for: IT administrators managing BitLocker across multiple devices, power users who prefer scripting over GUI navigation, and anyone who needs to disable BitLocker as part of a larger automated workflow. For a simple single-device disable, either the Control Panel or the Settings app is equally effective.
Open PowerShell as Administrator
All BitLocker PowerShell cmdlets require an elevated session. Use either of these methods:
- Press Windows key + S, type PowerShell, right-click Windows PowerShell, and select Run as administrator.
- Alternatively, press Windows key + X and select Terminal (Admin)

Check Which Drives Are Encrypted Via PowerShell
Before disabling BitLocker, run a quick status check to confirm which drives are encrypted and note their mount points and protection status:
Get-BitLockerVolume
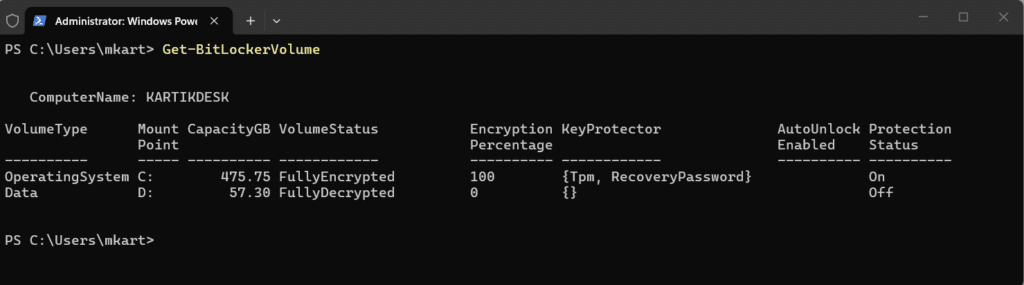
The output lists all volumes with their key fields. Look for the following before proceeding:
- MountPoint: The drive letter — note this for the disable command.
- VolumeStatus: Confirms the drive is FullyEncrypted before you run the disable command.
- ProtectionStatus: Shows On for active BitLocker protection.
Disable BitLocker on a Single Drive via PowerShell
Use this to decrypt one specific drive such as OS drive, a secondary data drive, or any other encrypted volume. Replace C: with your target drive letter.
- Run the following command to disable BitLocker and begin decryption on the C: drive:
Disable-BitLocker -MountPoint ‘C:’
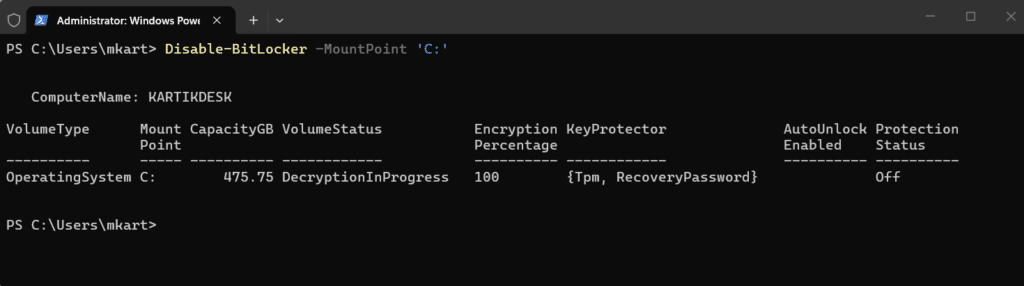
PowerShell returns immediately after issuing the command — decryption runs in the background. The cmdlet removes all key protectors from the volume and starts the decryption process. You can continue using your PC normally throughout.
- Monitor decryption progress by running:
Get-BitLockerVolume -MountPoint ‘C:’

Watch the EncryptionPercentage field count down from 100 to 0, and VolumeStatus change from FullyEncrypted to DecryptionInProgress and finally FullyDecrypted when complete.
Note: If your OS drive has automatic unlocking keys stored for other data drives, Disable-BitLocker will fail and return this error. Fix it by running Clear-BitLockerAutoUnlock first to remove all auto-unlock keys, then re-run the Disable-BitLocker command.
Disable BitLocker on All Drives via PowerShell
When you need to decrypt every BitLocker-protected volume on a machine, pipe Get-BitLockerVolume directly into Disable-BitLocker. This is significantly faster than running individual commands per drive. This is useful in scenario such as device decommissioning, reimaging, or selling.
- Clear any auto-unlock keys first to prevent the cmdlet from halting mid-execution:
Clear-BitLockerAutoUnlock
- Pipe all encrypted volumes into Disable-BitLocker to begin decrypting everything at once:
Get-BitLockerVolume | Disable-BitLocker
Windows begins decrypting all encrypted volumes simultaneously. Decryption runs in parallel across all drives
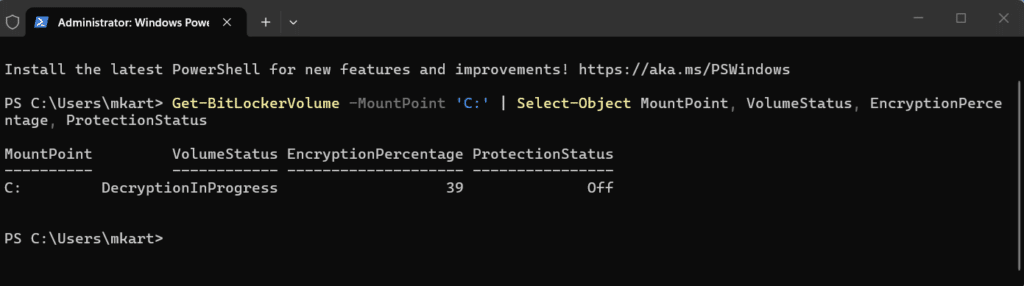
- Monitor decryption progress across all drives:
Get-BitLockerVolume | Select-Object MountPoint, VolumeStatus, EncryptionPercentage
This filtered output shows just the three fields you need to track decryption progress across all volumes without scrolling through full detail output for each drive.
Suspend and Resume BitLocker Protection via PowerShell
Suspending BitLocker is the right choice for temporary maintenance tasks such as BIOS updates, firmware changes, or hardware swaps, where full decryption is unnecessary. The drive data stays encrypted; only the protection layer is paused. PowerShell’s Suspend-BitLocker cmdlet gives you precise control over how long the suspension lasts through the -RebootCount parameter.
Suspend BitLocker Protection for One Restart
This suspends protection and automatically resumes it after the next restart — the safest option for one-time maintenance tasks like a BIOS update:
Suspend-BitLocker -MountPoint ‘C:’ -RebootCount 1

The -RebootCount 1 is the default behavior even if you omit the parameter entirely. After one restart, BitLocker protection resumes automatically without any further action on your part..
Suspend Indefinitely BitLocker Protection (Until Manually Resumed) via PowerShell
Use RebootCount 0 when you need protection suspended across multiple restarts — for example, during a multi-step hardware upgrade:
Suspend-BitLocker -MountPoint ‘C:’ -RebootCount 0
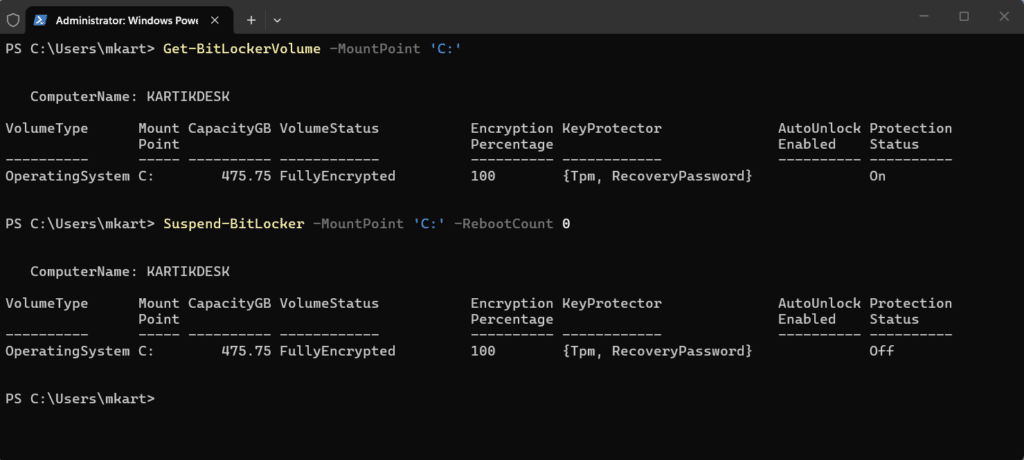
Important: When using RebootCount 0, BitLocker protection does not resume automatically after a restart. The drive remains unprotected until you manually run the Resume-BitLocker command. Do not leave this state longer than necessary.
How to Verify Decryption Is Complete
- Run the status check at any point during or after decryption:
Get-BitLockerVolume -MountPoint ‘C:’ | Select-Object MountPoint, VolumeStatus, EncryptionPercentage, ProtectionStatus
Decryption is fully complete when all three fields confirm the following:
- VolumeStatus → FullyDecrypted
- EncryptionPercentage → 0
- ProtectionStatus → Off
How to Turn Off BitLocker in Windows 11 via Command Prompt
Command Prompt’s manage-bde utility handles every BitLocker off-switch scenario, i.e., decrypting a single drive, suspending protection temporarily, pausing an in-progress decryption, and resuming it again. It is the go-to approach in environments where PowerShell execution policy is restricted, in legacy batch scripts, and for IT admins who prefer the familiar syntax of manage-bde over PowerShell cmdlets.
Open Command Prompt as Administrator
All manage-bde commands require an elevated Command Prompt. Use either of these methods:
- Press Windows key + S, type cmd, right-click Command Prompt, and select Run as administrator.

- Alternatively, press Windows key + X and select Terminal (Admin), then press Ctrl + Shift + 2 to switch to the Command Prompt tab.

Note: Click Yes on the UAC prompt. Confirm the title bar reads Administrator before running any commands. manage-bde returns an access error silently on non-elevated sessions.
Check Encryption Status Before Disabling
Run a status check first to confirm which drives are encrypted and note their current protection state:
manage-bde -status

For a specific drive, add the drive letter:
manage-bde -status C:
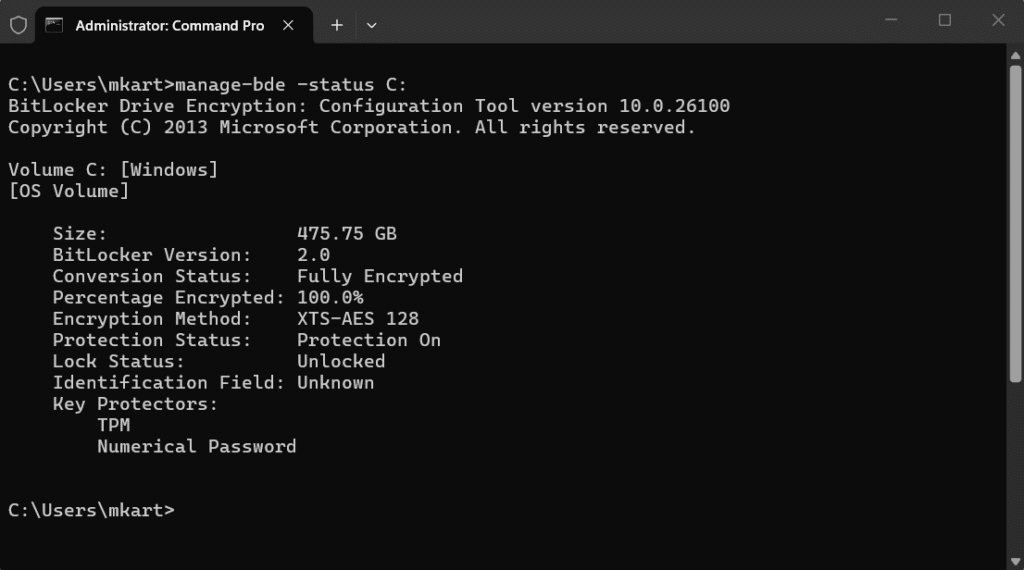
Check the following fields in the output before proceeding:
- Conversion Status: Should show Fully Encrypted — confirms there is an active encryption to remove.
- Protection Status: Should show Protection On — confirms BitLocker is actively protecting the drive.
- Percentage Encrypted: Shows 100% when fully encrypted. You will watch this count toward 0.0% as decryption progresses.
Turn Off BitLocker on a Single Drive (Full Decryption)
This permanently removes BitLocker encryption from the specified drive. Decryption starts immediately and runs in the background, replace C: with your target drive letter.
- Run the following command to begin decryption on the C: drive:
manage-bde -off C:
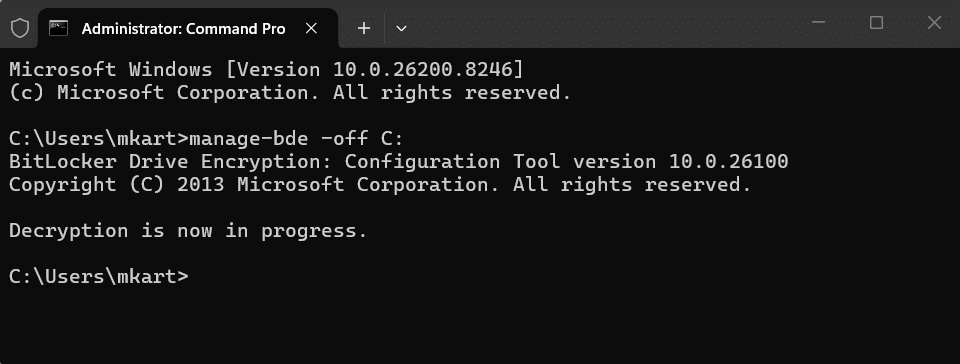
- Monitor decryption progress by running:
manage-bde -status C:
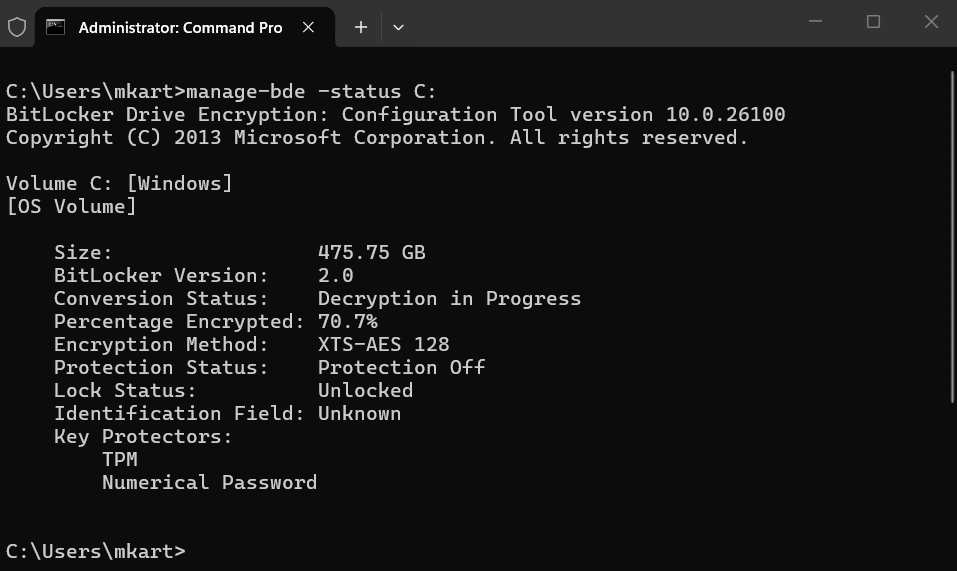
Watch Percentage Encrypted decrease from 100.0% toward 0.0%, and Conversion Status changes from Fully Encrypted through Decryption in Progress to Fully Decrypted when complete.
- Confirm decryption is fully complete by running the status check once more and verifying:
manage-bde -status C:
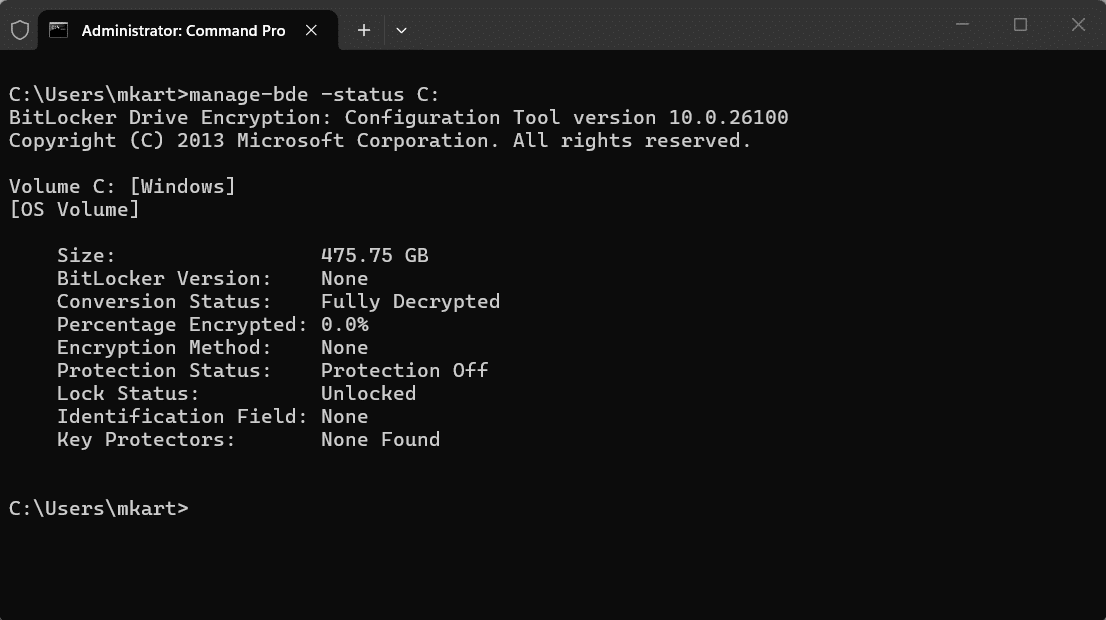
Decryption is fully complete when the output shows:
- Conversion Status: Fully Decrypted
- Percentage Encrypted: 0%
- Protection Status: Protection Off
Turning Off BitLocker on a Secondary Data Drive via Command Prompt
The command is identical for any drive, just replace C: with the target drive letter. For example, to decrypt a D: drive:
manage-bde -off D:
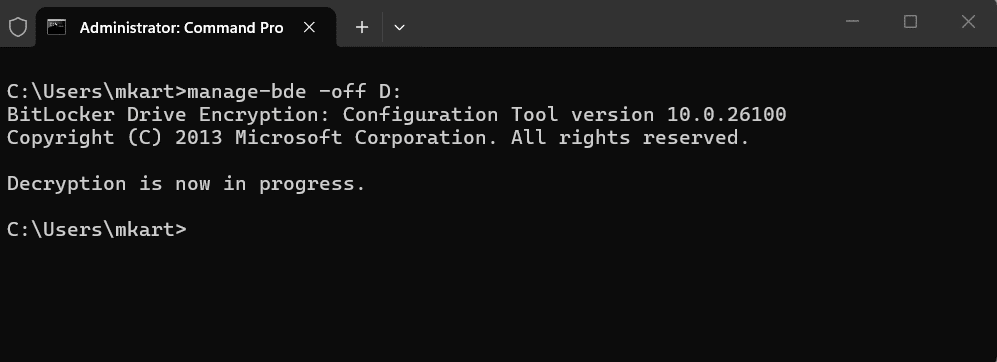
Data drives do not require a restart. Decryption begins immediately and runs in the background while the drive remains accessible.
Suspend BitLocker Protection via Command Prompt
Suspending BitLocker pauses protection without removing encryption. The drive data stays encrypted, but the volume master key is temporarily stored in a readable state. Use this before BIOS updates, firmware changes, or hardware upgrades, not for long-term removal of protection.
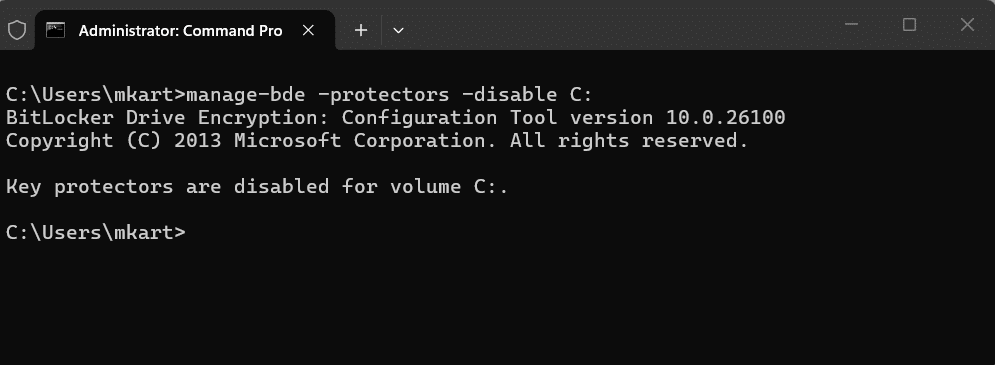
- Suspend BitLocker protection on the C: drive:
manage-bde -protectors -disable C:
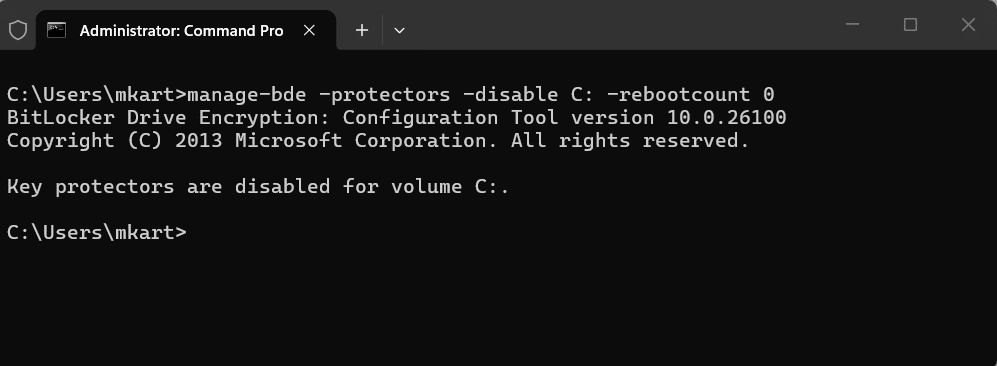
By default, this suspends protection until the next restart, at which point BitLocker automatically resumes. To suspend across multiple restarts, add the -rebootcount flag with a value between 1 and 15. For example, -rebootcount 3 keeps protection suspended across three restarts.
- To suspend protection indefinitely until you manually resume it, use rebootcount 0:
manage-bde -protectors -disable C: -rebootcount 0
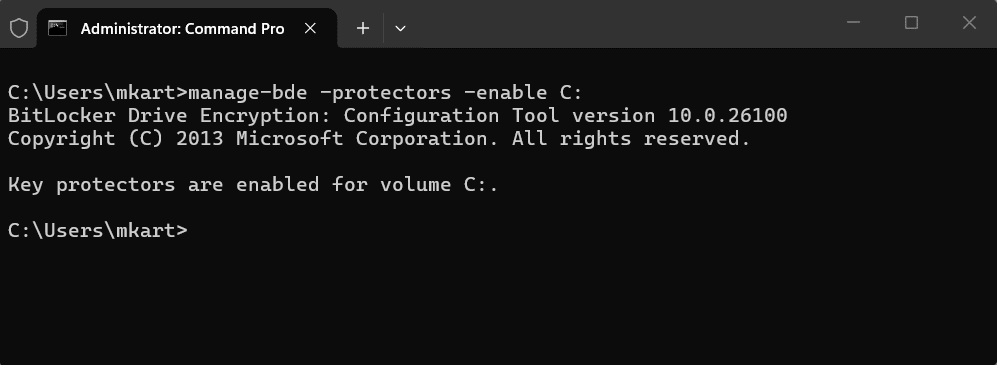
- Resume BitLocker protection manually after your maintenance task is complete:
manage-bde -protectors -enable C:
Pause and Resume an Active Decryption via Command Prompt
If you have already run manage-bde -off and decryption is in progress, you can pause it mid-process without any data loss. This is useful if you need to restart for an unrelated reason or temporarily free up system resources.
- Pause decryption on the C: drive mid-process:
manage-bde -pause C:
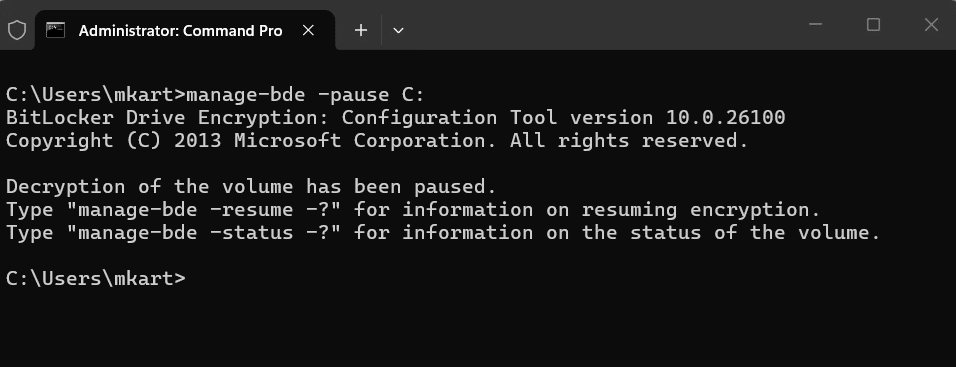
Decryption halts at its current percentage. The drive remains partially decrypted but fully accessible. Windows preserves the state so decryption can resume exactly where it left off.
- Resume the paused decryption:
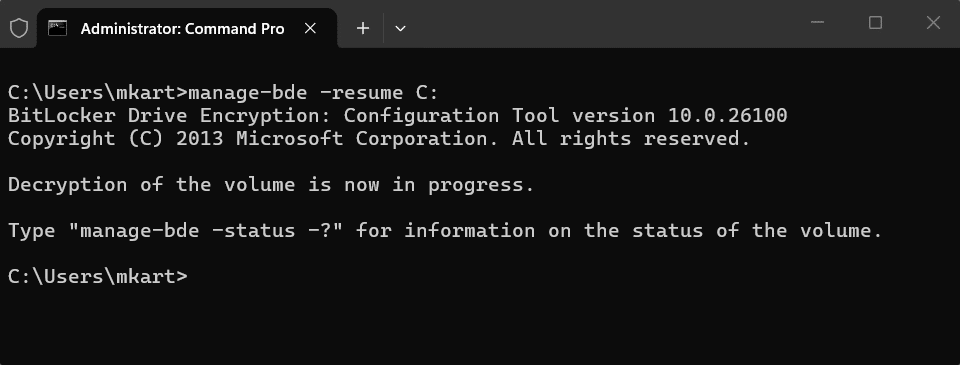
manage-bde -resume C:
Decryption picks up from the same percentage it paused at and continues in the background. Note that this is different from manage-bde -protectors -enable, that command resumes BitLocker protection after a suspension, while manage-bde -resume restarts an actively paused decryption job.
Conclusion
Turning off BitLocker is straightforward once you know which method fits your situation. Use Control Panel when you need per-drive control or are dealing with removable drives. Use the Settings toggle for a quick disable on the OS and fixed drives. Use PowerShell or Command Prompt when you need to script it or work across multiple drives in one go.
Whatever your reason for turning it off, whether it is a hardware repair, a device handover, or preparing a device for resale, always make sure decryption has completed fully before you shut down, reformat, or hand over the device. An interrupted decryption can leave your drive in an inconsistent state that is difficult to recover from
Which method worked best for you? Drop it in the comments below.
BitLocker protects your data at rest, but it does not remove existing virus and malware threats. Running regular antivirus scans alongside BitLocker ensures your device is protected against viruses, malware, and data theft. Learn how to run a Windows Defender scan on Windows 11 if you are using the built-in option.
Frequently Asked Questions (FAQs)
No. BitLocker cannot be managed from the BIOS. You must turn it off from within Windows using Control Panel, Settings, PowerShell, or Command Prompt.
Yes, provided you follow the correct steps and let the decryption complete fully before shutting down or removing the drive. The risk is not in turning it off — it is in interrupting the process midway.
You do not need to disable BitLocker to upgrade from Windows 10 to Windows 11, but it is strongly recommended to suspend BitLocker protection during the upgrade. This prevents the upgrade process from triggering recovery mode. After the upgrade completes, Windows will automatically re-enable BitLocker protection.
Hardware changes such as a motherboard replacement or BIOS update alter the measurements stored in the TPM, triggering BitLocker recovery mode. After an authorized service repair, BitLocker may ask for a recovery key on every restart until you turn BitLocker off and back on to re-establish the TPM protector. Always suspend BitLocker before any hardware service to prevent this.
Yes. Using Control Panel or PowerShell, you can turn off BitLocker on individual drives. Decrypting OneDrive does not affect the encryption on any other drive on your system.
Yes. Setting up a dual-boot requires disabling Secure Boot, and doing so while BitLocker is active will trigger BitLocker recovery mode on the next restart. Turn off BitLocker fully and wait for decryption to complete before making any changes to Secure Boot or partitioning your drive.
